Monday, July 30, 2012

Chalk it Up

We've been going chalk crazy lately! Here's a little peek at all the neat things we've thought up while playing with our chalkboard paints.


Spray wooden plaques with chalkboard paint and attach ribbons for quick and cute wall hanging note centers. We made these especially for a wedding party table to distinguish the bride and groom's special spots.


Speaking of saving spots, these reused wine bottles make great centerpieces or as table number markers. We used our Bistro chalk markers on most of our samples, but you could use regular or colored chalk also. A note of warning regarding the Bistro chalk markers - test your surface in a small area first, sometimes they can stain the surface of your piece.


We've got a lot more ideas waiting for you at our store too. Make sure to come and check them out.

See you soon!
Puna @ Enchanted Lake

P.S. If you scroll down to today's previous post, you can learn how to make a beachy-keen wreath. It's really easy and a lot of fun.

Crankin' Out Crafts Episode 132 - Beach Wreath (Summer Wreath)


Welcome back to another craft-filled week on Crankin’ Out Crafts. For this week, we’re going to focus on summery wreaths. In today’s episode, JFlo is back to show us a nautically inspired Beach Wreath.

Learn how to make a beach/ocean-inspired wreath!


Supplies:
Straw wreath
10” Deco mesh
White tulle
Printed tulle
Shells
Scissors
Hot glue gun
Glue sticks
Greening pins

The light and airy tulle and Deco mesh used on our wreath really recalls the seaside and ocean waves. We think it makes a perfect accent for Summer or for a vacation house on the beach.

Friday, July 27, 2012

Crankin' Out Crafts Episode 131 - Key Holder Canvas


For our last canvas themed project, Puna will show you how to make a decorative and functional key holder.

Keep keys organized with this decorative key holder.


Supplies:
5”x5” canvas
Scrapbooking paper
Cup hooks
Paint coordinated to paper color
Mod Podge
Brush
Awl or paper piercer

This versatile wall hanging can be adapted to a few different sizes and many different styles to fit your personal design aesthetic. Join us again next week for more crankin’ fun!

Duct Tape Book Cover


Aloha Crafters ~

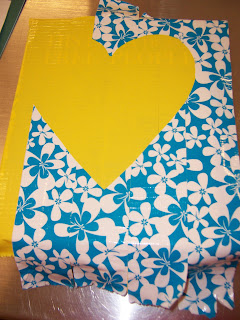
Today's Idea & Inspiration is a Book Cover made with Duct Tape. There's a plethora of designs you can make to decorate your book cover. Duct tape is a very versatile medium; school colors, mascots  or logos would be a fun design. I chose to make a checkerboard that covered the back & spine of the book and an inset heart for the front.
Supplies:
  • DUCK TAPE-BLUE SURF FLOWER (30131169)
  • DUCT TAPE-YELLOW (23029978)
  • Scissors
  • Wax paper
Instructions:

1. Vertically place lengths of one pattern/color of duct tape down back of book cover. Adhere to the top edge of book only.
2. Horizontally place widths of another pattern/color of duct tape across back of book cover. Adhere to side edge of book. Weave through vertical pieces.

3. Continue the length of the book.

4. For the front,  vertically place strips of one pattern as follows:
5. On a piece of non-stick paper, ie wax paper, vertically place strips of patterned duct tape. Cut out heart.
6. Place patterned heart duct tape onto front cover as follows:

7. Wrap edges around book, adhere to inside cover as desired.

8. Pare down "left over" heart from cut out. Place in center of heart cut out.
9. Label or decorate further as desired.

Happy Crafting!

Thursday, July 26, 2012

Kawaii Tile Jewelry


We've got super kawaii paper in so I made some Kawaii Tile Jewelry!!  Don't you think the frogs will be a good gift for someone going to Vegas and the birds would be cute for someone that uses Twitter?  Come in to our Mapunapuna Bead Shop on Sunday July 29th at 2:00 PM to watch our demo on how to make these!  We've got the birds in different colors (all on one 12x12 sheet) and also MONKEYS!!  Stop by because I'll cover various tips on how to make these.

See ya at the store!

Lynn H @ BFC Mapunapuna Bead Shop

Wednesday, July 25, 2012

Crankin' Out Crafts Episode 130 - Puffy Paint Canvas


Our next project is a take on something that has been trending on the internet lately, dimensional canvas wall art using only one color. For today, Brandon will show you how it’s done using white canvas and some white puffy paint.

Create a beautiful and elegant design on canvas!


Supplies:
11x14” canvas
White puffy paint
Light colored pencil
White paint

To get the best results, you may have to paint your canvas a color to match your puffy paint before you apply the puffy paint. In that case, you would need to also purchase acrylic paints to complete this project.

*Don't forget to view today's previous posts on a fun favor idea & our Crafting Events this weekend!

Crafting Parties this Weekend!

On Saturday, July 28th we will be having TWO crafting events at our stores!

On the Big Island at our Hilo BFC Store - Come to our BEN'S BASH Event from 10am-4pm. Activities include a Craft Fair, games, food, and make 'n takes. Come and craft with Jenny from Sister Stamps from 12-2pm! You can also win prizes and discounts.

Saturday, July 28th from 10am-4pm at Hilo BFC

On Oahu, come to Mapunapuna BFC for our annual CRAFTING CARNIVAL from 10am to 2pm. We'll have special guest crafters, demos, make 'n takes and more. Projects include a lollipop favor and cardmaking with Joy from the Joy of Crafting, a Sizzix Pop 'n Cuts Card with Cheryl M., a Deco-Book, Deco Foodie Clay Charms, and favors. 

Saturday, July 28th from 10am-2pm at Mapunapuna BFC

In addition, the Mapunapuna store will be having in-store specials on July 28th - One Day Only!

One Day Only - In-Store Specials at Mapunapuna on July 28th!

Visit the stores for additional details. Hope you can join us at Hilo or Mapunapuna BFC this weekend!

*Don't forget to scroll down and read today's earlier post from Market City! They show you how to make a fun party favor - Foam Sheet Fortune Cookies!

Foam Sheet Fortune Cookies


Share these fabulous fortune cookies with your guests at your next party!

Not only are do these foam sheet fortune look adorably fabulous, but they are easy and fun to make.

Directions:

Print or write fortunes, questions, phrases etc on 1/4" to 1/2" strips of paper.  You can personalize the fortunes to celebrate a special occasion - use as an interactive ice breaker centerpiece, an invitation to your event, or just to send a sweet or inspiring message to your friends and family members.

Cut a 3-4" circle out of a foam sheet.  Place the fortune strip across the inside of the circle. Fold the circle in half glueing the two rounds together with glue dots or double sided tape. Bring the open ends together opposite the rounds allowing a crease to form along the folded side of the circle. (see photo above) Glue the two sides together and fasten with a clothes pin until glue has dried.....and TADA..you have yourself a personalized fortune cookie.  We carry a large variety of foam sheets and take-out boxes to put them in!


Make smaller fortune cookies with ribbon for fortunes and some folded tulle as a hair accessory or pin.  Take this idea and let your imagination run wild!  This is a fun and fast craft to do with the kids too!

-Market City BFC

Monday, July 23, 2012

In the Black

If you read Kahului's post on Friday, you already know about our newest product, the black canvas. Obviously, we're all very excited about our new find so you'll probably be seeing a lot more about black canvas over the next little bit. I wanted to show off some our display pieces to give you an idea of how versatile the canvas can be.


Crayons, canvas, and a heat tool are all you need for these works of art.

These two pieces are done using our latest "hot" art technique, crayon dripping. I love how the drip art gives the work such a feeling of movement and I LOVE how the colors seem so much brighter on the black canvas. As you can see, we can't seem to stop melting our crayons.


Opaque acrylic paints can really pop on a black canvas.

This canvas panel was done using acrylic paints. You can see how easily anyone can make a beautiful work of art.


A little paint, a canvas, and a stencil, and Pow! A ready-to-hang work of art.
This canvas used a mix of acrylic paint and paint pens with a simple flower stencil. By far my favorite despite it's simplicity, this last piece was so very easy to make. I think it turned into a bold and stunning work.

Hope you liked looking through our black canvas gallery. All of these pieces are on display right now in our store at Enchanted Lake, so stop by and check them out.

Puna @ Enchanted Lake

*You can watch our Crankin' Out Crafts episode on how to make your own crayon drip art if you scroll down to today's previous post

Crankin' Out Crafts Episode 129 - Crayon Drip Canvas


Welcome back to a new week of Crankin’ Out Crafts. This week our featured theme is all about having fun with canvas. In today’s episode, Lisa will show you another take on something we’ve already featured on Crankin’ Out Crafts, crayon drip art.

Crayons are not only for coloring - create a unique and colorful work of art!


Supplies:
Stretched canvas
Crayons
Heat tool

Experimentation is the key with this fun project. Try different ways of applying the crayons to the canvas or holding the heat tool at another angle to change up your design.

Friday, July 20, 2012

Crankin' Out Crafts Episode 128 - Hanging Lantern


Our hanging décor week is almost up, but we have one last quick project idea for you. Today, Puna is back to show you how you can use another version of the Martha Stewart party crafting template, which we featured earlier this week, to make a hanging paper lantern decoration.

With Martha Stewart's Party Crafting Template, you can make your own lanterns!


Supplies:
Martha Stewart party crafting template
Scrapbooking paper
Stapler
Hole punch

Although it’s not recommended to use these paper lanterns near open flame, you can hang them onto strings of LED Christmas lights for added effect. We hope you enjoyed our hanging decoration week, check back with us again next week for more crankin’ crafts.

*Don't forget to read today's earlier post on the new black canvases, now available at our BFC stores. 

Black Canvas


Aloha Crafters ~

Today's Idea & Inspiration is Black Canvas - what fun! Black Canvas allows light colors to pop and dark colors to go deep.
  • Use with paint, spray paint, paint markers, oil pastels & mixed media.
  • Great for stencil techniques.
  • Allow the canvas to show through to create edges and contrast.


Happy Crafting!

- Kahului BFC

Thursday, July 19, 2012

Interchangeable Bracelet


Wearing multiple bracelets is very popular but sometimes it can be a hassle to deal with all the clasps on each bracelet and they tend to run around your wrist at varous points, all visible and distracting!  We'll be doing a demo on Saturday July 21 and 28 starting at 2:00 PM at our Mapunapuna Bead Shop to show you how to make a S hook clasp that allows you to have an Interchangeable Bracelet and by using a pretty button you won't mind that the clasp is visible!  As you can see above, I have 3 strands on this one but you can always use less or more as you desire!

Thanks for stopping by and I'll see you later!

Lynn H @ BFC Mapunapuna Bead Shop

Wednesday, July 18, 2012

Crankin' Out Crafts Episode 127 – Accordion Circle Hanging Decoration


Ready for more great party decoration ideas? Up next is Puna who will show you another spin on a hanging pennant that makes a great party decoration.

Easy to make party decorations!


Supplies:
2 Pieces of the same scrapbooking paper
Coordinating paper
Martha Stewart Scoreboard
Double-stick tape
Hot glue gun
Glue sticks
3.5” Scalloped circle punch

The scoreboard is not necessary to make these accordion circles, but it sure does make it easier and faster. Also, pennants like this can easily be made in a few different sizes and patterns and hung grouped together for maximum impact.


Tuesday, July 17, 2012

"Christmas In July" Event at Pearl City BFC

Come and join us at Pearl City's "Christmas in July" event on Saturday, July 21st from 10am-1pm. 

It's not too early to start thinking about Christmas!

We will be doing craft make 'n takes and having demonstrations all in the Christmas-theme. Stop by to craft with us and to get ideas for the upcoming holiday season! See store for additional details. See you there!

Monday, July 16, 2012

Workshops for Crayon Drip Art


Hello fellow crafters! If you've been anywhere on the internet lately (especially Pinterest) you might have seen some crayon art being thrown about. These great works of art are so much fun to do, I can tell you from personal experience that you won't want to stop making them. (I currently have about four unfinished pieces laying about my room just waiting for me to come back with a handful of crayons.)


One of the best things about them, though, is that they are a great creative craft for kids to do with a little adult supervison, of course. Familys can get together and create artwork and kids can make their own vibrant pieces to hang up in their rooms.

We want to thank all our students from last Saturday for joining us.
We all had a wonderful time watching the creation of your new, amazing works of art.

If you want to give this activity a try, we have some special workshops going on at Enchanted Lake Ben Franklin right now. For the next two Saturdays, that is July 21st and 28th, we're offering one hour sesssions from 10am to 2pm on how to make your own original crayon drip art. The workshops are open to adults and children and include a 16"x20" canvas, crayons, and the use of a heat tool, all for just $15 a person. You have to hurry, though, because our space is limited to 4 students an hour.

We look forward to seeing you there!
Puna @ Enchanted Lake

Don't forget to scroll down and check out today's Crankin' Out Crafts episode on how to make a beautiful party decoration.

Crankin’ Out Crafts: Episode 126 – Hanging Star Decoration


Getting ready to throw a few summer parties? Well, this week on Crankin’ Out Crafts, we’re focusing on hanging decorations that are perfect for your next summer bash. Today’s episode features Brandon showing you how to make a beautiful paper star decoration.

See how easy it is to use the Martha Stewart Party Crafting Template!


Supplies:
Martha Stewart Party Crafting template
12x12 Patterned, double-sided scrapbooking paper (6 sheets)
Scotch tape
Stapler & staples

Experiment with different sizes and types of scrapbooking paper for different looks for your star and hang at your next party for super “wow” effect.

Friday, July 13, 2012

Crankin’ Out Crafts: Episode 125 – Owl Cello Bag Favor


Brandon is back again with our last owl-rific project, another fun party
favor - the Owl Cello Bag Favor.

Easy-to-make owl favors!


Catch the segment on our YouTube Channel: Crankin' Out Crafts: Episode 125 - Owl Cello Bag Favor

Supplies:
3.75" x 6" cello bag
Scrapbooking paper
Blue Marvy Uchida scalloped circle punch (2”)
Yellow Marvy Uchida circle punch (1-12”)
Green Marvy Uchida circle punch (3/4”)
Glue-stick or double-stick tape
Stapler & staples
Scissors
Pen/Pencil

Thanks for giving a hoot everyone! We wanted to let you know that no owl
favors were harmed in the making of these episodes. See you next week with a
whole new theme!

*Don't forget to scroll down and read today's earlier post from Kahului BFC!

Every Child is an Artist

Aloha Crafters ~

Today's Idea & Inspiration is inspired by a quote from Pablo Picasso, "Every Child is an Artist".

Ben Franklin Craft Stores offer a plethora of ideas to inspire your young artist's creativity. Clay, colors, paints, papers, woods, beads, floral, cake decorating supplies and models are just a few of the things to explore, all of which can be found throughout our stores.

We offer free project sheets and are pleased to help with any questions.

And, if you bring your child's artwork into our Kahului store, we will enjoy displaying it in our store window.

Happy Crafting!

-Kahului BFC


Thursday, July 12, 2012

Simplicity Earrings


Sometimes you just gotta appreciate the beauty in minimalism!  We took 22 gauge wire, hardened it to function as ear wires and then attached beads.  The lines are clean and simple so we named it the Simplicity Earrings. We're doing a demo on the Simplicity Earrings on Saturday July 14 starting at 2:00 PM at our Mapunapuna Bead Shop so come in to find out how to use the various tools that we carry and how to use them!

Hope to see you there!

Lynn H @ BFC Mapunapuna Bead Shop

Wednesday, July 11, 2012

Crankin’ Out Crafts Episode 124 – Owl Embellishment


Can we get a "hoot hoot" for JFlo? She's here to make our next owl project,
a cute Owl Embellishment.

Add this owl embellishment to a page, card or frame!

Watch the episode on our YouTube Channel:  Crankin’ Out Crafts: Episode 124 – Owl Embellishment

Supplies:
Magazine
Ink pads
Scrapbooking paper
Double-stick tape
Twig or branch
Scissors
Buttons
Glue dots

Use this embellishment as a great handmade add on to scrapbooking pages,
cards, or even home décor.

Monday, July 9, 2012

Duct Tape Bow


This past Saturday, I had the opportunity to take part in some special Hello Kitty Make N' Takes that were taking place at all of our stores all over the island. We did some really, really cute projects, but the one thing that really made an impression on me (along with, I think, a lot of the participants) were the duct tape bows. Now, if you've ever read my posts on our blog, you know that I've been a little duct tape obsessed lately, but I can't help myself, it's just so much fun to work with. Anyway, for today's blog, I decided to revamp the Hello Kitty duct tape bow using some of our other duct tapes. (To tell you the truth, the Hello Kitty Bow project was just so popular, we sold out of all the Hello Kitty duct tape and I didn't have anything left for the blog today.)


This duct tape bow is so super simple that I'm sure you're going to want to make a bunch, just like me. To start with, you need some scissors, about 30 inches of duct tape, and something to put your bow on, like a barrette or a bobby-pin. Cut an 18 inch piece of duct tape and fold it over on itself, sticky side in, leaving a small amount (a 1/4 inch to 1/2 an inch) of sticky tape on one side. This is just so that both sides of your tape have a color or pattern to them instead of being sticky. Your tape should look like the picture above.


Next, you need to take the small sticky end and tape it to the folded end of the tape to make a circle, like a bracelet. Scrunch the center of the circle to make a bow. Now, cut another piece of tape to about 12 inches and then cut that 12 inches lengthwise to about a third of the width of the tape. You're going to use this small strip to wrap around the center of the bow to keep it in shape. You can also add in the barrette or bobby pin now by taping it in with the tape.


And that's all there is to it. Here's a look at my finished bow in cheetah and turquoise. There's something about the shininess of the duct tape that really draws my eye. I hope you like it just as much as I do. If you have any questions about the project, we supply a free project sheet in our stores. Also, if you want, you can always come and visit us and ask me about it. I promise, it's too much fun to make for me to turn it down.

Puna @ Enchanted Lake

P.S. There's a cute project on COC today in the earlier blog post. If you like owls, you don't want to miss it.