Monday, December 31, 2012

Crankin' Out Crafts Episode 196 - Vinyl Mustache Mirror

This week we're kicking off the new year with vinyl! Today, JFlo shows you how to make a fun project made with vinyl mustache stickers.


Mustaches are in! Here's a simple and trendy project to start off the new year.


Supplies:
Vinyl Mustache stickers
Flexible mirror sheet
frame
scissors
Burnishing tool (like a gift card)

Stop by and see our selection of vinyl words, phrases and shapes. Use them to decorate your next craft project.

Friday, December 28, 2012

Crankin' Out Crafts Episode 195 - New Year’s Photo Booth


Brandon is here to show you a quick and easy photo booth for your New Year’s celebrations.


Supplies:
Foam core
Xacto knife
Black, gold, and silver cardstock
Wooden dowels
Black paint
Scissors
Hot glue gun and glue sticks

Don’t forget to make some props to go along with your photo booth. For our glitzy and glamorous theme we made props like a top hat, a mustache, and a monocle.

Create a New Year's Resolution Photo Op

Aloha Crafters ~

Today's Idea & Inspiration is a Backdrop for a New Year's Resolution Photo Op. Using our 12X12 Chalkstock Paper, the writing can be changed by just erasing and reapplying personalized resolutions time after time.

Supplies:
  • Backdrop of choice (form core, canvas or cardboard)
  • Waterfall Raffia (300777840
  • Glossy Black Spray Paint (77642637)
  • Brilliant Gold Spray Paint (77643080)
  • Spotted Leopard Duck Tape (4369831)
  • 12X12 Chalkstock Paper (30132754)
  • Brown Sugar Glitter Tape (30136570)
  • Foamie Tiara (30104877)
  • 2" Foam Letters (30104791)
  • Tape of choice
  • Blade of choice
Instructions:
  1. Using Black Spray Paint, paint backdrop
  2. Tape strands of Waterfall Raffia to dried backdrop
  3. Using Brilliant Gold, Spray Black Backdrop with attached Waterfall Raffia
  4. Once dry, remove raffia
  5. Cut ends off Tiara foamie, spray it & letters with Brilliant Gold Spray Paint (see picture)
  6. Using Brown Sugar Glitter Tape, adhere 12X12 Chalkstock Paper to Backdrop
  7. Using blade of choice, cut hole for head (if desired, arm holes can be cut to hold 12X12 chalkstock paper)
  8. Adhere Tiara
  9. Using Spotted Leopard Duck Tape, "frame" backdrop
Happy Crafting!


Wednesday, December 26, 2012

Snowflakes for Sandy Hook


If you're following our Facebook page, you may have already heard that on Saturday, December 22nd, our Enchanted Lake Ben Franklin store decided to take part in a small initiative to make snowflakes for the survivors of Sandy Hook.


When we found out that the PTSA of Sandy Hook was collecting snowflakes to hang in the school rooms following the Christmas break, we knew that it was something that our employees and our customers would be passionate about taking part in.


We just wanted to say thank you to everyone who took part in our snowflake decorating on Saturday. Sandy Hook will soon be receiving all of the wonderful snowflakes that you helped to make, each one carrying Hawaii's aloha, hope, and well wishes along with it.


Puna @ Enchanted Lake

Crankin' Out Crafts Episode 194 - Glitzy Wine Charms


Dress up your stemware in time for New Year’s. Today, Puna will show you how to make some elegant, monogrammed wine charms.


Supplies:
Mirror poster board in gold or silver
Glass tiles
Letter stickers
 “Made for you” charms
Jump rings
Gold, silver, and copper seed beads
Small star sequins
Hoop ear wires
Glossy accents
E6000
Scissors
Pen
Beading pliers

These beautiful charms make great gifts and favors too.

Monday, December 24, 2012

Paper Garland


Paper garland is such a easy and fun way to spruce up the room for any occasion.  Simply use any punch or scissor to cut out shapes from your choice of card stock (double sided paper works great!), and feed them one at a time..one after another into your sewing machine....it is really that easy!  Make sure to leave some extra thread at the beginning and end of your strand, so you have something to hang it up by.  I made this silver and gold garland for New Year's, but it's not too late to add some to your tree.

Crankin' Out Crafts Episode 193 - New Year’s POP Curtain

Get ready for your New Year’s celebration with JFlo today as she shows you how to make a great decoration for your party.


View the episode on our YouTube Channel: Crankin' Out Crafts: Episode 193 - New Year's POP Curtain

Supplies:
Mirror poster board in gold and silver
Large, purple, Marvy Uchida circle punch
Double-stick tape
Nylon monofilament

Hang this eye-catching curtain around your home for the festivities or in front of a blank wall for a great photo backdrop.

Happy Holidays from the Ben Franklin Crafts ohana!

Friday, December 21, 2012

Crankin' Out Crafts Episode 192 - Decorative Packaging (Gift Wrapping Tips)


Accessorize your packages with ornaments, lace, ribbon and bows.  Some tips and tricks to ribbon tying on your gifts. 

Wrap up your gifts with your own personal style!


General supplies for gift wrapping:
ribbon
tape
double-stick tape
scissors
wrapping paper

optional:
lace
baker's twine
glitter tape
glue gun & gluesticks
ornaments & other embellishments

Have fun and be creative when wrapping your gifts and goodies this Christmas! Happy Holidays!

Christmas Utensil Holder

Aloha Crafters ~

Today's Idea & Inspiration is Christmas Utensil Holders.

Supplies:
  • Big Shot Pro Machine (30098709)
  • Sizzix PillowBox Die (30084050)
  • Large Base Guillotine Paper Trimmer (30063940)
  • 12x12 Glitter Stripe Green (30116171)
  • 12x12 Glitter Stripe Crimson (30116170)
  • 12x12 Micro Glitter Silver (30116117)
  • 12x12 Grass Green (30132667)
  • 12x12 Poinsettia (30101283)
  • 12x12 Black Chalkstock (30132754)
  • 12x18 Self Healing Olfa Cutting Mat (77531418)
  • X-Acto Knife (23977)
  • 15" Stainless Steel Ruler (30109202)
  • Adhesive of choice
  • Scissors
Instructions:
  1. Using Pillow Box Die Cut in the Big Shot Machine cut Glitter Stripe Paper & matching 12x12 color paper
  2. Adhere papers together
  3. Cut notched edge from front of pillow box top & bottom
  4. Fold & adhere pillow box together
  5. Using Guillotine, cut Silver Glitter paper into 1 3/8" square, cut Black Chalkstock into 1"x6" strip
  6. Using X-Acto Knife, Steel Ruler & Self Healing Cutting Mat, cut 7/8" square from middle of Silver 1 3/8" square
  7. Adhere black strip around pillow box for belt
  8. Adhere silver belt buckle on top of belt
Happy Crafting!

Wednesday, December 19, 2012

Crankin' Out Crafts Episode 191- Bow Making


Learn a quick and easy way to make a fluffy bow every time.  

With just ribbon and scissors, you can make beautiful bows!


View the Bow Making Episode here: Crankin' Out Crafts Episode 191- Bow Making

Supplies:
Ribbon (satin or acetate)
scissors

Add a bow to a gift, wreath, tree or lei! They had the perfect finishing touch to projects.


Tuesday, December 18, 2012

Sandy Hook Angel Ornament


"Every time a bell rings, an angel gets their wings"

A school teacher approached me yesterday at our Market City location looking for help with an angel ornament idea to send to the families of the Sandy Hook tragedy.  This is the idea we came up with.  I was so touched by the heart felt sentiment of this lovely women, that I promptly made one.  This is what crafting is about....an inspired idea..created with love and compassion..shared with others from the heart to bring comfort and joy.  This ornament is to remember and give love to the little angels of Sandy Hook Elementary... we will never forget you!


Materials Used:     

-wood Heart (wings)
-wood balls (head)
-wood candle cups (body_
-large flat sequins (halo)
-Ceramcoat Metalic 14k Gold paint (wings)
-gold glitter (wings)
-Crafter's Acrylic dark turquoise paint (body)
-Folk Art violet pansy paint (head)
-gold elastic thread
-small jingle belss
-ribbon
-poly-foam brush (3)
-hot glue gun and sticks


Put It Together

-paint one side of heart gold and sprinkle with gold glitter while paint is still wet.
-paint bead/head violet and brush with gold paint when dry
-paint candle cup/body with turquoise and brush with gold paint when dry
-paint backside and edges of heart with violet dragging the edges onto the gold with very little paint on the foam brush
-glue or tie gold elastic string strung with bell through the candle cup.
-using your hot glue assemble the head to the bottom of the candle cup and sequins to the back-top of the head.
-glue created figure to the center of the heart. 
-glue ribbon to the back to hang.

Monday, December 17, 2012

Christmas Timely Decor


Who says it's too late to get Christmas decorations? I'm still getting ready for a small Christmas party we're having, and I think I found just the thing to spice up the decor. We may have sold out of a lot of our Christmas stock, but there are a few things left that you can effortlessly make striking displays with. To get you started, here are a few stylish and easy decorations I made using some beautiful berry sprays that we've got in our stores.


Don't forget that sometimes the simplest decorations can be the most stunning. I used pieces of sheer gold ribbon to complement these berry sprays as a vase filler.


Living here in Hawaii, sometimes mistletoe is hard to come by. Instead, you can easily bundle some red berry sprays together with satin ribbon to hang in your entry-way or over your doors.


Lastly, I put together this wreath without using a wreath form, just by winding the berry sprays around each other. A sheer, gold bow at the top adds a subtle sparkle.

So, although the Christmas pickings may be slim, you can still use your crafty streak to impress your friends and family with your own Christmas style.

Thanks for decking your halls with us!

Puna @ Enchanted Lake

P.S. There's a gift wrapping episode of Cranking out Crafts if you scroll down to today's earlier post.


Crankin' Out Crafts Episode 190 - Gift Wrapping with Bags


Learn unique ways to embellish that brown paper bag and make it Creative and Cute!

Dress up paper bags with scrapbook paper, ribbon & more!


Supplies:
paper bags
scrapbook paper
double-stick tape
ribbon
baker's twine
glue gun & gluesticks
button

This is a quick and easy way to decorate bags that you already have in your home. Switch up the paper to fit any occasion throughout the year!

Friday, December 14, 2012

Crankin' Out Crafts Episode 189 - Tinsel Tree (Tomato Cage)


Puna’s back with another great holiday decoration made out of a tomato cage.

Here's another tomato cage tree for your yard!


Supplies:
Tomato cage
Wired tinsel garland
Star garland
Hot glue gun and glue sticks

It doesn’t take long to make this eye grabbing accent piece so it’s great for some last minute party décor.

*Don't forget to read today's earlier post from Kahului! They show you another great project for Christmas.

Ribbon Tree Ornaments

Aloha Crafters ~

Today's Idea & Inspiration is a Ribbon Tree Ornament.

Supplies:
  • Sheer Organza Silver Ribbon (30116622)
  • Bead Stringing Wire (77184788)
  • Inspiration Beads ( 30118329)
  • Crimp End Beads (30102623)
  • Crimp Beads (30102621)
  • Dritz Fray Check (77651521)
  • 12mm White Star Bead (30078691)
  • Scissors
  • Beading Wire Cutters
  • Sewing needle
Instructions:
  1. Arrange beads in desired order
  2. Cut bead stringing wire 2"-3" longer than the length of "arranged" beads
  3. Attach crimp bead on one end of wire
  4. String 1st bead
  5. Fray check end of ribbon
  6. Using needle, pierce hole in ribbon, leaving desired length (see picture)
  7. String 2nd bead, loop ribbon, pierce with needle, string ribbon
  8. Continue stringing beads and ribbon, ending with star bead
  9. Attach crimp end bead
  10. Cut ribbon & use fray check on end
Happy Crafting!


Wednesday, December 12, 2012

Crankin' Out Crafts Episode 188 - Straw Wreath


Today's project is a Paper Straw Wreath. Learn how to make this adorable wall decoration great for any occasion!

Straws can also be used to make decorations!


Supplies:
decorative straws
styrofoam wreath or disc
ribbon
hot glue gun 
scissors  

The paper straws come in assorted colors and designs. Don't be afraid to try out different materials to make your own unique wreath!


Tuesday, December 11, 2012

Alcohol Ink Vase..Great Gift Idea!!

In the beginning of the holiday crafting season I had a blast decorating ornaments with alcohol inks....I couldn't believe how something so easy and fast to do could come out so beautiful every time.  So....I got a little alcohol ink happy and started using them on any non-porous surface I could find!  I was so happy with how this glass vase turned out and I just think it's such a fun gift idea.  Ben Franklin carries a variety of alcohol inks and vases...you could do the outside of an crimped ivy bowl for a very inexpensive favor, center piece or gift idea.  It's not too late for this fast last minute holiday craft.  Other ideas include votive holders, little metal tins, picture frames, ornaments and more!


Monday, December 10, 2012

Tis the Season for Homemade Gifts


It's getting down to crunch time! Is everyone ready for Christmas? Well if you're anything at all like me, you've probably got a few gifts left to make. Here's a simple and yet elegant looking wall hanging that has a dual purpose as a holder for small things that you pick up along your daily adventures but never know what to do with. Things like ticket stubs, business cards, and change all fit perfectly in these tiny pockets. All you need to complete this project is some ribbon and baking twine, a few mini wooden clothespins, some paint, stencil brushes, and stencils. The stencils I used are called "Four Seasons" and are from our Martha Stewart Crafts line. You might even want to go a step further and make this gift extra special by stenciling a family name on the hanging.

Well, I've got to get back to my gift making! Thanks for stopping in.

Puna @ Enchanted Lake

P.S. There's also a post from earlier today from our Crankin' out Crafts video series. You have to scroll down to see it though.

Crankin' Out Crafts Episode 187 - Deco Flex Tree


Need an easy holiday centerpiece? Try this tree made with Deco flex tubing and a Styrofoam cone. Puna will take you though the project, step-by-step.

Try the new Deco Flex Tubing to create a Christmas centerpiece!

Take a look at the episode here: Crankin' Out Crafts: Episode 187 - Deco Flex Tree

Supplies:
Deco flex tubing
Styrofoam cone
Buttons
Greening pins
Scissors
Hot glue gun and glue sticks

This pretty tree can be made on any size Styrofoam cone to complement your holiday table decorations.


Friday, December 7, 2012

Santa Tulle Wreath

Aloha Crafters ~

Today's Idea & Inspiration is a Santa Tulle Wreath.

Supplies:
  • Plush Santa Hat (30107742)
  • 10" Straw Wreath (77603647)
  • 2 White Tulle Rolls (77442731)
  • White Duct Tape (23029977)
  • Glue gun
  • 3"- 4" Ribbon Scrap
  • Needle & Thread
  • Fabric Scissors
Instructions:
  1. Cover Straw Wreath with White Duct Tape
  2. Cut White Tulle into 15" strips
  3. Knot White Tulle strips around 3/4 of Straw Wreath
  4. Make Loop with Ribbon Scrap
  5. Sew Ribbon Loop 1/3 of the way up from bottom edge in the middle back of the Santa Hat
  6. Tack thread through front of Santa hat
  7. Hot glue Santa Hat to Straw Wreath
  8. Trim Santa's Tulle "beard" as desired
Happy Crafting!

*Don't forget to scroll down to read today's earlier post! Brandon is making Gingerbread Birdhouses on our latest Crankin' Out Crafts Episode.

Crankin' Out Crafts Episode 186 - Gingerbread Birdhouse

Brandon has turned unfinished birdhouses into Gingerbread Master Pieces! Modeling Paste is the secret tool to this Holiday Decor.

Cute gingerbread birdhouses are easy & fun to make!

Watch the episode here: Crankin' Out Crafts: Episode 186 - Gingerbread Birdhouse

Supplies:
Brown paint
white paint 
modeling paste
birdhouse
plastic bag
embellishments - acrylic crystals 

Have fun crafting for the holidays and don't forget, you can share your creations on our facebook page! Have a great weekend and Happy Holidays!

Thursday, December 6, 2012

Yay For Gingerbread!


At the Hilo Ben Franklin store we have an AMAZING gingerbread house display in our Christmas forest. Between all the trees, it looks like a little house in the clearing that you might find somewhere in the woods.


To the right of the little house are all of the gingerbread houses, sleighs, and trees that we have available for you to come buy and build and decorate with your family, friends, or even by yourself. Let your creativity run wild! (Personally, I'd buy and build one of these by myself so afterwards I'd be able to eat all the leftover candy by myself and not have to share. ^.^)


And here's the special part of the whole display. The Gingerbread House! (And the tree, can't forget the tree.) It's it pretty? So festive! But wait! What's that little sign in front of the house?


It's a disclaimer. Our sweet little gingerbread scene is Non-Edible. Aw. So no midnight snacks or little nibbles. If you're making a gingerbread house and want to keep it all nice and pretty, make sure you seal it with a spray sealer or varnish to make sure the little buggies don't get to it.

Please come and visit our Gingerbread Scene and the rest of our Christmas forest. All the good stuff is going fast, so come see us soon! And when you come see the gingerbread, tell Salena that she did an amazing job!

See you soon!! Happy Holidays!!

~Jen
Hilo Ben Franklin

Oh yeah, and don't forget to check out the melted snowman blog that Pearl City posted earlier today. It's such a cute project! I want to try it!

Melted Snowman Ornament


Ah...Frosty didn't appreciate our Hawaii sunshine...he did leave his magic hat behind so we know he's still here in spirit! Today, we're creating melted snowmen ornaments; join me from 10am-12noon to make one to hang on your tree or decorate your wreath! This month we have lots of demonstrations & workshops to help you with your holiday theme...there's deco-mesh wreaths, ribbon trees, paper pinecone ornaments, angel pins, and a whole lot more! Join me for a Beader's Holiday this Saturday...we have a make/take Paper Clip Angel, a Beaded Wreath or a Christmas Bracelet! You'll need to register early for the Christmas Bracelet but just stop in for the angel & wreath!
There's always something crafty going on at Pearl City!
gloria @ Pearl City

Wednesday, December 5, 2012

Crankin' Out Crafts Episode 185 - Glittered Christmas Tree


Watch JFlo create this fast and easy Christmas Decoration using Glitter-It glue, stryofoam cone and glitter.

Make an easy and elegant centerpiece for your holiday display!


Supplies:
Styrofoam cone
glitter
Glitter-It Glue
paintbrush
scrap paper
candlestick holder

We carry styrofoam cones in different sizes, so you can create a mini forest for your tablescape! Try glittering different things to create unique displays and decorations.

Tuesday, December 4, 2012

Heart Punch Tree Favor

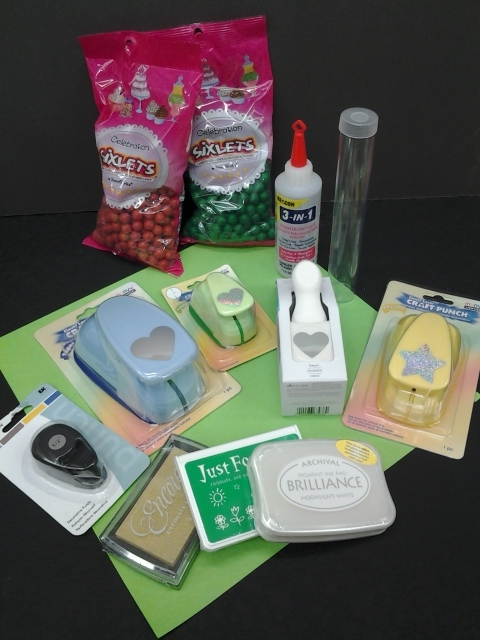
I just love the creative possibilities that punches have.  Today, I decided to use 3 different heart punches, star punch, and a little circle punch to create a tree on our 7 inch favor tube.  I love how it turned out!


Materials:
- Marvy Uchida Heart Punches (blue and green)
-Martha Stewart Heart Punch
-Double Sided Tape
-Beacon 3in1 Glue
-Marvy Uchida Star Punch (yellow)
-EK tools 1/2" Circle Punch
-Red, Brown and Yellow Card stock 2"x 3and 3/4" each
-White, Green and Gold Stamp Pads
-Candy
-Favor Tube: sku 30123061 *item of the month

How to:
-Using double sided tape stick brown paper around the bottom portion of the tube
-Punch 12 hearts with the blue punch
-Punch 8 hearts with the Martha Stewart punch
-Punch 7 hearts with the green punch
-Using various stamp pads distress the hearts to add texture
-With double sided tape down the center of the backside of the heart add 3 rows of 4 of the largest heart (staggering each row)
-Add 1 row of 8 Martha Stewart hearts (stagger with previous row)
-Stagger one last row of 7 of the smallest hearts
-Punch 1/4" circles (and whatever else you want to add) out of red card stock and glue onto tree
-Punch yellow star and glue or tape to the outer part of the lid of the tube.


Monday, December 3, 2012

Crankin' Out Crafts Episode 184 - Yarn Ball Decoration


Learn how Lisa creates this easy, non-breakable, decoration for Christmas. All you need is styrofoam balls and some yarn.

Using just a few supplies, you can create your own Christmas décor!


Supplies:
yarn
styrofoam ball
scissors

Have fun mixing and matching yarn colors in different styrofoam ball sizes! Stay tuned for more Christmas crafts this week on CoC.