Wednesday, January 30, 2013

Crankin' Out Crafts Episode 209 - Letter Sculpture


Hugs and kisses are in store today when Puna teaches you how to create a sweet sculpture using paper mache letters.

Stack Paper Maché letters for a cool sculpture!

Supplies:
12” paper mache letters
Wooden plaque
Scrapbooking paper
Stamp ink
Double-stick tape
Scissors
Pencil
Spray paint
Acrylic paint

This would also make a great decoration for a room. Spell out a name or a word!

Paper mache letters make great statements in the home and are becoming more and more popular as décor.

Tuesday, January 29, 2013

Butterfly Bookmark


One of my resolutions this year is to read more. You know what that means....it's bookmark making time!!!  This  bookmark idea is great because it is cute, super 
ready-made and quick!  A great favor idea for a birthday party or book club.


Pick your favorite Felties Stickers, some pretty ribbon and some scissors...you are ready
to craft. Simply ...

1- cut ribbon...about an inch longer than your book (10 inches is a good length)
2- peel the backing off your stickers 
3-sandwich each end of the ribbon in between two stickers that match in size.
Read away!!!!!


Monday, January 28, 2013

Crankin' Out Crafts Episode 208 - Tin and Magnet Set


Jflo expresses her love of paper crafting in today’s episode by making a magnet and tin set.

Make magnets & a matching tin for Valentine's Day!


Supplies:
Tin container
Scrapbooking paper
Heart shaped glass tiles
Super strong magnets
Glossy accents
E6000
Scissors
Baker’s twine

A homemade magnet set like this one is a special treat for teachers too!


Sunday, January 27, 2013

Be My Valentine Banner

Aloha Crafters ~

Today's Idea & Inspiration is a banner for Valentine's Day. With the many fun coordinating two-sided papers we offer, this project was a breeze.

Supplies:
  • 13 12X12 Coordinating Imaginesce Valentine Paper (for backgrounds)
  • 2 12X12 Cardstock (2 different colors of choice for heart & letter frame)
  • 1 12X12 Coordinating Imaginesce Valentine Paper (for lettering)
  • 2 Pkg Arched Pennants (30120188)
  • 13 Silk Flower heads & leaves
  • Red Facet Hearts (30118819)
  • Eclips Machine (30120535)
  • Romantic & Heart Nouveau Alphabet Cartridge (30128577)
  • Xyron Machine (3004148)
  • Adhesive of choice
  • Sissors
  • Hole Punch
  • Ribbon of choice


Instructions:
  1. Cut 13 pennant shapes using the Imaginesce Valentine paper (use Arched Pennant as a pattern)
  2. Adhere cutouts to chipboard using Xyron machine
  3. Punch holes through cut & adhered pennants (see pictures)
  4. Cut accent strips from complimentary paper
  5. Adhere strips to pennants
  6. Cut 13 4" X 5 1/2" hearts
  7. Adhere to pennants
  8. Cut 13 frames using the Eclips machine & Romantic cartridge
  9. Adhere silk flowers, leaves and heart facets to hearts
  10. Tie pennants to ribbon

Happy Crafting!


Saturday, January 26, 2013

February Calendar Updates!

Hi!

I know several of you who come and visit us at Hilo Ben Franklin on Saturdays with your kids swing by this blog every once in a while, so I wanted to make sure that you're updated on our February calendar! I'm sorry to say that our Saturday Keiki Crafts have been taken off the calendar for February. There were several factors that were taken into consideration when the decision was made, but it had nothing to do with us not having a great time with all of the kids every weekend. Is this a permanent decision? Well, nothing's ever permanent. If you'd like to see Keiki Crafts come back, please let the Hilo Ben Franklin Store Manager, Bert, know!
Other than that, we still have lots of great demos planned, so please make sure to come and check those out. We're also planning our first event of the year, scheduled for the end of the February, so stay tuned for more details about that.

See you soon!

~Jen at Hilo Ben Franklin

Friday, January 25, 2013

Crankin' Out Crafts Episode 207 - Core’dinations Card


You’ll love tearing up our new Core’dinations paper with Puna to make a simple thank you card.

Check out our new Core'dinations paper - embossed with beautiful designs!


Supplies:
Core’dinations pre-embossed paper
Cardstock card base
Double-stick tape
Sanding block
Thank you stamp
Ink pad

Don’t just stop at making cards! Core’dinations papers are great for decorations and scrapbooking too.

Wednesday, January 23, 2013

Crankin' Out Crafts Episode 206 - Desk Calendar


Learn how to use paper to decorate a pretty and convenient desk calendar.

Make a neat calendar for your office with wood, paper, & stickers.

Take a look at the segment here: Crankin' Out Crafts: Episode 206 - Desk Calendar

Supplies:
Wooden desk calendar
SRM month stickers
Scrapbooking paper
Paper trimmer
Double-stick tape
Ink pad
Fine point Sharpie

This calendar is great for the office or on your end table or counter at home.


Tuesday, January 22, 2013

Stop and Smell the Pinwheels


The spring breeze is blowing through the store

with bright colors and beautiful decor....

Say hello to a garden nome...

take a spin in the pinwheels..

find a treasure to brighten your home.


see you soon.....


Monday, January 21, 2013

Crankin' Out Crafts Episode 205 - Wallflowers (Paper Roses)


Puna’s here today to show off a great paper decoration she made using Core’dinations Kraft Core cardstock.

Create gorgeous paper roses with cardstock!

Catch the how-to video on our YouTube channel: Crankin' Out Crafts: Episode 205 - Wallflowers (Paper Roses)

Supplies:
12”x12” sheets of Core’dinations cardstock (1 per flower)
Sandpaper sheet or sanding block
Pencil
Scissors
Hot glue gun and glue sticks

Make these flowers to hang on the wall, dress up a lampshade, or as a decoration on a gift box.

Sunday, January 20, 2013

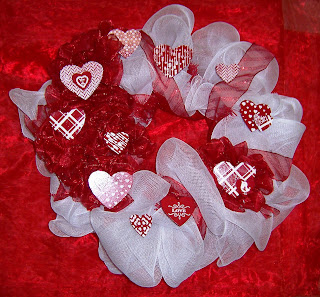
Wooden Hearts Wreath


Aloha Crafters ~

Today's Idea & Inspiration is a wreath perfect for Valentine's Day. This is a different use for those scrapbooking Valentine supplies in your stash; or a fun reason to purchase more.

Supplies:

  • Red Pine Work Wreath (30132493)
  • White/Clear Mesh (30104485)
  • Bowdabra (30075356)
  • Red Crafter's Acrylic Paint (30020802)
  • Titanium White Basics Paint (30094441)
  • Bag of Wooden Turning Hearts (77614875)
  • MSC All Over Petal Heart Punch (30123975)
  • MSC All Over Heartbeat Punch (30123974)
  • Tweed Pattern Stamp (30138985)
  • Arrow Background Stamp (30139029)
  • Heart Background Stamp (30139027)
  • Amore Stamp (30139031)
  • Love Stamp (30139032)
  • Sending Love Stamp (30139035)
  • Red Ribbon of choice
  • Scrap Paper or blank stencil plastic
  • Adhesive of choice
  • Paintbrush of choice
  • Paintpan of choice
  • Varnish of choice
  • Paint tape of choice


Instructions:
  1. Using Red Pine Work Wreath & Mesh create wreath (see previous blogs for how to) 
  2. Wrap Wreath with Red Ribbon
  3. Using the Bowdabra make 6-8 Bows
  4. Using Red Paint, paint wooden hearts
  5. After hearts are dry, spread white paint in a paintpan, use to apply to stamps, stamp hearts
  6. Using MSC punches, make stencils, use to stencil hearts
  7. For Plaid heart, tape off with painting tape
  8. After hearts are thoroughly dry, varnish if desired
  9. Adhere bows & wooden hearts to wreath as desired
Happy Crafting!

Friday, January 18, 2013

Crankin' Out Crafts Episode 204 - Moss Letters (Paper Maché Letters)


Using green moss to wrap the letters creates a earthy look great for that Garden Party or the new trend for Weddings.  

Bring a touch of green to your event with Moss Letters!


Supplies:
Paper Maché Letters
sheet moss
canvas (we used burlap canvas)
glue gun & glue sticks
paint
paintbrush
e-6000 glue
ribbon
*optional: additional greenery

Besides moss, you can also glue other materials like different types of flowers depending on the theme.

Wednesday, January 16, 2013

Crankin' Out Crafts Episode 203 - Yarn Wrapped Letter (Paper Maché Letters)


Create a unique look with yarn by simply wrapping it!

Using just yarn & glue, you can add texture to a project!


Supplies:
Paper Maché Letter(s)
yarn
Scissors
glue gun & glue sticks

Try wrapping with different colors of yarn to create another look!

Tuesday, January 15, 2013

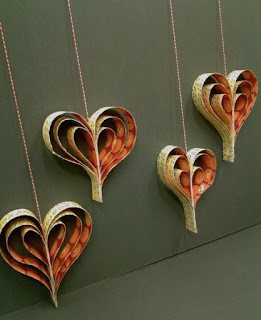
Paper Heart Embrace

Paper Heart Embrace


Materials:
-Bo-Bunny Back to Backs “Love Letter Notes” 12x12 card stock, sku 30137297 (or any double sided design)
-Paper Trimmer
-Stapler
-Double stick tape
-Bakers twine


Put it together:
1) Cut 6 1” strips out of 12x12 card stock
2) Lay out 3 strips vertically, with the pattern you want on the outside faced up.
3) Place double stick tape 1 ½ inches down on the first strip and lay the top of the second strip onto the tape.  Place double stick tape 1 1/2 inches down from the top of strip two and place the top of strip three onto the tape.
4) Lay out the next three strips and repeat step 3.
Now you have two strips.
5) Take the two strips (the sides with the overlapping facing) and place them together as if they were kissing!
6) Staple the sides together about 2 ½ inches from the top.
7) Cover the staples with double stick tape
8) Take the now outer strips of paper on either side, and bring down creating a small heart with a tail.
9) Repeat the same technique, taping further down the “tail” each time creating a nesting effect. Trim the tail if you wish.
10) Now you have three adorable nesting hearts.  Using double sided tape, attached bakers twine, thread or ribbon to the inside “v” of the outside heart.

Hang your beautiful heart for all to love!


Monday, January 14, 2013

Spread the...


Have you lost that lovin' feeling for your Valentine's Day decorations? Get it back with a simple and quick fix that will get you back to loving Valentine's Day in all its pink-hearted glory.

All you need for this project are some frames, some scrapbooking paper, and some vinyl letters. The frames for this don't even need to match; you can use all different sizes and colors, like I did, if you want. Just cut down your pieces of scrapbooking paper to fit in the frames (if you have a paper trimmer this step can be pretty speedy and brainless) and put the paper into the frames the way you would a photo. Then, make sure your glass is nice and clean by wiping it down with some rubbing alcohol and stick your vinyl letters to the glass. Make sure you do a little spread the love dance as you set your frames up on your end table or counter because this swanky decoration was so snappy you were done before you could spell L-O-V-E.

Puna @ Enchanted Lake

Scroll down to fall in love with paper mache letters too!

Crankin' Out Crafts Episode 202 - Paper Mache Letters - Patina Letter


JFlo creates a Patina look on our New Paper Mache letters.  Watch how easy it is to create!

Add a rustic and distressed look with paint to our new paper maché letters!

Learn how to create this look on today's episode: Crankin' Out Crafts: Episode 202 - Patina Letter (Paper Maché Letters)

Supplies:
Paper Maché Letter(s)
Acrylic paints (we used soy paint)
(Colors: Turquoise, lime green, copper, bright orange)
paintbrush

You can also adhere the letter to a canvas as a backdrop.  

Sunday, January 13, 2013

Have a Sweet Birthday Card using Baker's Twine

Aloha Crafters ~

Today's Idea & Inspiration is a "Have a Sweet Birthday" birthday card.

Supplies:
  • Red & White Baker's Twine (30136465)
  • 2" Super Strength Glue Dot (30129711)
  • 1/4" Red Organza (30004167)
  • 4" Lollipop Sticks (77656280)
  • 12x12 Red Cardstock (30101283)
  • 12x12 Love U More Brave Heart Paper (30137282)
  • Fantastic Birthday Stamp Set (30139007)
  • Memento Red Ink Pad (30131248)
  • Crystal Embossing Powder (30001625)
  • Heat It Craft Tool (30003773)
  • 3/16" Double Stick Tape (30013283)
  • Adhesive of choice
  • Cutting Board
  • Scoring Board
Instructions:
  1. Cut 12x12 Red Paper 8 1/2" X 5 1/2", score at 4 1/4", fold
  2. Cut 12x12 Love U More Brave Heart Paper 3 7/8" X 5"
  3. Using double stick tape, adhere Love U More paper to Red paper
  4. After peeling off one side of 2" Glue Dot, curl the Baker's Twine around to form the lollipop
  5. Peel off other side of Glue Dot & adhere to Love U More paper
  6. Stamp & emboss Love U More paper using stamp, ink, embossing powder & heat tool
  7. Cut 1 lollipop stick 1 7/8", tie bow using red organza to 1 end of stick
  8. Adhere stick under Baker's Twine lollipop
Happy Crafting!

Friday, January 11, 2013

Crankin' Out Crafts Episode 201 - WINDOW PAINTING Clean-up


Brandon gives us two simple ways to remove paint from your window.  Nothing like clearing your “canvas” for another masterpiece.

Brandon shows you easy clean-up for your window painting projects.


Supplies:
Razor Blade
Windex or any type of glass cleaner
Paper towels

Feel free to share your window painting designs with us, as well as any other projects that were inspired by a Crankin' Out Crafts episode! Share them on our Facebook page here. Have a great weekend and visit us next week for more quick and easy crafts.

Thursday, January 10, 2013

Felt Flower

There's always something crafty going on at Pearl City!

Happy New Year! New Year celebrations and resolutions (how many have you made?)! February is fast approaching & thoughts of hearts & flowers start to come to mind. Cut out heart shapes from felt, arrange them & create an open rose like the one above or wrap the hearts tighter and create rose buds. These are easy to make & a perfect project for kids to create for their teachers, mom, aunties, grandmoms or any special lady! We'll be creating these pretty blooms at Pearl City for a make-n-take this Saturday, later this month & in early February (just in time for Valentine's Day). This Saturday's Crafting Adventures also includes a make-n-take for the Paracord Bracelet; see you there!

gloria @ Pearl City

Wednesday, January 9, 2013

Crankin' Out Crafts Episode 200 - WINDOW PAINTING Letters


See how easy Brandon uses computer printouts to paint perfect letters! Watch as Brandon shows you how easy it is to paint letters backwards, to make it readable from the front.

Write a special message on your window!


Supplies:
Computer
Word Program
Paper
Printer
Delta Ceramcoat Paint
Brushes

Today marks a milestone for us - our 200th episode! We would like to thank everyone for your support and for tuning in every week. We hope we have inspired you to create and try new projects. We look forward to many more videos in the future. Mahalo!

Tuesday, January 8, 2013

Spring Bird Houses


Spring Bird Houses


Spring into your décor with bright colors, moss green and these adorable bird houses!

We used:
-Ceramcoat bright yellow paint
-Basics brown acrylic paint
-super moss preserved sheet moss
-hot glue gun and glue sticks
-decorative birds

Start by painting your house.  Using the poly foam brush to paint the bird houses is easy to do and creates a very rustic look.  Paint all over yellow first, when dry apply brown using top edge of your foam brush in light vertical strokes.

Using the hot glue gun, add the super moss and your birdie!


Monday, January 7, 2013

A Red (and Pink and Paper Mache) Letter Day


I've got the most exciting news to tell all of you type and font fanatics! We finally have large (and I mean HUGE) paper mache letters in the store! Yay! The ones pictured above are 24 inches of font-tabulous lettering. There are so many things that you can do with them; we just can't stop making samples.


Here's a sample that I made for a kitchen. I used scrapbook paper, double-stick tape, and duct tape to make these diner-esque letters.


This sample was made by Lisa at our store and she decided to mount her letters to a wooden plaque to make a standing font sculpture. Isn't it beautiful? We have so many more ideas for you in store, just wait until you see what we come up with next!

Thanks for reading!
Puna @ Enchanted Lake

There's also a lovely episode of Crankin' Out Crafts below. Please scroll down.

Crankin' Out Crafts Episode 199 - WINDOW PAINTING 101


Join Brandon as he shows you the best tools to use to paint your picture windows. 

Add a decorative touch to a window with painting!

Brandon starts this week off by showing us the best paint to use on your window murals, and the importance of layering. Be sure to use acrylic paint, and not a permanent glass paint (unless you want it to be permanent). Also, the firmer your brush, the better the control. Try to stay away from soft bristles like camel hair and sable.


Supplies:
Delta Ceramcoat Paint
Brushes
Water
Razor Blade
Paper Towels

Painting your windows is a great idea for a storefront, office or at home. Change up the design depending on an upcoming holiday, event, or even just a special message you want passersby to see!

Sunday, January 6, 2013

New Year, New Demos!


Happy New Year!!

With a new year, comes a whole new group of demos! At the Hilo Ben Franklin store, we've been working hard at coming up with a lot of different demos to share with you. There are also new classes and workshops in the works to please keep checking the craft calendar to see what's coming up. If there are any classes or demos that you'd like to see, let us know! 

We hope you have a wonderful, crafty new year! 

See you soon!

~Jen at Hilo Ben Franklin

Beaded Bow Necklace


Aloha Crafters ~

Today's Idea & Inspiration is a Beaded Bow Necklace.

Supplies:
  • Beads
  • Wire - 24 gauge
  • Chain
  • Clasp
  • Jump Rings
  • Thread – similar to bead color
  • Jewelry pliers
  • Scissors
  • Sewing Needle
Instructions:
  1. Cut 9” wire, make tiny loop at end with pliers
  2. String 3” of wire with beads
  3. String end of wire through tiny loop at other end of wire
  4. String another 3” of beads
  5. String end of wire through tiny loop again
  6. Wrap wire around center 2-3 times then trim
  7. Cut thread about 12”, tie knot at end that will not slip through beads
  8. String 1 bead, go back through the same way (making it a stop bead)
  9. String 4” of beads onto thread, tie off
  10. Thread excess thread back up through beads
  11. Tie strand of beads around center of wire bow (you may wish to glue or sew in place)
  12. Attach jump rings to bow than chain
  13. Attach jump rings to other end of chain, attach clasp
Happy Crafting!

Friday, January 4, 2013

Crankin' Out Crafts Episode 198 - Whatever Clock


Create a unique gift for that friend who is always LATE!  This is a fun quirky clock using canvas board, clock movements and vinyl.

Finish your projects with vinyl letters, numbers, & shapes.

Learn how to make this project from our video on YouTube: Crankin' Out Crafts: Episode 198 - Whatever Clock

Supplies:
Vinyl numbers & letters
12x12 frame (we used a format frame)
12x12 canvas panel
paint & paintbrush (we used soy paint)
scrapbook paper
decoupage glue
burnishing tool (like a gift card)
scissors
clock movement kit & battery
Cropadile tool
*Optional: Ink, stamp pad for distressing

We hope you enjoyed our episodes this week and that they have inspired you to use vinyl on your projects. Have a great weekend!


Wednesday, January 2, 2013

Crankin' Out Crafts Episode 197 - Vinyl Tips


Learn some tips and tricks for transferring vinyl onto a surface.

JFlo teaches you the basics on how to apply vinyl to your projects.

Watch the informative segment here: Crankin' Out Crafts: Episode 197 - Vinyl Tips

General Supplies for applying vinyl to projects:
Vinyl stickers of your choice
burnishing tool (like a gift card, stamp pad, or something with an edge)
project that you will be adding vinyl to

Add vinyl to a frame, canvas, wall, or wood surface! 

Tuesday, January 1, 2013

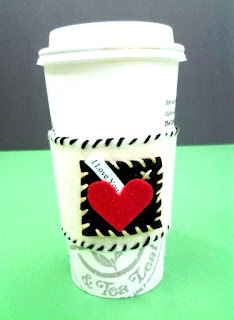
Wear Your Heart on Your Sleeve

Heart Felt Coffee Sleeve/Koozie


Wear Your Heart on Your Sleeve

Materials:
-Sleeve template (I used a cardboard sleeve from a local coffee house)
-Felt and/or Felties
-Sharp scissors
-Embroidery floss and large needle
-Hot glue or Fabri-Tac

How To:
-Using sharp scissors and your template cut felt (you can trace it with pencil)
-Thread floss onto needle (I doubled it, but you don’t need to).  Whip stitch around the edges of the felt.  Start and finish on the ends..glue the ends overlapped when you are finished stitching and add buttons or other embellishments.
-Cut out a square from brown felt and whip stitch the same way and glue to outside center of felt sleeve.
-Cut out a heart from the Felties, or use pre-cut ones.  Glue around the point and edges of the heart and stick onto the brown square.  This will leave the top of your heart open to put your little love note in!!
-Type or stamp words on paper, cut in a strip and stick it in your heart.
-Grab a latte and present to the one you love.

* OR…Make the square on the sleeve into a gift card pocket!!