Wednesday, February 27, 2013

Crankin' Out Crafts Episode 220 - Memo Panel


Did you get the memo? JFlo is here to get you up to speed with a cute memo panel idea.

Always forgetting something? Write reminders on a memo panel to help you!


Supplies:
Wooden panel piece
Scrapbooking paper
Acetate
¼” hole punch
Ribbon
Pencil
mod podge
scissors

These small panels are great to hang on a door knob or in a small space and can still be made to look cute and coordinate with your style.


Tuesday, February 26, 2013

More Quick and Easy Wedding Glam...say BLING!!!


BLING ON THE WEDDING IDEAS!!!!

We just can't get enough of this amazing bling ribbon!  It is so fabulous, versatile and easy to use.  Vases, candles, picture frames, gift tins and earrings...we have got you covered from center pieces to gifts for the bridal party!  Don't forget to scroll down and check out Sunday's blog from Kahului for more great quick and easy wedding glam ideas!

Monday, February 25, 2013

Typography Necklace

Do you swoon over a new font you found on the Internet? Do you stop and stare at a well printed sign? Do you love typography and all things wordy? Do you love type so much that you never, ever want to be parted from it? So much so that you want to wear wonderfully font-tastic jewelry every where you go?

If you answered yes to any of these questions, I made this necklace just for you! It's the perfect accompaniment to any word nerd's attire, and as you can see, it's a testament to your gumption, courage, and general moxie-tude.


If you want to create your own typographic statement jewelry, all you need is some shrink plastic (yes, I am talking about those good old shrinky-dinks that you used to play with when you were seven and had to bug your parents to stick in the oven for you), a 1/4" hole punch, some chain, jump rings, a clasp, and a sparkly crystal on a head pin for the extra accent.

Then, you can download your new favorite font, print up a wonderful word (like moxie) and simply trace your word onto your piece of shrink plastic. The necklace above is made with matte shrink plastic and a slick writer pen from American Crafts. Don't forget to cut out your word and punch your holes before you start to shrink. String everything up on a chain and show off your new word nerd style. Oh the moxie-ness of it all!

Puna @ Enchanted Lake

Whoops! Almost forgot to let you know that there's a post before this one. Please scroll down and check it out.

Crankin' Out Crafts Episode 219 - Decorative Tin Memo Board


It’s a new week here on Crankin’ Out Crafts and we decided that this week we’re going to help you a little with organization by doing some memo board projects. The first one is presented by Puna.

Organize with a memo board created by you!


Supplies:
Decorative tin sheet
Doily
Spray paint
Ribbon

The tin sheet means that this eye-catching memo center is magnetic and so easy to use.

Sunday, February 24, 2013

Quick & Easy Wedding Glam

Aloha Crafters ~
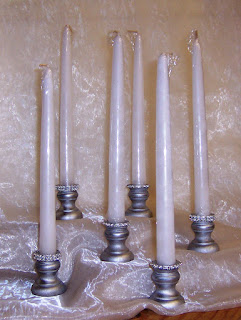
Today's Idea & Inspiration is Quick & Easy Wedding Glam using our Rhinestone Ribbon and Sterling Silver spray paint. I did both these projects in less than an hour. As an added bonus, the King & Queen candlesticks were made for less than $2.00 each.
Supplies for Dessert Tower:
  • 4 Tier Dessert Tower (30097956)
  • Sterling Silver Spray Paint (77527846)
  • Rhinestone Ribbon (30137944)
  • Adhesive of choice (I used doublestick tape)
Supplies for Pillar Candle & Stand:
  • Round Box Dish (30107253)
  • White 3x6 Pillar Candle (30060780)
  • Silver Sparkle Lace (30132554)
  • Sterling Silver Spray Paint (77527846)
  • Rhinestone Ribbon (30137944)
  • Adhesive of choice (I used doublestick tape)
Supplies for King & Queen Candlesticks
  • Wood Turned Candlestick (77937938)
  • Sterling Silver Spray Paint (77527846)
  • Rhinestone Ribbon (30137944)
  • Adhesive of choice (I used doublestick tape)
Happy Crafting!

Friday, February 22, 2013

Come and Join on Saturday for Fun

Join us for Make-It Take-It's here at Mapunapuna on Saturday February 23 from 10 AM -2 PM for fun and crafting as we Celebrate Girls Day !!


Here are the activities...

Fun Size Candy Kokeshi Doll
Fee $2.00 from 10AM-11AM

Kokeshi Doll Lolipop Cover or Tag
Fee $2.00 from 11AM-12NOON

Origami Crane Folding
FREE from 12NOON-1PM

Kimono Girl Pin/Magnet
Fee $2.00 from 1PM-2PM

DEMO's
Microwave Mochi Maker - Lets make mochi
10AM-10:30AM

Please continue reading about Crankin' out Crafts....

Crankin' Out Crafts Episode 218 - Ornate Frame


This last frame looks amazing painted in bold colors for a trendy look. JFlo talks about our newest addition to our ready-to-decorate frames.

Add some style and color to any room with this frame!


Supplies:
Ornate wooden frame base
Spray paint
Stamp ink

Did you know that picture framing is so old, a framed picture was even found in an Egyptian tomb dating back to the 2nd century AD?

Thursday, February 21, 2013

Gift Card Holder


Gift cards are great for Birthdays, Anniversaries, Graduation or any special ocassion! You don't have to keep searching for the "right gift", she would love a gift card....get one from her favorite store (Ben Franklin!) & she can get the item she's been wishing for! Create a unique & beautiful gift card holder that says she's special! The one pictured above is super-easy to make, cut,score & fold a 4-1/4" X 11" printed cardstock, double-stick tape, a bit of embellishment & you're good to go!
Don't forget to join us on Saturday, February 23rd from 10am-2pm for a Girl's Day Celebration (there's a celebration at every craft store)! There will be make-n-takes, demonstrations & even delicious Mochi!
There's always something crafty going on at Pearl City!
gloria @ Pearl City

Wednesday, February 20, 2013

Crankin' Out Crafts Episode 217 - Monogram Frame


Want another great frame idea? Puna has a Monogram frame ready to show you.

Add paint, ink, and Master Shine Top Coat to finish!


Supplies:
Wooden frame base
Spray paint in two coordinating colors
Large 9.5” wooden letter
Master Shine top coat
Stazon stamp ink
E6000 adhesive

You could use the first initial of someone’s name or a family name to decorate this frame depending on your choice of picture.

Tuesday, February 19, 2013

RTD Recycled Notebook!

We have an awesome variety of kraft colored, ready to decorate notebooks that are so cool and very inexpensive.  
This is a great gift/favor idea for so many occasions.....  turn it into a best wishes/address book for your Grad or classmates, a fun diary or journal for all ages, a gift log for a baby/wedding shower, or a mini scrapbook you can take and share with your friends anywhere!  
The ideas are endless!  I had fun making this example with some of our beautiful card stock, galaxy marker, bakers twine, stamps and stamp pads...I even added a little pocket with double stick tape! 
 So easy and fun, and super affordable...I can't wait to make a bunch and share them with my friends!!!

Monday, February 18, 2013

Crankin' Out Crafts Episode 216 - Decoupage Frame


Get framed this week with some new Crankin’ Out Crafts episodes. Our week starts with JFlo and an easy decoupage project.

Save your paper scraps to decorate a wooden frame!


Supplies:
Square wooden frame
Scrapbooking paper
Decoupage
Stamp pad
Sandpaper or Xacto knife
Paint brush or sponge brush
Wooden accent shape, optional

Frames can make great gifts for every occasion and with simple tricks like today’s project you can make a frame to coordinate with any décor.


Sunday, February 17, 2013

Found Object Bird House


Aloha Crafters ~

Today's Idea & Inspiration is a "Found Object" Bird house.  Granted... there is a lot to be "found" in a craft store, (we do have our share of odd & ends) so I settled on a theme to keep it from becoming overwhelming.

The base for this bird house is a frame that had lost one of its legs; the post - a broken dowel; the bird house itself had been damaged and I hot glued it back together.

I spray painted the whole piece with left over sterling silver paint.

Treble & bass clefs were formed using a thick silver wire and then pounded flat.

Vintaj heart plates were embossed with Vintaj gear works and then spray painted sterling, as were the Vintaj birds, heart lock & key.  

Elements were attached with T pins, nails and a glue gun.

The clock works was also broken, so I broke it further and pieced it back together onto the bird house, painting & hot gluing each piece.
The eclips machine was used to cut our new Sticky Back Chalkboard vinyl into letters. I then gave the letters an "antique" look highlighting them with a silver Sharpie.
                   
Scraps of cardstock & vellum were embossed with embossing powder and a heat tool.


Happy Crafting!

Saturday, February 16, 2013

We're Being Attacked By Little Green Monsters!


Help! Hilo Ben Franklin has been attacked by Little Green Monsters demanding...Feed Me!?! Uh...what? Wait, I know we have good food here in Hawaii, but Feed Me!?

Oh wait. We're not being attacked are we? That's just Gerrie's Craft Pick of the Month for March! Oops. Hehe.

Anyway, if you'd like to make a Little Green Monster of your very own, here's what you'll need:

Unfinished wood box (the sku for one Gerrie used is 30137830)
Acrylic Paint in the following colors:

  • Spring Green (for the body)
  • Black (for the inside)
  • Red (for the tongue)
  • Orange (for the nose)
White fun foam (for the teeth)
Google Eyes
PomPom
Wood toothpick (for the sign)
Wood circle (for the sign)
Hot Glue

And in three easy steps you can have your own monster:

  1. Paint the box
  2. Cut the teeth
  3. Glue it all together!
If you have any questions or need more detailed instructions, come visit Gerrie in March when she demos how to make this Little Green Monster. Check the craft calendar for dates and times. 

See you soon!

~Jen at Hilo Ben Franklin

Friday, February 15, 2013

Crankin' Out Crafts Episode 215 - Letters Frame


Personalize your frame with your painted initial. Use our new ready-to-decorate chipboard letters!

Personalize a frame with an initial!


Supplies for Frame:
MDF Ready-To-Decorate Frame
Chipboard letters
scrapbook paper
double-sided tape
scissors
ink pad (for distressing edges)
paint & paintbrush
decoupage glue (gloss finish)
burlap sheet
gluegun & gluesticks

Supplies for Pennant:
scrapbook paper
baker's twin or yarn
hole punch

These frames are so easy to make! Decorate some to give out as gifts to family and friends.

Thursday, February 14, 2013

Happy Valentine's Day!


Celebrate Valentine's Day with a pair of Heart Banner Earrings!  Here's what you'll need:

1 1/2 inch eye pins x 24
1/2 inch head pins x 8
4mm crystal bicone in red x 2
3mm crystal bicone in red x 8
2.3 mm small silver plated chain
ear wires
11/0 seed beads in red and white
round nose pliers
chain nose pliers
wire cutter
bead mat
ruler

Take 9 eye pins and trim them down to 1 1/16 inch from the eye.

We can now start to string on the seed beads onto the shortened eye pins.  After the seed beads are on, loop the end of the pin to create an eye that is similar in size to the other end.  Eyes need to face the same way.  You will need to lay each eye pin onto your bead mat in sequence of completion from left to right.  The eye loop that you make should always be on the top.

1. String on 13 white seed beads, loop the end and place onto your mat.

2. String on 6 white seed beads, then 3 red seed beads, and then 4 white seed beads.  Loop the end and place onto your mat.

3. String on 5 white seed beads, then 5 red seed beads, and then 3 white seed beads.  Loop the end and place onto your mat.

4.  String on 4 white seed beads, then 5 red seed beads, and then 4 white seed beads.  Loop the end and place onto your mat.

5.  String on 2 white seed beads, then 6 red seed beads, and then 5 white seed beads.  Loop the end and place onto your mat.

6.  String on 4 white seed beads, then 5 red seed beads, and then 4 white seed beads.  Loop the end and place onto your mat.

7.  String on 5 white seed beads, then 5 red seed beads, and then 3 white seed beads.  Loop the end and place onto your mat.

8.  String on 6 white seed beads, then 3 red seed beads, and then 4 white seed beads.  Loop the end and place onto your mat.

9.  String on 13 white seed beads and then loop the end and place onto your mat.


Take a 2 inch eye pin and string on a white seed bead.  Now string on each beaded eye pin starting from the left and moving to the right, stringing on a white seed bead between each one.  After the last eye pin is strung on, string on a white seed bead.  Trim the end down so that you can loop the end to create and eye then same size as the one on the other end.  Repeat this process for the bottom eyes.

Take 4 head pins.  On each one, string on a white seed beads, a 3mm red bicone, and another white seed bead.  Loop the end into an eye and trim down.  Attach a beaded head pin to each corner of the scroll.

Take an eye pin and string on a white seed bead, a 4mm bicone and another white seed bead.  Loop the end into an eye and trim down. 

Cut the chain to get 2 sections that are 3/4 of an inch.  Attach one section to the top left eye of your scroll and the other section to the top right eye of your scroll.  Join the two ends of chain to the beaded eye pin and then attach an ear wire.

Repeat all for the other side of the earring.

I'm thinking that this technique could also work for a pattern of different designs but the hard part will be to figure out the seed bead placement.  Please scroll down to read about the tree of life projects at our Pearl City BFC and have a wonderful Valentine's Day!

Lynn H. @ Mapunapuna Bead Shop BFC

Trees of Life


Trees of Life

A team of beautiful ladies from PACT came in and created one of a kind Trees of Life. They chose their leaves & flower colors, learned the techinque of twisting wires for branches and tree trunk and created thier own unique tree. Aren't they beautiful? There's always something crafty going on at Pearl City! We have lots of classes, workshops & demonstations...come join us! This week-end, Gayle will be teaching a Beginner's Beaded Charms class...if you haven't beaded a charm before, you start with the mandatory basic Tamari Ball & go from there. Learn the Tamari Ball this week-end & you can join Gayle next week-end for another cute beaded charm. Next Saturday, February 23rd, Gayle will be teaching & demonstrating Hello Kitty beading for our Hello Kitty Girls' Day Celebration! Set the date on your calendar & join us!
gloria @ Pearl City

Wednesday, February 13, 2013

Crankin' Out Crafts Episode 214 - Letters Centerpiece


Create your own Centerpiece for any occasion with Paper Mache letters. 

Decorate our large paper mache letters for a unique centerpiece!

Watch today's episode on our YouTube channel: Crankin' Out Crafts: Episode 214 - Letters Centerpiece

Supplies for Letters:
Paper Maché letters (*We used 8" & 12" size letters)
Small Pictures (*printed on copy paper)
Decoupage glue (*We used the Americana brand, gloss finish)
paint & paintbrush
ribbon
wood plaque
burlap sheet
gluegun & gluesticks

Supplies for Pennant:
scrapbook paper
yarn (*we used fun fur yarn) or bakers twine
scissors
hole punch
scotch tape

This centerpiece would also be perfect to decorate a kid's room!


Tuesday, February 12, 2013

Peacock Feather Clothespins Note/Picture Holder

It love the giant clothespins we have in the stores...so I decided to throw on some paint and feathers and make these beautiful note/card/picture holders/ center pieces.  This idea makes for great table markers at a wedding, a fun note/photo display in your home or office.....or you could stick a magnet on the back and use it to show off your A+ paper on the fridge.

Materials:
-Big Clothespin (we have a few big sizes)
-Crafters Acrylic Turquoise paint and foam brush
-Peacock feathers
-Fabri-Tac or hot glue (for feathers)
-Tacky Glue and finer brush (for the glitter)
-glitter
-Flat back adhesive embellishments

Paint the clothes pin.  
Glue on your feathers..you can shape or trim them if you like.
Paint on tacky glue where you want to sprinkle the glitter.
Embellish away!!


Monday, February 11, 2013

Make Your Own Mercury Glass

If you're like me and looking for a romantic, shabby chic feel for your decor, you need to know how to make your own mercury glass! You can find really nice mercury glass pieces in a store but they're going to cost a lot. Thank goodness I found a helpful site on Pinterest that had a great tutorial on how to make your own mercury glass look. I had to try it out myself, and now I'm passing my version on to you.

First, get your supplies together. You need some glass pieces like the ones in the picture below, a spray bottle, white vinegar, water, and Krylon Looking Glass Mirror-Like Paint. The Looking Glass paint is a spray paint, so don't forget to do this project in a well ventilated area.


Next, fill your spray bottle half way with vinegar and the rest with water. Lightly spritz your glass pieces until they have little beads of water on them.

Then, before the water dries, very lightly spray the Looking Glass spray paint onto the glass. Make sure that the nozzle is at least 6 inches away from what you're spraying, otherwise the paint will run because it's very watery. Gently dab your glass with some paper towel or kleenex (preferably something without much lint) to take off some of the paint. You can repeat the last couple of steps a few times for a more mercury glass like effect, but I only spritzed and sprayed twice in all.


Here's how my mercury glass looks. Aren't they beautiful? I have to admit though, after my paint and my water/vinegar mixture dried completely, I went back over all of the glasses with another super light (I held the nozzle about a foot away from the glass pieces) coat of paint because I wanted just a little more shine. All in all I made 8 small glass pieces and I don't think I went through half of my spray paint.

These three pieces are going into a vintage birdcage in our store so you can always drop in to see them. I hope you enjoyed the post, have fun with your mercury glass making!

Puna @ Enchanted Lake

Sunday, February 10, 2013

Valentine Tabletop Tree with Woven Heart Topper

Aloha Crafters ~

Today's Idea & Inspiration is a Tabletop Tree for Valentine's Day. This tree is made with conversation hearts, but other candies could be used, this is only limited by your imagination.

Supplies:
  • Styrofoam Cone (77603431)
  • Glass Candlestick (30129586)
  • Hot Pink 1 1/2" Organza with Satin Ribbon (30115458)
  • Fray Check (77651521)
  • Adhesive of choice
  • Scissors
  • Paint of choice (silver spray paint was used in example)
  • Varnish if desired
  • Candy
Instructions:
  1. Paint Styrofoam Cone, let dry
  2. Adhere painted Cone to Candlestick (glue gun was used in example)
  3. Adhere Candy to Cone
  4. Varnish  
  5. Cut 1 ~ 4"  & 1 ~ 3" strip of Ribbon
  6. Cut satin sides from Ribbon, use Fray Check on salvage edges
  7. Form a V with the 4" strips of Ribbon, adhere at tip
  8. Form another V with the 3" strips of Ribbon, adhere at tip
  9. Adhere 3" V to 4" V at tip
  10. Weave & adhere (see picture) 
  11. Adhere Woven Ribbon Heart to 1 piece of candy
  12. Adhere to top of tree
  13. Tie bow around Candlestick
Happy Crafting!

Friday, February 8, 2013

Crankin' Out Crafts Episode 213 - Washi Tape Pennant Cake Topper


Washi tape comes in many different styles and you can create your own cake topper with this easy idea. All you need is washi tape, bakers twine and dowels.

Here's a fun way to decorate a cake!


Supplies:
washi tape
dowels
baker's twine
scissors

This project would be great for a birthday cake or even one for Valentine's Day! There are so many things you can create with washi tape. What have you made with washi tape lately? 

Wednesday, February 6, 2013

Sweet Treats

Hello Kitty Sweet Treats

It's easy to make theme party favors with these round acrylic treat boxes! If you have little artistic talent (like me!), use a picture from a coloring book as your template. Just place the cover over the image & glue on flat back gems. If you don't want the bling, you can trace the image with deco color markers & add embellishments as desired.
Don't forget to stop in at the Pearl City store for our *Hearts & Flowers make-n-takes from 11am-1pm on Saturday, February 9th. You can create an EZ Beaded Heart, a Valentine Candy Kisses Holder or a Candy Kiss Rose Bud for your special Valentine.
There's always something crafting going on at Pearl City!
gloria @ Pearl City

*make-n-takes fees vary

Crankin' Out Crafts Episode 212 - Washi Tape Cupcake Topper 


Watch Lisa as she creates quick and easy cupcake toppers with washi tape.

Washi Tape Cupcake Toppers


Supplies:
craft picks or toothpicks
washi tape
scissors

These cupcake toppers would be great for any holiday or occasion, just change-up the washi tape design/color to match! 


Tuesday, February 5, 2013

Brought to you by the letter.........


Hurray for paper mache and wood letters!!!!  Who knew they would be this much fun! SERIOUSLY!!! 

You can decorate with acrylic paint, Mod Podge, photos, card stock, shells and sand, flowers, super moss, Tim Holtz Distress Inks, ribbon, twine, yarn, glitter/glitter tape, washi tape, decorative duct tape, die cuts, flat back embellishments...or any embellishment for that matter...The possibilities are endless...and we are just getting started.

You can decorate one letter or spell something out... they are great wall decorations or center pieces for any occasion.  Collage it with pictures and memories for for your graduate or new baby.  They come in a variety of sizes and styles....wood or paper mache.  

...paper mache letters are on sale until Feb 9th..so get to your nearest Ben Franklin and pick some up today! 

Make sure you scroll down and check out our Crankin Out Crafts Episode for more amazing letter ideas!

Monday, February 4, 2013

Crankin' Out Crafts Episode 211 - Washi Tape Clothespin


Change your ordinary clothespin to extraordinary in seconds with Washi Tape!

Add to your message center, attach photos, or clip tags with clothespins!

Watch how to make this very easy project here: Crankin' Out Crafts: Episode 211- Washi Tape Clothespin

Supplies:
clothespins
washi tape
scissors
*Optional: paint (if painting clothespins)

We carry a wide variety of washi tape designs to match your project or any occasion. Stop by our stores today to check out our selection!

Sunday, February 3, 2013

Steampunk"ish" Valentine XO Sculpture

Aloha Crafters ~
 
Today's Idea & Inspiration is a Valentine sculpture made with medium size paper mache letters. Using Bo Bunny Valentine 12X12 paper it was simple and fun to make this X & O piece for our Valentine decor.
 
Supplies:
  • 12" Paper Mache Letter X (30136823)
  • 12" Paper Mache Letter O (30136814)
  • YOU ARE LOVED Rubber Stamp (30138612)
  • I Heart YOU Rubber Stamp (30138612)
  • BE Heart MINE Rubber Stamp (30138612)
  • Lg Red Rose Polystones (30137005)
  • Sm White Rose Polystones (30137005)
  • White Leaf Polystones (30137005)
  • Assorted BO BUNNY Valentine 12X12 papers
  • STERLING SILVER Champion Spray Paint (77527846)
  • Adhesive of choice (I used double stick tape & a glue gun)
  • Scissors
  • Pencil
  • Base of choice 
Instructions:
  1. Using STERLING SILVER Spray Paint, paint letters & base, allow to dry thoroughly
  2. Using Letters as a pattern, trace onto background paper of choice, cut out & adhere to letters
  3. Cut out embellishments & decorate as you wish, adhere to letters
  4. Have FUN!

  5. Using glue gun, adhere letters to each other and base

Happy Crafting!

Friday, February 1, 2013

Crankin' Out Crafts Episode 210 - Cupid’s Arrow


Jflo wants to spread the love this Valentine’s Day with these cute arrow favors.

DIY Cupid Arrows are a fun way to wish someone a "Happy Valentine's Day!"


Supplies:
Paper straw or wooden dowel
Felt
Feathers
Hot glue gun and glue sticks
Scissors

Attach notes to these lovely little arrows and hand them out on Valentines’ Day instead of a card. You’re sure to get a few hits.