Wednesday, October 28, 2015

Witch Hat Centerpiece

Happy Halloween, everyone!
 
Well, Happy "Week of" Halloween. ;)  It's right around the corner and we all know Halloween parties are tons of spooky fun!  So, I have a cute little centerpiece that's very simple to make, fast and very affordable.  If you suddenly decided to host a Halloween party, this is a great project for you!
 
~~~~~~~~~~~~~~~~~~~~~~~~~~~~~~~~~~~~~~~~~~~~~~~~~
Supplies Needed
Paper Mache Cone
Black Spray Paint
Black Felt
Purple Felt
Decorative Halloween Pick (glitter ball one)
Hot Glue Gun
Fabric Scissors
Elastic Cord
Needle


 ~~~~~~~~~~~~~~~~~~~~~~~~~~~~~~~~~~~~~~~~~~~~~~~
  
Let's get started!

First, spray paint the paper mache cone black.  (I did it before I took the picture.) 
After that, cut a circle out of the felt.  Try to use the whole width of the felt sheet. 


Then, sew a small circle about 3 inches in diameter at the very center of the circle and pull on it to sort of "scrunch" it.  This becomes the wavy brim of the witch's hat.  It doesn't need to be wavy if you don't want it to.   I would actually suggest using the black 2mm foam sheet as the brim if you are planning on making the brim straight.


Next, cut a strip of purple felt about 2.5" x 12". Hot glue it to the bottom of the cone. 
I left a 1/4 in. space from the bottom of the cone.  Hot glue the brim to the cone base.

 
Lastly, cut a branch off the glittered ball pick and wrap it around the base of the cone to cover up the empty space and add a little something extra.  And there you have it!

This is a very simple centerpiece which could easily be turned into a place marker by writing the name of your guest on the cone with some acrylic paint pens such as the Deco Paint or Montana markers.  Some extra glitter and color wouldn't hurt as well.  Hey, the hat doesn't have to be black.  Why not invert the colors, or maybe even make it orange or chartreuse to keep with the Halloween color scheme? 

Have fun and we hope you have a fun and safe Halloween!
Erika @ PC 

Crankin’ Out Crafts, Episode 440 – Beaded Spider


Check out this spooky spider Lynn creates using beautiful beads. You can put a pin on the back of this to wear or decorate your home or desk with this creepy critter.  Download the pdf of the project sheet here: http://bit.ly/1MSiwzF

Supplies needed:
20 gauge wire 30085106
24 gauge wire 30085108
Jesse James Beads (Design Elements for small spiders, Strands or Inspirations for medium-large spiders)
4mm beads
6mm beads
bead caps
6mm bugle beads, color of choice
11/0 seed beads, color of choice
round nose pliers
chain nose pliers
wire cutter

Watch this Crankin’ Out Crafts episode here: https://youtu.be/ixEKm6S5Ono

Tuesday, October 27, 2015

Crankin' Out Crafts - Wreaths Series

Episode 436– Grapevine Wreath

Learn how to make a variety of decorative wreaths for your home or office! JFlo takes you step by step. Click on any of the links above to watch an episode.


Supplies needed:
Grapevine or straw wreath 
Floral wire
Wire cutters
Ribbon
Picks and sprays of your choice
Scissors
Greening pins (for straw wreaths)
Chalk, bistro markers or acrylic pens (when using wreath with chalkboard ribbon)

Tuesday, October 20, 2015

Rustic Wedding Centerpiece

Hello, Crafters! 
Anyone going down to check out the Hawaii World Class Wedding Expo this coming 
Friday and Saturday at the Convention Center for some great ideas for your special day?
Well because of this big event coming up, this week we're going to be making some
 cute centerpieces for a rustic or country garden themed wedding.

~~~~~~~~~~~~~~~~~~~~~~~~~~~~~~~~~~~~~~~~~~~~~~~~~~~~~~~

Supplies Needed 
Two 4 inch wood slices
One 3 inch wood slice
 Hot Glue Gun
Twine
1 1/2 inch Burlap Ribbon 
Scissors
Spanish Moss
One Pint Mason Jar
Small chalkboard hanging (pictured later)
Extra Fine Deco paint pen (pictured later)
----------------------------------------------
 Tea Light Votive (I used the metallic silver David Tutera one.)
Tea Light (Flameless or not. Your choice.)
Flowers 
 
 
Excuse the upside down picture.. My computer was being finicky.
 
~~~~~~~~~~~~~~~~~~~~~~~~~~~~~~~~~~~~~~~~~~~~~~ 

 Let's get started!
 
 First, I hot glued the smaller wood slice to the larger one and then hot glued the 
other large slice on top where they met.  I dotted some hot glue at the places where the slices overlapped and stuck on some of the Spanish moss.

 Next, after removing the lid from the mason jar, I cut about a 10 inch strip of burlap ribbon and hot glued it around the "waist" of the jar.

Then, I wrapped about 20 inches of twine around the ribbon and made a bow.

Next, hot glue the mason jar to the top wood slice.  This is when I also hot glued the 
votive to the larger of the slices on the bottom and stuck in the tea light.

 Here is the littlest chalkboard we got in this year.  Isn't it adorable?  Because I wanted the table number to be permanent, I decided to use a paint pen instead of chalk.  You could also use a Bistro chalk marker because those aren't erasable on this surface as well despite it being a chalkboard.
(The only chalk that is removable would be the actual compressed "school" chalk.)

 I hot glued the chalkboard to the base on the small wood slice.  Here is where you could add more Spanish moss on the bottom side of this as well.

Now all there is left to do is add your flower arrangement!  The pink roses with the glittery dew came in our Christmas shipment this year and the small white flowers are something we carry year round in our wedding section.  Aren't they beautiful?  Of course, you could always fluff it up a bit! Maybe with some thin branch tips in the bouquet? A little glitz with some glitter, rhinestones or sequins? Maybe some coarse gold or silver mixed in with some water in the jar?  
The possibilities are endless!

I hope this helps inspire all the husbands and wives to be and shows that a DIY wedding is 
definitely worth the work!  You get to be original and unique by having total 
control over your decorations and favors.  
 Be sure to check us out at the Wedding Expo this Friday and Saturday for 
more ideas and inspiration!  

See you there!
 Erika @ PC


Snowstorm Ornament


Hello Crafters!

Here's a different idea for decorating those lovely clear ornaments. Instead of glitter use snow!
 
~~~~~~~~~~~~~~~~~~~~~~~~~~~~~~~~~~~~~~~~~~~~~~~~~~~~~~~~~~~~~
 
 
Supplies:
- Unbreakable Ornament (any size)
-Glitter It! Glue
- Twinkle Flakes Fake Snow
- Funnel
- Iridescent White Scribbles
- Silver Glitter Glue
- White or Silver Ribbon


 First, take the top off the ornament and fill with a bit of Glitter It! glue. Swirl to coat the inside of the ornament completely. Pour out the excess glue.
 
Next, place the funnel in the opening of the ornament and fill with twinkle flakes. The flakes may need some help getting through the neck of the funnel, I used a pair of scissors to push them through.


Swirl the flakes around to coat the inside of the ornament. Dump out the excess flakes that do not stick to the ornament. It should look something like this:


Then using the white Scribblers, draw a swirl around the entire ornament. I started at the top and spun the ornament around as I applied the paint, rather than trying to move the bottle around the ornament.


After the white layer is dry, add a silver layer right next to the white one. Let it dry.


Lastly, put the cap on the ornament and add a bow!
 
 
So much sparkle!


Have fun and get crafty!
 
Alix
Market City BF

Saturday, October 17, 2015

Monster Corner Bookmarks


Hello Crafters!
Halloween is right around the corner! Are you ready? If not, it's okay! Here's a quick, kid friendly idea for some last minute crafting.
 
~~~~~~~~~~~~~~~~~~~~~~~~~~~~~~~~~~~~~~~~~~~~~~~~~~~~~~~~~~~~~~
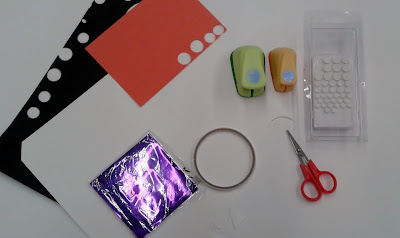
Supplies:
- Scissors
- Double Stick Tape
- Pop Dots
- Scrap Paper (Various Colors)
- Origami Paper (Various Colors)
- Circle Punches (Various Sizes


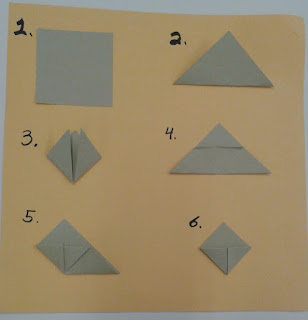
Take a piece of your selected origami paper and fold it into the corner bookmark. Here is a step by step diagram.


To complete the bookmark, I've tucked the top triangle into the opening. This step can be skipped if you'd like to decorate that flap instead.


All tucked and creased!


Next we're going to make the embellishments for the monsters. Here is where you can be extra creative! The size and quantity of monster face features is all up to you!
 
 
For Eyes:

Using different sized punches, punch out circles in different colors of scrap paper. Layer for an extra spooky effect!


Using pop dots will make eyes "pop" out of your bookmark! Try putting the pop dot on different layers of the eyes.
 
 
Use double sided tape to stick the eyes on the bookmark


For Teeth:
 
A tip for making triangle shapes: cut a corner off an already square piece of scrap paper.

 
Double stick tape the rest of the facial features to the bookmark.

 
The final product!


Try using different sizes and prints of origami paper for the base bookmark.


Have fun and get crafty!
 
 
Alix
Market City BF

Wednesday, October 14, 2015

Custom Planner Insert

Hello, Crafters!
As you all know, the planner craze is ragingly popular right now and it finally reached the islands with Mambi's Happy Planner! I love how easy they are to customize.  
All you need is washi tape, stickers, photos, scrapbook paper, and a bit of creativity and imagination.  This week, I have a project that will add a more personal and fun touch to your planner.

Let's get started!

~~~~~~~~~~~~~~~~~~~~~~~~~~~~~~~~~~~~~~~~~~~~~~~~~~~~~~~~~~~~~~~~~

 Here's what you'll need:


We R Memory Fuse Tool Kit
Scissors
Paper Cutter
12x12 Scrapbook Sleeve
Photos and/or Cardstock Scraps 
Sequins (optional)
Standard Hole Punch
Sharpie (Not Pictured)


First, lay out your cardstock pieces and photos and figure out how you want them to look once fused together.  The striped paper on the side is where I plan on punching the holes for the planner binding.


Start with the piece of cardstock that would take up the bottom corner of the photo sleeve. 
For my layout, I started with the white and gold striped paper on the far left.  Make sure that the paper is flush against the side of the sleeve so that it stays straight in the planner.  Fuse the top of the piece, then the side using the Fuse ruler.


 I then slipped the bottom photo in and fused it down before fusing its side.  The "lovely day" piece needed sequins so I fused the side first, slipped the sequins in, then fused the top.  I fused the top photo and cardstock piece after that and cut the excess plastic off the sides with the sliding cutter.
I then used one of the pages of my planner to mark where I want to punch the holes with a Sharpie, making sure they were about 1/4th of an inch from the side. 

Then, I cut tiny slits on the side so that the insert would "snap" right onto the Happy Planner's bindings.


And there you have it!  This is great for adding memories of special holidays and events to your binder, or if you just happen to catch the scrapbooking bug.  Highly customizable, cute and simple, it's a great way to add that personal touch to your planner.  

Have fun!
Erika @ PC