Friday, August 30, 2013

Crankin' Out Crafts Episode 286 - Hanging Bat Favor (Halloween Treats)


We have one more cute Halloween treat idea for you today and hopefully you won't think it's too "batty!"

Hanging Bat Favor using paper maché cones

View our last Halloween treat episode on our YouTube channel: Crankin' Out Crafts Episode 286 - Hanging Bat Favor

Supplies:
Paper mache cone
Black acrylic paint
Red stickles
Bump chenille stems
Small treat bag
Ribbon
Wire cutters
Scissors
Hole punch or awl

Isn't it great that these small cones come in a pack of 6? It makes it even easier to do this favor for a bunch of people that might be hanging about.

Thursday, August 29, 2013

Haunted House Decoration

Here’s a great way to turn a wood birdhouse into a great haunted house centerpiece. These can hangers-on to great table decorations. 


Supplies:

Acrylic paint

Decoart Decoupage Gloss

Wood Birdhouse

Scrap paper – The Authentique Thriller paper is great to use

Double-sided tape

Pop Dots

Halloween ornaments/accessories

Shape punches

Tim Holtz's Distress Stain


Paint the birdhouse black. Let it dry. While it is drying, I looked through the Authentique Thriller paper to decoupage the house or using the scrap paper picked out to decorated the birdhouse. To give the paper a distressed appearance I ripped the paper and used the Tim Holtz’s stain. To finish it off I added a spider web and used grey acrylic paint on the roof. 

Happy Crafting! Beth @ Mapunapuna BFC


Wednesday, August 28, 2013

Crankin' Out Crafts Episode 285 - Witch Legs Favor (Halloween Treats)


JFlo has a favor idea today that's definitely going to have you "legging" it to buy supplies.

Witch Legs Favor made with candy stick bags


Supplies:
2 candy stick bags
Sixlets
Black cardstock
Printed cardstock
Ribbon
Button
Double-sided tape
Scissors

Monday, August 26, 2013

Crankin' Out Crafts Episode 284 - Spider Eggs Favor (Halloween Treats)


Who's ready for some special Halloween treats? Puna kicks this week off with a tasty favor that has a gross name.

Halloween Candy Favors

Watch our first Halloween Treats episode here: Crankin' Out Crafts: Episode 284 - Spider Eggs Favor

Supplies:
3"x4.75" clear treat bag
Cardstock
Die cut shape or punch
Sixlets
Ribbon
Stickles for accents
Double-stick tape

You can extend this idea to make other spookily cute treats. Try using orange Sixlets for "Witchy Warts" or white Sixlets for "Boo Poo".

*Don't forget to scroll down to read today's earlier post from Enchanted Lake BFC!

Uncontainable Fun

Because Ben Franklin just got in a ton of fantastic jars, bottles, and other containers, I thought I would share a couple of ideas on how you can use them as whimsical decor pieces. They are food-safe containers, but that doesn't mean that you only need to fill them with food.


For my two lovely examples, I used pieces of washi tape to decorate the outside of the containers, cutting out basic shapes to make pennants and a fence. For the jar, I decided to insert a pretty little birdie, a branch, and some moss to create a small, dreamy, summertime scene.

There will be more container ideas coming up soon.

Thanks for reading!
Puna @ Enchanted Lake

Sunday, August 25, 2013

Bezel Resin Pendants

Aloha Crafters ~
Today's Idea & Inspiration is a trio of Bezel Resin Pendants. These pendants were made using our new Bezel Pendants and Jewelry Resin. Lani, our talented associate filled two with glitter and the third with beads. There are any number of objects that can be added to jewelry bezels to create an endless array of patterns and textures. Paper and photos can be inserted, and pigments, dyes, metallic powders, oil & acrylic paints can also be added.
Supplies:
  • Jewelry Resin (30139371)
  • Beveled Pendants (sq = 30142770) (oval = 30142774)
  • Beads of choice
  • Glitter of choice
Instructions:
  1. Measure & Mix resin accurately according to Jewelry Resin packaging.
  2. Pour a small amount of mixed resin into bezel.
  3. Place objects where desired.
  4. If bubbles appear, pop with toothpick.
  5. Fill bezel with resin slightly higher than the rim.
  6. After curing, trim and sand edges.
Happy Crafting!
Robin @ Kahului

Friday, August 23, 2013

Crankin' Out Crafts Episdoe 283 - Skele-Mesh Decoration (Halloween)


Here's another great decoration thought up by JFlo and showcasing her wily ways with Deco Mesh.


Make a Skele-Character for your Halloween Wreath!


Supplies:
4" Styrofoam ball
Black acrylic paint
21" deco mesh cut into two 5"-6" pieces
Pipe cleaner
Glue gun
Paintbrush
Scissors

Use this decoration to hang all by itself, or add it to a wreath.

Endless Summer Crafting @ Pearl City


Here's another sneak peek at one of the make-n-takes happening at Pearl City's Endless Summer Crafting event this  Saturday, August 24 from 10am-2pm.  Do you recognize Hello Kitty's friend? Perler Beads make this an easy and fun project for everyone...join Jaime and make a Hello Kitty or Minion to hang on  your bag or child's backpack!  Come see the Hello Kitty Car and join in the fun....there will be demonstrations, make-n-takes & prizes!  See you there!  There's always something crafty going on at Pearl City!
gloria @ Pearl City

Thursday, August 22, 2013

Halloween Paper Mache Cone


This is a great start to all the great Halloween decorating. This makes for a great Halloween Centerpiece or anywhere to show off in your house. There are endless way to decorate your paper mache cone. This is one of the great ways to decorate it.

Supplies:
30121473 - Paper Mache Cone
30108688 - Purple Glitter Tulle
30119093 - Black Americana acrylic paint
30140545 – Pick-glitter black bat
30140560 – Glitter black leaf
30133893 – 2pc Halloween Critter
30120797 – Stretchy spider web
Flower
Leaves
Sponge brush
Glue Gun

Cut about an inch of the tip of the cone. Paint the cone and the leaves with the black acrylic paint. Wrap the tulle around starting from the base to the top of the cone. Glue the flower and the leaves to the base of the cone. Glue your glitter black bat on the cone. I put my bat above the flower. Take the Glitter black leaf and cut portions of the branches to glue in different places of the cone. Add the Halloween critter to the top.
You’re done! 

Happy Crafting! Beth @ Mapunapuna BFC


Wednesday, August 21, 2013

Endless Summer Crafting

Pearl City's Endless Summer Crafting event is this Saturday, August 24th from 10am-2pm!  Have you penned it into your calendar?  Come see the Hello Kitty car!  There will be demonstrations, make-n-takes, prizes & fun!  Create a Honu favor with Joy from 10am-11:30am!  Here's a sneak peek at the cute treat:  
 
 
You can "bake" a Hello Kitty cookie charm with Erika!  This make-n-take uses air dry Hearty Clay and looks so Delicious!  Erika made several samples & will help you make one just like the one on the lower left (another sneak peek!):

More sneak peeks tomorrow!  There's always something crafty going on at Pearl City!  See you on Saturday!
gloria @ Pearl City


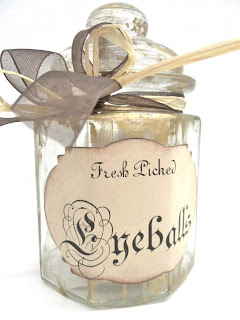
Crankin' Out Crafts Episode 282 - Jar of Eyeballs (Halloween)


Puna joins us today with a project that's a little creepier than the last and sure to make a statement.

A Jar of Eyeballs


Supplies:
Glass jar
Brass liquid gilding
Cardstock
Shape punch or scissors
Brown ink pad
Ribbon and rafia
Paintbrush
Double-stick tape
Gumballs
Edible food writer

If you're feeling really creep-tastic, use the edible markers to make bloodshot eyes to fill your jar.


Tuesday, August 20, 2013

Witches Hat


Halloween is just around the corner and if you plan on making your decorations, then you'd better start early! This Witches hat could be used as a decoration by itself on a table, mantle, lanai or in a wreath even! It is so simple to make... All you do is:

1 paper mache cone
1 sheet of chipboard or mat board (Any stiff cardboard like material)
3 different Halloween colored ribbons
Fabri-Tac
Black acrylic paint


Cut the chipboard (or stiff cardboard) in a circle about 2" wider than the base of the cone, this will be the brim of the hat. Glue the brim to the base of the hat, now we have our hat shape! Paint the whole thing with black acrylic paint, you can add glitter or any color you would like also. Wrap different ribbons around the base and use one for a bow. Adhere with Fabri-Tac and you are DONE!! Wasn't that easy and awesome?! 

Thank you for looking and CRAFT ON!!! ~ Deborah @ Market City

Monday, August 19, 2013

Crankin' Out Crafts Episode 281 - Deco Mesh Spider (Halloween)


JFlo is trying to get ready for Halloween with some new decorations. Today it's a goofy spider.

Deco Mesh Spider for Halloween

Watch our how-to video on our YouTube Channel: Crankin' Out Crafts: Episode 281 - Deco Mesh Spider (Halloween)

Supplies:
4" styrofoam ball
Two 1" styrofoam balls
Two buttons
10" roll of deco mesh
Greening pins
Wired tinsel
Glue gun and glue sticks

Hang these silly spiders from the rafters at your Halloween party, or set them on a table as centerpieces.

*Be sure to check out our earlier posts!

For the record...

Today's blog topic focuses on something that a lot of younger people may not get the chance to see very often. If you don't know what these earrings are supposed to be then you're missing out on a piece of musical history! I made these vinyl record earrings because last week Monday was Vinyl Record day.


They were pretty easy to make too. All I did was take a couple of big black buttons and add small pieces of red paper to them to cover up the button holes and to be the record label. Then, with a white ultra-fine Deco Color pen, I made the highlights on the sides of the record. To add the ear hooks, all I did was punch a hole at the top of the button with the Crop-a-dile and add a jump ring.


Here's a picture of my coworker, Asia, modeling the earrings for me. I tried to use the biggest buttons I could find. If you don't have the buttons, you could also easily make the records out of clay.

Let's bring vinyl back in style! Well, for your ears anyway.

Puna @ Enchanted Lake

Sunday, August 18, 2013

Fun Ways to Save for a Vacation

Aloha Crafters ~

Today's Idea & Inspiration  is Glass Blocks that will remind or provide a "bank" to save for a vacation. We have so much fun paper in our Make a Memory department, ideas for your specific goals will leap out at you.

The Vegas block above was backed with glitter scrapbook paper and than a black deco paint pen was used to paint the front.

 
The same process was used for our Disney Glass block above.

 
For our Surfing Vacation a retro map paper was used for the backing and than a complimentary paper was used for the front and then adhered to the block and covered with Glossy Accents.
 
Happy Crafting!
Robin @ Kahului
 

Thursday, August 15, 2013

Let's get creative with eyelash yarn

What do you think of when you see eyelash yarn? Lei's, crocheting, or knitting? Well here's a new, fun, and easy way to use this yarn and the keiki's will love it too. 

Supplies needed:
Eyelash yarn
Styrofoam ball
Fabric-tac
Optional items:
Felt
Googly eyes
Chenille
Ribbon
Glue gun
Cheesecloth


Glue the start of the eyelash yarn and start wrapping around the styrofoam ball. When the styrofoam ball is completely covered cut and glue the end of the yarn. Then it's time to make your character. Be creative and use many of the supplies listed above.

Tuesday, August 13, 2013

Evil Despicable Me Minion


Evil Despicable Me Minion Jar!


A few weeks ago we showed you how to make a Minion from the movie Despicable Me, now take a look at this purely evil Minion... He has crazy hair and everything!

You will need:
A mason jar
Purple acrylic paint
Bottle cap (I used a Snapple bottle cap)
Purple yarn
Black and white felt
One large googly eye
Fabri-tac

First, paint the inside of the jar purple. After the inside is dry, cut out his black overalls from felt and glue on with fabri-tac. Also cut a strip for the strap of his glasses and glue on. Paint the inside of the bottle cap with white acrylic paint and glue the googly eye into the center. Attach his bottle cap eye to the jar. To make the hair, use pieces of yarn tied at the base and brush it out with a hair brush to give it a troll look, glue it to the top of the jar. Last, cut out his evil spiked teeth from white felt and glue onto the jar. ISN'T HE JUST SO EVILY CUTE!

Thanks for looking and CRAFT ON! ~Deborah @ Market City

Monday, August 12, 2013

A Sand Keeper

Don't you love it when inspiration strikes you at the most unforeseen moment? My inspiration for today's blog came to me when a friend of mine was shopping for a tray to place some small flowers in. After searching through the store, he settled on this wooden piece that has small partitions and a sliding glass door. When he added the small, corked bottles to it I knew that we had a great idea in the making.


Here is my take on what he and I put together that day. I'm going to call it a sand keeper  but really it could hold any small mementos from trips for a beautiful display. I painted the box with our Americana Multi-surface paints in a few beachy colors and later added some shells to the outside.


Craft bottles are in each compartment to hold sand or small shells. Mementos could also be simply placed inside the keeper. To distinguish one section from the other, I just wrote out small tags with place names on them and attached them to the bottles with bakers twine.

I hope you like the idea, you could stop by our Enchanted Lake store to see it, if you wanted to.

Puna @ Enchanted Lake

Sunday, August 11, 2013

Wishes for Baby ~ Quick & Easy Baby Shower Idea

Aloha Crafter ~

Today's Idea & Inspiration is a Baby Shower Idea. Our glass blocks were decorated as a receptacle for notes from shower participants for Baby. The glass blocks were backed with scrapbook paper, then letters were adhered and covered with Glossy Accents. This is a quick and easy idea for Baby Showers.

Happy Crafting!
Robin @ Kahului

Friday, August 9, 2013

Crankin' Out Crafts Episode 280 - Water-Soluble Graphite Pencils


For our last "artsy" episode, Puna returns with a product that really washes away the competition.

Water-Soluable Graphite Pencils


Supplies:
Water-soluble graphite pencils or
Sketch and Wash pencils
Brush
Water
Mixed Media or Watercolor paper

These graphite pencils are great for taking with you outdoors to do quick sketches.

Gilding How-To

Martha Stewart Crafts Liquid Gilding is a one-step leafing paint that gives a rich metallic luster to projects. What exactly is gilding? Gilding is the art of applying metallic leaf to a surface. Gilding can be applied to almost everything, wood, metal, glass, and fabric. Gilding comes in a variety of colors including gold, silver, and copper.


Use a soft bristled brush and lightly paint in one direction. Give one hour to dry between applications. This is one of the great ways to gilding in craft projects. The different colors can accent so many decorative craft projects. 


Supply list:
30132797- Copper Martha Stewart guild liquid
30132799- Silver Martha Stewart guild liquid
30132800- Gold Martha Stewart guild liquid
30132798- Brass Martha Stewart guild liquid
Shells
Paint brushes
Painting sea shells and adding some burlap with some colorful sand can make for any type of centerpiece. 


Thursday, August 8, 2013

Endless Summer Celebration!

Come out and join us for our Endless Summer Celebration! It's Saturday, August 24 at HouseMart Ben Franklin Crafts - Pearl City. It's gonna be a great time! =)

Wednesday, August 7, 2013

Crankin' Out Crafts Episode 279 - Elegant Writers vs. Micron Pigment Pens


JFlo joins us today to talk about a special washing technique using the Elegant Writer calligraphy pens and the difference between dye based ink and pigmented ink.

Elegant Writer vs. Micron Pigment Pens


Supplies:
Elegant Writer
Micron Pen
Brush
Water
Mixed Media or Watercolor paper

Use the Micron pen for the lines that you would like to be permanent, hard lines and the Elegant Writer for shading and washing.

Tuesday, August 6, 2013

Alcohol Inks and Bells!!

Colorize your Jingle Bells to ANY color you want using Alcohol Inks from Tim Holtz! 


Alcohol Ink “Stains” the metal with bright or subtle colors depending on the one you choose. It’s a great way to customize your decorations.
These bells are great for the upcoming fall, put them in a bowl for a modern yet classic look, or tie some in a wreath. These Alcohol inks give a great Antique / rustic look 

Supplies: Alcohol Inks (Copper, gold, reds, blues, purples)
Felt pads and tool
Jingle bells (silver or gold)

Step 1: Use the Alcohol Ink Tool and Felt pads. Squirt a few drops of the ink onto the felt pad.
Step 2: Blot the felt pad on the metal bells to transfer the ink, set aside to dry for a few minutes and you now have custom Jingle Bells!   


Thanks for looking and CRAFT ON!!! ~Deborah @ Market City

Monday, August 5, 2013

Origami Box Lights

Here's a really simple do-it-yourself decor idea that can really dress up a room, party, or patio - preferably a covered patio since neither the origami paper nor the lights are going to stand up to rain and weather. These lights look great at night or during the day, and establish a romantic, cozy atmosphere with their warm glow whenever they're on.


To make them yourself, you need a string of white lights (I used our Bridal light set that contains 35 lights on a 12 foot length) and a pack of origami paper (the set I used had 5 different patterns in it and just enough paper for me to cover every light on the string).


To begin the box, start with your origami paper facing the wrong side up and fold it in half diagonally.


 Now fold it in half diagonally again so that you've made an "x" with the folds.


Flip the paper over and fold it in half two more times to make a plus shape fold through that "x" shaped fold you made previously.


This is what the wrong side of your paper should look like now. It's easier to see the folds here than it is to see them on the patterned side.


With the paper back to right side facing up, begin pushing the straight folds toward the center. Now gently flatten your paper together.


When you flatten your sheet completely, you'll have this triangular shape.


Now take one bottom corner of the triangle and fold it up to line up at the top point. Do the same with the other side.

 
Flip the paper over and repeat the last step so that you have this diamond shape. Now rotate the diamond 180 degrees so that you have 4 small flaps at the bottom of the diamond.


Take one of the side corners of the diamond and fold it to the center. Repeat this step on the other side corner.


Flip the diamond over and repeat the last step so that your piece looks like this.


Fold one of the bottom flaps up to meet the corner of the diamond that you just folded in. About half of this flap will stick out past the rest of the paper.


Now fold the part of the flap that sticks out over the side back toward the center of your paper to match the rest of the flap so it looks like this. It looks like a small triangle now.


Take that little triangle that you just made and insert it into the slot in the corner that it was resting on top of.


You have to repeat the last 3 steps three more times with the other flaps on your paper so that eventually it will look like this. If you lift up the sides a little you'll find that one of the points (it's the top one in this picture) will have a small hole in it.


Blow into that small hole to inflate your box. Whew! I think that was harder for me to describe than it was to actually fold all of these boxes. It certainly took longer.


You can add your origami boxes to the string of lights by inserting a light into the same hole that you used to puff out your boxes. Now hang those lights up and plug them in! Beautiful!

The lights look even better in person. Won't you come and see them?

Puna @ Enchanted Lake

By the way, there's another post from earlier today so please scroll down to see it.