Monday, January 29, 2018

Upcycled Party Decor

Hi and happy Monday! To beat those Monday blues, I thought we could talk a bit about parties! I've been loving all the cute fun bright spring decor I've been seeing around and wanted to show you a cute way to turn paper bags into hanging poofs! They would be great around the main buffet table, or around a photo booth!

Supplies:
craft paper bags
scissors
hole punch
string
double sided tape


First cut all the tops of the bags. I used 10 bags per hanging flower fan.


I hole punched my bags on both sides of the bottom flap (4 holes per bag) 


String together all 10 bags!


Use your double sided tape (one piece in the middle, and one on the top) to attach all the bags together! This will also cause the tops to open more!


Ta Da! Tie off your string and trim the excess!
Have fun throwing spring parties!!

Bethany @Enchanted Lake


Monday, January 15, 2018

Moss Fairy Garden Frame

Happy New Year crafters!
I'm excited for spring and everything garden party! I was inspired by our collection of fairy garden decor trickling in and thought a frame would make the perfect addition!


Supplies:
wood frame
hot glue / hot glue gun
assorted moss
rope
oil based black paint pen
natural cardstock patterned paper
optional : mushrooms, succulents, fairies, butterflies, birds, sticks

First, cut your cardstock paper sheet to size, and place inside frame.

Trace your favorite quote or calligraphy phrase through the glass panel with the oil based marker. 
Allow to dry and then place in frame.

Then glue rope all around inside and outside edges, adding extra glue to the inner sides so that it is more secure.

Then glue in mosses and fun earthy natural accents! 


Ta Da!
All you would need is a cute little fountain and fairy scene to go with this cute frame!

Happy Spring!

Bethany @Enchanted Lake


Tuesday, January 2, 2018

Asian Floral Lanterns

Hello, everyone! New Year's has come and gone, happy 2018! I hope everyone has the greatest year yet! This year, it will be year of the dog, and Chinese New Year is hot on our heels, and what better way to decorate than with pretty paper lanterns? These aren't in the traditional red, but still, who could complain when they're this lovely?


Materials

  • White Paper Lantern
  • Black Paint (acrylic or watercolor)
  • Brush-preferably a Round. Size is based on preference.
  • Sakura, Plum, Apple, or Dogwood flower spray.
  • Hot Glue Gun + Glue Sticks

Instructions
  • Remove all flowers off your spray. They should pop off nice and easy peasy. (I used plum blossoms for this one!)

  • Inflate your lantern by inserting the metal piece to create a globe shape.

  • Using your brush and paint, create branches across your lantern. You can concentrate them on the front, or have them wrap all the way around the lantern- totally up to you!

  • Hot glue on your flowers that you plucked off semi-sporadically onto the painted branches.

  • Done! Enjoy! :) It's also optional to put lights- like firefly lights or tea lights inside the lantern for nighttime use. It adds a soft, pretty glow!

Monday, January 1, 2018

Sea Glass & Starfish Light Catcher

Happy Monday!
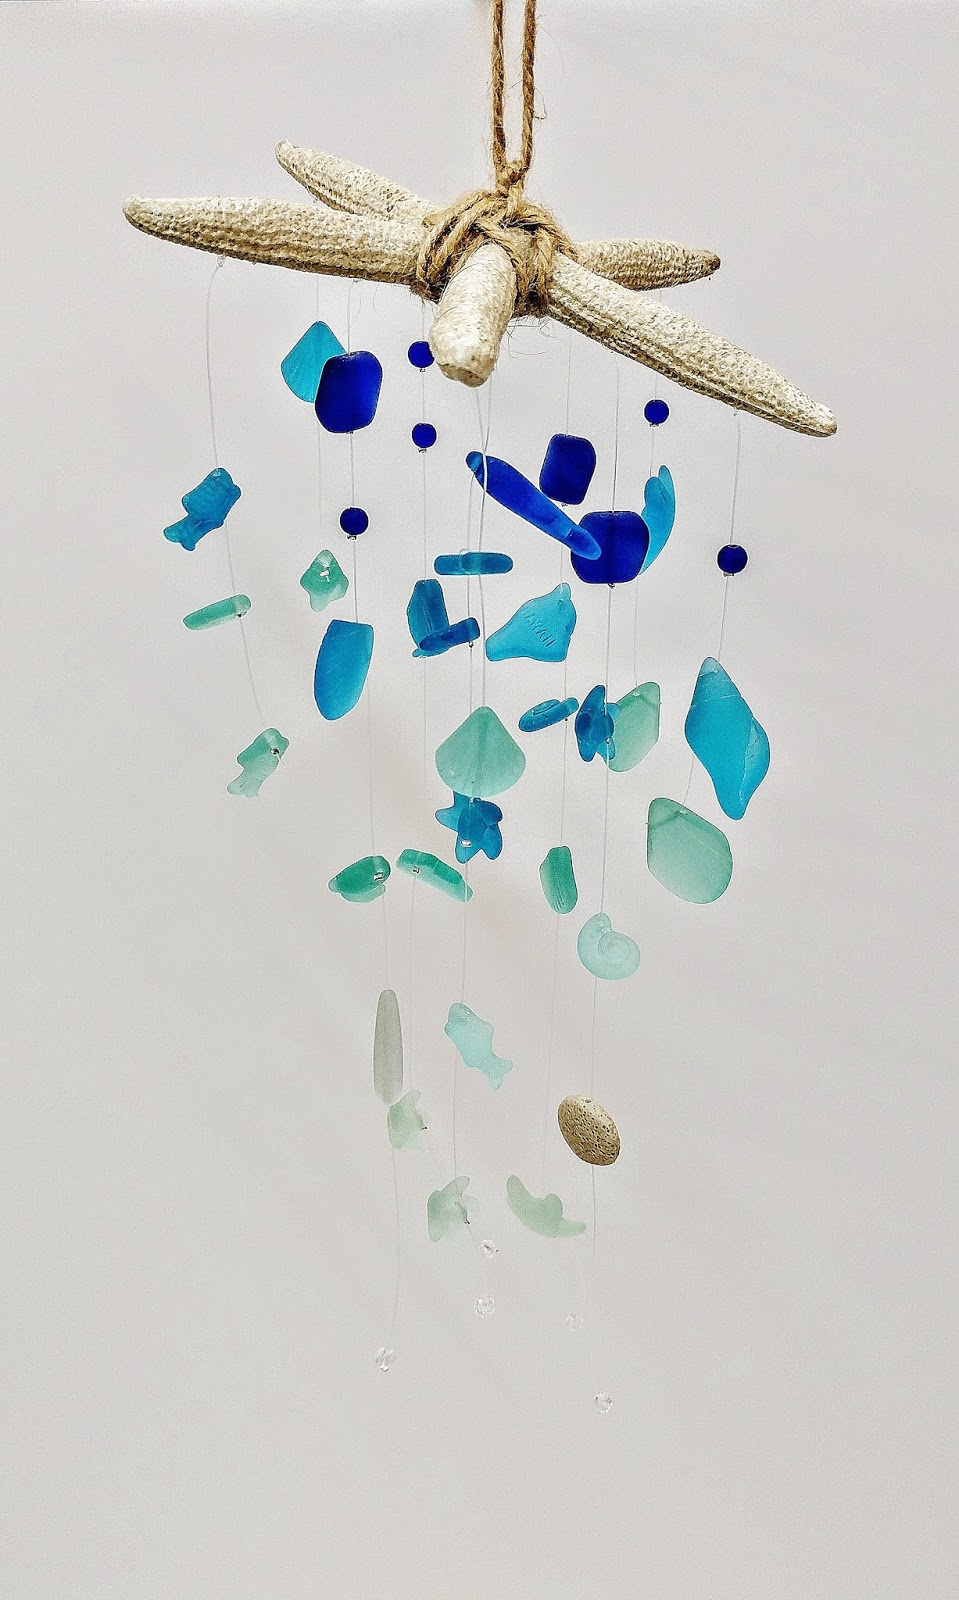
Let's have fun this week with some tropical sea glass mobiles! After all, Kailua is a beach town! I was inspired by the ombre sea glass colors available at HouseMart Ben Franklin and thought this mobile would be great for a baby's room or even outside the front door to greet guests as they enter the house!


Supplies:
Resin starfish (a real one would break)
clear beading plastic string or fishing line
scissors
small silver crimp beads
hand held crimper
assorted bags of sea glass
jute

First I tied 2 strings to each starfish leg that were 2 feet long. Then I started with the darkest blue of sea glass and put the bead through on to the string, and finished each bead off by placing a crimp bead, and using my hand held crimping pliers, flattened out said crimp bead so that the sea glass couldn't slide down the string! I kept stringing and crimping, going from dark to light. I put more beads on the center strings, and as I went down, I spaced out the beads further and further from each other. 

One of the sea glass strands came with a sand textured bead as well as small clear sparkling faceted beads, which I incorporated into the ends of the mobile so that they looked like water crystals. This was really fun to make, and using those crimp beads made a world of difference!

When I finished, I trimmed all the excess strings off the ends, and secured the center of the starfish with jute so that it could hang from the middle.

Have fun making your mobiles! Feel free to make different kinds using different beads, or even get crazy with it and use felt flowers! Have a great week!

Bethany @ Enchanted Lake