Saturday, August 26, 2017

Napkin Art

            Large napkin art


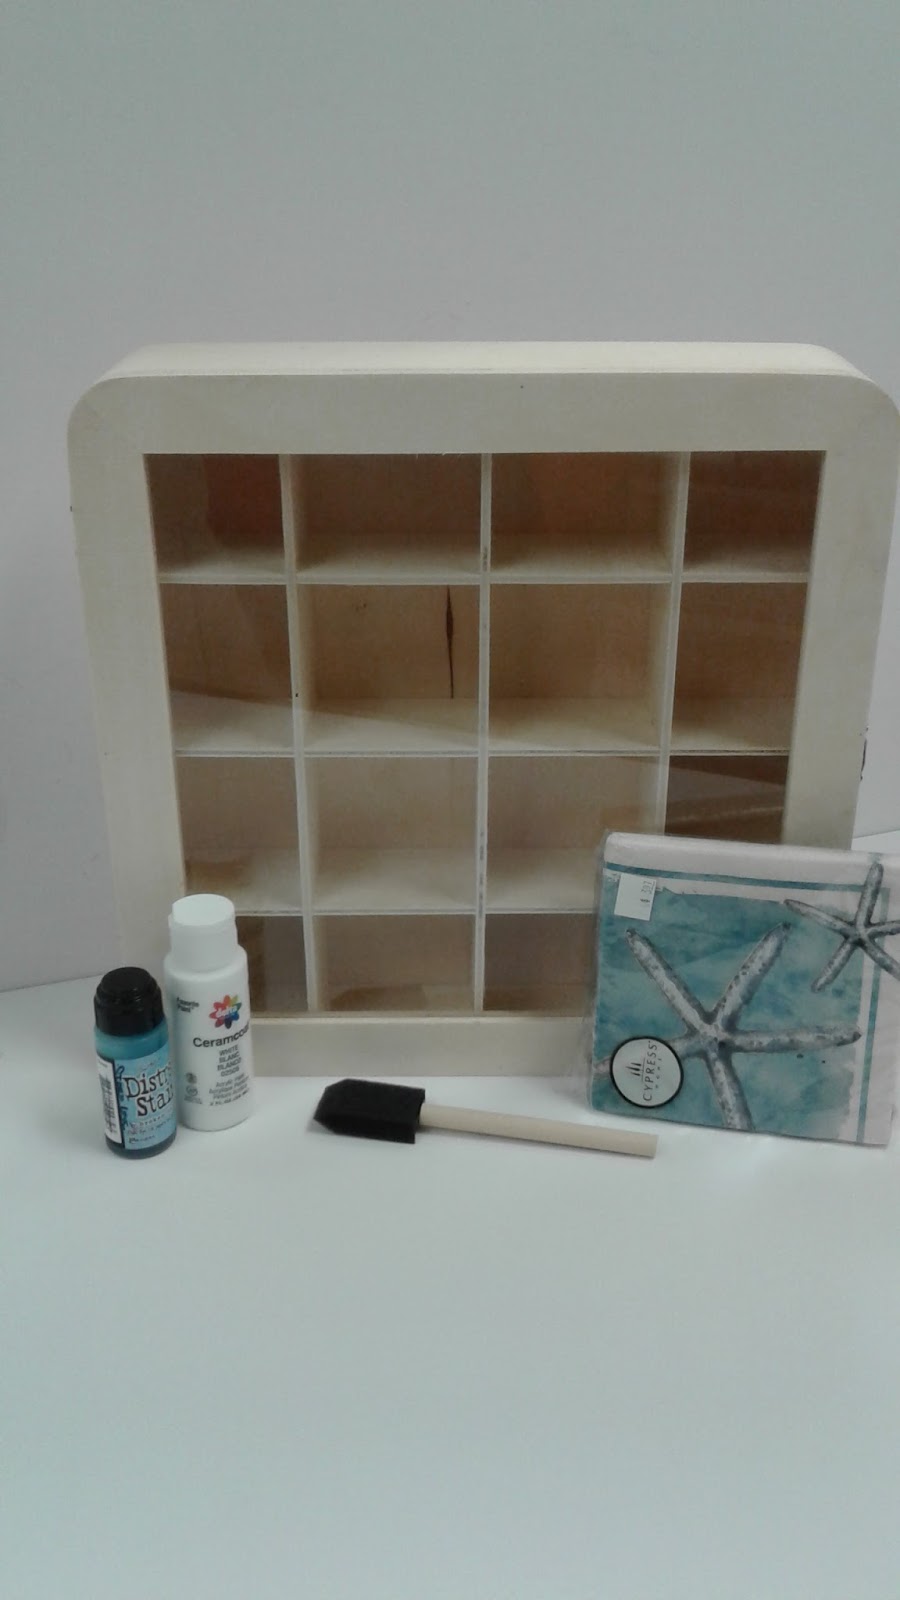
Large unfinished glass top box
Napkins with print on it
Mod podge
Sponge brush
A color paint to match the napkin


Paint the box and set to dry
With the sponge brush rub Mod Podge to the glass set the napkin on the top of the glass. Try to straighten the napkin, but do not pull or rub it. Will tear
When dry, dab on the mod podge. You might want to do 2 coats, let dry in between coats.


Hilo Ben Franklin

Saturday, August 19, 2017

Popsicle Card

                Popsicle Card


Material List:
Scoring Board
Paper Cutter
Solid Paper
Printed Paper (Used Bo Bunny)
Crop-a-dile corner
Scallop Pinch 2”
Jumbo Popsicle
Double sided tape


 Score your printed paper into a 6x4, and solid into 4x3
Then Cut them.


Use the Crop-A-Dile to round the corners of the paper.


Take your Popsicle stick and cut off the end, You will want it 4” long.


Write a saying to go with your card on the solid paper.


Double stick the Popsicle stick to the card, then cover it with the solid piece of paper you wrote on.


When you are done you can take the scallop punch to the upper right hand corner of the front of the card.  This will make it look like a bite mark.


                     Cute way to say hello, miss you


                   Hilo Ben Franklin

Saturday, August 12, 2017

Fairy Bowl

                    Fairy Bowl


Material List:
5.6 Glass Bowl
Moss
Rocks
Mimi Wood Disc.
Succulent
Sand – Black


 Start by putting the sand at the bottom of the bowl


Arrange the wood disc in the back and the middle of the bowl.


Add the moss to the sides and the back


Add the rocks to the side and some at the front.
Arrange the succulents to the side
Place your fairy on top of the wooden disc.

    You can glue them down , or leave them free


                        Hilo Ben Franklin

Tuesday, August 8, 2017

Fall Paper Maple Leaves

Hello, everyone! I'm back again for this August Tuesday! Today I am going to show you the simplest fall-themed craft that if perfect for fall- and all the ensuing crafting and decorations! These simple paper leaves are great for kid's crafts and also great for making more elegant decorations as well, especially when you embellish with a touch of Tint-It Spray! Let's get started!


Materials


  • Cardstock -OR- Construction Paper in Autumn colors.
  • Scissors
  • Glue
  • Stencil (found here: http://kellbellestudio.blogspot.com/2013/09/fan-folded-leaf-tutorial.html)
  • Tint-It Spray (Gold Shimmer, Mango, Strawberry, and Sepia)


Instructions
  • First, take your paper and fold it in half width-wise. (Hamburger-style, for those like me who need the simpler lingo)

  • Take your stencil  and align it at the folded edge of your paper, then trace the stencil.

  • Cut out the stenciled shape, and unfold the now cut-out paper.

  •  Fold the wider end of the shape up 1/2 an inch. Flip over and repeat, folding accordion style until you reach the end of the paper.


  • Fold the paper upwards, the shorter side on the bottom, connecting the two longer pieces.
  • Glue the two folded edges together to create your maple leaf

  • Now, take your Tint-It Spray and spray the edges and base of your leaves. I used Mango for the yellow leaves, Strawberry for the red leaves, and Sepia for the orange leaves. If you end up doing brown leaves, I used the Gold Shimmer color for that color. (Before: Right, After: Left)


-Helen C.-
Kahului Ben Franklin Crafts


Monday, August 7, 2017

Crackle Apothecary Bottles!

Hi everyone!
I hope you guys have been having a great summer! I know it feels so soon, but I've already been getting into the swing of fall! It will be here before we know it! Plus I love fall crafts, so I'm actually pretty excited about this change of pace. Today's craft is apothecary jars! Ben Franklin just got in some more really cute bottles and jars, and I wanted to really transform them into aged and crackled ingredient bottles!


Supplies: 
3 glass bottles of assorted sizes
spray paint in black, and gold
crackle gel
paint brush
acrylic paints in gray, charcoal, and gecko green
jute
black cardstock
white pen
hole punch
scissors
optional: gloss sealer spray (to keep them from chipping)


First, you'll need to wipe down your bottles. Then spray one by one with your black and gold. Let sit to dry for 15-30 mins.

Once they are dry to the touch, using your brush, apply a generous coat of the clear crackle gel to the entire visible surface of your bottle. (There's no real need to do the bottom.)


Next, wait about 5 minutes for the gel to dry enough to feel "tacky" instead of "wet". 
Then will a clean brush, one color at a time, lay strokes of paint over the gel. Be careful to not mix the gel and top layer of paint. The key is to lay the paint right on top. The thicker your paint, the thicker the cracks will become. The thinner the paint, the smaller and finer the cracks will become. It's perfectly fine to have a mixture of thicknesses! I think it adds more dimension and variety to the crackle. After all, when things age, they don't age and wear down in exactly the same way in all places!

The direction of your strokes also really matters. You want to stay consistent and brush in all the same angles:
-all up and down
-all side to side
This technique will create an organized look about your piece. Like wood grain. 


 You can really tell in the paint stroke direction in this picture! The green bottle I went up and down, and the gray one I went side to side. Also the gray one had thicker paint strokes, so you can really see the cracks more visibly!

For the tags, I cut out squares from black card stock, hole punched the tops, and hand wrote the creepy crawly ingredients! I also drew a white border around the edges of the paper, and then I tied them on with Jute!

Have fun with your crackle paint!
It's available at any local House Mart Ben Franklin.
Happy crafting!

Bethany @Enchanted Lake

Sunday, August 6, 2017

Pineapple Perler Bead

           Pineapple Perler Beads

Material List:
Perler bead book of patterns
Perler beads (for the pineapple Yellow-Orange-Brown and 2 color greens
Perler Bead board
Iron
Wax Paper


Set the perler bead board over the picture.


Start putting the perler beads on the board. Same color as the picture.


When done, place the wax paper over the beads and heat. This will melt them together.
Flip board over and do the same on the other side.

You will have the the pineapple. You can do all kind of thing with them. Frame them, put magnets on the back, make keychains, charms and all kind of fun ideas.


                                              Hilo Ben Franklin

Friday, August 4, 2017

Fun Corn Decor

With Fall right around the corner, there's no better time than now to start getting your Fall décor started and put out! This project is fun and easy and only uses two main 'ingredients'. Beads and pipe cleaners.

The first step for this project is to get three pipe cleaners. For the best outcome, use light brown or dark brown colored chenille. Twist them all together in the middle so that you now have six ends poking out of one jointed middle. You can now start to slide your beads onto your pipe cleaner and they won't slide off the other end. I used yellow and orange colored beads to give a nice fall corn color look, but you are encouraged to use any color you'd like. I used eleven beads in random order on each of the six pipe cleaner ends. After you've put all your beads on, bring all of the ends together and twist tightly right behind the final beads in each stem. Shape your corn if it gets bent out of shape, and there you have it! Your corn is finished and ready to display!

 
Make this in any size you'd like, you can even change this by twisting six pipe cleaners together all at one end and making a much larger ear of corn.
 
Happy Crafting!!
Megan @ Paa