Thursday, October 31, 2013

DIY Santa Hat


It’s getting closer and closer to the Christmas Holiday. What a great idea to personalize your own Santa hat  and have some fun making it . Come on into Ben Franklin to get your Santa hat and the many supplies to make it your own.


Happy Crafting! Beth @ Mapunapuna BFC

Wednesday, October 30, 2013

Crankin' Out Crafts Episode 307 - Snowflake


Create large, eye catching decor pieces with a little bit of paint and some popsicle sticks.

Giant snowflake made with painted jumbo popsicle sticks

View our newest episode here: Crankin' Out Crafts Episode 307 - Snowflake

Supplies:
Jumbo popsicle sticks
Acrylic paint or spray paint
Ribbon
Hot-glue gun and glue sticks

It's always helpful to plan out your design first before trying to piece your snowflake together.


Tuesday, October 29, 2013

Resin Paper Punch Pendant

Making your own pendants out of paper has never been easier! Using UV Resin to seal, harden and protect the paper you can turn just about any paper punch into jewelry!!


Supplies:
Martha Stewart Butterfly Paper Punch
UV Resin
UV Lamp
Jump Ring
Necklace chain


Punch the butterfly out of any paper you want, I used a cream colored cardstock. Using the silicone pad, cover one side of the paper punch out with UV Resin, place under the UV Light for a few minutes and then flip it over and repeat on the other side. This will coat the paper punch out with hard clear Resin. Add the Jump ring and put onto the necklace chain! You now have a cute necklace that you did ALL YOURSELF!

Monday, October 28, 2013

Resin-ating Everything

You may have seen a lot of posts lately about our new UV Crystal Resin that we are now carrying in our stores. That's probably because this product is so super cool that all of us are excited about using it. I personally like this resin because it makes making classy jewelry amazingly easy and, well, classy looking. Also, as you will soon find out, it is gloriously versatile in the things that can be done with it.


This lovely Parisian looking piece is a cell phone charm straight out of a kit. The kit includes everything that you see (plus more) and everything you need to make this chic charm.


This pendant borrows an idea from the lovely Beth at our Mapunapuna store. I was so in love with her sprinkle pendant that I just had to make one for myself. I mean, who doesn't love candy?


This nautical stunner was made by our very own Toni and is a purse hook. I'm thinking handmade Christmas gifts for all those large handbags that my friends frequently tote around. 


And this piece, believe it or not, is a jelly jar lid. This is another great gift idea for Christmas. Give to your friends who need a small jewelry holder that is just as elegant as their jewelry.


What did I say? Totally versatile, right? I'll expect to see you all in our stores soon to get your hands on some awesome resin-ating fun.

Puna @ Enchanted Lake

Scroll down for fun with Popsicle sticks for the holidays on Crankin' Out Crafts!

Crankin' Out Crafts Episode 306 - Santa's Friends Ornaments


Today's episode kicks off a week of crafting using popsicle sticks, those fun and wonderful things we all remember from school projects and summer crafting. Puna will start you off slow with some simple ornaments.

Santa's Friends Ornaments made with jumbo popsicle sticks


Supplies:
Jumbo popsicle sticks
Acrylic paint
Baker's twine
Scribbles
Eyelash yarn
Pipe cleaners
Pom poms
Hot-glue gun and glue sticks

Make a bunch of these fun ornaments with a group of kids and decorate away.

Friday, October 25, 2013

Crankin' Out Crafts Episode 305 - Wooden Ornament


Brandon knows how you can give those ready-to-decorate ornaments a final, special touch.

Ornaments decorated with Snow-tex & Diamond Dust


Supplies:
Wooden ornament
Acrylic paint or pens
Diamond dust
Snow-tex

Snow-tex can be used for so many of your Christmas decorations to add more of a "white Christmas" feeling to your home.

Thursday, October 24, 2013

Hawaii World Class Wedding Expo XXXI

Hawaii World Class Wedding Expo XXXI at the Hawaii Convention Center

Visit our Booth along with Celebrations at the Wedding Expo on Friday, October 25th from 6-10pm and Saturday, October 26th from 11am-5pm at the Hawaii Convention Center. We'll show you DIY craft projects you can make for your big day! Come and see our elegant ideas and inspiration for wedding invitations, favors, centerpieces, and more.
Tickets are $8 at the door. Pick-up $1 off coupons at our Oahu BFC stores and Celebrations (next door to Mapunapuna BFC).

http://www.benfranklinhawaii.com/promotions


Happy Crafting! Beth @ Mapunapuna BFC

Crankin' Out Crafts Episode 304 - Snowy Tree


Puna jumps in on the snow-filled fun with this simple, snowy Christmas tree.

Paper Maché Cone decorated with Snow-tex

See how easy it is to make this craft! Watch our video here: Crankin' Out Crafts Episode 304 - Snowy Tree

Supplies:
Paper mache cone
White acrylic paint
Snow-tex
Popsicle stick
Embellishments like small ornaments, lights, or tree topper.
Hot-glue gun

Create a wintery scene by making three different sized trees and grouping them in a display.


Wednesday, October 23, 2013

Crankin' Out Crafts Episode 303 - Ho Ho Ho! (Snow-tex Letters)


Brandon starts off our week of snowy fun with some jolly decor.

Decorate Paper Maché Letters with Snow-tex!


Supplies:
Paper mache letters
Acrylic paint in black and red
Gold glitter foamie
Snow-tex
Popsicle stick
Paint brush
Scissors
Hot-glue gun and glue sticks

Get into the cheerfulness of Christmas by hanging these letters at the door for everyone to see.

Sunday, October 20, 2013

Ghost Earrings

Aloha Crafters, 

Today we will be making a pair of ghost earrings out of clay. Its fun, festive and an easy alternative to a costume.

Supplies:
  • White sculpey (77512152)
  • Black sculpey (77511741)
  • Pink sculpey (77521260) (optional)
  • Silver earring hooks (30095672)
  • Silver eyepins (30095651)
  • Sead beads (30130496) (other colors optional)
  • Sculpey glaze (30113788)
  • E6000 glue


Instructions:
  1. Take white clay and make 2 balls in the same size
  2. To form ghost tail, roll one end of the ball into a cone and curve up slightly
  3. Take small amount of black clay and make 2 dots for eyes
  4. Take small amount of pink clay and make 2 oval dots for blush (optional)
  5. Take eye pin and place it at the top of ghost head
  6. Bake at 230 degrees for 30 minutes
  7. Once clay has cooled off remove eye pins, add a dab of E6000 and reinsert at the top of ghost head.
  8. Take 2 eye pins and place 3 different colored beads on it.
  9. Attach beaded eye pin to ghost and silver earring hook.
  10. Dip ghost in glaze and let dry.

Wear your earrings and enjoy!

Happy Crafting!
Lani @ Kahului


Friday, October 18, 2013

Crankin' Out Crafts Episode 302 - Halloween Ornaments


Brandon's back with a great Halloween craft involving Christmas ornaments!

DIY Halloween Ornaments


Supplies:
clear plastic ornament
Ceramcoat acrylic paint
Sharpie marker
remnant ribbons

Turn a clear holiday ornament into a fancy Halloween decoration for your Halloween wreath or or to string up around your home

Thursday, October 17, 2013

Halloween Unbreakable Ornament


Halloween Ornament

Creepy, Crawly and Creative is what your going to say when your child makes this bat ornament. 


Supplies:
30143772 – Clear unbreakable ornament
77613620 – Black Foam Sheet
30055159 – Moving Eyes
30131084 – Stickles
30121824 – Glitter it
30141797 – Vintage Sparkle

Cut the shape of bat wings with the black foam sheet. Make any design with the Stickles on the foam sheet. Pour a small amount of glitter it in the unbreakable ornament and swirl it around. Make sure to get all of the ornament coated. Pour any remaining liquid back into the Glitter It bottle. Add a good amount of glitter to the inside of the ornament. Give it a good shake to make sure the glitter has coated the inside. Glue the eyes and bat wings. A hat or add some pom poms to make bat ears will finish the ornament. 

Happy Crafting! Beth @ Mapunapuna BFC

Wednesday, October 16, 2013

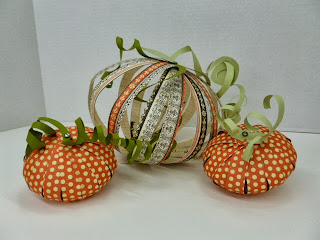
Crankin' Out Crafts Episode 301 - Paper Strip Pumpkin


Use up your scrap paper to create a fun, festive, fall-filled finding.  

Cute paper pumpkins made from leftover scrap paper!

Watch how easy it is to make this craft! Crankin' Out Crafts Episode 301 - Paper Strip Pumpkin

Supplies:
brads
scrapbook paper
paper trimmer
Crop-A-Dile

J-Flo turns decorative strips of paper into a fabulous pumpkin for your autumn table. Great for Thanksgiving, too!


Tuesday, October 15, 2013

Resin Working with Shells

Check out these AWESOME Shells created using UV Resin, Photos and some embellishments!!


Supplies:
Photos (Printed on Computer Paper)
Sea Shells
UV Resin
UV Lamp
Mod Podge
Small Brush
Embellishments (Rhinestones, Glitter, Small metal embellishments and tiny pearls)
Sand (Tan Color)


How To:

Use Mod Podge to adhere the photo to the inside of the shell by brushing a coat onto the shell itself and also brushing a coat onto the back of the photo. Carefully rub out any air bubbles with your fingers. Once the Mod Podge dries, Pour some UV Resin onto the edges of the shells and dip them into Sand, place under the UV Light for a few minutes and take out. Coat the photo and the inside of the shell with Resin and place back under the UV light for a few minutes to harden. Use Rhinestones and small embellishments by coating the embellishments with Resin on the shells and placing under the UV Light to harden.

Use these shells as a way to display your trips and memorabilia. They would look great scattered in a bowl or even on a magnet! Glue a ribbon on them as a Christmas Ornament!

Thanks For Looking and CRAFT ON!!!!!! ~ Deborah @ Market City


Monday, October 14, 2013

Crankin' Out Crafts Episode 300 - Pumpkin Flowers


B-Dizzle drops in this week to show us a simple and beautiful craft to decorate your home or door with!  

Fun Halloween Flowers made with kraft bags


Supplies:
Kraft colored paper sacks
double stick tape
1/8" hole punch
twine or jute
decorative scrapbook paper
black paper
scissors
hot glue gun
glue sticks

Watch as she turns ordinary paper sacks into a cute Halloween decoration.

Fill Up a Frame

Are you looking for great gift and decorating ideas for the soon to be upon us holiday season? What about a new, stylish frame?


These extremely affordable shadowbox frames are perfect for gift giving and decorating. Fill the shadowbox section with almost anything, then insert a picture and you're done.


For fall, here is a colorful leaf filled frame. You could also fill with raffia, small pumpkins, or even candy corn for a festive fall feeling.


If it's Christmas you're decorating for, fill the shadowbox with jingle bells, snow, pinecones, or peppermints. It's a fun, playful way of framing that special photo.

Thanks for the read!
Puna @ Enchanted Lake

Wednesday, October 9, 2013

Glitter - Crankin' Out Crafts Halloween Special

Tune in to our YouTube channel for a special treat today! Watch our Halloween video created by our HouseMart Ben Franklin Crafts and Crankin' Out Crafts Team showcasing DIY craft projects! Video can be viewed on our YouTube Channel here or click on the image below.

Watch our Glitter Halloween Special now on YouTube!

Come in for all your Halloween projects from favors, treats, spooky décor and costumes. We have lots of ideas and inspiration to share with you! Don't forget to also follow us on Pinterest to see more creative projects you can make. Happy Halloween!

Tuesday, October 8, 2013

Keiki Class Monster Ball!

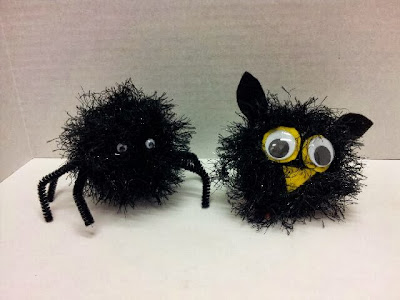
We are having our Fall Keiki Classes here at the Market City Store!! Check out these AWESOME Fuzzy Monster Balls the Keiki did today! 


Supplies:
Eyelash Yarn
Googly Eyes
Yellow Felt
Black Felt
Orange Foamie Sheet
Fabri-Tac Glue
Black Pipe Cleaners


Use the Styrofoam Ball as the inside of your monster, begin by using the Fabri-Tac Glue and spreading a good amount on the ball and wrap the eyelash yarn around the Styrofoam Ball until the entire thing is covered (You may need to use more glue as you go.).

For the Owl, cut his ears out of the black felt and glue on using the Fabri-Tac. Cut the eyes and beak out of the yellow felt and glue on. Next cut the feet out of orange Foamie and glue on using the Fabri-Tac. All that is left is his great big googly eyes! Glue them on as well and you now have an ADORABLE Monster Owl!!!

For the spider, cut pipe cleaners into about 5" lengths and just poke them into the ball, add the eyes and TADAH!!! Spoooooky Spider Puff.......

Thanks for Looking and CRAFT ON!!!! ~ Deborah @ Market City

Monday, October 7, 2013

Crankin' Out Crafts Episode 299 - Easy Tutu


Puna's back to explain how easy it is to create a cute tutu for Halloween.

Easy Tulle Tutu

Learn how to make this easy tutu out of tulle from our video here: Crankin' Out Crafts Episode 299 - Easy Tutu

Supplies:
Tulle
Ribbon
Crochet headband or beanie
Piece of cardboard or canvas panel
Scissors

Tulle tutus are not just for toddlers! Think about creating a matching mother and daughter costume set.

*Don't forget to scroll down to read today's earlier post on a cute holiday project from Enchanted Lake BFC! 

Clever Christmas Countdown


Yes, I know that many of you think it's too soon to be thinking about Christmas. I mean, we haven't even gotten to Halloween yet, right? But, if you want to be on top of your homemade Christmas, now is the time to start.


On that note, today's blog topic is this fast and easy "Days Til Christmas" counter. For the project you need either a plastic plate or a ready-to-decorate wood frame, chalkboard paint, multi-surface paint or acrylic paint, ribbon, scrap paper, Bistro chalk markers, chalk, double-stick tape, and a hot-glue gun.


This version has a spot for your favorite picture at the top. I painted the edges of the frame with Americana multi-surface paints, and the part with the counter, with the chalkboard paint. Around the picture is a frame of printed scrap paper and under it a quick bow. Use Bistro markers to write a more permanent "Days til Christmas" at the bottom of your chalk board, and the chalk to write in your daily count down. As of today, we have 80 days til Christmas.


Our second counter is on a plastic charger plate that we have in specifically for Christmas this year. Paint the chalkboard paint on the flat, center part of the plate. The cute bow at the top is simply hot-glued on. A note on the chalkboard paint: follow the directions closely. The paint will take 24 hours to cure before you can write on it with the chalk. The "Days til Christmas" saying is again written with the more permanent Bistro marker, and the countdown is in chalk.

80 days left til Christmas. Are you ready?

Puna @ Enchanted Lake

Sunday, October 6, 2013

Spooky Halloween


Aloha Crafters ~

Today's Idea & Inspiration is scary Halloween Decor. Here on Maui, we are getting ready for Halloween in a big way. We have a variety of animated ghouls, ghosts and witches to haunt your Halloween festivities, plus ideas on how to display them.

Come by and get "spooked", or check out:  www.youtube.com/watch?v=jGgOqbhMwYY

Happy Crafting!
Robin @ Kahului

Friday, October 4, 2013

Crankin' Out Crafts Episode 298 Tombstones (Halloween Decoration)


Our last DIY for this week is a tried and true favorite. Brandon will show you how to create realistically scenic tombstones.

Brandon shows you how to make realistic tombstones!

Watch our how-to video here: Crankin' Out Crafts Episode 298 - Tombstones

Supplies:
Styrofoam block
Black Design Master spray paint
Acrylic paint in gray, green, and brown
Paint brush
Saw
*Optional pieces of cardboard*

Tombstones made out of Styrofoam are great for outdoor decorating.

Thursday, October 3, 2013

BFC Fall Keiki Craft Class

Our Fall Keiki Craft Class starts October 7-11 from 10-12pm. This is a great opportunity for the keiki's to create awesome crafts and make great friendships.

Ben Franklin Mapunapuna Store will be having 2 Make n Take's on Saturday, October 5, 2013 from 11am-1pm.

Celebrate World Card Making Day with us! Make a card at the store for any occasion.

Candy Crush Craft: Are you a Candy Crush Addcit or know someone who is? Come in for a great Make n Take that will showcase your passion for Candy Crush! You can choose between a Smart Phone Plug Charm or a Candy, may you want to do both!


Fall Keiki Craft Classes at ALL STORES October 7-11, 2013 (10am-12noon)


This week-long program was specifically designed for kids 8 years and older to expand their imagination by utilizing tools and techniques in a fun & creative environment. By the end of the week, your child will go home with 10 unique projects for you to share with the rest of the family and treasure for a lifetime! Project Info: Mon, Oct.7 - Class Shirt / Fall Fan; Tues, Oct.8 - Monster Ball / RTD Pail; Wed, Oct.9 - Canvas Painting / TicTacToe Magnet Set; Thurs, Oct.10 - Halloween Mask / Wind Chimes; Fri, Oct.11 - Halloween Ornament / Halloween Lei. Sign-up today at any Hawaii BFC store. Fee $60 includes all supplies for 10 crafts. Space is limited! Click on image to download Registration Form. See stores for more details.

Painted Glass Ornament by Frank Dumlao

Frank Dumlao is a painting instructor here at our Mapunapuna store. He dropped by and did a demo on Saturday, September 28. He painted these beautiful glass ornaments.

Check out our store calendar to see the dates and times to learn at one his classes One Stroke w/ Frank Dumlao class.
http://www.bfcraftclub.com/joy-crafting/craft-calendar


Happy Crafting! Beth @ Mapunapuna BFC

Wednesday, October 2, 2013

Crankin' Out Crafts Episode 297 - Ghost Family (Halloween Decoration)


For today's ghoulish DIY, Puna walks you through the super fast steps to make a cute trio of ghosts.

Ghost Decoration

Watch how to make this easy Halloween craft here: Crankin' Out Crafts Episode 297 - Ghost Family 

Supplies:
Three paper mache cones in different sizes
White acrylic paint
Black acrylic paint or paint pen
Pencil
Paint brush

This is a great Halloween project to include your children in; they can make up their own ghostly faces.

Tuesday, October 1, 2013

Crankin' Out Crafts -ep296 Pinata Costume


Welcome to our DIY Halloween themed week of Crankin' Out Crafts. To start things off, JFlo shows us an especially cute and easy Halloween costume.

DIY Pinata Costume for Kids

Catch this episode on our YouTube Channel: Crankin' Out Crafts Episode 296 - Pinata Costume

Supplies:
T-shirt
Felt in many colors
Headband
2 Paper mache cones
Ribbon
Double-stick tape
Scissors
Hot-glue gun and gluesticks

A really cool thing about this costume is that you can pull the felt pieces off of the t-shirt if you need to reuse it again.

Don't forget to scroll down and read today's earlier post - Market City shares a festive holiday project!

Deco Mesh Christmas Garland

DECK THE HALLS WITH DECO MESH!!! FA LA LA LA LA...... ! 


Deck out your halls and banisters with awesome Deco Mesh Garlands. It is easy, fast and looks GREAT!


Supplies:
Deco Mesh (WE used the sparkle Silver)
Large Poinsettia
Pine Picks
Chennille Stems

Use the chenille stems to secure the deco mesh to the banister by just bunching the deco mesh up and twisting the wire around it. For each "Puff" in the garland pull a length of deco mesh about 15" and then bunch and tie it only about 8" from the last tie, this will create a nice poof! Use the chenille stems to tie a poinsettia at the base of each puff. Take the Pine Picks and fill on the gaps so the whole top of the deco mesh is crowned with Christmas picks!! YES, IT IS THAT EASY!!!

Thank You for looking and CRAFT ON!!! ~ Deborah @ Market City