Saturday, October 21, 2017

Pompom Ghost

         Pompom Ghost


Material List:
Pompom Maker
White Yarn
Sharp Scissors
2x2 Black felt
15mm Google Eyes
Hot glue gun


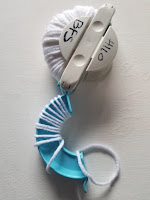
1- The pompom maker opens from both sides, open one side. Start to wrap the yarn around it. Make it as full as possible; just make sure you can close it.
2- Open the other side and do the same. Cut the yarn when done


3- You will need a 12” piece of the yarn
4- When both sides are fully covered with the yarn & closed. Take your scissors to cut down the middle of each side.
5- Take the yarn, put in the middle and tie real tight.
6- Then pull out the sides.
7-Take you scissors and Shape. Starting at the top of the pompom,  cut small and work your way down the pompom.
8- Leave it long on the bottom. Shape it, so it looks like both side are going out
9- Glue on your google eyes to the front and make a mouth out of the felt and glue on. .


 JOY @ Hilo Ben Franklin

Monday, October 16, 2017

Rustic Wood Ornaments!

Hey everyone! 
Christmas is right around the corner, and I wanted to show you how easy and fun it is to use pretty holiday papers on wood slices and how you can further embellish them with shiny foil words, quotes, and patterns!


Supplies:
wood slices
matte Mod Podge
pretty holiday cardstock papers
scissors
pen / pencil
brush
assorted colors of Minc foil
Zig 2-way glue pen
assorted tree picks and sprays
hot glue / hot glue gun
laser wood cutout holiday silhouettes 


 First to make cute holiday backgrounds on your wood slices, trace circles around them onto the pretty papers, and then cut them out. Apply the matte Mod Podge with a brush to the wood slice and adhere cardstock circles to them.

In order to use the Zig 2-way glue pen and the Minc foil, write a word on the paper and allow to dry. (3-5 minutes) When the glue is fully dry it becomes tacky (as opposed to wet) so it can pull the foil from the sheet and become a pretty shiny design! 

If you want to get really fancy, you can add some laser cutout holiday images and use it as a dimensional accent to the top of your cardstock wood slice!


Once the glue is dry, apply foil (pretty side facing up) and press firmly with your finger until you see glued image showing through the foil. When you peel upwards, you'll find that your foil has transferred! Just in case the foil didn't full pull off the sheet, you can reapply the foil to any remaining tacky areas. Feel free to also reapply the glue pen and layer colors together! Have fun foiling!!  


Use your hot glue gun / hot glue to adhere silhouettes, or pieces of picks /  sprays to wood slices!
Ta Da!
So easy and so cute!!  

Have fun decorating!

Bethany @Enchanted Lake

Monday, October 9, 2017

'Moon Phases' Coasters

Hey crafters!
HouseMart Ben Franklin has so many cute wood projects to decorate and customize!
As soon as I saw this coaster set, I knew I had to turn them into moon phases!


Supplies: 
wood coaster set
paintbrush
black, white, gray acrylic paints 
black or white water based acrylic fine tip paint pens
Krylon triple thick clear glaze spray


Paint your moon phases, or pretty designs of choice, then wait 10-20 minutes for paint to dry. Write your words with the paint pens, and then spray with your super glossy spray to protect the image from water damage! So cute and so fun to customize such practical house items! These would make great gifts as well! 

Happy Monday!

Bethany @Enchanted Lake 


Saturday, October 7, 2017

Boo wood disc


                       Boo Wood Disc


Material List:
3 wood disc
Creamcoat   White, Orange and Yellow paint
Black Deco marker
Pencil


-      Paint the top of the Disc. White, then the middle part with Yellow and and blend.
-      The bottom part will be orange and blend into the yellow part.
-      Now paint all 3 discs.
-      With the pencil put the b on the first disc, O on the next 2
-      Go over the pencil with the black Deco Marker

                   Have a spooky Halloween


                                                Joy @ Hilo Ben Franklin

Monday, October 2, 2017

Haunted Pumpkin Diorama!

Hey holiday DIY experts! 
Oh my goodness, I'm so obsessed with this new festive project! HouseMart Ben Franklin still has a few of these dense carve-able Styrofoam pumpkins left, and it occurred to me that I could build a scene inside of one!


Supplies:
Dense styrofoam pumpkin
xacto blade
acrylic paint in 2 colors of gray, black, red, butter yellow, and dark purple
1" wide nylon brush
cup of rinsing water / paper towel
black spray paint
BoBunny black Perler Pen
circular wood disc
sticks that look like a tree
Halloween resin miniatures (jack-o-lantern and gravestone)
copper wired firefly lights (3 AA batteries) 
hot glue / hot glue gun
assorted moss
paper cutout of a moon


First using your xacto blade, cut out an oval circle shape from your pumpkin. 


Next, paint your pumpkin outside dark gray. When dry, lightly and roughly brush the light gray over it. Spray paint the inside black and wait to dry.

Once dry, paint inside the pumpkin with acrylics a sky gradient with the colors blended from black, to purple, to red, to yellow all the way to the bottom, so that the inside of your pumpkin looks like a perfect background for a creepy sunset!

Wait to dry, and then set up wood disc and Firefly lights battery pack inside the base of your pumpkin. Hot glue in place. Allow for easy access to change batteries as necessary. 

Hot glue the paper moon to the inside ceiling of the pumpkin with a clear thread. Hot glue mosses and tree and resin miniatures in place. Again allow for easy battery changes. 


Hot glue the firefly lights every 3 bulbs to the inner circle of the pumpkin. This will create really nice front lighting. I avoided putting any lights too far back. 

Then I used the black BoBunny Perler Pen and made raised tiny black dots all the way around the opening of the pumpkin.


So super cute!
Hope everyone is having fun getting into the spirit of the season! Have a great week!

Bethany @Enchanted Lake