Friday, October 28, 2016

Minimal Fall Garland

Well, it's almost the end of October, and it honestly makes me feel so sad!
The Autumn season is fleeting!  It's time to make the best of it.
We've got one more month to go, so it's never too late to put up some fall décor.
The project I have today is very minimalist and requires only a few supplies. 
Don't fret!  It's simple quality is what makes it ADORABLE.  Also, it's great for kids!
Although, because this requires basic sewing skills, close supervision might be needed for younger children under 7. 
Let's get started!
 
+ + + + + + + + + + + + + + + + + + + + + + + + +
 
 
Supplies Needed
Felt in Autumn Colors
Embroidery Floss in Autumn Colors
Embroidery needles
Scissors
Yarn or Jute Twine
Permanent Marker (optional)

+ + + + + + + + + + + + + + + + + + + + + + + + +
 
 
First, cut out leaf shapes from your pieces of felt!  I chose orange, olive green, golden yellow, maroon and brown.  The simpler your leaf shape, the better.  You can use a marker to draw your
leaves first as well.


Second, use the embroidery floss to sew on some veins.  I have a step-by-step-process pictured below.  Basically, you want to work your way up from the bottom of your lead and sew the veins from the sides to the middle.

After the veins, go ahead and cut out some letters if you'd like.  I cut out the word "FALL", but other words like "GIVE THANKS" or "AUTUMN" would be really cute as well!  You can use any color, but for this garland, I chose black so that the word stands out from the leaves.


After that, hot glue your leaves and letters onto some yarn or jute twine and hang it up! 
Now you can enjoy the beauty of autumn leaves in your home.  For us in Hawaii,
(who can only see the leaves change color on dying mango trees) this would be a great
garland to make and put up year after year.
 
Have fun!
Erika @ PC


Wednesday, October 19, 2016

Halloween Photo Booth Frame

If you haven't started planning your Halloween party yet, it's time to get started!
Today, I have a fun and easy project that's sure to please friends and family of all ages.
This generation seems to be all about instant photos again.  Polaroids have made a comeback in
a BIG way, the technology being even more popularized by Fujifilm's Instax camera series. 
Photo booths are also a big thing!  I've seen them at many holiday parties, complete with props.
What better souvenir to take home from a party than a photo?  Frozen memories, right?
Here, I have a fun prop that can be made using very basic techniques and
only a few supplies.
 
+ + + + + + + + + + + + + + + + + + + + + + + + + + 
 
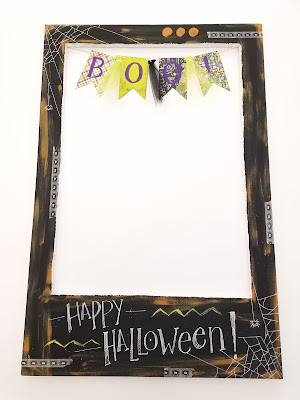
This takes the humble foam board and makes it into something special and memorable!
The only supplies I used to color it was acrylic paint in Halloween colors, a white acrylic paint marker and some washi tape.  The banner within the frame is made out of cardstock and tulle and hung on a piece of baker's twine.
 
I first cut out the inside of the board using an X-acto knife.  The opening is about 16x22" and there is a two-inch margin on the top, left and right side of the opening as well as a 6 inch border on the bottom.  I used the iconic look of the Instax photos because the dimensions of the foam board was perfect for it.  Plus, the extra space at the bottom left room for more decoration and messages!
 
I chose a basic black as the base color of the frame and then distressed it with some Bittersweet orange Ceramcoat acrylic paint using a dry bristle brush.  After that was dry, I stuck a few pieces of cute spider washi tape in a few areas and then doodled and wrote my message on it using a Deco-color acrylic paint marker. 
 
I cut a basic pennant shape out of some Halloween cardstock and used Ceramcoat's Passion purple to paint on the letters.  Some black and apple green glitter tulle was used to add a little more texture to the banner.  After stringing everything onto some baker's twine, I hot-glued the ends to the back of the frame and let it bow into the opening a little. 


And now it's done! 
This is such an awesome activity to have at and holiday party and I highly
recommend it.  Have fun and see you all next week!
 
Erika @ PC

Tuesday, October 11, 2016

Spooky Snail Mail

What is UP my crafty peeps?
We've had a bunch of new Halloween scrapbooking collections, all from the best names in the business!  American Crafts, Doodlebug, Bella Blvd. and Pebbles have some fantastic and adorable designs for all of your creepy crafting needs.  I had a lot of fun creating a board of a bunch of different ways you can mix and match Doodlebug's collection, Boos & Brews, specifically.
What's better than customized and colorful snail mail?  This activity has been gaining popularity again, including special items like watercolored postcards and "pocket letters".  What better way to send some love to family and friends during the holidays?

 
Here are a few examples of what you can make with this collection!  It's very colorful and bright, with a cutesy Mad Scientist and Haunted House theme on each paper design.  There are also a few sheets that have strips of sayings or cards that you can cut out if you don't want to use the full design on the other side of the sheet. (Yay for double-sided paper!)
 
 
Potion bottles, rainbow curlicues, strips of stars, moons, spiders and fun-colored eyes are among the many designs available!  So much fun to mix-and-match!


Here is a mix of ephemera that are available in Doodlebug's "Odds & Ends" Ephemera pack.
You can't handle the cute!  This is less than half of the pieces that are included.  Such a deal!
And who doesn't love WASHI TAPE?  Here are the four Halloween designs they have.  The spider one is what I used on ALL of the pieces in the first photo!  So adorable!
 
So, get your creative juices flowing and let loose!  Don't be afraid to mix designs and media.  That's the beauty of the collection.  Everything's so fun and colorful that you can't go wrong with whatever combination you make!  Don't forget:  Doodlebug's awesome Baker's Twine!  I grabbed a bright neon green color to add a little more texture to the pieces.  Also, distressing does wonders when you want to tone down the bright colors.  Graze the edges of each component with a brown stamp pad!  This is the effect shown below.  Even though the designs are more on the kiddie/cutesy side, a little bit of old vintage charm can help make it more for the adults!

 
Have fun sending your Spooky snail mail this Halloween.
If you do, we want to see posts on Instagram!  If you've purchased any of our wonderful holiday scrapbook collections and made some amazing mixed media postcards or envelopes and letters, take a photo and please use the tags "#bfcrafts" and "#spookymail!
Can't wait to see what everyone conjures up!
 
See you next week!
Erika @ PC

Wednesday, October 5, 2016

Doodle Bug Aloha Tip Jar

Doodle Bug Aloha Tip Jar


What we used...
  • Doodle Bug's Pineapple Scrapbook 12"x 12"Paper (NEW!)
  • Montana Paint Pens in White and Green
  • Americana Satin Acrylic Paint in Turf Green and Gold
  • Ready to Decorate Wish Bank
What you'll need...
  • Blue Painter's Tape
  • Paper Trimmer
  • 1in. Paint Brush or 1in. Sponge Brush
Prep your wish bank, whip off any dust or dirt from the wood. Now we don't want paint on the glass, so take your Blue Painter's Tape and cover up the edges of the glass where it would meet with the wood. Tape up the inside glass too if you're going to paint the inside. On the outside we painted our wish bank Turf Green from Americana's Satin Acrylic Paint using a sponge brush, for more control use a paint brush. For the inside we painted it with Gold from Americana's Satin Acrylic Paint.

Next while the paint is drying, your wish bank needs a nice background. Since we just so happen to live in Hawaii, pineapples seems so fitting. With Doodle Bug's new paradise line it was the perfect choice. Just like fitting a picture into a frame, trim down your desired scrapbook paper down to fit the back with your Paper Trimmer. We like the new Fiskar's Re-enforced Paper Trimmer, cuts perfect straight lines and comes with a scoring piece as an added bonus! When the paint is dry you can insert your new background image.

On top of the glass, Montana Paint Pens were used to write "Tip Jar, Mahalo" White was used for "Mahalo" so that the more tips there were, the more visible it would be.

Time to update those tip jar cans! This is a great touch for those local business to add into their shops! With the bright green and gold paint with the iconic Hawaiian pineapples, it's hard to miss.

Thanks for crafting with the Krazy Goo!


Monday, October 3, 2016

Starry Stone Cauldron

Hey fellow crafters!
Check out this crazy amazing cauldron!


And it's SO easy to make!

Supplies:
Krylon charcoal stone spray
glass bowl with curly feet
plastic or vinyl stickers (stars) but you can also use alphabet letters
rubbing alcohol/cloth or paper towel
newspapers to protect surface
firefly lights


First wipe down your glass vase with rubbing alcohol and a cloth. This will remove any smudges or fingerprints so the spray can coat the glass evenly.

Then apply your stickers all over the face, ensuring that the edge is smooth and flat with the glass. You don't want the spray to drip behind the sticker!


Then lay the vase upside down on your newspaper, blocking the inside from any of the mist and spray away! Keep in mind the texture will occur quickly. Though it comes out at high pressure you'll want to do more coats vs. coating it all at once in order to avoid pesky drips. 

This stone spray needs to dry completely before removing the stickers. No sneak peeks! Let sit for 1 hour, then carefully peel off your stars.


Throw in some warm white firefly lights in there to really make your stars shine!
Or red and purple lights would be fun!
Happy Autumn!

Bethany @ Enchanted Lake

Sunday, October 2, 2016

FALL LOVE


Fall Love


Flowers
Paper Stern wire
Orange satin ribbon 7/8
Fishing line

Small fall leafs
Yellow/orange paper
Olive green paper
Orange burlap ribbon 5/8”
Die cut machine.  Need 2” letter 
Glue Gun and Glue sticks

·         


 Take the 2 Paper stem wire and twist them together to make a circle


      Take the floral tape and wrap around the two sides that you twisted together
·         Using the orange satin ribbon. Wrap around the whole thing. Use a little glue once in a while to make sure it does not shift.


·        
·         
·         When done shape the circle into a heart form
·         With the glue gun put leafs all around the heart.


Take a piece the orange burlap, place it across the middle of the heart.
·         Then using the die cut and the 2” letter cuts. Cut out the word fall in both colors. Glue them to the burlap ribbon
·         


      Attach the fishing line to both sides of the top of the heart
·          Decorate the top with the flowers


                                                           @ HILO BEN FRANKLIN

Saturday, October 1, 2016

Crepe Paper Pumpkin Goodie Bags

Need something to pass out this Halloween, but placing them in those treat bags not enough?
Here's something easy and simple to do, and that's just too darn cute. The kids are going to love it!
Making it and/or receiving it this Halloween.


Here's what you'll need!
  • 9.75" x 9.75" Orange Crepe Paper Folds (not streamers)
  • 3" long Green Decorative Tape (duck tape worked wonders!)
  • Black Vinyl Sticker Sheet (optional)
  • Scissors
  • Candy
You can pick up all your supplies at your nearest friendly Ben Franklin Crafts Store!

Open up your Crepe Paper Folds and unroll it twice.
Cut that fold into halves, and you got your 9.75"x 9.75" square.
This should create a 3"x 3" pumpkin.
Tug on the sides to stretch out your crepe paper just a smidge.
Don't tug in the direction of the grains, it wont stretch that way and end up ripping.
Place a handful of those cadies in the middle!
Take all four corners and sides, bunch them up at the top.
Make sure your candies are secured.
Caution with the crepe paper, it is delicate. Pull too hard and the candies will pop out!
Twist the excess crepe at the top nice and tight.
With your 3 - 4" Green Duck Tape, secure the top and wrap it around to make the stump.
To give your pumpkin a happy face...
With the Black Vinyl Sticker paper, cut out two triangles and a oval.
Cut the oval in half and cut out little squares for the teeth.
Place your stickers on your pumpkin and have fun this Halloween!

Thanks for crafting with the Krazy Goo!