Saturday, April 30, 2016


                                      Aloha from Joy at Hilo Ben Franklin on the Big island of Hawaii

                                This week we are featuring a “Mother’s embrace” Mother’s Day card.


Materials used:
        (1) 5” x 7” Card (Any color)

-          (1) Brown card stock 4 ½” x 6 ½”  

-          (1) Pink card stock 4”x 4”

-          (1) Green card stock 3” x  3”

-          (1) Blue card stock 3” x  3”

-          Black sharpie pen

-          Paper scorer and cutter

-          Double stick tape

-          3D foam squares


Now we put it all together:

-          Cut out shape’s provided for you

-          Tape the 4 1/2x61/2  brown card stock to the front of the already made card

-          Take the 4x4 pink card stock, trace and cut out the Mommy bird out of it.

-          Take the 3x3 blue card stock, trace and cut the baby bird with it

-          Take the 3x3 green card stock, trace and cut the both arms out of it.

-          Place 3D foam squares at the neck and bottom of the Mommy bird and place onto the card

-          Place double stick tape on the back of the head, and a 3d foam square on the bottom of the Baby bird. Then place the head under the neck of the Mommy bird.

-          Using the double stick tape, place the arm without the tab on it over the mommy. When looking at the card, it will be on your right hand side.

-          Place double stick tape on the tab on the arm, insert the tab behind the baby bird’s head.

-           Make sure the arms are overlapping and tape. If they are off a little, the cut to match.

-          Attached is a Diagram of the placing for the bird’s and arms.

-          Take the Sharpie and draw in the eyes and legs.


                       All that’s left Is to write a message and sign the card and give it to Mom.


                                                   Hilo Ben franklin

Thursday, April 28, 2016

All About Davilla; Watercolorist and CZT

Hi, Everyone! 

I wanted to take the opportunity today to introduce one of our new independent instructors here at the Mapunapuna Ben Franklin, Davilla Harding.   

Davilla is an exceptionally talented watercolorist and Zentangle artist -- as well as a certified Zentangle instructor, or CZT -- with many years of teaching experience who we are excited to say will be offering her extensive knowledge to our customers beginning with her first class in May. I'm going to share a bit of her bio with you, as well as a brief interview that she was awesome enough to do.  


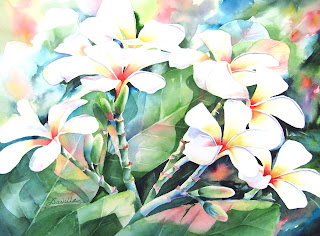
First and foremost, a bit about her classes! During the first watercolor class, starting May 12th, students will be painting Plumeria. I love how she talks about watercolor; she talks about making the paint 'dance' with light and color, and she really means it! Her paintings are so incredibly vibrant and engaging. Isn't this gorgeous?

As of this moment, Davilla is scheduled to teach 4 different watercolor classes -- two floral pieces and two still life -- and 2 Zentangle classes. Each of these classes is 4 sessions long, with one class per week. 

Davilla is not only talented and engaging, but truly a lovely person. We are so very excited to have her joining us. But don't take my word for it; she'll be in the store demonstrating her technique this Saturday the 30th at 12:00pm. Come say hello, get to know her and get your name on that class list! Space is limited...I've already got my name down! **Psst, her first Zentangle class is in June, make sure you get your name down for that one soon, too!

 Her art has been shown in a number of exhibits and can be found in collections all over the country. Davilla's artwork has been published and she has won numerous awards, which is hardly surprising given her talent! Here's what she had to say during our recent Q&A when I peppered her with questions about her background:


Q: How long have you been on Oahu? What brought you here? 
A: I have lived on Oahu a little over 3 years.  It was a natural for me to move here as Hawaii has always been considered a "second home" by several of my family members.  My mother was the first to come here in the early 1930s when she graduated from college.  Being part of a military family, we lived many places around the world, but my mother (and any other family members who cared to join her) often traveled back to visit Hawaii whenever there was an opportunity

Q: How long have you been painting? Did you start with watercolor, or did you start with a different medium?
A: I have been painting with watercolor since I first walked into a watercolor workshop in 2005, and an instructor was giving a demonstration.  It was "love at first" as I saw the watercolors  dance across the watercolor paper with their beautiful translucence.  I like to say that was the day that watercolor "discovered" me.

Q: How about zentangle? When did you first start tangling? What inspired you to try it out? 
A: My love for the art of Zentangle came about 5 years later when I first saw a large painting which combined watercolor and the "tangles" of Zentangle.  I subsequently took a workshop on this art technique.

Q: The process of getting certified as a zentangle instructor is not an easy or fast one. What made you decide to pursue it? 
A: As people saw my Zentangle art, they wanted me to teach them this wonderful art technique. However, as you know, you must be a Certified Zentangle Teacher (CZT) in order to teach this art method.  I attended the required seminar for certification in Rhode Island and have been so pleased to be able to share this wonderful art form!

Q: I know that you were a school teacher for many years. What inspired the transition from teaching children, to painting, to teaching adults to paint? 
A: When I retired from 31 years of teaching, I wanted to continue to pursue creative, productive activities.  That is when I walked into my first watercolor class as described above.  For me, passing along the beauty of watercolor and/or Zentangle is the perfect "marriage" of 2 different disciplines/arts!

Q: If you had to pick three things, what are the most important lessons that you want your students to take from your watercolor classes? 
A: This is a wonderful question!  I always have many different goals and objectives for the classes I teach, but primarily I want the participants to achieve the following:
1.  Learn the basic principles of design and composition so they can develop into independent artists
2.  Discover the "magic" of watercolor as they learn to let the watercolor  paint itself and/or experience the meditative art form of Zentangle.
3.  And most especially, have FUN as they create!

Q: What are you most looking forward to about teaching at Ben Franklin? 
A: I'm looking forward to [teaching] at Ben Franklin as it such a wonderful "hub" for creative people to come and find numerous possibilities and methods for their individual art expression! I've already enjoyed meeting the dedicated and devoted staff who are committed to helping the customers "discover" their own artistic journey!
  For more information on upcoming classes, feel free to look for me or talk to any of our awesome associates at the registers. Oh, and if you want to hear a funny story, ask Davilla or myself about fate playing a hand in her joining the team.

To check out more of Davilla's amazing artwork, visit her webpage at www.artworksbydavilla.com

Thanks for reading! 

Chelsea @ Mapunapuna


Tuesday, April 19, 2016

Steampunk Mermaid Jewelry Box

Mermaids?  Lovely!  Steampunk Mermaids?  Ah-maaa-ziiiing!
This week's project uses the new Graphic 45 - Under the Sea scrapbook paper that our stores got in
a couple weeks ago.  The name is somewhat misleading because when they were put out, we found out that they were not like any other ocean-themed paper we've seen before.
In fact, there was a very quirky Victorian Steampunk twist to it.  Which was AWESOME.
Seriously, why did we have to wait so long for this paper??


Alright!  I took one of our really cool unfinished jewelry boxes to decorate using this scrapbook paper. To get started, I painted the outside with Chalky Finish in the color Treasure to give it a cool ocean feel.  I then Mod Podged scraps and cutouts of the paper onto the top and sides of the box.  I also Mod-Podged scraps of the Seashell print onto the interior bottom of the jewelry box.  
 Inside, there were little compartments that I painted using the brighter colors that were present in the paper to compliment the teal blue of the chalky finish.  After Mod-Podging more cutouts on the bottoms of the compartments and one onto the mirror that was underneath the box's cover, I painted the inside of the box with a bright Satin Americana paint in the color Leprechaun.  
After that, I distressed the sides of the box with Delta Ceramcoat in Metallic Gold 14K.

As a finishing touch I embellished the box with some of Tim Holtz' small metal gears and small beads using UV resin... Juuuuust to add a little extra Steampunk feel.  And there we have it!
Always remember:  Make it your own and have fun.  We have a TON of scrapbook
designs available for you to customize your very own jewelry box and a plethora of unfinished wood boxes for you to choose from.  There are seriously so many choices, so don't hesitate to ask for some ideas and inspiration.  
That's what we're here for!

Erika @ PC


Wood Chest Grad Card Box

Hello Crafters!

Keeping with our graduation theme, today we'll be working on making a graduation card box out of one of our wood chests!
 
 
Card boxes can come in all sorts of shapes and sizes, and since we have a large variety of wood boxes and chests, this can be a perfect opportunity to get creative with them, just in time for graduation. Just like last week, I'll be keeping to the McKinley High School theme for this chest. So what I did was paint the top of the chest like the head of a tiger, the McKinley mascot, while keeping to their school colors, black and gold. For extra flare, I gave him foamie ears on the back, and fangs when his "mouth" opens up to receive cards. Along the front I glued "2016", which can easily be a graduate's name instead for your card box.
 
 
For this project, the materials I used are:
- Unfinished medium sized wooden chest
- Design Master yellow spray paint
- Design Master glossy black spray paint
- Black Ceramcoat Acrylic Paint
- Citrus Ceramcoat Acrylic Paint
- 2mm Goldenrod Foamie Sheet
- 6mm Black Foamie Sheet
- 6mm White Foamie Sheet
- Yellow/Gold cardstock
- Accu Cut Machine (Not Pictured)
 
 
First step for this card box is spray paint. I spray painted the inside of the chest with glossy black, and the entire outside with yellow. I suggest you spray the inside first, but try not to get any of it on the outside of the box. Spray the inside first so when you paint the outside, you can cover up any mistakes you made.
 
Next, once that's dry, sketch out the pattern of the tiger head with a light pencil. Like last week, I used the McKinley High School sticker we have in Ben Franklin as reference for the tiger. Only draw the top half of the tiger's face across the top off the chest. Remember, the opening of the chest will serve as the "mouth." This is optional, but I continued drawing the sides of the tiger's face down the sides of the chest.
 

Once you have your pattern all sketched out, go ahead and paint it with the acrylic paints. I used black for the tiger stripes and nose, and white for part's of the tiger fur and his eyes. I painted the rest of the chest that wasn't a tiger black, so that includes the front bottom half of the chest.
 
Now for the fun part. while the paint is drying, you can start on his ears and teeth. From my white Foamie sheet, I cut two long curved triangles, "fang" shapes. It's important that when you cut these out, leave an extra inch or so at the base of each fang. Now cut two more pieces of foam that are about an inch by an inch and a half rectangles. With your two fangs pointing towards you, and curved toward each other, you are going to glue one rectangle piece on the top base of each tooth.
 
Now you are going to glue the fangs to the chest. Apply the glue to the rectangle parts of each fang, and glue them to the inside of the front of the top of the chest. Place them according to where the mouth is painted on the outside of the chest. Now your tiger has some teeth! The extra rectangle pieces are to keep the teeth from being flush with the chest so it can still close properly.
 
Now for the ears. Out of the black 6mm foam, I cut two "shark fin" like shapes with rounded tops. (That's just what the tiger's ears looked like to me.) If you want to make them more triangular, that's ok too. Next, trace the black shapes onto the yellow foam sheet and cut two matching pieces out. on each yellow piece, cut out a smaller "fin" or triangle shape from the bottom of the shape. Now glue the yellow pieces to the black pieces, but make sure you glue them on opposite sides, so you'll have a left and right ear.
For this last step I just used scraps of my yellow foam, but you are free to make them the same shape as your ears, but leave about an inch extra length on the bottom. Glue these pieces to the backs of each ear. Now each ear should have a tab at the bottom.
glue each tab to the back corners of the top of the chest with your ears facing forward. The back of your chest should look like this.
 
 
You're almost done! Now all that's left is to decorate the front. I cut out "2016" in yellow cardstock in the typewriter font from the Accu Cut and glued it to the bottom front of my chest. Of course this would also be the perfect spot to have a graduate's name as well.
That's it! You tiger grad card box is complete! Of course this is just one of many possibilities you can create for ta unique card box for the graduate's special day. Good luck and I hope this was helpful for some creative ideas!
 
James@ Market City


Monday, April 18, 2016

Shadow Boxes : Hot Air Balloon

Today's project is DIY shadow box making!


Ideally when you put together your own shadow box display, no matter what season or occasion, you are going to want to consider 3 different basic elements.

     *your flat background (can be solid or patterned or include a photo)
     *text (your message or quote or caption)
     *3 dimensional objects (the things that will fill the space inside)

If you stay true to this recipe, you can't go wrong!
Shadow boxes are great to showcase all kinds of things. Think of it as new level scrapbooking. 
The most popular occasions would be:

     *to display a family member's photo with tiny treasures
     *show a summer or beach scene
     *Engagement photos with mementos
     *Graduation pictures
     * "Baby's Firsts"
     *Christmas scene
     *Birthday Box
     *Vacation trips
     *your favorite quote
     and the list keeps going!

For the shadow box I made today, 
the supplies you will need to recreate it are:

shadow box with an unfinished wood frame
assorted solid and patterned cardstock paper
matte or gloss Deco Page glue/sealer
Exacto blade
acrylic paint
brush or foam-on-a-stick
foam Pop-Up-Dots
double sided tape
baker's twine
ball point pen or pencil
scissors
assorted sizes of white pom-poms
hot glue gun & glue sticks


First,
Paint your frame using your acrylic paint. I used a dark maroon. Dry time should be between 30 mins to an hour. 

Then using your Deco Page and brush/foam-on-a-stick, glue a piece of your cardstock to the backing of your frame! After 5 minutes, cut off the edges with an Exacto blade.

(The cardstock I chose had the phrase, "Oh! What a beautiful day!" on it and had pictures of clouds smiling so I was inspired to make something that was sky related. Thus the hot air balloon idea was born!)


Then hot glue 3 white pom-poms to the baker's twine. Length should be the as wide as your shadow box. Glue ends in place inside the frame, about halfway in between the front and back so that your string looks like it's floating.


Next to draw the hot air balloon, sketch out a circle. Then extend circle down to make a light bulb shape. Don't worry about all the sketch lines, the secret is to turn it around to the other side once we have the perfect shape. 


Once we have our balloon shape, trace it on to another piece of cardstock paper. Taking the lighter color, draw stripes up and down, then cut along the lines. You will only be keeping every other stripe.


Stack your stripes on top of your first balloon using your pop up dots. These will make the stripes stick out!
Then putting a strip of double sided tape to the back of the balloon, stick the 3 strings of baker's twine, and then either glue or tape to the back of the "basket" of your balloon.


Then simply attach balloon via pop-up dots to the backing of your shadow box frame and ta da!
So cute.


I used a Decocolor white acrylic marker to draw arrows on the top to add some more detail. Drawing on the outside adds something different than what you'd expect from a typical frame.


And there it is! 
Adorbs.

Have fun making your own shadow boxes! Explore new themes and ideas!
Have a great week :)

Bethany @ Enchanted Lake

Saturday, April 16, 2016

                              Aloha from our Island of Hawaii
     .
  “U“want an easy graduation centerpiece/front table piece?            


Materials:
   -  Piece of black glitter paper             5x5.
   -  9.5” Wood Letter
   -  Embroidery thread (choice of          color)
   -  Elements Brads
   -  Design Master 14KT Gold               Spray paint


Now this is going to be real easy:
n Choose a wooden letter.
n  Spray it with the design master 14KT gold.
n  Set to the side dry.  
n  Make a tassel using the DMC embroidery thread.
o   I used the Beadalon Tassel maker tool to create the tassel.

o   Poke a small hole in the middle of the glitter paper. Wrap the tassel around the brad. Then put the bard in the hole and close.
n Take the low temp hot glue gun to clue the cap to the letter.

                      
                                 MAHALO!  JOYT@HILOBEN               

Thursday, April 14, 2016

Mermaid Lap Desk


Hi there, Crafters!

For today's project, I decided to follow the old adage of "waste not, want not" and use the materials I had from last week's Mermaid Art Journal to create a project I've been itching to try; a fun and functional lap desk. I'm so in love with this Voyage Across the Sea collection, I was thrilled to be able to work it in to another project.

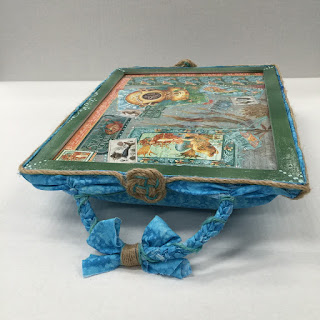
I started off by choosing an 11"x14" frame. Any frame will do, (the 11" x 14" is a great size, although you could also go a bit bigger for a roomier desk,) but since I had already decided that I wanted to use Krylon's Sea Glass spray paint in Aqua I went for one in white. Technically, the sea glass spray paint is made for glass but I'm a crafter, and rules are meant to be broken when it comes to crafting.


While my frame was drying, I started working on the collage that serves as the decorative top to my desk. The best part about this project is the fact that anything you can think of can be added here;You can display family photographs, art work or if use a shadow box, you can even glue in small objects. It will all be protected by the glass or acrylic sheet that comes with the frame! In my case, I used the left over pieces of card stock from last week's project, a couple of coordinating pieces of card stock and finally accented it all with the same BoBunny glitter paste and pearlescents and a few self adhesive rhinestones. My collage went in to the frame just like it would if I were planning on hanging it on the wall, and the pillow bottom was created by using a couple of our fat quarters, pillow stuffing and hot glue.


Here are a few pictures of how it looked while I was still working on it:


After my fabric was glued and pillow stuffing stuffed, it was just a matter of braiding my handles and adding the decorative accents I had decided on:

I wanted to stick with a nautical theme, so I tied in (pun intended) rope and twine. I wrapped the rope around the entirety of the frame twice using hot glue, and created a 'knot mat' on either side. This is totally optional, but I do think it added a nice touch to my finished product. The extra fabric at the end of each braid was made in to a bow and wrapped with a piece of twine. How cute is that?
When all was said and done, the finished product was a gorgeous, light weight and shockingly comfortable lap desk. I'm so pleased with it, I'm already working on two more; one for a gift and one to keep! 


Want to make one yourself? Drop on in and we'll get you all set up! Talk to you soon :)

- Chelsea @ Mapunapuna

Wednesday, April 13, 2016

Crankin’ Out Crafts: Lei Making II

Episode 474: 3 Straw Round Lei

Beth explains how to create a one-of-a-kind lei with 3 straws and yarn.


Supplies
Handcrafted Lei & Flowers XI, page 32
3 skeins Nani Yarn- your choice of colors
3/8"Grosgrain Ribbon (cut grosgrain to lei length plus 24" more for tying)
Scissors
Tape
3 Bubble drinking straws

Click here to view this episode

Episode 475: 4 Straw Round Lei 

Watch as Beth demonstrates her favorite lei, the 4 straw Lei.


Supplies
Handcrafted Lei & Flowers XI, page 33
1 skein Ali'i yarn your choice of 1st color
1 skein Ali'i yarn your choice of 2nd color
3/8" Grosgrain Ribbon your choice of color (cut grosgrain to lei length plus 24" more for tying)
2 kukui Nuts
Scissors
Tape
4 bubble drinking straws (2 colors)

Click here to view this episode

Episode 476: Candy Lei

A sweet how-to video treat by Beth.


Supplies 
Handcrafted Lei & Flowers V, page 58
1 Pkg Lei netting
Curling Ribbon or Satin Ribbon
Assorted Candies
Scissors

Click here to view this episode

Tuesday, April 12, 2016

Anchor Wood Panel Art

Afternoon, Crafters!
Today I have a "Pin-spired" nautical-themed piece of art that can be re-created with just three items! Seriously!  It's an easy and fast gift for that ocean-loving friend or for yourself to use as some
really cool beach décor.
 
 
The only things you will need to make this is paint, a 9x12 inch wood panel and some jute rope.
You're going to need two or three colors of paint to create that ombre effect on your wood panel.  Darkest blue will go at the bottom, then you keep mixing in more and more white to tint that color as you move toward the top of the panel. 
Next, paint on an anchor in pure white, being sure to leave a little space at the top and bottom of it.  Hot glue a few strips of our new Studio G jute rope on to the top and bottom for some accenting texture and there you have it!
 
This is, again, a very fast and minimalistic piece of nautical art that can be "spruced up" and personalized quite easily.  Write a friend's or loved one's name on it.  Mod Podge some sequins onto the anchor.  Glue some shells or starfish on it. 
Create your own masterpiece!
 
 
Have fun!
Erika @ PC

Graduation Poster Board

Hello Crafters!
Since graduation season is upon us, today we’re going to talk
about graduation poster boards!
 
Today I’ll be focusing on this graduation board I themed with
McKinley High School. Their colors are black and gold, and their
mascot is a tiger. As you can see, I stayed with a black and yellow
theme, and added their mascot in the background.
 
 
What I used for this project was:
-20x30 foam board
-Design Master Black Glossy Spray Paint
Citrus Ceramcoat Acrylic Paint
- Black Cardstock
- Yellow Cardstock
-Scrap Poster board (Not Pictured)
-Masking Tape (Not Pictured)
-Accu Cut machine (Not Pictured)
 
For my sample graduation boards, I cut our 20x30 foam
boards in half, just for the sake of making multiple sample boards
while using less materials. Feel free to make a full sized board for
your project.
 
First, I spray painted my board all black for the background,
again, this is just because of the multi purposed board. You are
free to start with a black, or any preferred color board.
 
After that was dry, I used the in store Accu Cut to cut out
“2016" with the School House font out of a scrap poster board to make a stencil.
I secured the stencil down to my board with masking tape and sprayed over it with yellow.
Extra note, I taped my stencil down from underneath the stencil rather
than around, so when I sprayed over it, the edges of the border will
be visible afterwards. This was intentional for that “graffiti” painted
style.
 
Once all the spray paint has dried, I started painting the tiger
logo with my citrus acrylic paint, using the McKinley HM High
School stickers we sell in store as reference.
 
Next step is the words. I used the Accu Cut Typewriter font to
cut out “Congratulations class of” out of yellow cardstock. Now on
my board, here is where I made a mistake, but actually turned out
to be a pretty cool effect. Some of my words clashed with the
yellow tiger in the background. To fix the problem, I cut out the
same letters that was clashing out of black cardstock. Then I
overlay yellow over the black, resulting in a cool shadow effect that
helped distinguish the words from the yellow background.
 
 
After that problem was solved, My McKinley grad board was
complete! I hope this helped you get ideas and techniques to
decorate your own grad boards to support your fellow graduates!
One last quick tip, it was easy for us to make our boards more
“school themed”, but personally I’d suggest you make your boards
more personal for that specific graduate your supporting. If they’re
in Cross Country, make a big pair of shoes! If they’re a
photographer, go for a huge camera! Get creative! The possibilities
are endless! Happy crafting!

James@ Market City

Monday, April 11, 2016

Seashell & Sand Garden Pot

Happy Monday!
Today I'm going to show you how to make a beachy garden pot for your lānai!


Supplies:

terra cotta pot
Krylon sand colored fine texture spray
pack of white shells
clear E6000 glue


First,
Spray your entire pot with your texture spray. Because the "limestone" sand color is so pale, you'll need to spray more in order to get a nice even coat. Let sit for a few hours outside.


Next, 
once textured pot is completely dry, glue shells around the outside using your E6000 glue. (Because the pot is curved you only need to apply glue to the inside of the shell on the top middle area and bottom middle area, as shown in the next picture.)
Because it is best to let this glue sit over night to completely cure, I tied a string around the shells to hold them on to the pot as they dried.


And that's all it takes! It definitely dresses up any front porch or garden nook. 
Happy Crafting!

Bethany @ Enchanted Lake