Thursday, March 30, 2017

Lit Up Lei

 Happy Graduation season everyone! I've been thinking about how cute all of the different colors of Firefly Lights are, and how fun making a one straw lei is, and I decided to put the two together!! All you'll need for this fun and glowy project is a strand of Firefly Lights, a straw, your chosen yarn, tape, scissors, and batteries. I showed the main materials here.
Begin your lei the same as you would any other one straw lei, except instead of stringing a ribbon through your straw, you're stringing the end of your Firefly Lights instead. Tie a loose knot at the end of your straw with your yarn around your wire. Now it's time to begin the fun part, wrapping around your straw!

 Continue to wrap your yarn around your straw, pushing the excess down along your wire until you fill your wire or finish with your yarn skein. Make sure that you spread your wrapped yarn evenly so that not a whole lot of wire is exposed! Add your batteries into your battery pack, and flip the switch on! You'll even be seen at night now! Great job!
I hope you enjoyed!!
Megan @ Mapunapuna


Thursday, March 23, 2017

Sweet Little Succulent


 I am always fascinated by succulents and how little upkeep and care they need. Unfortunately, I am one of those people that cannot maintain one of these gorgeous plants. I decided I needed to make myself one instead. Materials needed to make yourself a cute little succulent plant include a sheet of a green felt, a needle, scissors, and thread. I used an extra strong string for mine.
Cut out different sizes of long triangles, try to make about five or seven of them all the same size of each size range you make. This will make your plant look more even. Once they are all cut out, the next step is stringing your thread through your leaves. 
Make  sure when stitching through your leaves to either fold it as seen above, or to just make sure to go in and out as seen below. It is important that all of your leaves are sewn on the same way as one another, otherwise you will have some that end up upside-down.
 
This is how each leave will look when pulled properly from above. String all of your leaves from biggest to smallest, and pull on your string once you have them all placed on. your string will coil up nicely and make a sweet little plant. The below picture is shown of the plant from below. 


There are only four layers in this plant, with the size of the leaves jumping from very large to quite small, you can vary yours to give all kinds of different looks to your plant! You can leave it outside and by itself, or you can place it inside of one of these tiny terracotta pots.  I really enjoyed the look both ways, it's totally up to you!!


Make this project your own and have fun!! 
Megan @ Mapunapuna

Wednesday, March 22, 2017

Ivy Bunny Bowl


What We Used:
  • One Ivy Bowl
  • Foam Craft Sheets, White and Pink
  • White Craft Pom Poms, 1/4 in and 2 in.
  • Spring Colored Ribbon, 2" wide
  • Googly Eyes, 15mm
  • Low Temp Hot Glue Gun
You'll need:
  • Scissors
  • Glue sticks for the Glue Gun
  • Pocket Lighter

Cut out shape of head and ears of White Foam Craft Sheet and Pink Foam Craft Sheet for inner ear and nose.

Glue pink ears to the white base, and your craft pom poms about 3/4" of the way to leave room for the big pompoms for it's cheeks. After pompoms, glue googly eyes and nose.

Tie a bow around the neck of the bowl, below the crimp edge. Cut tails at a 45 degree angle. To prevent fraying, a pocket lighter can help. Don't touch ribbon to the flame, let the heat melt the edges slowly.

5 Large pompoms for it's arms and feet go on the bowl as show. One more for it's fluffy back side!

OR! Come Join us for a workshop on March 31st for $15 at HM Ben Franklin Crafts, Market City. All your supplies will be included.

Saturday, March 18, 2017

Hearty Clay Rose

Hearty Clay Rose


Supply list:
White Hearty Clay
Tools
Daniel smith Water color Red and green


Put a small amount of White hearty Clay in your palm of your hand, roll it into a small ball. Then using your thumb press it flat into a shape of a petal. Take it and start to roll it into a bud. It will be the base of your rose.

Repeat process, but you will roll it onto the bud to start to form your rose.
Take another piece of clay to make your leaf. Make an ellipse shape with the clay. Take your tool and press into the side to give it the leaf effect. As shown in picture.
Then take the sharp end of the tool and make the veins for the leaf.
Set it aside to dry. Will take about 8 to 24 hours.


When dry you will paint it. Take a small drop of each color.
With your brush add a small amount of water. Then paint the rose. You can use less water for a darker color and more water for a lighter color.
Then paint the leaf. The same way.

   You now will have a rose that will last forever!!!!


    Joy @ Hilo Ben Franklin

Thursday, March 16, 2017

Felt Macaroon


Happy Thursday everyone! My sweet tooth has hit me again while crafting, and this time I made a macaroon. It was so fun and easy to make, a craft that the little ones can help with and enjoy.
The materials that you'll need for this craft, are two sheets of felt in whatever colors you choose, about a handful of Polyfil, string, a needle, scissors, and two circles to trace for size reference.


 I made two large circles and two slightly smaller circles on my first color felt, and one slightly smaller circle (the same size) on my second color felt. Cut those out once you've traced them all.

Sew in and out around the edge of your large circle, and once you've finished all the way around, tug on your string slightly. 
As you're tugging on your string, place your large circle onto one of your smaller circles for size reference. If your large circle is now smaller than small circle, now is the time to trim those down to size. 


You can now begin to fill your open circle with Polyfil. Be sure not to overstuff!! It won't look like a cookie if there is too much in there.

You can now sew your first smaller circle of the same color onto your larger beginning circle. Make sure that you are closing it up all of the way, and leaving a little room around the edges as well.


Repeat the first process so that you have two edges and one circle of filling. You can now stitch them all together to complete your cookie!!


There are so many variations to this that you can make, have a great time making your own little colorful French macaroons!!!
Megan @ Mapunapuna

Saturday, March 11, 2017

Shamrock Mason Jar

                                                                 Shamrock Mason jar


Supply list:
 Mason jar
24kt gold Design Master Spray Paint
Vinyl Sticker
Accu-Cut Machine
Die cut#
Firefly lights


 Take the Vinyl Sticker and Cut out the Shamrock using the Accucut and Die #   .
  Put the Sticker on the top of the Mason jar. Then With the 24kt Gold Spray Paint.
Spray paint the Mason jar and the lid.  Set to the side and let dry.
When dry peel off the sticker. You will end up with a gold mason with a window of a Shamrock.
 Set the Firefly light inside

    Happy St. Paddy’s day!
     Joy Hilo Ben Franklin


Monday, March 6, 2017

St. Patty's Day Leprechaun Hat Cups


St. Patrick's is coming up fast, so today's craft are cute little leprechaun hat cups! Use them as decoration, or as functional drinking cups for a St. Patrick's themed party!


Essential Materials:
  • Oyster Votive
  • Two shades of green foam sheet
  • Glitter gold foam sheet
  • Black satin-edged organza ribbon
  • Ballpoint pen
  • Scissors
  • Exacto knife
  • Double stick tape
Optional Materials:
  • E6000 glue 
  • Alcohol ink 
  • Black deco pen
  • Ruler
  • Black satin ribbon

Making Your Hat:
     Step one: Make the brim. 
Flip the votive upside down and trace the wide end onto the darker green foam sheet, then cut it out. Use either double stick tape or the E6000 glue to attach the foam circle to the bottom of the cup.
A 2" Fiskers thick punch could work too!

      Step two: Attach the belt. 
Wrap your ribbon around the cup and cut it to length (just about 7"). Use double stick tape or glue to attach the first side, then wrap it around (making sure to keep it level) and attach the ends.

      Step Three: Make your buckle and lucky shamrock. 
Cut out your buckle and shamrock from paper, then trace them onto the appropriately colored foam sheets and cut them out. Use the exacto knife for the inside of the buckle. Once everything is cut out attach them to the cup using either glue or tape. Make sure to use the buckle to cover up the seam from where the ribbon ends meet!


Feel free to trace our template, or get extra creative and make your own!

       Step Four: Finished!
Use the black deco pen to outline the brim and shamrock, and add a little detail to the shamrock leaves. This is optional, but it makes everything look like a fun cartoon!


Want to get even more creative? Add some color to your glass using alcohol ink, or use green glitter foam to give things even more pizzazz!
This cup is a combo of Pesto and Stream, but we have lots of shades of green to choose from

Remember, alcohol ink can be washed in water without harm, but it is alcohol soluble. Be aware of how you intend to use your cups before you choose your decoration!  Have fun and happy crafting! 

Saturday, March 4, 2017

Starfish Wishes!

Hey Crafters!
If you guys haven't been down to any of our stores recently,
you seriously need to make the trip.  ESPECIALLY if you are a wood crafter!
We have so many unfinished wood pieces for everyone to paint and decorate
that it's insane!  Never had we had this big of a variety in our stores.
And for you ocean-themed décor lovers out there, you will love all of the nautical
items we have been getting in as well!
Coral sprays, seaglass pieces, laser-cut mermaids and scientific octopus illustrations; 
If you can name it, we've got it.  Today, you can mark this post as "Starfish Spam" because it is just starfish-themed wood crafts galore!
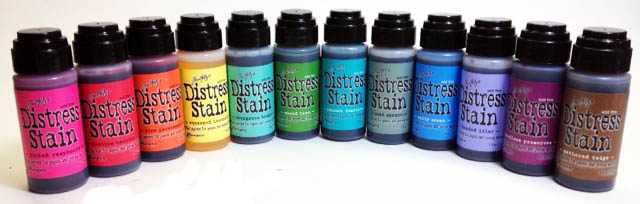
Another magical technique that I learned from our amazing Visual Merchandiser, JFlo, is the use of Tim Holtz' Distress Stains to give an interesting and colorful look to the wood pieces.  Because many of the woods are lighter in color, the stains will appear as a vibrant watercolor effect on the surface!
You can even stain the wood with multiple colors and distress it even more with acrylic paints for a vintage "shabby chic" look.
Below I have a small box distressed with light pink and cream-colored stains which was then distressed with a few streaks of Delta Americana acrylic paint in the color Chocolate. This particular paint color gives more of a gel stain feel with some fine golden glitter mixed in.  It looks SO GREAT with it and definitely adds that extra special something!

I then hot-glued a small white wooden starfish cutout, which were sold in a pack with a variety of sizes.  This one seemed perfect.  Don't think you can't distress this little starfish too, because it will look awesome with some stain and paint as well!  And the little white speckles around the starfish?
White Sakura Gelly Roll.  YEP!


This strand of beaded cord was too cute to pass up!  I needed to put it on something as a decorative and beach-y, ocean-y accent.  So, I took a small wooden easel sign, colored it with a few stains in cream and a few shades of green and blues and then distressed the edges with Ceramcoat paint in the color Wedgewood Blue.  I then hot-glued a small piece of the cord to the side!
This can make a cute table-number sign, menu board, a desk memo board or even just a cute frame for your precious memories.
Finally, just to appreciate the pure essence of a starfish, here we have... a starfish!
This is a pallet that I painted with Delta Americana's Waterfront, which is a bright and fun shade of turquoise!  I then distressed the edges with a brown stamp pad.  Yes, you read right!  Stamp pads are great for distressing because you've already got your ink on a felt pad and all you need to do is rub the edges of a project with it.  Perfect every time! 
I still felt like the blue needed to be toned down a bit more to achieve that vintage ocean-themed look I was going for, so I went with Tim Holtz' Distress stains in Burlap and Walnut.  These are both brown tones, with burlap being the lighter cream, yellow tone and walnut being a deep and rich brown.  I had to be careful with Walnut, so I just took a synthetic flat brush, tapped it onto the stain bottle's felt top and streaked the color onto the wood. Using a little water, I was able to spread the dark color on and make it look more like aged wood without it appearing too streaky.  To add a little extra something, I streaked a little Ceramcoat Metallic 14K Gold over the surface.  It also gave the surface more dimension.  Then, I hot-glued a pretty white starfish onto it!  Simple yet elegant. 
Not just aged, but Vintage and Chic!

Stop by to check out our selection of wood pieces today and I am guaranteed that you will find that perfect piece for your desk, coffee table, bedroom, anything!  You will be amazed.
Also, don't forget to stop by our scrapbooking and hard crafts departments for some Distress Stains and Acrylic Paints!
Have fun and see you next week!
Erika @ PC