Wednesday, June 29, 2016

Fairy Garden Treasure Box

Happy Summer, Everyone!
The Summer Equinox has officially come around with an awesome display of the Strawberry Moon.
(Unfortunately, the cloudy sky made it difficult to see but at least we have something to look forward to in 2067.) 
It's the official time for reading!  Beach reads, Travel reads...  It's summer tradition!
My craft for this week is incorporating another big fad that we're bringing back this year: 
Fairy Gardens!
Whaaat?  Summer reading and Fairy Gardens?  
Not as crazy as you think.  See, I'm thinking fairies read too.  
I'm sure they have miniature books in their miniature shelves inside some oak tree library. 
So, they've got to be in on this summer reading thing too, right?  
Here's a peaceful little place I think a fairy can do just that. 


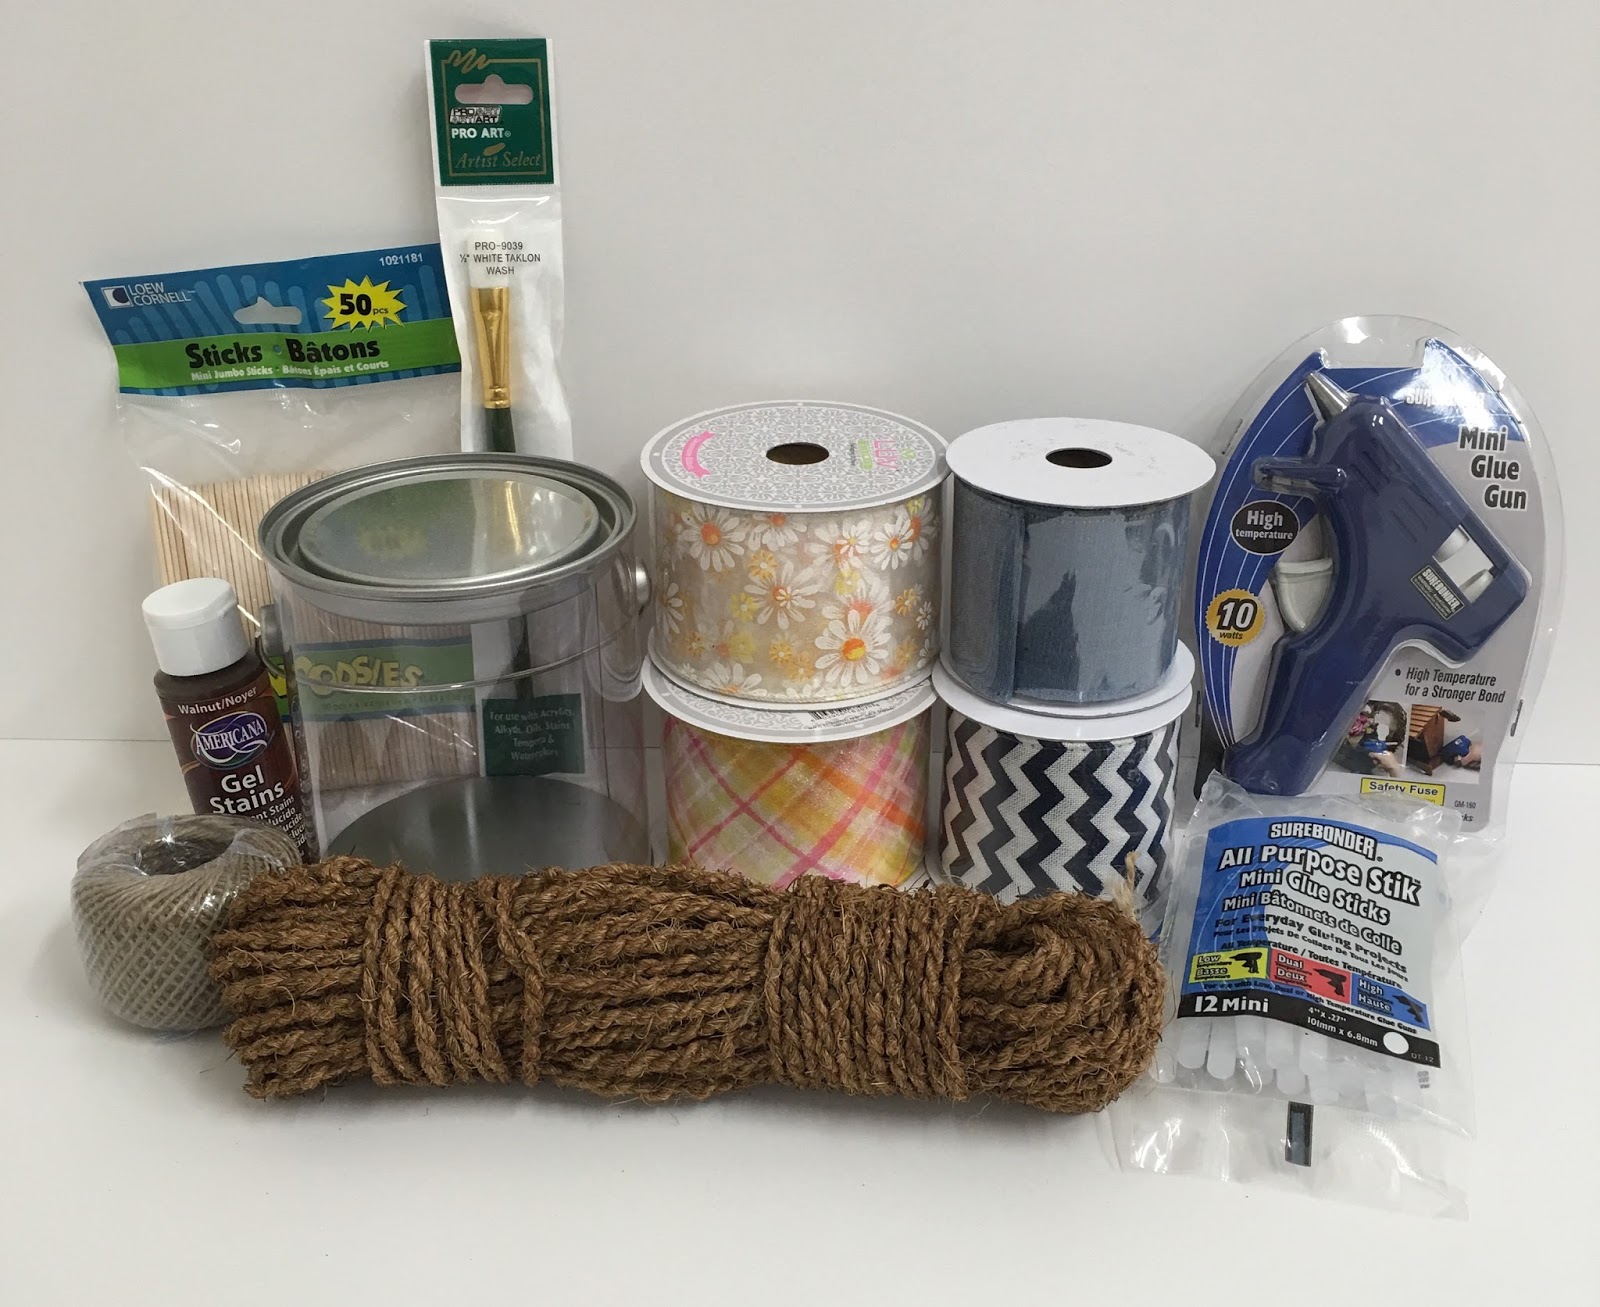
Here's what you'll need!
- Paper mache treasure box
-Acrylic Paint (not pictured)
- Plastic Succulent cuttings
- Moss 
- Floral Wire 
- Paper 
-Wood pieces
- Wire cutters
- Round-nosed pliers
-Hot glue gun


 I went ahead and painted the individual pieces of wood first to create my own furniture.  I also hot glued a loop of floral wire to create a chair backing.   You can use whatever colors you want for your furniture set.  While those were drying, I painted the treasure box in a Steel Grey (Delta Americana) and distressed it with Ceramcoat Metallic 14k Gold for some accents. 


I then took small squares of cardstock and stacked them to make mini book pages and hot glued them together.  After this, I cut a small piece of darker kraft paper cardstock to make a book cover.  After the treasure box was dry, I stuffed the bottom with Spanish moss and added some succulent cuttings in the corner to look like bushes, added a few drier pieces of moss to cover up the holes on the side and hot gued the furniture into the main carpet of moss.


That's all she wrote!  
This is a great summer project to do with the kids because it allows them to use their imagination to create their own world.  It's something fun that will definitely take their mind off sweltering summer heat, so save it for one of those rainy days when you need some enchantment.
Have fun and see you next week!
 
~ Erika @ PC ~

Monday, June 27, 2016

Rope Octopus Wall Art

Happy Monday!
Today's craft is perfect for any under the sea themed room in the house!


Supplies:
wooden pallet with the slats close together
thin coconut rope
scissors
pencil and eraser
thin round nylon brush
wide nylon or bristle brush 
cup of water and paper towel
hot glue gun/glue sticks 
Americana acrylic paint in the colors Cocoa Bean and Waterfront


First, paint your entire pallet with the Waterfront Americana paint using your wide brush. Rinse your brush in the cup of water and dry with the paper towel. Let pallet dry for at least 30 minutes. 


Then with a pencil and eraser, sketch out the general shape of an octopus.


Then take your coconut rope and start hot gluing it to your pencil lines, being careful not to use too much glue or else you'll be able to see it. Cut the rope along the way if you come across any points where the octopus arms intersect.


Take your time and glue the rope a little at a time, so the placement and bond is exactly how you want it to be.


And lastly, take your thin nylon brush and paint the Cocoa Bean color all around the outside of your octopus, making sure to get all the tiny corners.
So adorable!!!


 Bethany @ Enchanted Lake

Saturday, June 25, 2016

Fourth of July Center Piece

                           Fourth of July flower Center piece


 =


Material list
Vase
Red, White and blue flowers
Rocket pick
American flag
White tissue paper
Red,and blue satin ribbon
Floral wire gauge 26


·        Put the tissue paper inside the Vase.
·        Stick the flower into the tissue, inside the vase. Make sure the stem of the vase does not show
·        Cut a piece of floral wire in half. Wrap it around the pick and then pick a flower to wrap around. So it does not show. Do the same thing with the flag.
·        With the ribbon, make a beautiful bow for the front of the vase.

                                  @Hilo BenFranklin

Wednesday, June 22, 2016

POM-POM Garland


Something different compared to a pennant garland. Adds a cute fun touch to any occasion. Great for decorating a room too.
 
What you'll need
Clover Pom Pom Maker
(comes in four different sizes, 2 large and 2 small)
Any Desired Yarn
(whether it'd be cotton, wool, or my favorite :) , baby soft)
A REALLY Sharp Pair of good Scissors
(I liked using Fiskars)


With your Clover Pom-Pom Maker flip up the half circle arms and begin wrapping, and wrapping and wrapping. Back and fourth approximately 4 times from left to right. Then beef up the middle as seen in the right side pictures. Repeat onto the other half of the arms. Since you should've ended up on the right end as shown below, you can easily continue with the same strand of yarn. Rather then cutting it and worry about it unraveling. As seen below, to keep it from slipping away, bring your strand between the two arms and then continue wrapping, repeat your first steps.

 
After you've completed wrapping both halves, grab your really sharp scissors and cut your yarn down the middle on both halves like so. Careful as to not pull at the yarn. Cut two pieces of yarn, for tying and securing your pom-pom. Make sure you pull it and it's nice and tight! The reason for doubling up on the tie is because I kept breaking my yarn. After securing the pom-pom, your maker splits into two. Lift the halve circle arms up and pull on the white part, away from each other. You're going to want to leave your long pieces hanging out from securing your pom-pom. That way you can tie your pom-poms together or use it for key chains.

 
Not quite done yet, now the fun part. Shaving your pom-pom down into a perfect circle. Do not use a buzzer. You'll have to do it traditional barber style and use your scissors. I recommend trimming little by little. Because you don't want to take off more then necessary. If your want to do a vertical strand of pom-poms as seen below, before detaching your pom-pom maker, tie your previous pom-pom onto your current one on the opposite side from your current pom-poms secured line. Repeat to desired length.

 
Voila! Your Garland!
Thank you for crafting with the Krazy Goo!
 
- Sara Goo, Market City Ben Franklins Craft


Summer Keiki Craft Camp 2016 - Mixed Media Projects

Summer Sun and Crafty Fun all rolled into one;
THAT is what Keiki Crafts is all about during this sunshine season!
We spent the second day doing Mixed Media art and making them into greeting cards
and envelopes.  It was a BIG HIT with the kids!  Colorful bubbles were everywhere!
We mixed watercolors and alcohol inks into Miracle Bubble Soap to blow colorful bubbles onto our papers.   The bubbles fizzed, popped, foamed and overflowed onto the papers to create beautiful and whimsical shapes and designs in pretty pastel colors!  Remember when you used to mix that chocolate syrup into a cool glass of milk and then blew into your straw to make it bubble up to the rim of your glass?  We used this technique with the alcohol ink colored soap and let the bubbles overflow into our papers!

Mix alcohol ink and soap, then blow some fizzy bubbles!

Blowing rainbow bubbles creates a splash of pastel color!

Such a gigantic mountain of pink bubbles!
Big bubbles are a surprise!
Let the bubbles fall onto the paper!
 We also used crayons to draw and sketch on our watercolor and brushed on some watercolors to create a resist effect.  Wax and Water don't get along, so the result is a cool resist design!
Check out everyone's awesome watercolor art!

Here's everyone's masterpieces!
 If you're interested in learning about this amazing Keiki Crafts Camp, come into any of our stores
and we'll be happy to give you more info about it!  Sign up your keiki today!

Erika @ PC        

Monday, June 20, 2016

Coloring Book Transfer

Hey Everyone! 
All you avid coloring book fans are in for a real surprise! 

The Ben Franklin stores in Hawai'i all sell these wonderful assorted sizes in smooth wood "canvases" that are multipurpose and ready to mount on the wall! You can deco page paper on them, transfer images, paint, wood burn, draw, stain, wrap, and glue decorative things to them!

I wanted to turn one into a "coloring page" that I could keep or give to a friend. 


Supplies:
1 Photocopy or online printout of a coloring page (keep in mind words will be backwards!)
Prisma colored pencils (the more colors the better!)
matte Mod Podge
brush
cup of water and paper towel

Optional Supplies:
Glossy Accents: for clear and 3 dimensional shine
Micron pen: for retracing any lines that became muddled by your pencil


 ---


First take your matte Mod Podge and paint the surface of your wood panel with your brush. You don't need to apply a very thick coat as computer paper is thin, and you don't want to trap bubbles of Mod Podge unevenly underneath. Then ink side down,
place your coloring page on the wood panel. With your hands, smooth out any wrinkles or bubbles. Set this aside overnight.


Next, dip your fingers into the water cup, and somewhat saturate the coloring page with them. Rub the paper off with your fingers. Be sure not to let any fingernails or rings scratch the image. Just rub all of the paper off and your image will be on the wood underneath! As it dries, you might see certain parts turn white. That means there is still some paper left on the wood, so use water again and rub off the rest.


Once your wood image is completely dry, color away! Prisma colored pencils have the highest wax content of all the pencils so the pigment will go on nice and smooth and vibrant. They even color well over each other! Other cheaper pencils might not work quite as well because if they are "scratchy" with less pigment, the color might not get into the slight grain of the wood. 

If you can't invest in your Prisma colors yet, you can always use the Prisma blender pencil! It's basically a pencil with clear wax in the center. You can apply it afterwards to blend colors together and smooth them out, which helps diminish the "scratchy" pencil look.

Once you're finished coloring, you can seal everything with another layer of matte Mod Podge to keep everything clean and protected! 

Have fun with different kinds of images!

If you have an app that turns photographs into drawings, print those out and color them using this image transfer method! What a great gift idea!


Happy Coloring!

Bethany @ Enchanted Lake

Saturday, June 18, 2016

Painted Vase

                                    
                                Decorated Vase


-  Rect. vase 6.75x3x6.75
  SPC Glass Nuggets
  Deco Markers Color Yellow-pink-green
  Alcohol ink  
  Stencil
  Masking tape
  Design master varnish UV spray


   Take the glass nuggets put them in a plastic bag. Add a few drops of the alcohol into the bag and shake. If you would like a deeper color and more of the alcohol ink and shake again. Place the nugget’s on a piece of paper to dry overnight.
With the masking tape. Place the stencil on the glass. Start to paint with the deco markers. Do not press too hard on the pen, it will release to much paint and seep through the lines of the stencil. If you think it needs a second coat. Let dry completely before you do a second coat.
Set on the side to dry. Take the stencil of very carefully. Then take it outside and spray a light coat of the Design master varnish over the paint.
When both items are dry. Take the glass and put the nuggets inside.
     It is a real project. You can use any glass and stencil.  Have some fun with it.


                               @HILOBEN FRANKLIN

Monday, June 13, 2016

Rainbow Rock Buddy

Today's project is great for kids and for adults!
Sometimes I'll write positive messages on rocks and hide them all around town, give them as rock gifts, or let them hang out with my potted plants or in my garden.
You can even paint them as rock labels to keep track of which plant is which.
But whatever you decide, painting rocks is fun!


Supplies:
smooth stones or river stones
assorted colors of solid color or iridescent Scribbles puffy paint
assorted colors of BoBunny Perler pens
assorted colors of Americana acrylic paint
small round or chisel tip nylon hair brush
white Montana Marker or white Decocolor acrylic paint marker
cup of water and paper towel
gloss spray varnish by Design Master or UV resistant spray by Krylon


First paint your rock a solid color of acrylic paint. This will be the base color.
Black looks best for highest contrast with intense rainbow colors.
you can either paint a shape on your rock, or paint the whole thing. The Americana brand is best because it's designed for a variety of surfaces. When you're done painting, clean off end with your cup of water and dry with your paper towel.
Then wait 5 -10 minutes for your rock to dry.


 Start from the center and make rings of colorful dots going outwards towards the edges. You can use a variation in pressure when squeezing out the dots in order to make them bigger or smaller.


 Continue your patterns all the way around to the edges. When done, let sit for about an hour. Ta Da! Rainbow rock!


Or turn your rocks into cactus plants! I painted them green, then used Scribbles puffy paint to make lines, then once those were dry I used the Perler Pen to draw my X shapes and make tiny dots.


Write a message to someone special. Using the BoBunny Perler Pens will give you very round bubble pearl shapes as opposed to the more "chocolate chip" look that puffy paints can sometimes make. I used a Montana Marker to write directly on the dried paint.


Don't forget to spray your finished works of art with a gloss varnish or UV resistant spray to keep your creation safe from the elements.
Experiment with turning your rocks into animals, foods, portraits, plant life, garden labels, and secret messages!!


Bethany @ Enchanted Lake


Saturday, June 11, 2016

Father's day Box


               Father’s Day Box


Materials List
Money Box
Printed cardstock
Wood shapes
Creamacoat paint
 (I used Navy Blue, White and Pink)
Masking tape
Sponge brush
Mod Podge
 Double sided tape
Foam Square dots
Need a circle and square punch (purple color)
Black Deco paint marker
Will need to 2 pictures


-      


T    Take the back of the box off. Line the inside and outside of the edge where the box and the glass meet with masking tape. So you can paint the box without getting on the glass.
-          On the back piece of the box. , take the printed cardstock and measure it, then cut it out. After that use the double sided tape to put it on the inside of the back board.


Using the sponge brush and the creamacoat paint. Put a small amount of the navy paint on the brush. Then brush it on a separate paper. Then you will lightly brush onto the box. You can put as much are as little as you like. Set aside and let dry.
-          Wash your sponge brush and dry with a paper towel, so it will be ready to use again.
-          Take the wood shapes and paint them (paint them any color you desire), leave to dry. I used square and circle shapes.
-          Your box should be dry by now. Repeat the same as I did with the navy paint but with the white paint. Then set  aside to dry
-          When the box is dry you will mod podge the box.
-          Also want to put a small amount of mod podge on the shape, and then put the picture on the shape, put more Mod Podge over it. Repeat on the other shape too. Let dry.


-          When shapes are dry put foam square on the back side of them.Then put the shapes on the back of the box, which you put the printed card stock on. Arrange them the way you desire. Just remember that you need to leave room so the back still fits on the box.
-          When the box is dry, take off the masking tape.
-          With your deco marker write whatever saying goes with you theme. Like I wrote “Dad your our star” Due to I used stars for my background paper.
-          Then put the back on the box. You can add to it if you like.
-          Have fun with this father’s day craft


                      JOYT@Hilo Ben Franklin

Thursday, June 9, 2016

SUMMER TIME BIRD FEEDER

 
Here's what you're going to need...
  • SPC's Clear Pail - 1 pint
  • Loew Cornell's Mini Jumbo Popsicle Sticks
  • SPC's Coconut Rope - 2 ply
  • Americana's Gel Stain in Walnut
  • Pro Art's 1/2" White Taklon Wash
  • Any 2.5" Decorative Ribbon
  • SPC's Jute Rope
  • Mini Hot Glue Gun - High Temp
  • Mini Glue Stick
...and maybe some bird seeds.
 
Before you jump the 'glue' gun, the best thing to do first is glue down your gel stained popsicle sticks for your little birdies to perch on. So bust out that brush and give them a single coat with your Americana Gel Stain in Walnut. Then, that way you can conceal it under the coconut rope as you begin to wrap the pail. I went and stuck on three sticks so that more birds can chow down in your new restaurant. *Make sure your handle is on the side of your popsicle sticks, that way it can just hang under the bottom.
 
Begin gluing down your end point at the bottom, where your popsicle sticks lie, but still covering (all) the popsicle sticks. Just glue half an inch down with every inch inbetween. When you come to where the handles connect to the pail, end your rope and glue the end down. Begin measuring and cutting the ropes close to the handle points. Then glue to fill up the two points between the handle ends. After you've filled up the two points, continue wrapping around the rest of your pail. To add some color to your bird feeder, with your decorative ribbon go ahead and tie a bow around the fully wrapped coconut pail. The jute twine is for you to hang your bird feeder. Just wrap around it two or three times and tie a knot, leaving 5-6 inches on each side. Make a loop knot at the very end, and tie a bow to make it cute.
 
Voila! Happy full birds in your yard! Ejoy!

Thank you for Crafting with KrazyGoo!

Tuesday, June 7, 2016

Mermaid Scale Frame

Get ready for a whole lot of purple!
Instead of the usual teal and pink combination that we usually associate with 
the mermaid, I'm putting another enchanting hue in the spotlight.
Over the past few months, mermaids have been EVERYWHERE.
(We even have a mermaid birthday party as this month's Pinspiration Station theme
at our Pearl City Store!)  So, what I've decided to make this week was a
 mermaid-themed gift that was simple to make, 
and REALLY affordable.  It's also a great summer project to do with your kids.
This project, my fellow crafters, is a Mermaid Scale Frame!


 ~~~~~~~~~~~~~~~~~~~~~~~~~~~~~~~~~~~~~~~~~~~~
 Let's get started!

***  Supplies Needed  ***
SPC Wooden Frame
4 inch Wooden Letter
Ceramcoat Acrylic Paint*
1 inch Flat Acrylic Paintbrush
Hot Glue Gun or Wood Glue
Paint Pen*

*use color(s) desired


 The colors I used for my frame were multiple shades of purple, teal and white.
The exact names are Passion Purple, Lavender, GP Purple, White and Coastal Waters.
(The last color mentioned was actually a Delta Americana acrylic paint, which basically just dries to
a Satin finish instead of matte like Ceramcoat.)
I made a scalloped, "scale" pattern starting from the bottom of my frame.  
Every time I painted the next layer of scales up, I made sure to overlap the previous one. 
This is where you can have fun with the colors.  Even if you have only four or five colors,
you can mix them up to make new shades or even add depth to your scales.  For example,
I blended a little of the dark GP Purple into the lighter Passion purple shade to get a nice shadow effect.  After letting your scales dry, you can even add some detail by dotting on dark paint over the light-colored scales and vice versa.  


I then painted the wooden letter and added pearl detailing using a BoBunny Pearl Pen.
This is basically a puffy paint for hard crafts and scrapbooking.  It works on wood, paper and clay
and dries to a pearlized finish.  After this, I glued the 'M' to the top right corner of my frame!
To personalize it even more, you can even write the name of your friend, mom, sister or whoever the 
receiver of this amazing gift is on your frame with a paint pen.  I used a black fine tip Montana marker.  That wraps up this project!  As always, don't hesitate to change it up and make it your own.
Have fun with it and enjoy!

See you all next week!
Erika @ PC