Monday, August 31, 2015

Ombre Wood Bead Necklace

Today we are going to learn how to make a super cute trendy necklace with just a few basic materials!

SUPPLIES:
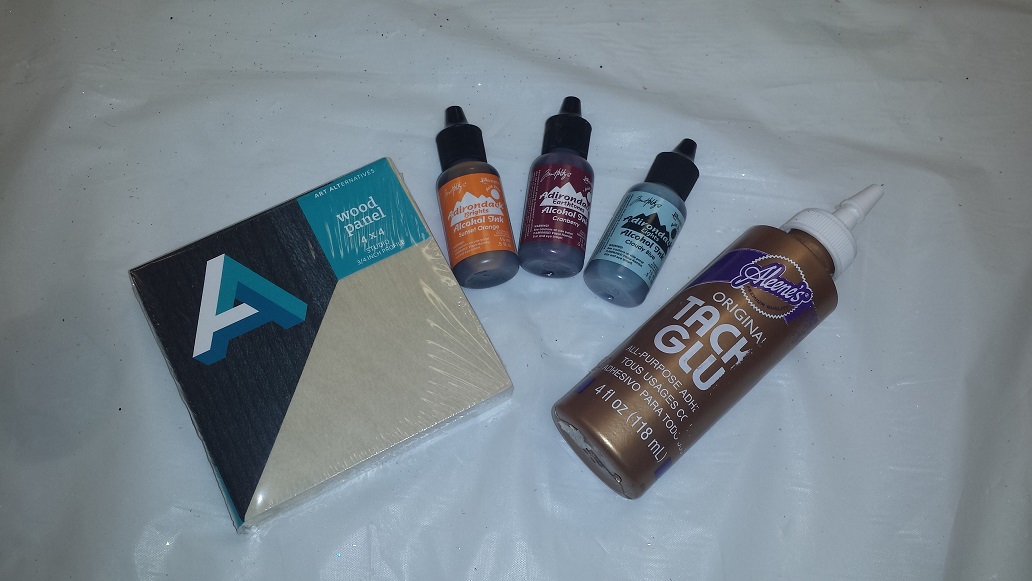
-wood beads (any one size, or varying sizes)
-acrylic paint (I used colors that would make a cohesive color palette)
-pencil
-fine tip thin brush
-scissors
-ribbon or string (I used a similar color to my paint colors)
-cup for water
-plastic bowl to mix paint
-optional: paintable varnish/sealer


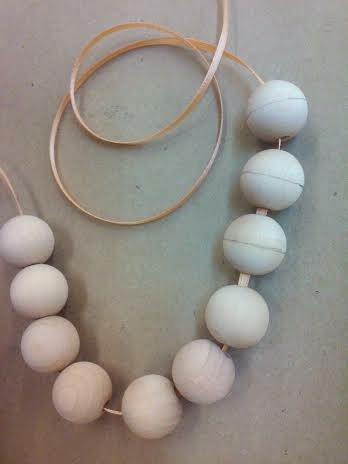
First thing we want to do is choose how many beads you want to go on your necklace.
I chose 10 because I didn't want the entire necklace to be all beads, I wanted the ribbon to be more a part of the look. Then draw a halfway line around your beads with your pencil. (Don't worry if it's messy you can erase it later.)


Once you've drawn lines on all your beads, string it on your ribbon to see where you want it to fall.


Once you have the length set, you can begin to paint your beads!
To have an ombre look, either start with the darkest color (if going from dark to light) or the most opposite color (if going from one color to another).

I started with my dark Coral.
Putting the bead on the end of the pencil will make painting easier.
When finished, use the stick end of your brush to pick up the bead through the hole and set down on a drying surface making sure to place it wood side down.


As you go from one end of colors to the other, add one drop into the mixture as you go.
Use your cup of water to clean your brush in between colors.


So in this photo I went from dark to light, adding more oranges and pinks and yellows as I went.
By adding one drop of the new color every time I painted a bead, it created a gradient within my necklace.

By no means do you have to make it complicated for your necklace to be cute, but have fun with it! The more you blend your transitions between colors, the more graduated your ombre will be!


Allow to fully dry for an hour before touching.
Once your beads are completely dry, you can erase the pencil markings off and
TA DA!
If you want to seal your paint, you can use a paintable varnish and that will give it a nice shine.
Allow to dry for another 2 hours.
I preferred the matte look to match the wood, but feel free to experiment!

String your beads with two similar colors touching each other.
Painted end to painted end.
Enjoy!


Bethany @ Enchanted Lake


Thursday, August 27, 2015

Solar System Communication Board

Hi there! Today I will be showing you this really cool project made by my coworker Claudia.  It's a solar system communication board! This is such a great project for astronomy and science lovers.


You will need the following supplies:

- Sculpey Clay (white)
- Reeves Acrylic Paint, 12 pack
- 12"x12" SPC Black frame
- 12"x12" aluminum sheet
- .5" and .75" magnets
- 2oz Chalkboard Paint
- Paint brushes
- Foam brush or sponge
- E6000
- 1 piece of white chalk

First, paint the aluminum sheet with chalkboard paint.  It will take 2 to 3 coats to cover it well.  Once the paint is dry, make stars using the white chalk.  Place the aluminum sheet inside the frame, behind the glass so that the chalk doesn't get wiped off. 

Next, mold the Sculpey into 5 spheres, the smallest about .75" in diameter and gradually increase size until the largest is about 1.5".  Carefully cut each sphere in half.  Bake them in an oven for 30 minutes at 130F. Remove and let cool for at least 20 minutes.

Once the clay is cooled you can start to paint!  You might want to reference an actual picture of the solar system to know what colors and what size to use for each planet.  Start with the sun, it'll be one of the largest spheres.  Paint the undercoat orange and use the foam brush or sponge to dab red paint over it to give it a textured look.  Paint the rest of the spheres and use different brush strokes and colors to create the different surfaces of the planets.


Once the planets are all painted and dry, use E6000 to glue your magnets to the flat side of the spheres.  Use the .5" magnets for the smaller planets and the .75" magnets for the larger ones.  Once those are dry you are ready to use your new communication board!


There you have it! Hope you enjoyed this project and until next time, happy crafting!

Rachel @ Māpunapuna

Wednesday, August 26, 2015

Fall Flower Memo Board

Hello, everyone!  So, the weather has been pretty gray and wet recently, but I hope you all are staying nice, dry and comfortable.  Nothing like staying home and crafting on a rainy day. Still eagerly waiting for the cold autumn weather to arrive though.  So excited! 
 
This week, we're going to be making a distressed wood memo board. 
 
 Supplies Needed
Wooden Sign
White Acrylic Paint
Brown Chalky Finish Crème Wax
Palette
Twine
Mini Clothespins
Paintbrushes (1 taklon/1 natural bristle)
Hot glue gun (Not pictured. Sorry! It was heating up!)

Let's get started!


First, give the sign two coats of white paint.  Let dry.
 
 
Second, dip the tip of the natural bristle brush in the brown wax.  Lightly brush the edges of each board with a light, transparent layer.  Make sure to follow the wood grain so that it looks natural.  Let dry.

 
Next, take the twine and hot glue the end to the back.
 
 
 Wrap the twine around the board three times, leaving at least 3 to 4 inches of space between each wrap. It's okay if the lines aren't straight.  Making them slanted gives it a more rustic look. Make the wraps tight, but do not pull it taut.  The mini clothespins are going to have to be able to fit! Hot glue the end to the back to secure.

 
I added a pop of color by hot gluing flower heads from a couple of the fall picks that we have in our stores this year.  It gave it that rustic, autumn look that I was going for.
 
 
These are memo boards are great for posting notes and photos.  They could either be propped up on your office desk or hung on the wall because these signs already come with rings on the back for hanging.  Very vintage and cute!
Of course, you could always make it your own by changing up the color and embellishments.  Some decals and mod-podged scrapbook paper would also be a great way to add some texture.
 
Have fun!
Erika @ Pearl City
 

Friday, August 21, 2015

Pawprint Art

Hello, everyone!  Today we'll be doing some art with the help of man's best friend.
This is a fun activity to do with puppies because, let's face it, what's cuter than little pawprints?
So, I decided to have my "furry cousin", Crystal, to assist with this project. 
Let's get started!

You will Need...
Non-toxic Acrylic Paint
Palette or Paper Plate 
Cardstock or Mixed Media Paper
Foam Brush 
 A bucket of warm soapy water
Washcloth
Your Dog! :)

I would also recommend doing this activity outside on some old newspaper or tarp.

 I decided to use Tropic Bay Blue, Caribbean Blue and Yellow.


 This is Crystal, the Golden Retriever puppy!  So cute!
  
First, using the foam brush, you're going to swirl the colors together a bit, or at least have them touching.  You definitely want a full paw print without any gaps. 


Take your pooch's paw and lightly dip it into the paint.  Don't press too hard, or the paint will end up between the toes and will create a blob instead of a pawprint.  If your dog is a bit fidgety like Crystal here, some treats will help. ;) You definitely don't want your dog to be licking the paint either!


The first print here is the result of too much paint on the paw.
 
 Next, holding the paper, press the paw into it, using your palm for support. I recommend using your palm because placing your paper on a hard surface would only give you a partial print. the curve and softer surface of your palm will result in a fuller and even print.  After you are done, make sure to wash your dogs paws right away!  Letting the paint dry will make it harder to wash off later.

I love how her fur added more to the prints.  They look like flowers!

Here are a couple of her best prints!  This is a great activity to do with your furbaby, and the prints would be adorable in a scrapbook, on ornaments, framed on the family photo wall and hey, even posted on the fridge!  As always, have fun adding your own twist and experimenting with different colors and techniques!

Erika @ PC

Thursday, August 20, 2015

Autumn Rice Mosaic

Hi there! Today I will be showing you how to make an autumn rice mosaic.

You will need the following supplies:

- Raw rice
- Alcohol Ink, your choice of colors
- 4"x4" Art Alternatives Wood Panel
- Tacky Glue
- Mod Podge
- BBQ Skewer
- Small bowls or an old muffin tin


First, pour a handful of rice into a small bowl or container.  Put about five drops of alcohol ink into the bowl.  Mix until all the rice is colored.  Add more drops if you desire more color.  Use a separate bowl for each color you're going to mix.


Next, use a pencil to draw your image on the wood panel.  If you are copying a printed image, you can use graphite paper to transfer it to the panel.


Spread tacky glue over a small section of your image.  Dip the pointed end of your skewer in the tacky glue to make the tip a little tacky.  Use it to pick up and place the rice down one by one.  Work in sections so the tacky glue doesn't dry out.


Once your entire panel is covered with rice, apply a coat of Mod Podge, either matte or glossy depending on your preference.  


There you have it! These look great if you have several that you display together.  They could also be used as coasters! There are lots of different things you can do with this.

Until next time, happy crafting!
Rachel @ Mapunapuna

Thursday, August 13, 2015

Falloween Jars

Hi there! Today I'll be showing you how to make two types of distressed mason jars, perfect for Fall/Halloween. The first is a candy corn pint size Mason Jar that's perfect as a centerpiece with some fall colored flowers.  The second is a pumpkin jelly jar that would be a great favor for your Falloween parties.

You will need the following supplies:

- One pint size mason jar and one 4oz jelly jar
- One 3/4"x1" cork
- Ceramcoat paint in Pumpkin, Hello Yellow, White, and Green
- Jute/twine
- E6000
- Sandpaper, preferably 150 or 180 grit
- Paint brush


We'll start with the candy corn jar.  First, paint the bottom third of the jar yellow.  Apply a thick coat of paint.  If you try to paint a second coat the first coat starts to peel off so try to just do one thick layer of paint.


Paint the next third of the jar orange and the last third white. 


Let the paint dry completely.  You can use a heat tool or blow dryer to speed up the process.  Once the paint is dry, distress your jar by lightly sanding off some of the paint. 


That's it! Now for the second jar, start by painting the whole jar orange.  Again, make sure you apply a thick coat of paint.  While that's drying, paint the lids green. 


Let everything dry before distressing.  The paint on the lids comes off really easily so make sure you sand very lightly. Put the lid back on the jar after you're done distressing.  Place a drop of E6000 on the center of the lid and on the narrow end of the cork.  Wait about a minute for the glue to get tacky before putting the cork on the lid.  Let that dry for a few minutes until the cork is firmly in place.  Cut about 10 inches of twine.  Wrap it around the base of the cork a few times then tie it in a bow. 


There you have it! Like I said these make great rustic looking decorations for your Fall/Halloween parties. 

Until next time, happy crafting!

Rachel @ Mapunapuna

Wednesday, August 12, 2015

Washi Tape Quill Pen

Hello again, everyone! Today we're going to have some fun with washi tape.  School's already back in session for the kids, so this is something that will definitely come in handy for them. Let's get started!
Supplies
Ball-point pen
Washi Tape
Twine 
2 sheets Vellum paper
Double stick tape
Hot glue gun
Floral Wire (for longer quills)*
Flush cutter*
Scissors 


*Note: The floral wire is only for long quills.  If you are making a quill that is only about 6 to 7
 inches long, you will not need it, for the vellum should be strong enough to stand on its own.
First, remove the ink reservoir.  I just twisted the cap off and pulled it out since the one pictured was retractable.  You may need pliers to remove the cap off depending on the type of pen.  remember to remove the spring as well.

Then, add a tiny amount of hot glue to the metal, about 1/4 in from the tip.  Attach the twine, then start wrapping.  You're going to wrap about 2 inches up the reservoir, wrap another layer of twine down towards the tip, then back up again.  Secure the end with some hot glue and snip off the frayed end of twine. This is so you will have a good grip on the pen when writing.

 Next, washi tape time!  These are two pieces of vellum that are about 7 inches wide and 12 inches long.  Apply the washi tape onto the vellum, making sure that the covered area is at least 5 inches wide.  Also, be sure that you tape the entire length of the paper; so from one end to the other.  Repeat on the other paper.  In the picture below, I just placed the second paper over the first one with the washi tape, and used it as a guide.


After the washi tape, flip each piece of vellum over so that the un-taped side is up. apply three pieces of double-stick tape from end to end.  Be sure that the pieces are at least 1/4 of an inch apart.
Cut off parts where there is no washi tape applied.


Place the ink reservoir onto one end of the vellum. Only about 1/4 of an inch of the twined part should be on the vellum.  (This is where you will hot glue a piece of floral wire onto the end (the last inch) of the reservoir.  It should be as long as the vellum paper. and can be secured with more douple stick tape.) Add some hot glue to the area where the twine meets the vellum.  Stick the second piece of vellum, washi tape side up, over the pen and floral wire, so that they are "sandwiched".

Here is where we will make it look like a feather!  First, cut the vellum into a long leaf shape.  It's easier to start from the "top" of the feather, so the side opposite of the pen.  


Then, starting from the top again, cut the fringe.  Make sure the cuts are more diagonal.  Try to cut as close as you can to the wire in the center.


There you have it!  These would be great for your kids to make and take to school, and would definitely stand out amongst the sea of gel pens and mechanical pencils.
They would even be fun to use in the office.
Have fun experimenting with different patterns and colors of washi tape!

Erika @ PC

Friday, August 7, 2015

Glittered Acorns

Hey everyone! 
 Fall is nearly upon us, so it's time to get started on some autumn crafts!
Today, we're going to be making some really cute glittered acorns.

Supplies
Wooden eggs
Glitter
Decoupage 
Paint brush for decoupage (not pictured)
Scissors
Twine
Hot Glue Gun


Let's get started!  First, you are going to decoupage the top two thirds of the egg.  Then, sprinkle on the glitter of your choice.  It's easier to do this over a piece of paper so that you can use the paper to pour the excess glitter back into its container. 


After letting the egg dry for about half and hour, decoupage the last third of the egg.  Make the end of the twine face upward, wrap the first row of twine around and tighten over the end. This is so the end will stay hidden and will also prevent the twine from unraveling. Continue wrapping until you reach the top of the egg. 


Leave about 1 1/2 inches of twine and cut.  In the center of your twine "curlicue", put a dab of hot glue and make a loop with the remainder of the twine.


 Stick the end into the hot glue and let cool.


Finito! 


Of course, it's always great try out with different colors of glitter and twine!  A few embellishments like rhinestones would look fantastic too.
These are great to hang from garlands, trees, or even just as fillers for a centerpiece.  
Have fun experimenting!

Erika @ PC