Showing posts with label #masonjar. Show all posts

Monday, August 1, 2016

Fairy in a Jar

Happy Monday!

Today's project is a fairy in a jar! So cute for around the house or in your garden.


Supplies:

smooth glass jar
matte mod podge
stiff bristle brush
clear or white chunky glitter
chip board (thicker than card stock, but thinner than cardboard) 
X-acto blade
battery powered tea light/firefly lights
white tissue paper (same as gifting tissue)
E6000 glue
hot glue gun/glue
assorted silk flowers and foliage


First, we need to cut out our fairy. 
You can trace a printed image, trace a sticker, use a die cut machine with a fairy template, or free hand the image. I chose the latter, but if you look up "fairy silhouette" online a lot of really great templates will come up. The important thing to remember is that the fairy wings have holes in them, so that the light can shine through them.

I drew my fairy with pencil on my chip board. 
Chip board is like really dense paper. Like poster board. It maintains its shape pretty well, so I thought it would be better than regular card stock. 
With an X-acto blade, I carefully cut out the pieces. 


(last minute I actually decided to remove the arm sticking out, I thought it looked too distracting) so you can still edit your image somewhat even after you cut it out. Plus keep in mind the smaller the area, the harder it is to cut out.


Then just add a swab of E6000 glue to the top of your fairy. Either to her head or top of her wing will be good.
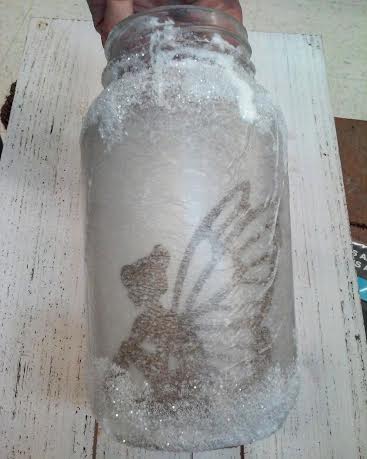
Then stick her to the inside of the jar. It looks better if her whole body is not touching the glass, so that it actually looks natural. Just one part of your cutout has to be glued to the glass. Since this glue takes a long time to cure, set the jar on its side with something on top of your fairy holding it in place until completely dry.


Then with your bristle brush, coat the entire outer surface of the jar with matte Mod Podge. Take the middle of your sheet of tissue and wrap it around the front, so that the ends meet in the back. The slower you wrap the tissue the better. Since it is so thin, once it gets soaked in Mod Podge it can very easily rip. Small wrinkles are okay.

Then when your whole jar is covered, set aside until dry.
After it's dry, you can add another coat of Mod Podge around the outside as a sealer to protect the tissue from dirt or scratches.


When you are applying your second sealer coat of Mod Podge, pour a bit of that chunky glitter on the top curve and bottom curve of your jar. This adds a "fairy dust" or even "frosted" feeling.


Then all you need is to glue some flowers and foliage around the top of your jar as an added accent! You can use twine to wrap, or even some charms. Whatever small accents you feel would fit your fairy garden motif would look lovely around the top!


And for the finishing touches all you need is firefly lights, or a flickering battery operated tea light! 
(Do not use a real candle or anything with a flame inside the jar, as the materials are quite flammable!)


Amaze your guests with your fairy catching skills! 
Have a great week!

Bethany @ Enchanted Lake

Monday, July 4, 2016

Americana Mason Jar Lights

Happy Independence Day!
Today we are painting mason jars in the colors of the American flag!
And with lights inside, they will provide the perfect atmosphere for your bbq and dinner parties.


Supplies:

3 Mason Jars, any brand or size (I used 12 oz)
Americana acrylic paint in the colors White, Dark Red, and Navy Blue
contact paper or adhesive vinyl
star hole punch (or at least 12 star stickers)
1 in wide flat nylon brush
bristle haired brush
Cup of water/paper towel (cleanup)
Dark Blue Montana Spray Paint
Rubbing alcohol
warm white Firefly lights or battery operated tea lights


 ---


First start painting stripes onto your jars. I started with the Dark Red, and using my 1 inch wide brush, I made markings about every other inch as to layout where my stripes will be.


Then once the red stripes are dry, add the white.


It's okay if your paint goes on thinly, with cracks or translucent patches. It's actually preferred, because you'll want the light to shine through the layers, so don't paint too many coats on your jars!  

Clean brush in cup of water and wipe with paper towel.


Then with your star punch, make about 12 stars from your contact paper or adhesive vinyl. (Alternatively, you can also use star stickers, but they will need to be smooth and sticky enough to seal completely to the glass.)


Then in no certain exact pattern, stick them to your last unpainted jar, making sure that all the edges are well sealed with the glass. Then take your rubbing alcohol and quickly wipe down the remaining visible surface of the jar. This will remove fingerprints and smudges that would otherwise become visible after being spray painted.


Let the Mason jar sit upside down on newspaper and spray the entire jar with your dark blue, making sure to get into the grooves of the top. Once you've completely coated the jar, let it sit for at least 15 minutes.


With your even darker blue acrylic paint, brush on in rough and uneven strokes over the jar to create an even more rustic look.


After the paint has completely dried for about 45 minutes, peel off the stars being careful not to scratch the painted surface. 
And ta da!
Place your Firefly lights or battery operated tea lights inside, and set them on your walkway, or on your dinner table. The glow will be perfect for viewing the fireworks.


---


Have a great day everyone and happy crafting!

Bethany @ Enchanted Lake 

Monday, March 21, 2016

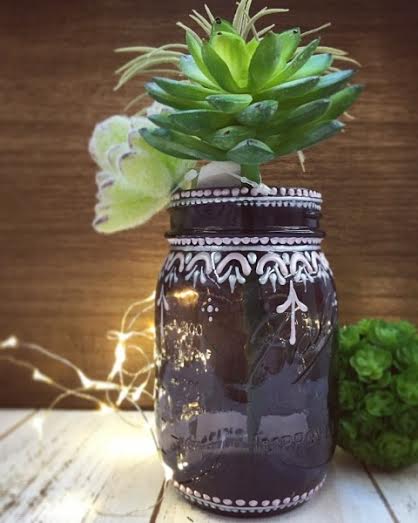
Henna on Purple Mason Jars!


Hey Everyone!
We are going to show you step by step how to do this henna design on a purple mason jar!

These are great for parties, weddings, gifts, DIY cake stand bases, or for housing succulents. 

The dark rich color of the jar adds a unique spin on the traditional rustic look.


Supplies Needed:

BoBunny Perler Pens (I used the colors Sugar and Tutu)
Mason Jars in any size (I used 1 pt)

***Optional Accents***
Candles or Firefly lights
Succulents
Chalkboard Sticker Labels
E6000 glue and a Cake Plate


BoBunny Perler pens come in many adorable Pearlized colors and can be found at any Ben Franklin store in Hawai'i.


First Step is to do a series of dots all around the top of the jar in the pink Tutu color. The Perler Pens respond like puffy paints, except they dry with a more rounded pearl-like look, which I like much better.


Next using the white Sugar color, go around your jar in a line. Then with pink Tutu, make arches going all around the jar. (At any time feel free to set aside to dry for a bit as to not smudge or smear the design accidentally. Just go at your own speed. It is also possible to do the whole thing without stopping to let it dry until the end.)


Then take white Sugar and make teardrop shapes in the empty corners of your arches.
First squeeze a dot then drag dot in a direction to make a shape that goes from wide to skinny. 


Do this same thing under the pink arches. Experiment with shapes! As long as each pattern looks roughly uniformed, try different kinds of shapes by changing the pressure and drag of your hand!


Add one large pink dot surrounded by 4 small white dots.

\


For this arrow shape, just make an extended teardrop shape, starting with the largest side first and then dragging the Perler pen. To make the arrows evenly spaced, I made one every 2 arches.


And that's how you make this design!! 
I went back later and made patterns on the bottom of the jar using the dot and line technique we used for the top.
You can also turn these upside down and adhere a plate to the top in order to make an ornate cake stand using E6000 glue.
Happy Decorating!

Bethany @Enchanted Lake