Showing posts with label #vase. Show all posts

Monday, May 2, 2016

Ombre Seaglass Mermaid Vase

For a beautiful mermaid vase or centerpiece, look no further!
Today we are making our very own using an ombre spray technique and a few ocean accents!
You can even include Firefly lights to give it a whimsical glow.


Supplies:

textured tall glass vase (two sizes are sold at Ben Franklin in Hawai'i)
Krylon Sea Glass Spray in the color aqua
dark brown burlap ribbon 1in wide
jute/twine
white starfish
dark brown netting
hot glue gun/glue sticks
*warm white Firefly lights


First,
After finding a place outdoors, and laying down some cardboard or newspaper,
turn your vase upside down and spray from the top down. The longer the spray is over the glass the darker the color will become. In order to get that ombre look, zig zag spray downwards, spending barely any time at the top of the vase. That will ensure that the top of your vase is almost perfectly clear, and the bottom is nice and dark. Continue this zig zag pattern on all sides and let dry for 30 mins.


Once the paint is dry, cut 2 strips of dark burlap ribbon and hot glue it to the sides of the vase.


Then hot glue your jute twine around the middle, overlapping the middle edges of the brown ribbon, but leaving room for it to show on either side of the top and bottom. Then glue starfish and netting!
So easy!


Monday, March 21, 2016

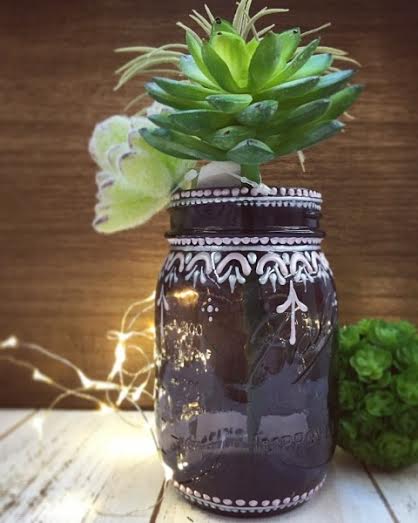
Henna on Purple Mason Jars!


Hey Everyone!
We are going to show you step by step how to do this henna design on a purple mason jar!

These are great for parties, weddings, gifts, DIY cake stand bases, or for housing succulents. 

The dark rich color of the jar adds a unique spin on the traditional rustic look.


Supplies Needed:

BoBunny Perler Pens (I used the colors Sugar and Tutu)
Mason Jars in any size (I used 1 pt)

***Optional Accents***
Candles or Firefly lights
Succulents
Chalkboard Sticker Labels
E6000 glue and a Cake Plate


BoBunny Perler pens come in many adorable Pearlized colors and can be found at any Ben Franklin store in Hawai'i.


First Step is to do a series of dots all around the top of the jar in the pink Tutu color. The Perler Pens respond like puffy paints, except they dry with a more rounded pearl-like look, which I like much better.


Next using the white Sugar color, go around your jar in a line. Then with pink Tutu, make arches going all around the jar. (At any time feel free to set aside to dry for a bit as to not smudge or smear the design accidentally. Just go at your own speed. It is also possible to do the whole thing without stopping to let it dry until the end.)


Then take white Sugar and make teardrop shapes in the empty corners of your arches.
First squeeze a dot then drag dot in a direction to make a shape that goes from wide to skinny. 


Do this same thing under the pink arches. Experiment with shapes! As long as each pattern looks roughly uniformed, try different kinds of shapes by changing the pressure and drag of your hand!


Add one large pink dot surrounded by 4 small white dots.

\


For this arrow shape, just make an extended teardrop shape, starting with the largest side first and then dragging the Perler pen. To make the arrows evenly spaced, I made one every 2 arches.


And that's how you make this design!! 
I went back later and made patterns on the bottom of the jar using the dot and line technique we used for the top.
You can also turn these upside down and adhere a plate to the top in order to make an ornate cake stand using E6000 glue.
Happy Decorating!

Bethany @Enchanted Lake