Wednesday, October 31, 2012

One More Call For Crafters!

HAPPY HALLOWEEN!!!

Now that I have that out of the way, Denise and Donna have asked me to put out one more call for crafters. So here's the flier:


There are only about 10 booths left so if you're still on the fence, you might want to make a decision soon before there isn't any space left! The booth space is going quickly and we can't hold spaces for anyone unfortunately, so please contact us today if you're interested in signing up.

And just a reminder to all off-island crafters:  you're more than welcome to sign up as well if you're interested in coming to Hilo. Give us a call and we can either e-mail or mail you the application.

Hope you all have a Happy Halloween!!

~Jen at Hilo Ben Franklin

((And check out the previous posts today by the Crankin' Out Crafts crew and the Hello Kitty post by Pearl City!))

Happy Birthday Hello Kitty!


Thursday, November 1st is Hello Kitty's birthday!
Pearl City BFC Beginner's Beaded Charms teacher, Gayle Navarre, will be demonstrating one of her student's favorite projects...Hello Kitty charms and figures! Gayle has created key chain minatures and even has a 15" Kimono clad Hello Kitty for you to see! Her students first learn to create a beaded Tamari Ball and progress to many other 3D charms! Visit the Pearl City store tomorrow from 10am-12noon, join Gayle to learn the basic Tamari Ball & celebrate Hello Kitty's 38th birthday!
There's always something crafty going on at Pearl City!
gloria @ Pearl City

Crankin' Out Crafts Episode 170 - Sequin Ornament


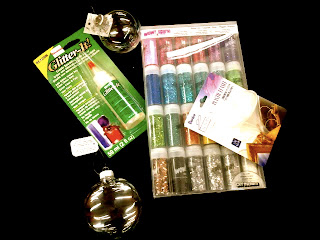
Don’t just use the Glitter-It adhesive with glitter, Puna shows you how to use sequins for a cute ornament.

Glitter-It Glue can also be used for sequins!


Supplies:
Glass or plastic ornament
Glitter-It adhesive
8mm sequins in your color choice
*optional* ribbons for embellishment

Sequins are great for eye-catching shine and come in a large variety of colors to complement any scheme.

Have a happy and safe Halloween! Have fun!

Tuesday, October 30, 2012

'Glitter It' and Alcohol Ink Ornaments

CLEAR ORNAMENT +ALCOHOL INKS + GLITTER IT + GLITTER = STUNNING!


Materials:
-Glitter It
-Clear plastic or glass ornaments
-Glitter
-Funnel (you can make one out of paper if you like
-Alcohol Inks and felt  and stamper 
-Gloves (if you don't want to get ink on your hands)


Glitter It!!

-First take the top of your ornament and at an angle pour Glitter It in the ornament.  Slowly swirl the ornament around (do not shake) gradually to coat the inside evenly...a little excess is ok.

-Pour glitter in the ornament with your funnel.  Swirl glitter around to coat the inside.  Let dry for a minute or five and dump out the excess glitter.


Alcohol Inks:

-Place felt on your stamper and add drops of Alcohol Inks...I like to use metallics and a few other colors at once...you can also do the colors one at a time and layer.

-Holding the ornament at the opening (use your gloves)...take the inked stamper and apply to the outside surface of the ornament.  I like to blot and twist a little, but don't be afraid to try your own technique.

-Let dry and accessorize with stickers, gems, ribbon and any embellishment you like...

Check out our other designs

Glittered inside with a few colors, alcohol inks outside...so pretty!
Glittered inside, alcohol inks outside

This one is glittered on the inside with snowflake foam stickers on the outside...pretty bow..tadaaah!


Glittered inside, foam letter stickers on the outside...


We have an awesome selection of glitter, ornaments, ribbon, stickers, alcohol inks and more!

Monday, October 29, 2012

Tomato, To-mah-to Tree


I'm still stuck on our wonderfully easy tomato cage trees. This time I made one that would be great for a front yard. Everything about this tree is made for the exterior; the Deco Mesh is plastic and foil so it's great for outdoors, the ornaments and poinsettias are plastic, and I made sure to add interior/exterior red Christmas lights in the center. I know it might be a little early to be thinking about getting your lawn ready for the holidays, but I couldn't help it, I'm so excited about how nicely these tomato cage trees are turning out. I hope you're enjoying the ideas as much as I am enjoying making them. Next week I'll try to do something for Autumn rather than jumping ahead to Christmas again.

Thanks for stopping by!
Puna @ Enchanted Lake

We've got a previous post today. Don't forget to scroll down and check it out.

Crankin' Out Crafts Episode 169- Glitter-It Ornament


Design and decorate your own plastic or glass ornaments with Glitter-It. Puna takes you through the easy step-by-step.

Add shimmer and sparkle to your tree with glitter ornaments!


Supplies:
Glass or plastic ornament
Glitter-It adhesive
Ultra-fine glitter
Small funnel
*optional* ribbons for embellishment

These beautiful ornaments put a little sparkle on your tree with ease and a little bit of Glitter-It will go a long way. You can make about 24 ornaments with just 1 bottle of 
Glitter-It!

Saturday, October 27, 2012

Paper Party Day!!


Today at Hilo Ben Franklin we had our last Paper Party of 2012. :( The day was filled with fun Make & Takes for Halloween, Thanksgiving, and Christmas. Many of our regular customers came in to join us and we also had a few customers who were just passing by and decided to sit down and learn a new project. Projects included a Christmas Album, a Sweet Treats favor, and cards galore!


Double-sided tape was used in large quantities, as was colorful paper. There were new techniques and designs learned and many design decisions to be made. Mags made earrings out of little mini glow sticks...I never thought of that! They were super adorable!

Everyone had a great time and one lucky customer won not one, but two gift cards for Ben Franklin Crafts! She was really enjoying herself and didn't want to leave, eventually making 11 cards! Great job Salena and Donna in putting the event together!

We'd like to thank everyone who has come out to any of our Paper Parties this past year. We hope you had a great time and that you'll join us for our Paper Parties in 2013 as well.

*~*~*~*~*~

Oh! I was also asked to remind you all that our Christmas Craft Fair is quickly approaching. Booth spaces are filling quickly but there are still spaces left. Corner and Wall spaces are $100 and Center spaces are $80. There is a small deposit in addition to the booth fees. Please give us a call at 935-0005 or stop by the Hilo Ben Franklin store for more details. You can ask to speak to Donna or Denise or get an application from any cashier.
And just a little clarification from a previous post...crafters from all islands (and beyond) are welcome! If you're interested in being a vendor, please give us a call and we'd be happy to send you an application.

See you soon!!

~Jen at Hilo Ben Franklin

CRAFT ROOM CLEARANCE

Pearl City Craft Room Clean-Up gives you the opportunity for savings!
Saturday, October 27th from 9:30am - 1:30pm

I'm cleaning the Craft Room and reorganizing! I've found several duplicate tools, as well as tools and products that we no longer carry. There's a Creatopia bundle, paper packs, displays and samples, leis, gently used tools, and more! All items will be sold "as is" with no refund/no return.
gloria@ Pearl City

Friday, October 26, 2012

Crankin' Out Crafts Episode 168 - Halloween Silhouette Lantern

This fun and easy project is just in time for Halloween and can be changed for any season. Puna will explain how to create this chic decoration.


Create lanterns for Halloween & the upcoming holiday season!

Watch the episode here: Crankin' Out Crafts: Episode 168 - Halloween Silhouette Lantern

Supplies:
Glass cylinder vase
Black cardstock
Bat punch
8.5’’x11’’ vellum paper
Black and orange ribbon
Double-stick tape
Candle or battery tea-light

Punch out fall leaves instead of bats for an easy Thanksgiving centerpiece, or snowflakes for Christmas and you have a candle holder for any occasion.


 *Be sure to scroll down to read today's earlier post from Kahului - a cute costume idea to make for your little girl!

Mermaid Tutu & Headband

Aloha Crafters ~

Today's Idea & Inspiration is a Mermaid Tutu & Headband. The child's clothing size is approximately 18 months.

Supplies:
  • 6" wide tulle
  • Ribbon
  • 6"wide lace
  • Beanie
  • Headband
  • 2 Small Fan Shells
  • Glitter
  • Adhesive
  • Pin back
Instructions for Tutu:
  1. Cut thread that holds top of beanie together
  2. Cut 20" lengths of tulle, ribbon & lace
  3. Dovetail cut ends
  4. Fold lengths in half, knot through holes in bottom of beanie
  5. For further instruction please see: http://ideasandinspirationsfrombfchawaii.blogspot.com/2012/08/crankin-out-crafts-episode-138-tulle.html
  6. Glitter shell
  7. Adhere shell to pinback
  8. Cut 2' of thin ribbon, fold in half, knot through front top of beanie
  9. Pin glittered shell to front ribbon knot

Instructions for Headband:
  1. Cut 8-10" lengths of tulle, ribbon & lace
  2. Dovetail cut ends
  3. Fold lengths in half, knot through holes in center of headband
  4. Glitter shell
  5. Adhere shell to center of tulle, ribbons & lace

Happy Crafting!

Thursday, October 25, 2012

Crankin' Out Crafts Episode 167 - Foamie Mask Favors


Need an easy, last minute idea for your Halloweeen party? Brandon is back again to save the day with a great favor craft.

These masks make great favors for your Halloween party!


Supplies:
Animal print foamie pack
Sharpie marker
Scissors
Dowels or sticks
Ribbons
Double-stick tape
Glue gun and glue sticks

You can really crank out some great mask favors using this foamie pack and everyone will think you’ve spent a lot of time on them.

Tuesday, October 23, 2012

Hello Kitty Witch Pumpkin

Happy Halloween Hello Kitty!!

Painting pumpkins is a huge trend this Halloween.  I saw this Hello Kitty Witch painted pumpkin, and had to make one as soon as possible!!!!


1) Using Crafter's Acrylic white paint and a poly-foam sponge, I painted my pumpkin white with two coats.  *Tip- it helps to clean off your pumpkin and make sure it has dried thoughrally before painting. 
2)While the paint was drying, i grabbed a black foamies sheet (to cut whiskers and small ovals for eyes), a yellow Felties sheet (cut small oval for the nose) and a thick white foamies sheet (for the ear or ears).  I used a small pumpkin, but any size will do, as long as it's shape is wide and round.  The size of your eyes, nose, whiskers and ears will depend on the size of pumpkin you chose.  I didn't use a template, I just winged it..
3) I used E600 Glue to attach the pieces and I think it turned out just fine! 


4) We have these fancy witch hats in all different sizes and ready for Kitty to wear!  I just placed it over the pumpkin stem and tadaaah!

Monday, October 22, 2012

Fall Tomato Tree

I always think it's really cool when people get creative and re-purpose items for things that I would never have thought of doing. Case in point, one of our new holiday products. We are now carrying tomato cages in our stores but we're not using them to corral tomato vines. Instead we are throwing our craftiness at them and decorating them with everything and anything we can think of.


Here's a picture of one of our newest creations, the fall tomato tree. For this project, we used the metal tomato cage you see on the right of the page and wired some orange Christmas lights on to it. We then wrapped the cage in Deco Paper Mesh and added some fall garlands and picks to dress it up. Finally, as a topper, we stuck a straw wreath with a few more picks and some ribbon to the cage.

Tomato cages make great decorations, as you can see, and that's why I think I'm going to be doing quite a bit more of them as we get further into the holiday season.

Thanks for reading!
Puna @ Enchanted Lake

P.S. There's another blog post today for a Crankin' Out Crafts Halloween project, but you have to scroll down more to see it.

HANA HOU: Crankin' Out Crafts -ep9 Halloween Bouncy Spider

Halloween is next week! Today we take a look back at a Crankin' Out Crafts episode featuring a fun & easy project - the Halloween Bouncy Spider.


Supplies:
Black pompom
Googly eyes
Beading elastic
Needle for elastic
Chenille stems (pipe cleaners)
Hot glue & glue sticks
All supplies available at our Hawaii Ben Franklin Crafts stores. Don't forget to visit us for all your Halloween crafting needs for costumes, decorations, treats, favors and more!


Friday, October 19, 2012

Crankin' Out Crafts Episode 166 - Paper Doll Costume


What a doll! JFlo is back to share another simple and speedy costume idea.

Make this fun & easy costume with just a few supplies!


Supplies:
Black Sharpie
White poster board
Scissors
Hole punch
Ribbon

Make accessories to go with your doll costume or even a couple of different outfits to change out throughout the night.

*Don't forget to scroll down to read today's earlier post from Kahului freaturing the "Doodle Yourself Mask", a great accessory for your costume.

Doodle Yourself Mask

Aloha Crafters ~

Today's Idea & Inspiration is a Doodle Yourself Mask. This mask is approximately 10.5" by 4". You may want to start by making a template out of paper to see how much of your face you'd like to cover before you start.

Supplies:
  • Tulle (color of choice)
  • Scribbles Fabric Paint (colors of choice)
  • Cardboard piece (approx. 12" by 6")
  • Masking tape
  • Plastic wrap
  • Paper
  • Scissors
  • Ribbon
Instructions:
  1. Doodle your mask on a piece of paper.
  2. Tape doodled mask paper on to cardboard.
  3. Cover paper/cardboard with plastic wrap, secure wrap.
  4. Tape tulle over plastic wrap.
  5. Trace over doodled mask drawing with Scribbles Fabric Paint.
  6. Allow to dry overnight.
  7. Cut out mask outline & eyeholes from tulle.
  8. Adhere lengths of ribbon to ends of mask.
Happy Crafting!


Thursday, October 18, 2012

Dia de los Muertos


Dia de los Muertos is celebrated on November 1 so come in for our demo on these Day of the Dead Earrings.  Images of sugar skulls have become popular in fashion so you can actually wear them anytime but it seems especially appropriate this time of the year and they are very easy to make.  We carry these skulls with our Imagine It gemstone line, they come in 2 different sizes and I used the larger size for these.  I  used 2 part epoxy to glue the Swarovksi 8mm margaritas into the eye sockets and then nestled them in a bed of uncooked rice while the glue dried.  Then I wire wrapped a bunch of our resin flowers from our bead soup collection with Swarovksi 3mm bicones and Sweet bead ball ended head pins.  Once I finished with the flowers my glue was set and I just stacked everything onto 20 gauge wire, topped it with copper beads and wire wrapped it close.  Add on ear wires and tadah!
Our demo will be at our Mapunapuna Bead Shop on Saturday October 20 and 27 at 2 PM so if you have time, stop by to check it out!

I'll see you at the store!

Lynn H. @ Mapunapuna BFC Bead Shop

Wednesday, October 17, 2012

Crankin' Out Crafts Episode 165 - Super Hero Costume

Brandon has an easy and fast costume idea for your favorite caped crusader.
 

Add the Batman logo to a black shirt for a super easy costume!

...Or how about the Superman logo!

View the episode on YouTube: Crankin' Out Crafts: Episode 165 - Super Hero Costume


Supplies:
T-shirt
Sticky-back felt
Scissors
Pencil

Make a costume to match your favorite super hero, or even have your child make up their own super hero emblem.

Tuesday, October 16, 2012

Cute as a Button Mini Christmas Tree

This adorable little tree was made by Courtney at Market City Ben Franklin...and I can't stop aww-ing over it.  We have a really nice variety of table top trees this year, and decor galore!!!


A Closer look....

Using yarn, toothpicks and wooden balls Courtney created darling yarn ball accent for her tree.


Gingerbread man and Snowflake buttons from Dress It Up are so nice!  The chain crochet garland with Ka'lina and Kui yarn is totally festive and adds a great texture and dimension.  The lights stand are so cute and battery operated.
Thank you Courtney for this amazing idea....come visit and see the many other creations from our talented employees! 

Monday, October 15, 2012

Photo Booth Fun

Who's ready for their close-up? We've just set up some fun photo booth stations for everyone at Enchanted Lake Ben Franklin. Check out some of these great pics we got when we caught some of our employees and their families photo boothin' around.

A few of our employees "monkeying" around with the Holiday Chic frame and props.
Asia, Greg, and Sarah trying to class it up in our Champagne and Ice photo station.
I think this picture was just to see how many people and props we could fit in our polaroid frame.
Last, but not least, here's Toni and friends hamming it up with class and a glass.
All of our props and frames for each of our themes were made by some lovely Ben Franklin employess out of foam core and then painted with acrylic paint. You are welcome to stop in and have some fun this Christmas season with us and our photo booth stations.

Puna @ Enchanted Lake

P.S. Scroll down for a great costume idea courtesy of Crankin' out Crafts.

Crankin' Out Crafts Episode 164 - Lego Costume

Need a quick and cheap costume? JFlo is back to help you out with an original costume idea.
 

This makes a great costume for kids!


Catch the latest episode here: Crankin' Out Crafts: Episode 164 - Lego Costume
 

Supplies:
Cardboard box
6 Round paper mache boxes
Spray paint
Masking tape
Box cutter or Xacto
Hot glue gun and glue sticks

You could even make a set of these costumes all in different colors for each member of your family.

Friday, October 12, 2012

Crankin' Out Crafts Episode 163 - Burlap Wreath


Burlap is the newest trend in home and party decorations. Watch Puna as she
shows you how to make a festive burlap wreath.

Make a wreath out of burlap ribbon! Add your own picks to finish.

Catch the episode on our YouTube Channel: Crankin' Out Crafts: Episode 163 - Burlap Wreath
 
Supplies:
Straw wreath in your size choice
3" burlap ribbon
Scissors
Greening pins
*optional: floral picks to dress up your wreath

The picks on this wreath can easily be changed out depending on the season
or holiday that you want your wreath to represent.
Also, our rolls of burlap ribbon are on sale now! We have 1-1/2" or 3" widths available. View our DIY Halloween Sale flyer that starts today, Friday, October 12 to Friday, October 19 on our website here.
*Don't forget to read today's earlier post from Kahului on their Green Monster Wreath. This project is perfect for Halloween.

Green Monster Wreath

Aloha Crafters ~

Today's Idea & Inspiration is a Green Monster Wreath. He was a lot of fun to make and quite simple.

Supplies:
  • 3-4 Rolls of Apple Green Tulle (30132540)
  • 14" Straw Wreath (77603621)
  • Greening Pins (77479485)
  • 2 - 3" Styrofoam Balls (30017676)
  • Black Glitter 12X12 Paper (30081254)
  • 1" Circle Punch (30028719)
  • French Paisley Ribbon (30091790)
  • Black Cardstock
  • White Cardstock
  • Adhesive of choice
Instructions:
  1. Cut Apple Green Tulle into 6-8" strips
  2. Fold tulle strips in half, pin using greening pins to front of straw wreath
  3. Adhere styrofoam balls to wreath (see picture)
  4. Punch 2 circles from Black Glitter Paper, adhere to styrofoam balls
  5. Make Bow Tie from Ribbon, adhere to wreath (see picture)
  6. Cut teeth from white cardstock, adhere to back of tulle
  7. Cut black cardstock to fit back of wreath, adhere to wreath
Happy Crafting!


Thursday, October 11, 2012

Cha Cha in the Pumpkin Patch


Here's another Halloween themed project that we will demo at our Mapunapuna Bead Shop.  Cha Cha bracelets have lots of charms dangling from the bracelet base and tend to be full with a lot of movement so I thought it would be fun to have little ghosts and witches dancing together in the pumpkin patch using some of our resin flowers from our bead soup, Swarovski pearls, orange gemstone, and plastic donuts.  Stop by our Mapunapuna bead shop to see the sample or for our demo which will be on Sunday October 14 at 2:00 PM. 

I'll see you at the store!

Lynn H @ Mapunapuna BFC Bead Shop

Breast Cancer Awareness

October is Breast Cancer Awareness Month

Join me on Thursday, October 11th to bead a Pink Ribbon to wear as a reminder for women to learn the importance of prevention, personal risk factors and early detection of this disease. Most women who get breast cancer have no known risk factors. Many women with one or more risk factors never get breast cancer. So it's impossible to know who will actually get breast cancer. Remember that the best protection is eary detection.
There's always something crafting going on at Pearl City Ben Franklin!
gloria @ Pearl City

Wednesday, October 10, 2012

Crankin' Out Crafts Episode 162 - Pumpkin Wreath

Need more fall decoration ideas? JFlo is back again today to show you how to
make something to spruce up your pumpkin patch.

Create this very festive wreath for the fall season!

Supplies:
Wire wreath form in your choice of size
Pumpkin colored deco mesh
Scissors
Chenille stem to match your deco mesh color
*optional: green deco flex tubing and fall leaves

This pumpkin "wreath" is great to hang on your front door or on your porch
because all the materials are made to withstand weather and rain.

Tuesday, October 9, 2012

Deck the Halls with Wreaths!!!

'Ding Dong!' the wreaths are here..and the possibilities are endless!!!


This festive wreath was made on a straw wreath base with Deco Mesh, ribbon and other holiday accesories...isn't it beautiful!


This grape vine wreath was jazzed up with some beautiful Deco Mesh ribbon and star sprays.  So simple and definately one of my favorites made by Jenny Floro. 

This straw wreath base is decked out with burlap ribbon and holiday picks..so classic!


Can you tell me how to get..how to get this adorable wreath?.. It's a work wreath base, green Deco Mesh, star garland, holiday picks, light bulb wreath, glitter balls from a holiday spray.  The ornaments were made with acrylic paint (Glossy Enamels would work great too), and deco pens.

If you are not ready to jump in the holidays, you can make your wreath for any season or occasion!


Monday, October 8, 2012

Deco Flex Tubing


I wanted to introduce everyone to a new Deco Mesh product that we're carrying in our Ben Franklin stores right now, called Deco Flex Tubing. It's essentially a tube made of Deco Mesh that you can use by itself or in your favorite decorating proejcts. The picture above is the gold tubing looped over on itself a few times and tied in the center to make a super easy bow.


The tubing is also a lot of fun to use in decor like wreaths or Christmas trees. Here's another example of the gold tubing used in a Masquerade themed wreath. I kept this one pretty simple with just a few small loops.


Our stores also carry the tubing in a few different colors like silver, gold, red, pink, and green. Here's a picture of the green tubing used in another wreath. I went a little wild and made really big loops with the tubing on this one.

If you want more detailed instructions on how to make the wreath itself, you can check out these previous blog posts:


I'm sure we're going to be seeing more projects incorporating our Deco Flex Tubing because it's pretty fun to work with and it's perfect for the upcoming Holiday season.

Thanks for stopping in!
Puna @ Enchanted Lake

Check out the previous post from today to learn how to make a Witchy Deco Mesh Wreath.

Crankin' Out Crafts Episode 161 - Witch Wreath


It maybe a scary thought for some of you out there, but Halloween is just around the corner. JFlo can help you get in the spirit with this witchy wreath craft.

A fun wreath to make for Halloween!


Supplies:
Black work wreath
21” Deco Mesh
Coordinating ribbon
Witch hat
Witch feet
Green floral wire
Scissors

This wicked wreath is sure to draw some attention to your Halloween décor and maybe even inspire some fun, spooky nights.

Friday, October 5, 2012

HANA HOU: Crankin' Out Crafts -ep92 Fabulous Masquerade Mask (On the Road Edition)

To finish off Halloween Accessories Week, we're doing a Hana Hou Episode on how to paint a masquerade mask. Face painting is an easy way to add to your costume - you can make it as scary and as pretty as you want!

Take a look back at our episode here on our YouTube channel: Crankin' Out Crafts -ep92 Fabulous Masquerade Mask (On the Road Edition)

Check out our new selection of snazaroo face painting supplies!

We now carry a new brand of face painting kits, paints, and supplies called snazaroo. The products work great for kids! This activity is fun to do and besides Halloween, you can do face painting at a birthday party or other events.

*Don't forget to read Kahului's earlier post today on Gourd Glamour!