Saturday, July 29, 2017

Pineapple Banner

                        Pineapple Banner


Scroll with Hanger    30182268
Scribbles   yellow-green- black
Montana paint pens yellow – orange- green 
Stickles    yellow – orange- green -silver
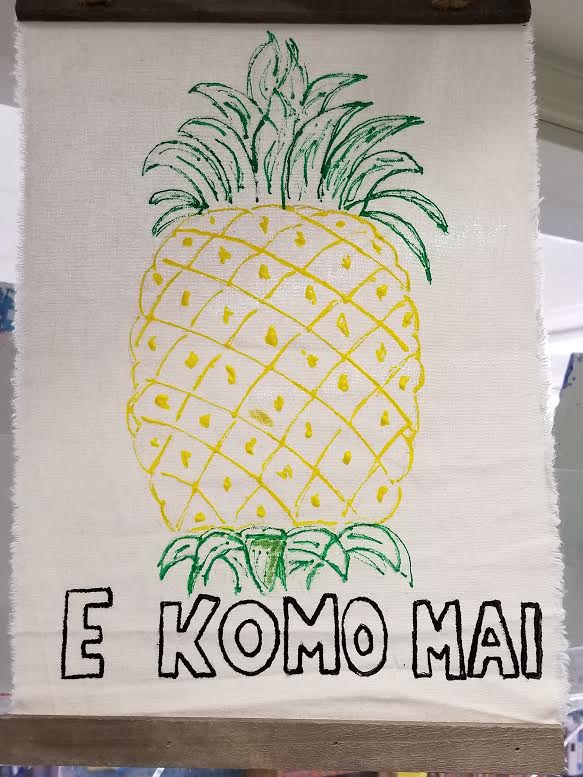


Draw the pineapple on the banner.
Take the scribbles and go over your lines. Set to dry
When dry use the Montana paint pens and color in. set to dry
When dry, cover the area with  the stickles to give it the glitter touch.

 Hand and Enjoy


Hilo Ben Franklin

Tuesday, July 25, 2017

Elasticord Needle Jewelry!

Hello, all! Another week has gone on by, and this time around we will be playing with a handy item: the Elastic Cord Needle! This needle is great for people who like planning out their jewelry- it allows you to lay out your beads for bracelets and necklaces (up to a certain length) and allows you to string them just as easily! I love this tool, especially for making PLUR bead bracelets or just cute accessories for the kids or even myself! The best part? It's not just for elastic- you can use it on just about any cording, making it a great addition to any beader's collection!


Materials

  • Elastic Cord Needle
  • Beads of your choice (holes must be 1mm or larger)
  • Elastic cord/Beading wire/beading thread (0.8mm or thinner)
  • Scissors
  • Beading Mat (optional)


Instructions
  • First, take your elastic and cut a piece 3 feet or longer- I have small wrists so about a yard works well for me. Set this aside for later.

  • Now, take your Elastic Cord Needle and lay out your beads- just string them through the needle; it's very simple! 

  • When you have finished your bracelet design, take your cut piece of elastic and fold it in half, then thread it through the J-shaped end of the needle, making sure it's even on both sides. Secure the bottom ends of the thread/cord by tying a knot. 

  • Now, slip the beads off the J-shaped end, and on to the thread! If the J-shape begins to open up, just take some pliers and smash it shut again.

  • Once you have finished this, take the cord off the needle, and secure the ends however you prefer- in this case, I simply tied a double knot.

  • There! You have now created a simple bracelet! These beads are very simple and very "kiddish", but there's also a sort of elegance to it, depending on how you lay them out! Definitely perfect for a bead party with your kiddies!


-Helen C.-
Kahului Ben Franklin Crafts

Monday, July 24, 2017

Ceramic Pineapples!

Happy Maker's Monday!
Today is a great day to decorate pineapples!
House Mart Ben Franklin stores just got in these really cute white ceramic home decor pineapples, and I was really itching to decorate them and add some color. There are so many ways you can add color to ceramic, I wanted to show you using some simple techniques and tools. 


This first pineapple is my FAVORITE!
All you need is alcohol ink in 2 greens and 2 oranges. 
I used a cotton swab, or a small square of felt, and squeezed a few drops on to the piece, and then promptly rubbed it on the surface of the pineapple. Because I only wanted the color to stick to the outer bumpies, I made sure to not press too hard and let the ink touch only the parts that stick out. Alcohol ink is SO easy to use! You can add splatters and drips, and because it acts like watercolor, you can get some really beautiful color blends by swirling multiple colors together. A little bit goes a LONG way. I must have only used 8 drops for this entire pineapple. The more drops you add, the more intense the color gets! Have fun using this technique on ceramic, or glass!
I finished this off by tying some jute around the leaves to give it a 'diy'-textured feel.


This next pineapple is very classy and is super easy to replicate! (I also love that this entertaining decor can be used as a candle stick, or single cupcake server, or votive holder!) I used 'Testor's' gold enamel and simply applied it with a brush! Easy as that! It's very thick, but also very drippy so be sure to spread out the gold or else it will pool up and drip off into places you might not want to be glossy golden! This gold enamel is so much better than gold paint. It has a very strong bond, and maintains that golden glossy metallic surface! So gorgeous!


This next pineapple is probably the most quirky! Ben Franklin sells brush tip glass markers, and I wanted to test it on a white ceramic piece. They are really fun to play with and the felt tip is flexible. If you are familiar with calligraphy markers, or TomBow markers, the felt tip is just like those! These markers will look translucent on clear glass, very opaque on white ceramic. I definitely liked the bold fluid strokes on this white pineapple. The colors will also mix with each other if you overlap the strokes while each color is still wet. I also love modern calligraphy and typography so I threw a little 'aloha' at the top. It's also recommended to bake the color on, so that it becomes super permanent. It's not meant to be food safe, so only apply to areas that your mouth or food will not be!

Have fun playing!

Bethany @Enchanted Lake

Saturday, July 22, 2017

Heart Punch Flower

                      Heart Flower


Heart Mega punch (purple)
12x12 piece of paper your color
1.5 circle punch
Hot glue gun


Punch out 16 to 18 hearts, using the punch
Punch one 1.5 circle with the punch
Fold your hearts in half


The circle is the base of the flower. Start to glue the hearts to the base.  As showed in picture


Keep layer them in the middle
Take one heart and roll it tightly together, then add another one to it.  Add another, this time more loser then the others.
Cut off the bottom and glut to the center of the base flower.
 Shape and form the pedals to your liking


                                          Hilo Ben Franklin

Tuesday, July 18, 2017

Mini Madness: Sizzix Sidekick!

Aaaaaand Tuesday has rolled around once again folks! Huzzah! This week's blog is super short and sweet- we are looking at our Sizzix Sidekick! While some of you may already have one or know what it is, for those of you who don't, here's the skinny: it's a tiny Sizzix BigShot (die-cut machine)! I just think it's adorable and perfect for small projects or people on-the-go! So, let's get to it, shall we?


Materials
  • Sizzix Sidekick
  • Paper Cutter/Trimmer
  • Paper
  • Acrylic Stamping Block & Stamping Inkpads (optional BUT highly recommended)
Product Info
  • Before we begin, let me just say one very important detail- when I say the Sidekick is like the BigShot, I mean exactly that! If you have a BigShot, you will know exactly what you are doing, for the most part.

  • The whole kit comes with 2 regular cutting pads, an embossing pad, a Sidekick machine, 8 dies, adorable photo-polymer stamps (no acrylic block though), and 2 cute embossing folders.

  • Handy Feature! The Sidekick boasts a suction lever on its side, allowing you to vacuum seal it to the table, allowing for no-slip ease of use! 

  • Cross-Compatibility: The Sidekick can be used with any other dies, so long as they are small enough to fit in the cutting pad.

  • Paper Sizing: for the most part, I use my paper trimmer and cut paper down to a width of 2.5 inches! That seems to be the ideal size!

 Instructions

  • To cut dies, simply use the two clear cutting pads (they will be teal in color) and create a "sandwich" of: cutting pad 1, die, paper, and cutting pad, then run this through the Sidekick- easy peasy. 

  • The use the embossing folders, use the grey embossing pad and 1 cutting pad. This sandwich goes: embossing pad, embossing folder (paper sandwiched inside), and cutting pad. Run this through to get the cutest embossed paper pieces!


  •  For some extra cuteness, I used the stamps to embellish the pieces I cut out! The "Hello" and "Thank You" stamps nest very well within the included circle die, and the heart die has a matching heart stamp. Mix and match, have fun with this, the possibilities are endless! Happy Cutting!


  •  *TIP* I have found that when embossing, solid colors look best compared to prints! And if you are not familiar with photopolymer stamps, fret not! Simply peel them off the plastic, stick them on an acrylic block, and voila! You are ready! Don't worry, the stamps can be removed from the block- it's 100% reusable. :)


 -Helen C-
Kahului Ben Franklin Crafts


Monday, July 17, 2017

I Like Big Cups & I Cannot Lie


Happy Maker's Monday! I was so inspired by this funny quote that I had to find a way to turn it into a wall sign. You can find your own favorite funny or inspirational quote and using just a few simple materials, can make your own very fancy sign! This simple idea can be used on SO many wooden surfaces, including boxes, and frames!

 
SUPPLIES:
Printed cardstock paper
matte Mod Podge
nylon paint brush
scissors/paper trimmer
white paint pen (either DecoColor or Montana)
pencil
wood pallet or board


First, pick a pretty paper to be the background for your quote! You will want to avoid choosing a paper that has too much contrast, so if it has a pattern, then it has to not have white or black in it. If you choose a dark paper, your text will really jump off the page, but the pattern might be harder to spot. 

Trim your paper down to size to fit neatly on the surface of your wood sign. 
Using your brush, generously coat the top of the wood, then lay down your paper. Seal the paper with a layer of matte Mod Podge over the paper surface.

Once it has dried, sketch out your quote lightly with your pencil.
Then use your white Montana marker, or white acrylic DecoColor marker to fill in your quote! I chose the 'I like big cups and I can not lie" as a silly statement to how much I love tea and coffee. Have fun with your quote! Even pair it with some mixed media and glue down some accessories. You can use beads, flowers, starfish, shells, washi tape, glitter, rhinestones, origami, moss, ribbon and so much more!

Happy crafting!

Bethany @Enchanted Lake 

Tuesday, July 11, 2017

Simple Obon Kanzashi

Simple Obon Silk Flower Kanzashi


Happy Tuesday! Obon season is still in full swing in Maui County (and throughout the state of Hawai'i) and I had a blast again this past weekend! While at Obon you notice lots of things: delicious food, beautiful uchiwa fans, gorgeous yukata, and also lovely kanzashi! Or in english, hair ornaments- usually floral, in the case of Obon. So I figured I'd share how to make some really simple ones that I use myself! These are very quick and easy to make, so let's get started!


Materials

  • Silk/Fake Flowers (your choice! Get a good variety!)
  • Barrettes
  • Felt *OPTIONAL*
  • Rhinestones/Pearls/Pearl Sprays/Bells *OPTIONAL*
  • Hot Glue Gun & Glue Sticks
  • Scissors

Instructions
  • Let's start with your fake flowers! Our stores have a wonderful variety- I pick colorful ones, and I prefer to buy bushes since you get lots of flowers and leaves. Trim the flowers and leaves that you'd like first, and make sure you clip the stems as close to the base of your flower as you can- it will be much easier to glue down!

  • Now take your barrette- open it up and remove the center piece and set it aside- this will make working with it easier.

  • Next, take your leaves (or cut out pieces of felt) and glue them down to your barrette. glue the bottom piece first, face-up, then glue the top leaf to the top of the metal piece, adding glue to the parts of the bottom leaf that overlap the top leaf, making sure you completely cover the metal piece. You can now put the metal piece you removed last step back into the barrette. :)

  • Going back to the flowers, glue down any calyxes that fall off and for security, I will usually fill the small hole at the bottom with hot glue!

  • Next, glue down your flower to your leaf base, it does not matter where- place it wherever you'd like. and you may add extra glue to the calyx or petals that tough the leaf to secure it down further. Keep adding flowers until you are satisfied, but watch out! These can get really big, really fast! 

  • As a last hurrah, I decided to add some rhinestones to this particular piece to mimic dewdrops! it also gives a little bit of sparkly flair!

  • Using the same techniques, I created two more pieces- notice how the flowers can contrast or be completely different in terms of sizes! I made these to match some of the yukata I own, and you can do the same! Have fun with these and feel free to be creative and embellish with beads, bells, pearls, ribbon- whatever you'd like! Enjoy, and happy crafting! :)


 -Helen C.-
Craft Coordinator
Kahului Ben Franklin Crafts


Monday, July 10, 2017

I Love Kailua !

Happy Magic Monday!
It has really been a very hot past few weeks. Beach weather is in full effect! I wanted to make a sign that was simple and fun and a great accent in my home.


 SUPPLIES:
wood panel with noticeable wood grain
'walnut' wood stain
nylon paint brush
E6000 glue
sand
starfish
acrylic paints in white, Lime Sorbet, Turquoise, and Caribbean Blue 

This sign is so fun and so easy to make! 
First use you stain and coat the entire surface. For all of the inner corners, use your paint brush instead of the dauber on the bottle.


 Wait for your wood panel to dry for 30 mins. The more stain you apply, the longer it will need to dry. If it is damp while painting, the color may mix with your acrylics.

Then with a pencil sketch of an inspirational word, or the name of your home town.
I used Turquoise first, then blended it into my Lime Sorbet, and lastly the Caribbean Blue. Acrylic is amazing because you can apply endless coats, so if at first your ombre blend isn't on point, keep trying! Just be careful to not paint too big. Saturating your brush with paint will make the strokes bolder and smoother. I painted a white heart on the side of Kailua.


Then using E6000, glue down your starfish! I also put some E6000 in the middle of the heart and then pressed white sand into it in order to give my sign some pop of texture!
Have fun with your signs!

Bethany @Enchanted Lake