Tuesday, September 27, 2016

Joyful Tassel Tote

Holy Baker's Twine!
Our stores have STOCKED UP on that classic Red and White Baker's Twine; a staple
of holiday crafters everywhere.  It's time to roll up our sleeves and get.. packaging!
That's right!  What's some cute Christmas packing without that twisted candy cane-like twine looped around or tied in a dainty little bow at the top? 
 
 
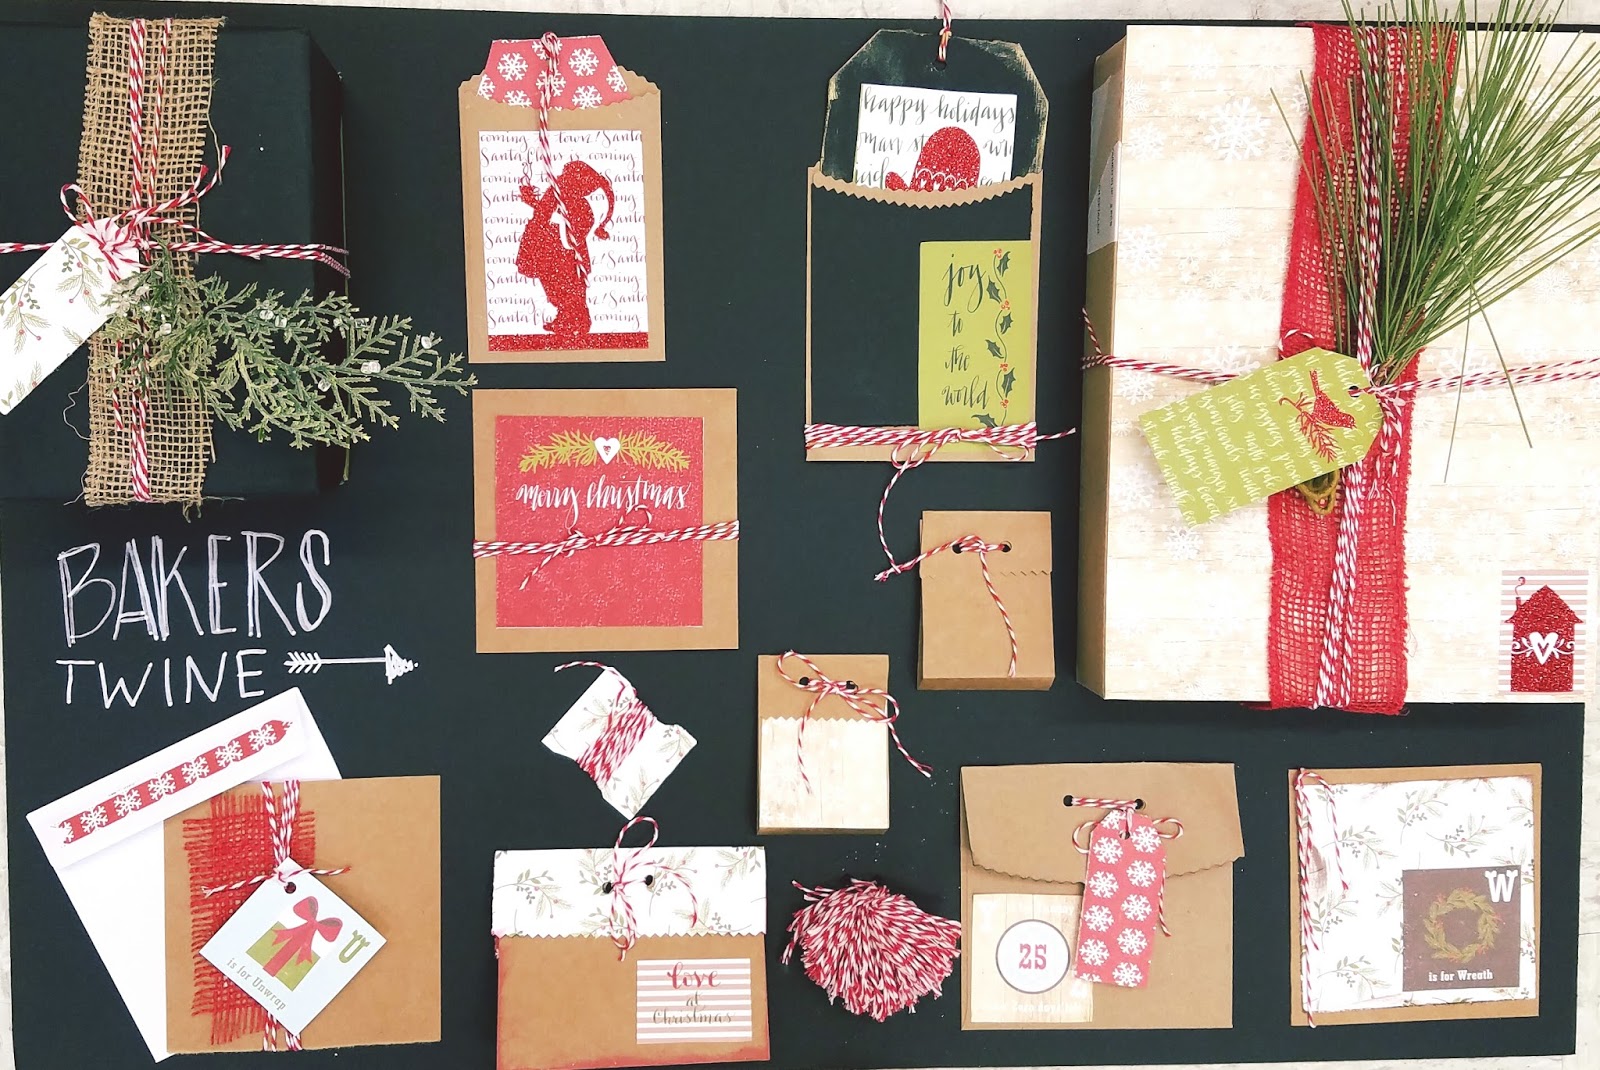
Not only is it great for some simple sprucing up on packaging, but it can be used in scrapbooking, art journaling, planning, as well as fiber arts.  It is a fabric twine after all.   Which means it's great for adding that decorative element to a simple hand towel or placemat.  Sew it!  Crochet it!  The possibilities are endless.!  Today's project is an easy and fun holiday tote that's sure to "bring joy" wherever you go.
 
* * * * * * * * * * * * * * * * * * * * * * * * * * *
 
 
Here's what you'll need!
- Baker's Twine
- Cardstock
- Tote Bag
- Red Felt
- Scissors
- Needle
- Sewing Thread
- Fabric Glue
 
* * * * * * * * * * * * * * * * * * * * * * * * * * *
Let's get started!
 
 
First thing's first:  Tassels!  These are going to be the head-turning detail that is going on your tote bag.  What you do is wrap the bakers twine around the bas of your fingers about thirty times.  Cut the string connecting the spool and then slip the entire loop off your fingers.


Use a three inch length of twine to tie off the top of the loop.  Then, get a length of twine about 5 inches long and wrap both sides of your loop together.  You want to leave about half an inch of space from the top.  Cut the strings at the bottom of the loop.  You can make as many of these tassels as you need to line the bottom of your tote bag.  I made five.
 
 
Sew these babies on!  You can make as many as you want.  It could even look cool with tassels going up the sides of the tote too!
 
 
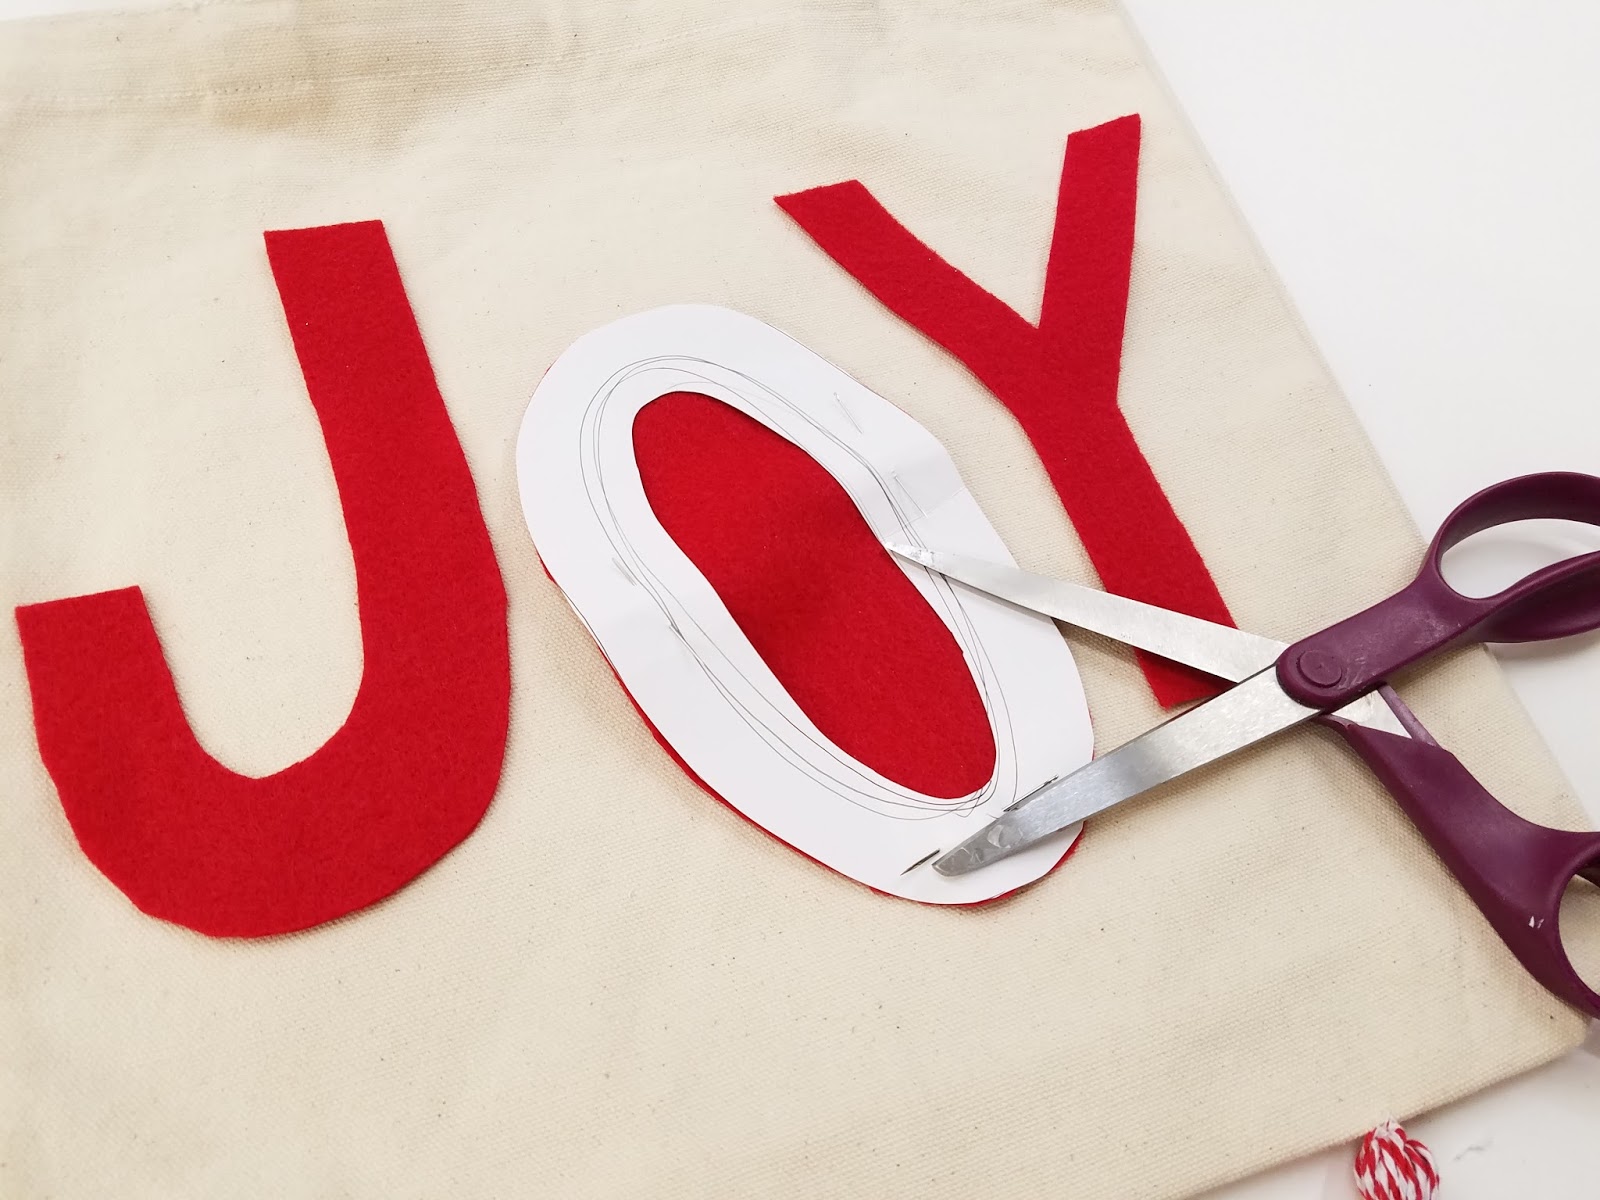
Next, make a few letter templates on your cardstock, cut them out and use them to cut out your felt letters.  The other option is just cutting out your letters free-hand!  I chose to cut out "JOY"  Other fun and cute Christmas-y words or quotes would be "Bag of Coal", "Noel", "Christmas Gifts", Merry", "Ho Ho Ho!"...  The list goes on.  Take your pick!
 
 
Next, you can use the baker's twine OR embroidery thread to make some embroidered embellishments on your letters or around your tote bag.  Here, I used a thinner baker's twine to add some basic embroidery stitches.  I did a Running Stitch on the 'J', French knots on the 'O' and a loose Satin Stitch on the 'Y'. 


There you have it!  This is such a fun and easy project that would work great with yarn as well!  The kids will love it, and teens would definitely love to join in!  Who doesn't want to make a DIY tote bag?  This is a very simple design that could be built upon.  Looking at it now, some mini pom poms, jingle bells, or even some extra decorative embroidery would be amazing, especially around the top of the bag and handles.  Make a baker's twine pom pom keychain to hang from the handles!
It's up to you!
 
Have fun and Happy Crafting!
Erika @ PC


Saturday, September 24, 2016

Fall mason lighted jar

                                           Fall mason lighted jar

·      


   8oz. Mason Jar
·        Orange, red, and yellow tissue paper
·        1” foam brush
·        Decou-page
·        Led battery lights
·        Die cut machine   cut # 55


 Instead of using tissue for the leafs, You can use fake or even real leafs
·        Take your tissue paper to the Die Cut machine. With the Cut # 55
Cut at least 3 to 4 leaves of each color of tissue paper.


·        Decou-page the whole outside of the Mason jar.
·        Take the leaves one at a time and arrange around the jar. Put another coat of decou-page over the tissue leaves. 


.


      Coat it real good.  
·        Set to the side and let it dry
·         When dry put in the LED light.


  @HILOBENFRANKlIN

Wednesday, September 21, 2016

Cute Pumpkin Vase

            Pumpkin Spice, Pumpkin Pie, Pumpkin Soup...  Everyone loves pumpkins!  They are a symbol of Fall and are there for simple and organic decor pieces that are perfect for said season.  Want to step up your pumpkin game further? The perfect time would be for Halloween, the time for that age-old tradition: CARVING JACK-O-LANTERNS!  A little bit of history on these spooky lanterns:  They were first used during the late 1600's to represent the Will 'o the Wisps that were seen floating around peat bogs at night.  Cool, huh?   Today, I'll show you how to make your very own Jack-o-Lantern! But, this one's going to be one that won't spoil and attract gnats and flies after two week...
                 
        
 + + + + + + + + + + + + + + + + + + + + + + + + + + + + +

Supplies Needed 
- Bubble Vase
-Tint spray paint in Mango
- Burlap sheet
- Fine Tip Montana Marker in Black
- Moss & Leaf pieces from a Fall Floral Spray
-Green Raffia
- Hot glue
-Scissors
-Firefly Lights
-Scrap piece of Cardboard


+ + + + + + + + + + + + + + + + + + + + + + + + + + + + + +

Let's get started!

            Step 1:  First thing's first:  Spray a few coats of the Mango tint onto your bubble vase.  I had already done that before I took the picture above.  This took about 3 to 4 coats.   Be sure to let each layer dry for a minute or two before spraying on the next one.

            Step 2: Use the Montana marker to draw a cute (or scary) Jack-o-Lantern face onto your vase.
Tip:  When coloring in a large area, use short strokes and be sure to lift your pen up between each stroke.  No back & forth strokes!  This is because the tint spray paint creates really thin layers that tend to peel off or scratch off.  You don't want a lumpy face!


           Step 3: Measure the top of your vase and cut a circle just a little bigger out of your scrap of cardboard.   I cut out a piece of burlap about an inch or so bigger than the cardboard piece.


          Step 4:  Hot glue the ends of your burlap onto the cardboard.  It doesn't have to be perfect!
Just make sure that there are no stray pieces sticking up.  If it's wrinkled and bumpy, it's totally fine.  It will actually help to add more texture and make it look more natural!


          Step 5: Next, roll up a piece of burlap and hot glue.  This will be the stem of your pumpkin.  You can cut the top to make it more even, or leave it as.  For my stem, it was a little too long, so I cut about an inch.  Hot glue your stem onto your burlap disc.


          Step 6: Start gluing some moss onto your pumpkin top.  this is where the uneven surface helps you out.  It will start looking amazing once you start doing this.  The moss is KEY to this project, because it adds the organic element.  


          Step 7: roll three pieces of raffia together until it starts to curl naturally.  Hot glue both ends to the base of of your burlap stem.  This will be the wilted vine. After this, you can glue a leaf or two onto it. 


 Add your firefly lights inside, top it off with it's cute little stem top and your new Halloween Jack-o-Lantern is done!  What's great about this Jack-o-Lantern is that it lasts for years!  All you have to do is replace the lights' batteries every once in a while.  It can also be a cute centerpiece for a Halloween party or even a great piece of decor for your mantel or coffee table.

Have fun and see you next week!
Erika @ PC

Monday, September 19, 2016

Pumpkin Made From Mason Jar Lids!

Happy Harvest to all of you dedicated followers!
And if this is your first time checking out a HouseMart Ben Franklin blog, welcome!!!


Supplies:

20 mason jar lids- any size
(you can find them in packs of 6 or 7) at any HouseMart Ben Franklin in Hawai'i
Salmon Uber matte spray paint
burlap
scissors
assorted ribbons (satin brown picot ribbon and tan burlap w/ green dots)
hot glue gun/ glue sticks
actual sticks from outside


First spray paint those lids! All you need is the rims, and not the flat discs. I used the salmon color, and it worked pretty well. It made my pumpkin take on a more subtle rustic color. You can also use copper spray to add shimmer accents here and there, to look like rust if you want your pumpkin to look more aged. Let your lids dry for 30 mins, and then hot glue ribbon on every other one! I alternated between two types of ribbon. 

Then simply tie your lids together in the middle! it helps to make sure all the lids are facing the same way.


Secure those sticks in there with a bit of hot glue.
Cut a few leaf shapes from your burlap and glue those in there as well!

And there you have it! Simple and so cute.

Bethany @ Enchanted Lake
 

Wednesday, September 14, 2016

Pokémon Pokéballs Perler Bead Key Chains!


Here's what you'll need...
  • Perler Beads Multi Mix Jar (for the Pokémon team Poké Ball rare colors)
  • Square Peg Board
  • Tweezers
  • Wax/Ironing Paper
  • House Hold Iron
  • Lanyard Hook
  • 7mm Jump Ring, or 7mm Split Ring for extra security
  • 2 Needle Nose Pliers or 1 Split Ring Plier and still 1 needle nose plier

Follow these patterns as shown above. Each block represents one peg on your peg board. The easiest way is to start at the very corner and count. "Row 1, 5 over, black x 4" "Row 2, 3 over, black x 2, red x 4, black x 2" etc...

Be sure not to hit the table!

Here is a listing of each color and the amount you'll need for each.

Poké Ball
Red (x37), Black (x46), White (x17), Grey (x12)

Great Ball
Dark Blue (x38), Magenta (x4) , Black (x46) , White (x12), Grey (x12)

Ultra Ball
Yellow (x20), Black (x66) , White (x12), Grey (x12)

Master Ball
Purple (x28), Magenta (x6), Black (x46), White (x20), Grey (x12)

Team Valor Poké Ball
Red (x20), Hot Coral (x38), Black (x16), White (x15), Grey (x33)

Team Mystic Poké Ball
Dark Blue (x20), Light Blue (x38), Black (x16), White (x15), Grey (x33)

Team Instinct Poké Ball
Cheddar (x20), Yellow (x38), Black (x16), White (x15), Grey (x33)

Ask a responsible adult to fuse your designs! Place your pegboard on a flat, heat-safe surface. Set a household iron to the medium setting. Place ironing paper over the pegboard. In a circular motion, begin to iron the project. When ironed properly, the beads will still have open centers. DO NOT OVER-IRON the beads as it will make the centers of the beads close and can make assembly more challenging. Let the design cool.

Remove the paper and bead design from the pegboard. Flip the design over to expose the non-fused side. Repeat step two. Let cool completely. Once the design is cool, peel off the ironing paper. Your pegboards and ironing paper are reusable.
Note: Beads need heat for about 10-20 seconds per side to fuse evenly. Lift the paper occasionally to see how the beads are fusing. Additional heating time may be required.

Next is the easy part, where you attach your split ring or jump ring. Using your needle nose pliers for the split rings, one in each hand. Split the rings open by pulling one side to you, and the other away. Do not pull them apart directly away from each other, outwards. For the split ring option, use your split ring pliers to save those pretty nails. Open the pliers and place the split ring on the flat side. As you close the pliers down, press the pointed side between the rings of the split ring. Once you have a grip on the split ring, you can slide it around until the end is securely open with room to add your charm, clasp, or whatever else you may be attaching.

Have fun hunting for those Pokémons!
 

Thank you for crafting with the Krazy Goo!

Tuesday, September 13, 2016

Halloween Apothecary Jar

     Are you ready for some frightful fun?  Halloween is next month, and it's about time for us crafters to get started on our spooky decor for the holiday.  Today, I have the perfect project lined up so that you will be ready for some ghoulish fun... A Halloween Apothecary Jar!  

^ ^ ^ ^ ^ ^ ^ ^ ^ ^ ^ ^ ^ ^ ^ ^ ^ ^ ^ ^ ^ ^
Let's get started!

You will need
Glass jar
Black Chalky Finish
Acrylic Paint (Assorted Colors) 
Brown Paint or Distress Ink
Brown or Black Paint Marker or Felt Pen
Scissors
Glue Gun
Cardstock


^ ^ ^ ^ ^ ^ ^ ^ ^ ^ ^ ^ ^ ^ ^ ^ ^ ^ ^ ^ ^ ^ 


Step 1: Take the top off your jar if it comes with one. Squirt some hot glue onto the rim of the jar and let it run down the sides.  Don't let it run too much!

Step 2(not pictured): After your glue is dry, paint the entire jar with the black chalky finish.  It doesn't have to be perfect!  Remember, it's old and distressed.  Unless you want to sand it later, let your dry brush to all the work.  Leave some pockets of glass visible.  Streaks?  Who cares! Also, keep in mind that you want to leave the glue gun "leaks" on the rim of your jar as clear as you can.

Step 3: Draw/write your label onto your cardstock and cut it out.  I recommend using a brown or black pen to stick to the vintage look. 


Step 4: Crumble up your label.  Yup.  Do it.  This will make it look more old and distressed because of the added texture.

 
Step 5: Now you want to unfold your label again and then weather your label with some brown paint.  Use a dry brush and very little paint.  Mod Podge this label onto your jar and let dry.

Step 6: Distress your jar even further by using your dry brush and some green paint to add more detail to the leaks. You can make it more dimensional by adding gold to your leaks.  I decided to streak just a little bit of the green and gold onto the rest of the jar as well.  It's okay if you go over the label a little bit too, as long as you stick to the borders.


 Step 7: This part is optional, but hot-gluing some moss onto the sides and top of your jar will add a really creepy and Witch-y look.
Also, if you have a cork that fits your jar, or if you're lucky and your jar already cam with one, you can make it look dingier by lightly staining it brown to make it darker.  After that, hot glue bits of moss onto it and glue it back onto your jar!


     All you Potterheads out there, make some noise!  Apothecary jars are that perfect mix of creepy, dark, mysterious, magical and fascinating.  What's cooler feeling like you have all the different ingredients around you to make a potion or conduct a spell?  Now, you can!  Create your own apothecary and potion jars this Halloween for some magical decor!  Then, you can invite friends and family to "Come sit for a spell.." (Ba dum TSS!)  

As always, have FUN and see you next week!
Erika @ PC

"BOO" Halloween Sign

September's here, which means FALL is right around the corner!  
It's time for pumpkin-spiced everything, cozy sweater weather and beautiful oranges, reds, golds and yellows.  Love those autumn colors!  
But right now, we're going to focus on Halloween, which means we'll get to play up those gorgeous shades of Onyx Black, Passion Purple, Pumpkin Orange and Chartreuse Green.  This fun palette is what makes this spooky and spunky "BOO" sign pop! 
Let's get crafting!

+ + + + + + + + + + + + + + + + + + + + + + + + + + + + + + + +

Supplies Needed
- 8" Wooden Letters
- Acrylic Paint in Various Colors
- Scrapbook Paper
- Halloween trimmings
-Acryling Paint Markers in Various Colors
- Ribbon
- Mod Podge (not pictured)
- Hot Glue Gun (not pictured)
- Scissors


+ + + + + + + + + + + + + + + + + + + + + + + + + + + + + + + + + + +

Step 1: Paint your letters with your chosen BASE coats.  I chose to paint my "B" purple and one of my "O"s in black.  I decided to leave my other "O" blank because I wanted to Mod Podge a sheet of scrapbook paper onto it.
 

Step 2. After your base coats are dry, you can start drawing your designs, pictures and patterns onto them!  I used a light green marker to draw some really cool spider webs onto my purple "B" and then took a dry natural bristle brush to distress the sides with some black paint.


 Here, I used a white paint marker to draw polka dots onto my second "O", dabbed some orange paint on with a dry brush, then, with the same dry bristle brush, distressed the sides with a bright Chartreuse green.


For anyone who is interested in Mod Podging paper onto their letters, all you have to do
 is brush a thick and even layer onto your letter and smooth the cardstock onto it.  Let dry.  After that, you can draw on details with an acrylic marker.  For example, I used a black Montana marker to doodle a haunted house onto the bright orange paper.


Step 3: After your letters are done, all you have to do is hot glue all your letters together and then embellish!  I took some spider web and and some decorative Halloween pieces to add more of that spooky and fun feel.  And it's done! 


 Enjoy making some awesome Halloween signs for your front door!
It's a great rainy-day activity for the family for any season.

Have fun, and Happy Crafting!  
See you next week!

Erika @ PC  

Wednesday, September 7, 2016

A PEPPERMINT DREAM CHRISTMAS: CANDLE CENTER PIECE


Good news everyone, Christmas is here! At least according to our store. Christmas items are slowly rolling into our stores. I know there are some hard core Christmas lovers out there, and it's time to begin the holiday homemade crafts! So that'd there be plenty of time to finish before Christmas.

It's simple, like this candle center piece!

What we used...
  • Square (Base) Glass Vase
  • Doodle Bug's Vellum Dot 12"x 12" Card Stock in Red
  • Darice Rhinestone Ribbon 1/2" wide
  • Darice White Snow Flake Ornament
What You'll Need...
  • Modge Podge
  • Sponge Brush
  • Hot Glue Gun - High Temp
  • 1-2 Glue Sticks
  • Paper Trimmer
  • Scissors
To begin, take measurements of your vase, and trim your paper down to size. You may want to stick with wrapping the 3 sides, and then cut out a separate panel for the last side. It's vellum so if you overlap the paper it will change the transparency and the dots will begin to cluster when you put a light inside. Optional to leave one side blank, especially if it's going against a wall.

Next, with your Sponge Brush, brush on a thin layer of Modge Podge one side at a time. Double check to make sure the other end of your paper will reach the 3rd side of the vase nicely. While the Modge Podge is still wet, you can reposition it. Push out any bubbles and rub out any wrinkles that may occur. With that in mind go ahead add some Modge Podge to the edge and work on the next side. Like wrapping a sushi roll.

Add some bling! Measure and cut the Darice Rhinestone Ribbon to desired length. With your Hot Glue Gun - High Temperature, glue down in small sections. Then for the final touch, using your hot glue gun again, attach a white snow flake. Don't forget your favorite scented candle, and have a wonderful (early) Christmas.

Thank you for crafting with the Krazy Goo!

Monday, September 5, 2016

Gold Rimmed Plaster Flowers

Hello all!
A while back I saw a photo of something like these flowers and couldn't find any tutorials, so I've done the leg work and recreated this elegant look using just a few basic supplies!


Supplies:

liquid gold enamel (found in the model paint section)
round nylon fine tip brush 
mineral spirits (cleaner)
large flat disposable dish or pan (for plaster) 
Design Master spray paint in mint
Plaster of Paris (small tub) but in usage, maybe 5 cups
several cups of water
stirring stick
plastic clothes hanger
newspaper
your choice of silk/faux flowers. The ones I used looked like a type of Magnolia.
(the more fabric in the flower, the better. Plaster won't bond to plastics.)


The first step is to pour out your plaster into the dish you've selected. Make sure that this dish can be either thrown away for used for other crafts, as the plaster may harden to the surface if not cleaned promptly. Normally in plaster projects, one would have a container of water, and simply pour the plaster in to it until the top of the pile is sticking out from the surface, but I did it the other way around. I added plaster and water until it was the consistency of pancake batter. You want it to be thick enough to coat the flower, not runny and watery. Also time will thicken your mixture because it will be starting to set even as you're working with it, so you'll need to work fairly quickly. 


I just put the whole thing in there, stem and all. I made sure to squish the flower in the plaster in my hands as to get it soaked into all the tiny areas, and so it can soak through the fabric to become stiffer and stronger once dried. Your flower will be somewhat heavy after being coated with the plaster, don't worry it will be lighter once it dries. I bent the stems and hung it on a clothes hanger over some newspaper. Let your flowers dry over night to completely harden.


The flowers looks really beautiful even just like this! Again, keep in mind any plastic in the flower will repel the plaster and even if the plaster covers the plastic parts (leaves, stamens) it will break off like a chocolate shell on ice cream.


I then took my mint spray paint and just lightly coated them, putting more color in the center of the flower, and barely any on the petals. I wanted white to show through, so by just adding a touch of color, it gave the flowers a soft porcelain effect.


After about an hour you can begin the enamel. Using a thin round brush, paint the enamel along all the edges of the flower, and the very center.


Clean your brush with your mineral spirits. You'll need a more aggressive chemical to to the job as the enamel will not want to come off the brush hairs! 

After all is dry and complete, feel free to arrange your flowers in vase, trim off the stems to glue them onto the lid of a box, or the side of a frame! This can be a really great way to give a really classy gift for a wedding, or for a golden anniversary! 


 Bethany @ Enchanted Lake