Thursday, June 25, 2015

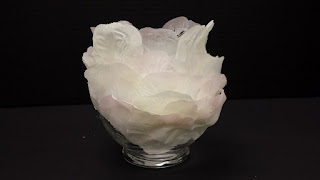
Rose Petal Votive

Hi there! I've been wanting to make this rose petal votive for the longest time and I finally had the chance! It was so fast and easy to put together and looks AMAZING. It'll make the perfect addition to any table decoration.

You will need the following supplies:

- One Ivy Bowl or Bubble Ball Bowl
- One solid color bag of fake rose petals
- Hot glue gun
- Battery operated candle or Firefly Lights
- Bling (optional)


Apply hot glue to the very bottom of a petal. 


Place it on the bowl so that the tip of the petal is slightly above the rim of the bowl.  By gluing only the bottom down, the top droops a little bit like a real rose. 


Glue petals down one by one until you have a layer that circles the entire bowl. Now start to apply the next layer so that it overlaps the top layer.  To make it look more organic, off center the petals so they aren't lined up perfectly. 


Continue to work layer by layer until you cover the whole bowl. 


 You can add some bling to the bottom of the bowl if you'd like but it's not necessary.


There you have it! I can't wait to use mine in my room or for a romantic candlelight dinner :)

Until next time, happy crafting!
Rachel @ Mapunapuna


Scrubby Yarn


We have new yarn!  This Scrubby yarn by Red Heart is fuzzy and soft and comes in a variety of colors.  It's the perfect yarn for a washcloth.  There's knit instructions on the inner label but you can just as easily crochet it too.  Adjust the instructions and make it to the size you want. 

I crocheted one and knitted one from one skein and still had yarn left over to make a another one!  These are easy projects for beginners because it can be made with just one type of stitch.  I made mine into squares.

For the knitters: Cast on the width you want.  Knit stitch across. Turn and continue to knit stitch across in rows until you get the length you want.

For the crocheters:  Chain stitch the width you want.  Turn and half-double crochet in each chain across. Turn and continue to half-double crochet in rows until you get the length you want.

This yarn can be used for fuzzy stuffed animals, sweaters, scarves or even lei.  Hmm... I'm going to have to consider all of these possibilities!

Scrubby on my mind!
Gloria @ HouseMart BFC Pearl City


Monday, June 22, 2015

Tulle Bow Hair Tie

Today you'll learn a simple and fast way to make your cute little tulle bow hair tie.  Let's get started.

Supplies:
Tulle (color of your choice)
Scissors
Yard Stick
Hair Tie


First gather your supplies.  Get your yard stick and tulle.  Measure out about 1/2 a yard to 1 yard of tulle and cut.  If you want your bow to be fuller you can cut out a longer piece.  Also cut out about 5 inches of tulle.


Wrap your 1 yard of tulle around your four fingers.  If you want the bow to be fuller, wrap the tulle around your finger tighter.

Gently slide the wrapped tulle off your fingers.  Get your 5 inch tulle and wrap it around the center of the wrapped tulle and tie a knot.


Slide your scissors between the knot and the outer fold and snip the tulle to separate the fold on both sides.
 It should look like this...


Trim of the excess tulle if necessary.


Get your hair tie and tulle bow.  Place the tulle bow onto the hair tie and with the center tulle tie a knot around the hair tie.  Trim off the center tulle to match the rest of the bow.


And you're done.  You can now wear this hair tie or give it as a gift.


Have a Craftastic Day!
Julie @ Enchanted Lake

Thursday, June 18, 2015

Father's Day Goodie Bag

Hi there! Father's Day is this weekend and I have the perfect goodie bag for you to make to put dad's gift in!

You will need the following supplies:
- A paper bag, any size will do
- 1 sheet of patterned scrapbook paper
- Ruler
- Scissors
- Double sided tape


First, draw a line 1 or 2 inches down from the top of the bag and in about a third of the way on each side. So, the middle of the bag should be blank.  Use your scissors to cut the lines you just drew.


 Next, cut out a tie from the scrapbook paper.  The size of the tie should match the size of the bag.  If you have a hard time drawing symmetrically like I do, then take a piece of printer paper and fold it in half.  Draw one side of the tie.  Cut it out while still folded in half.  Open up your paper and you should have a symmetrical tie.  Now use it to trace onto the scrapbook paper.  Adhere the patterned tie to the front of the paper bag using double sided tape. 


Now put your gift inside! Fold over the flaps you cut and tape down over the top of the tie, also using the double sided tape.


There you have it! Now you have the perfect wrapping for your Father's Day present. 

Hope you all have a great Father's Day and until next time, happy crafting!

Rachel @ Mapunapuna

Thursday, June 11, 2015

Glitter Bowl

Hi there! Today I'll be showing you how to make this awesome glitter bowl!

You will need the following supplies:
- Mod Podge, glossy
- Chunky Glitter (any color)
- Balloon
- Foam brush
- Jumbo craft stick


First, blow up your balloon to the size bowl you want to create.  Next, mix equal parts Mod Podge and glitter in a bowl using the craft stick.  You may want to add more glitter to get the mixture really thick. 


Use either a foam brush or the jumbo craft stick to apply the mixture to the balloon.  I preferred the craft stick because it was easier to pile it on.  It also helps to sit your balloon in a bowl as you work.  


The size/height of your bowl depends on  how much of the balloon you cover.  Make sure you apply a thick layer of the mixture.  You shouldn't be able to see the balloon through it.  Once you're done applying the glue mixture, set it aside to dry over night.  Keep in mind that the bowl will be flexible, it doesn't dry stiff.


Once it is good and dry you can pop your balloon and remove it from your bowl.  Now it's ready to be used! It makes a beautiful accent to a table or bookcase.  You can also use water balloons to make smaller bowls, perfect size for a desk or vanity.  


There you have it! I hope you enjoy your new, fabulous bowls and until next time, happy crafting!

Rachel @ Mapunapuna

Monday, June 8, 2015

Sea Glass Mason Jar

Today we are going to make a Sea Glass Mason Jar.  It can be used for many different occasions.  Let's get started!

Supplies:
Popsicle Stick
1" Foam Brush
Elmer's Glue
Icing Coloring (Your Choice)
Paper Plate
Clear Spray Paint (sealer)

Optional Supplies:
Jute
Sea Glass
Shell (drilled)

First you need to gather your supplies.


Now take your paper plate and pour about 1" in diameter of Elmer's glue onto the plate.


Take your popsicle stick and dip it into your icing coloring.  Scrape one side of the popsicle stick on your icing coloring bottle.  Mix your dipped popsicle stick with the Elmer's glue until one color is formed.


Take the lid off of your mason jar and start painting your glue mixture onto your jar with the foam brush.  Paint the entire mason jar and let it dry upside down.


 Once dried spray your jar with a clear spray paint.  That way you will seal the jar and prevent the sea glass look from chipping.  At this point you can wrap the bottom of the lip with jute and add a sea glass or shell for a more decorative look.


And you are done! 

*Please keep away from direct sunlight to prevent the sea glass look from fading*

Have a Craftastic Day!
Julie @ Enchanted Lake


Thursday, June 4, 2015

Grad Party Centerpiece

Hi there! Today I'll be showing you an awesome centerpiece idea.  It's perfect for your upcoming grad parties but it's so universal you can make it for any celebration.

You will need the following supplies:

- Styrofoam ball, you can choose what size ( I used the 4" one)
- Tissue paper in at least 2 different colors ( I used 3)
- Glitter paper or metallic paper for cut outs
- white floral wire
- 1 BBQ skewer
- Hot glue gun
- serrated knife or Styrofoam cutter 


First, use the serrated knife or Styrofoam cutter to cut your ball in half.


 Next, cut your tissue papers into approximately 8" squares.  I cut each sheet in half and then cut those halves into thirds.  You can make them smaller if you want a little smaller centerpiece.  I used about 9 sheets per color. 


Take one sheet of tissue paper and pick it up from the center.  Pull the outside edges down and gather them.


Put hot glue on the center of the tissue paper and place on the Styrofoam.  You'll need to hold it there for about a minute so it doesn't fall. Alternate between the different color tissue papers.  The metallic I used is blue on one side and silver on the other so I used both sides instead of purchasing 2 different colors. That way, I had white, silver and blue. 


Continue, alternating colors until you cover the whole Styrofoam.


Now you can add your embellishments! I used the store die cut machine to cut out "2015," 2 large stars, and 2 small grad caps out of glitter paper.  I used a Marvy Uchida star punch to punch out smaller stars as well.  I used double sided tape to join the 2015 together and hot glued it to a BBQ skewer.  Then I glued each of the other cut outs to a piece of white floral wire that I cut at different lengths.  Poke them into the Styrofoam to arrange.  You can also add a photo of the graduate or school logo.  You can really add anything you want.


It makes such a great centerpiece and works for any occasion!

I hope you enjoyed this project and until next time, happy crafting!
Rachel @ Mapunapuna

Crankin' Out Crafts Episode 422 - Painting Simple Flowers

JFlo continues to show you how to paint simple flowers on a canvas. This is great for children or beginner painters.

Simple Flower Painting the kids can do, too!

Learn more about this painting technique on our YouTube Channel: Crankin' Out Crafts Episode 422 - Painting Simple Flowers

Supplies:
acrylic paint
paintbrush
canvas


We hope you have enjoyed our episodes this week on Canvas Painting. Stop by the store for more ideas and supplies for painting and summer crafting!

Tuesday, June 2, 2015

Crankin' Out Crafts Episode 421 - Easy Painting Technique

Do you need a summer craft for you and your kids? Check out this easy painting technique as JFlo creates a one of a kind wall hanging.

Learn an easy painting technique on Crankin' Out Crafts!

Watch our latest episode here: Crankin' Out Crafts Episode 421 - Easy Painting Technique

Supplies:
green acrylic paint
yellow acrylic paint
paintbrush
canvas


Stay tuned for another painting on canvas later on this week!

Monday, June 1, 2015

Graduation Gift Box (unfinished wood box)

Today you'll learn how to create a cute graduation gift box using an unfinished wood.  It's great to give as a gift or you can use it as a center piece.  Let's get started.


Supplies:
Unfinished wood with a removable cover
Acrylic paint - black
Acrylic paint - color of your choice
Paint brush
Hot Glue Gun
12mm Rhinestone (clear/crystal)
DecoColor - Gold (fine tip)

Optional Supplies:
Buttons
DMC Floss


First gather your paint and unfinished wood box.  Paint the bottom of the box with the school color or any color you choose and paint the top (cover) black.


Take your top cover (black) and get your rhinestones.  With a hot glue gun add a dot of hot glue onto the lower part of the cover and add your rhinestone.  Continue this step until you cover the bottom rim of the cover.


Once that is complete, with your gold paint pen draw/write Class of 2015 on the top of the cover.


At this point you can hot glue on a button with a tassel in the middle of the box cover (optional).

And your done!
Hope you enjoyed this quick graduation gift box!


Have a Craftastic Day!
Julie @ Enchanted Lake