Thursday, June 30, 2011

So Many Charms....

So I love dimensional charms, the ones made out of Swarovski crystal that people attach to their cell phones or purses...I LOVE them a lot and there are so many different designs out there that it's hard to just pick a few to decorate my purse. But sometimes having a bunch of them each individually attached to your purse via cell phone straps can get overwhelming and what if heaven forbid one breaks off? Well here's what I've been doing...


Get a length of chain, here I used 12 inches worth but the length will vary depending on how many charms you want to attach and how you want to have it on your purse which we will get into shortly. Attach a lobster claw clasp on each end. I attached my charms to the chain but purposely kept a few inches of chain on each end free of any charms. Then attach to your purse in 2 different ways...


The chain can go directly across from one end of the purse to the other by attaching the ends to the purse straps, the lobster claw clasp can be hooked directly onto the chain after looping through the purse ring or strap. This gives a very nice display of your charms.

The second way has the chain looping around just one purse strap, this allows you to have a slight overlap of the ends of the chain (again the lobster claws are hooked directly onto the chain) which results in a very secure closing because you now have 2 catch points! If one lobster claw fails then the chain is still attached together by the other lobster claw.

Because I wanted my chain very secure I did 3 things.
First, I made sure that all the links of the chain were closed links (soldered close) which is usually the case with sterling silver chain rather then base metal chain which stands the chance of being able to be pulled apart due to open links (like jump rings).
Second, I attached the lobster claws by wire wrapping them to the chain.
And Third, I wire wrapped the charms to the chain. Now you could attach your charms to the chain via a lobster claw clasp which would allow you more versatility since you would be able to then easily change out the charms. Or you could attach the charms via a split ring but I got turned off from split rings after one snagged into one of my purses, but hey...that's just me. Attach your charms the way you like best!

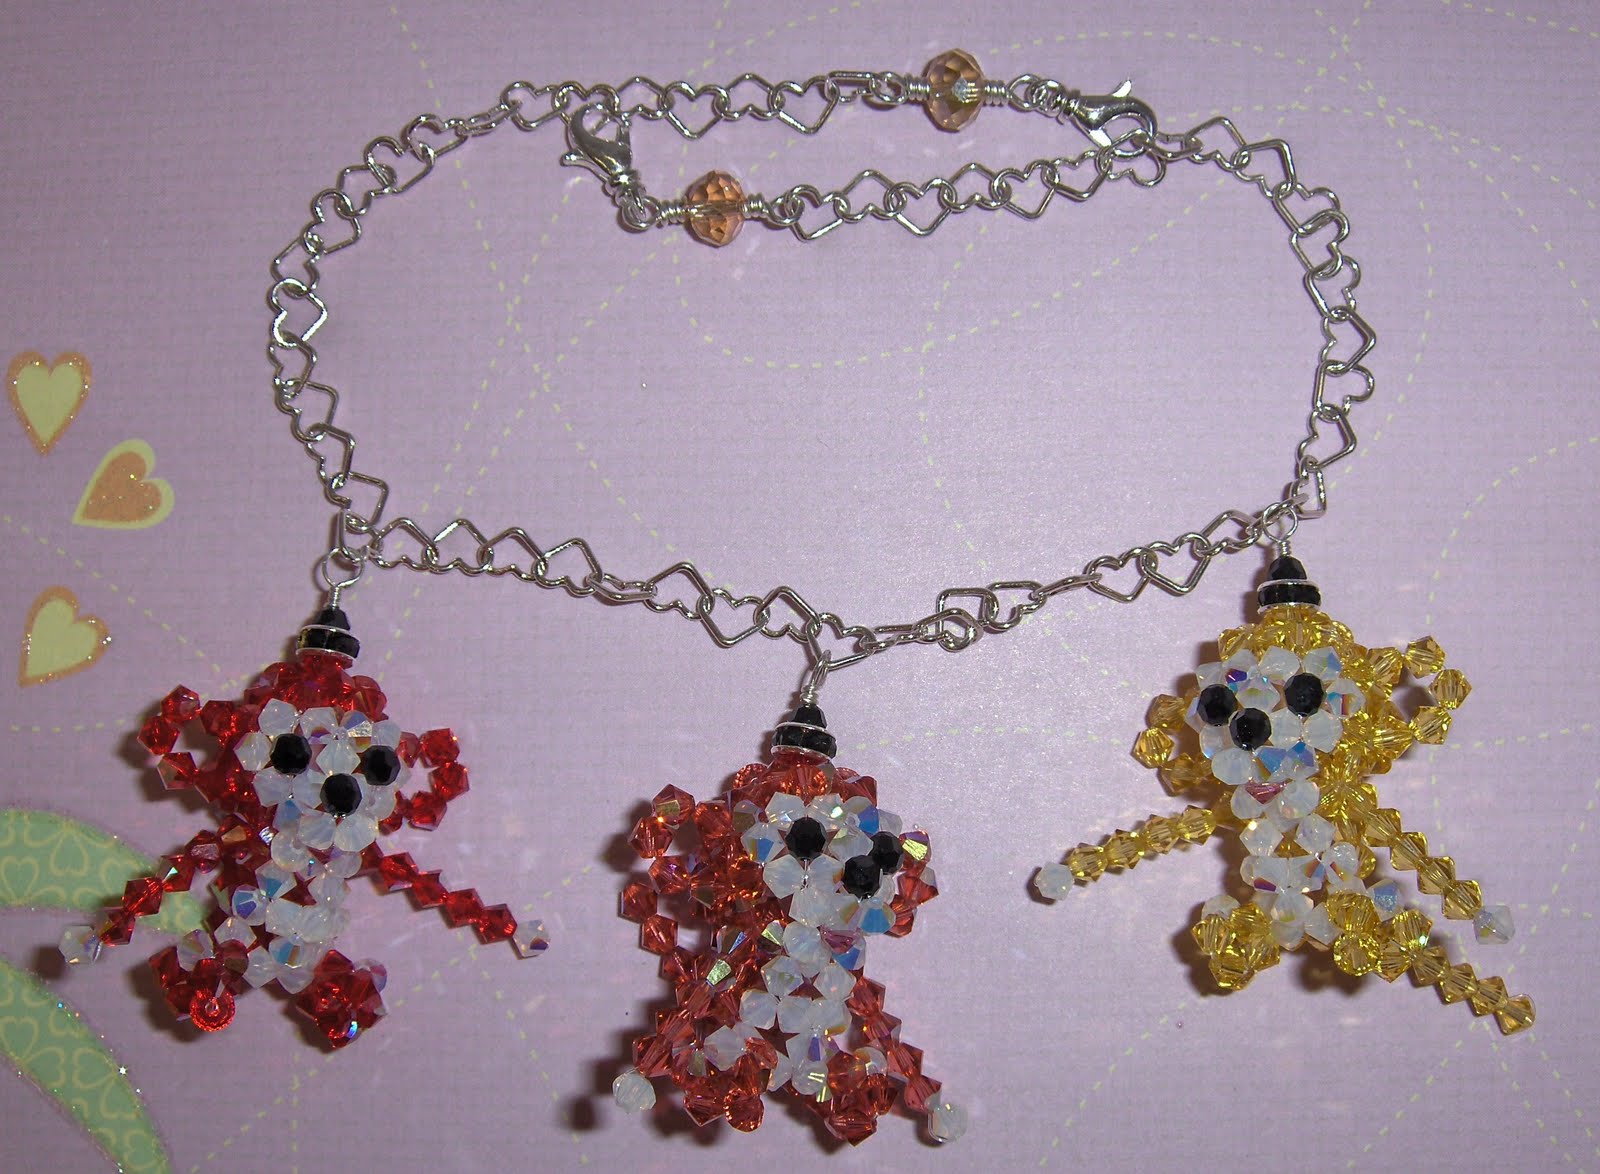
I really like this method not only because it allows you to display your charms but because you can also do it in a theme! Special thanks go out to Stephanie, our administrative assistant at Mapunapuna, for allowing me to use her purse as a model! By the way, the instructions for the monkeys are in that beading book I blogged about a few weeks ago so come pick up the book if you want to make some yourself!

Have a great weekend and I'll see ya later!

Lynn @ Mapunapuna Bead Shop

Friday, June 24, 2011

Tech Thursday - Freezer Paper revisited

The other month, we had Brandon from our Enchanted Lake BFC on the show explaining how to do freezer paper stencilling. For those of you who missed it, that's today's Technique!

 First you need to find a design, I decided to just draw mine. You can use coloring books or even your Cricut or eclips machine!

Next you need the Freezer paper. Place a sheet of freezer paper over your design, shiny side down and trace.

Think about what part of the designs you want painted, this will help you decide where you need to cut out.

You need to cut where you want paint to go.Cut your traced design out, a swivel craft knife blase is great for doing this.

I always turn it over to the other side to make sure the edges are nice and clean, no little paper "hang nails"

I needed to also cut out the eyes, nose and mouth to keep those areas unpainted.

Place the cut-out freezer paper on your shirt and place the smaller pieces back onto the face.

Iron the freezer paper to the shirt. Make sure all the cut edges are sticking to the shirt.

Place a plastic coverd cardboard inside before painting to protect the other side of the t-shirt.

You can use regular acrylic paint mixed with textile medium to paint on your shirt. This gives you a whole array of colors to work with. I decided to try out the new So Soft fabric paints, perfect for this type of project.


I just used a foam brush to paint the large areas in. Along the edges, my paint strokes go from the edge inwards, so that I don't push up the edges and get paint under the design.

Let dry. Then, carefully lift off the freezer paper, revealing your painted design.

I removed the eyes, nose and mouth pieces so that I could paint these areas in with the black paint.

For this I used a liner brush and what I call my bottle cap painting, meaning iIjust use paint from the bottle cap.Lastly, I wrote in my words using the liner brush again.

I made this shirt for Saturday's Crafting Carnival at the Mapunapuna Ben Franklin Crafts. Please join us for a fun day of crafting and prize give aways from 10am to 3 pm. See you there!

Thanks for stopping by today and hope to see you this weekend!

Thursday, June 23, 2011

Vintage Trinkets


Vintage Trinkets is a new line of embellishments for our Make a Memory department but they are so pretty that I HAD to turn some of it into jewelry! Flowers, birds, brass and gold....rocking that antique vibe and very romantic.


Here I added Swarovski pearls to make a sweet charm bracelet.


Here's a cute statement necklace using the large bird cage, this is on a really long chain that we sell exclusively at the Mapunapuna bead shop. The large beads on the side are from another new line called Design Elements that co-ordinates beads in different textures and colors to come up with some very beautiful mixes.


And here are some earrings I made with some of the left over beads and embellishments from the packs I used for the bracelet and necklace. If you have a chance to come to the Mapunapuna Crafting Carnival on Saturday June 25 between 10 AM and 3 PM you can see me demo this ring...


Remember BIG rings are trending right now! Or you can attend our make and take to create a simpler version of the bird charm bracelet that looks like this...


And we are still doing our Bead Shop demo on the faux suede bracelet that looks like this...


Of course there will be a lot more going on that day so it's going to be very exciting and I hope you can make it!

Lynn @ Mapunapuna BFC

Monday, June 20, 2011

A Fun Weekend

Happy day after Father's Day everyone. We hope that you all had as much fun as we did this weekend. We started our weekend off with a 20% B.Y.O.B(ag) sale where we pulled the name of our "My Tent" giveaway winner. Here's a picture of our lucky winner, Vivian from Waimanalo, and our assistant manager Jenny.
If you were lucky enough to shop here with us at Enchanted Lake, you might have seen us having a blast with our Gem Ring make 'n take. If you missed it, don't fret, I'm going to show you how to do this blinged up project right here on the blog. These rings are tremendously easy to make and a lot of fun. They would be great for an activity at parties, favors, or even as a gift.


The supplies for this craft are as follows: Cute scrapbooking paper of your choice (I used the new Stella and Rose 6x6 stack), Glossy Accents, E6000, adjustable ring backs, and some flat-backed glass gems.


The hardest part of this project is probably finding the right bit of scrapbooking paper. You can use patterned, glittered, or embossed paper; whatever strikes your fancy. I do suggest, however, that you look for small patterns to use with the smaller gems.


Once you have your paper picked out, squeeze a dime sized amount of Glossy Accents onto the flat side of your gem, right in the center. Then turn your gem sticky-side down and press onto your paper until the Glossy Accents oozes to the edges of the gem.

After the Glossy Accents has dried, which takes 15-60 minutes according to the manufacturer, use a pair of scissors to trim around the edges of the gem.


Now squeeze a small glob of E6000 onto the ring back and attach the ring back to the back of the gem.


Now all you need to do is give the E6000 some time to dry before you take to the streets with your new personalized bling. Here's a picture of some of my favorite designs using the Stella and Rose paper:

We will be doing more of these make 'n takes here at Enchanted Lake for the next few months so don't forget to check out our store calendar or just drop by to check it out.


Puna @ Enchanted Lake

Saturday, June 18, 2011

Summer Education!

Just because it's summer doesn't mean we've forgotten about the hard-working teachers that may be busy plotting and planning the next school year. (Sorry kids, but yes, you do have to go back to school in the fall and teachers spend the summer finding new ways to teach you the important information you'll need for the rest of your lives.)

We recently got some new educational tools in and they're now available at our store. Bulletin board decorations, stickers, flash cards, and much more can be found! (One of my favorite designs are the monkeys that we now carry!) All kinds of things to decorate your classroom with!

While we're on the subject of teaching and education, if you haven't seen our monthly calendar recently, you're missing out on some great classes and demos that get offered every month. We have card classes, jewlery-making classes, and demos of all kinds. Just to give you an idea of what we offer, here's a list of some of the demos that are offered weekly:

Keiki Crafts - Bring the kids to do a simple, but fun, craft every Saturday from 10 to 12 in the morning.

Sizzix Make & Take - For $5, come and learn a project made with a featured Sizzix die and purchase the die at a discounted price afterwards. Saturdays from 1 - 3p.m.


Here at Hilo Ben Franklin we have some awesome classes and amazing teachers that lead them.

Linda teaches classes that feature one of our newest products that we carry, the Cricut machine. She's always willing to explain the many things this little machine can do. Some of her classes have included learning how to cut material (fabric) and make photo albums and boxes.

Julie is our jewelry teacher. She mainly holds classes where students will work on a bracelet made of Swarovski crystals, pearls, or both. Julie even offers Student's Choice classes once in while where the students get to choose which of her designs they would like to learn. Perfect for students who may have missed a class and don't want to miss out on the fun.

Jayla offers a class once a month called Cutsie Cards and Crafts by Jayla. Students work on cards or various other crafts using stamps. It's a fun class that's great for almost all ages. Perfect for Mommy/Daughter time or even a Girls' Night Out.

One of our own Hilo Ben Franklin family members, Donna, teaches her own class once a month called Donna's Kraft Kine Cards. Held one Friday night a month, this popular class fills up quickly. There's a voluntary card exchange that takes place during the class and light refreshments are offered (and often brought to be shared by students.)

For many of our classes, seating is limited and sign-up is required 2 weeks in advance. Be sure to pick up a craft calendar at any register during your next trip to the store to see what's coming up.


**Coming Soon**
~ Paper Party and Family Fun Day - This day is truly a FAMILY fun day. There will be projects for the whole family to enjoy. More details are being finalized, but make sure to save some time to come by on July 23!!

~ Hilo Ben Rockets & Models Club - Coming in August! The club will be meeting once a month and will give rocket and model enthusiasts an opportunity to talk about and work on their models and rockets. Stop by any register to leave your name and e-mail address if you're interested in being added to our list to get information as soon as we have it.


Hope you're all having a great summer!

~Jen at Hilo Ben Franklin


Thursday, June 16, 2011

Beaded Animals


We have a Bead Shop exclusive (available only at Mapunapuna, Maui, and Hilo BFC)!! If you're into making cell phone charms, you know that instruction books on this mainly come out of Asia and that they can be expensive! Well, we have this cute little book now available at our BFC Bead Shops and it's only $4...that's right FOUR DOLLARS!!!! There are a whole bunch of super kawaii animals in this book and although the directions are to make these out of 10 to 12 mm beads, you can change the size of the beads to adapt it to the smaller cell phone charms! Here's some that I made over the last 3 days:


There are several more dogs patterns, a cat, a monkey, a turtle, a teddy bear, a rabbit, and a frog! I would say that these are intermediate patterns so if you're interested in starting this type of craft, pick up some of our beginner free instructions like the beach ball and cupcake but definitely get this book because this type of deal does not come often. Once we sell out, there won't be anymore so what are you waiting for!!

Thanks for stopping by and I'll catch ya later!

Lynn @ Mapunapuna Bead Shop

Wednesday, June 15, 2011

Egg Decorating with Eileen!


Egg Decorating with Eileen Tokita! A new class at Pearl City features beautiful Faberge' style eggs.....join the class this Saturday, June 18th from 10am-2pm. This month's special feature is a decorated duck egg in which stands a porcelain doll. If you want to try something different, Eileen brings along other designs too!

We have a Father's Day Celebration happening this Saturday as well....join us from 11am-1pm for Make-n-Takes...bring along your keiki! And, as featured previously, there's a class on the hex nut braclet from 1:30-3:30pm on Saturday(this one requires registration by noon, Friday).

Happy Crafting!
Gloria @ Pearl City

Monday, June 13, 2011

Let Summer "Grow" On You


Save the world AND have some awesome summer fun. Ben Franklin stores now have great plant and tree kits for your gardening pleasure. With prices ranging from only $3 to about $25, we can save the world on a budget. Get involved and get your green thumb growing for a healthier planet.


Puna @ Enchanted Lake

Saturday, June 11, 2011

Cars and Rockets and Battleships, Oh My!

Come Check It Out!!

If you haven't been to Hilo Ben Franklin recently, you may not have seen our newly expanded selection of rockets and models. (No, not supermodels...just cars, trucks, and other fun stuff. :D)

We have a new selection of toys for big boys (and girls too), not just the little ones. Our store manager, Bert, is a model enthusiast and has been looking forward to the addition of new items to this previously slim section of the store. Not only are there new models and rockets, but there are paints and other much-needed supplies for your project. Everything you need to be able to put together and launch your rocket is right here at Ben Franklin!

There are cars and even big trucks...

Battleships and tanks...

And, of course, rockets!

The paints and other things to decorate your projects are right above the models.


These rockets and models make great projects to work on with your kids. I heard a great story today about a father working on a model car with his little girl. It'll create great memories for both of them. I remember my dad and my brother working on model jets when I was little. They're still showcased on a shelf in my parents' room at home.

Come visit us soon to check out the new stuff! Maybe you'll find your new project where you least expect it. These rockets and models also make great Father's Day gifts. (Pssst! Father's Day is on June 19!)


**Coming Soon!!!**

* Rockets and Models Club - Details are still being worked out, but keep on the lookout for a new club for model and rocket enthusiasts. We'll be meeting once a month, probably at the beginning of the month, to work on and talk about our rockets and models. More information will be available as things are finalized.


* Paper Party and Family Fun Day - Save the Date for Saturday, July 23, 2011 for our Hilo Ben Franklin Paper Party and Family Fun Day! We're still hard at work putting together the fun stuff we'll have prepared for you but as soon as we can, we'll share the details with you!


See you soon!


~Jen @ Hilo Ben Franklin

Thursday, June 9, 2011

Royal Pomegranate Ring


A new Swarovski 2 hole bead is now available at our Ben Franklin Bead Shops and we've got a free worksheet that shows you how to use it to create this ring! You're going to need monofilament, 5mm bicones, 4mm fire polish beads, and seed beads in size 15 and 11. If Sapphire isn't your color, have no fear because the 2 hole bead is also available in red magma, rosaline, amethyst, and crystal ab. I consider this a beginner project but if you have any doubts then stop by our Mapunapuna Bead Shop on June 19th and 26th (that's the last 2 Sundays of the month) for our demo that will be between 2 and 3 pm. I know that I'll be able to finish this pattern before the hour is up so I'm going to reach into my bag of tricks and demo another ring also using Swarovski beads so I hope you have the chance to stop by!

I'll see you at the store!

Lynn @ Mapunapuna BFC Bead Shop

Wednesday, June 8, 2011

Hex Nut Bracelet


I saw this as I was browsing some craft sites & couldn't resist! I thought it would be great for a Father's Day project. It's an easy braiding technique with hemp & hex nuts....the stores have hemp in natural as well as a few other colors, the hex nuts can be found at your favorite hardware store. Check the website: honestlywft.com....you'll find complete instructions there. Or, join me at Pearl City for a workshop to make one...Saturday, June 18 from 1:30-3:30pm. We have twine or hemp to purchase but you'll have to bring along 18 (or more) small hex nuts! This would be a terrific gift for that special man or make it for yourself!
Craft Diva!
gloria @ Pearl City

Monday, June 6, 2011

Doughnut Day

Hello faithful blog readers! This past Friday, June 3rd, was National Doughnut Day and Enchanted Lake Ben Franklin celebrated our love for doughnuts. We had free samples of our mini Doughnuts made with our doughnut pans by Jenny and Dolly. Here's a picture of the awesome spread.


We also had a couple of make 'n takes for you doughnut lovers. The first were doughnut earrings made out of Hardy Clay. They were almost good enough to eat.


The second make 'n take was a simple doughnut card. This card used a fun and easy technique called paper piecing to make the wonderful plaid colored doughnut.


Remember to look for copies of our store calendars for more fun events. Coming up next month we have a fun Lollipop Day planned on July 20th. We will have free lollipops (while supplies last) and fun make 'n takes and demonstrations for our attending crafters. Hope to see you there!


Puna @ Enchanted Lake