Friday, May 31, 2013

Crankin' Out Crafts Episode 255 - Braided Headband


Here's a closer look at how to make this great braided headband inspired by some Pinterest DIYs.

Braid ribbon, paracord, and ball-chain to create this headband!


Supplies:
3/8" Ribbon
Paracord
Ball-chain
Hair elastic
Wire cutters
Scissors
Lighter

These headbands are so easy you can make a bunch and wear two or three at a time!

Wednesday, May 29, 2013

Crankin' Out Crafts Episode 254 -Glamour-Band


It's glamorous and oh so easy! JFlo makes a super sparkly headband on today's show.

Add bling and glam to an ordinary headband!


Supplies:
5mm rhinestone cup-chain
Skinny black headband
1/8" satin ribbon
Fabri-tac
Scissors

This accessory adds an elegant touch to your outfit or you can make them as a great DIY bridesmaid gift.

Monday, May 27, 2013

Crankin' Out Crafts Episode 253 - Criss-Cross Headband


This week on Crankin' Out Crafts we're headbanding our fingers off! Our first episode starts you off with a simple band.

Add a cute design with colored ribbon to a plain headband!


Supplies:
2" Cloth-covered headband
3/8" ribbon
Scissors
Hot glue gun and glue sticks
*optional* Clip-on flower

This easy headband is great for a child to make for birthday parties or to as a gift. Just make sure you have parental supervision for the hot-gluing.


Argyle Headband

So, by the way, I'm still stuck on making hair accessories. Today I'm going to share a super quick headband which I made using just a few supplies. Something about this gray ribbon and pink paracord makes me think of argyle sweaters, so that's what I decided to call it, the "Argyle Headband".


Ta-da! To make this headband I used an "ouchless" hair elastic, some gray grosgrain ribbon, pink 550 paracord, and a ball-chain in a copper color.

After you've gathered all the supplies you just need to knot your three cords to the hair elastic and start braiding. When you run out of ball-chain just knot your headband to the other side of the hair elastic and poof! You're done!

Don't forget to melt the ends of the paracord after you cut them. If you don't they'll fray and the whole thing will pull apart!

Toni was nice enough to volunteer as a model for this shot!

My Argyle Headband was definitely a Pinterest inspired project, but I had to change a few things up like the using the paracord and ribbon. Check back in at our stores for instructions; they're on their way.

Puna @ Enchanted Lake BFC

Celebration Party Favor


It's Party Season!  Graduations, weddings, babies, birthdays, retirements and more....summer brings celebrations & parties.  I saw this on Pinterest & just had to make it!  I used small glass globes but you can do the same with drinking glasses & cups, or recycle those baby food jars, Starbucks bottles & more to create vases or party favors! Just create dots for a confetti look with DecoColor markers!  Fill it with goodies for that summer party!  There's always something crafty going on at Pearl City!
  gloria @ Pearl City
 

Sunday, May 26, 2013

Quick & Easy Wedding Favors

Aloha Crafters ~

Today's Idea & Inspiration is a Quick & Easy Wedding Favor. This Rhinestone Frame doubles as a guest place card.

Supplies:
  • Silver Favor Frame (30064303)
  • 7/16" Double Stick Tape (30013285)
  • 1.5" Rhinestone Ribbon (30137942)

Instructions:
  1. Cut Rhinestone Ribbon to fit Frame Sides
  2. Using Double Stick Tape, adhere to Frame
Happy Crafting!
Robin @ Kahului

Saturday, May 25, 2013

Summer's Coming!

Now that the school year is done for most schools, I'm pretty sure the next thing is to find projects to keep the kids busy. I just wanted to give you a quick run-down of what we have planned right now. We have lots of things coming in lately that could give you great ideas! There are mosaic kits, and lots of other craft kits. If you're planning a trip to the beach or want to spend more time outdoors, we have water toys and lots and lots of bubbles. Also coming up is our summer project series. For several weeks, we'll have a new make & take project every Saturday. Come into the store for more details. The projects and super fun and super cute! (Hello Kitty anyone?)

And don't forget to check out the craft calendar in store or online! Each month you can join the sales associates in our store as they share their favorite craft projects! The projects are all different and all creative and fun! Days and times vary, so check out the calendar.

Hope you're having a great Memorial Day Weekend!

See you soon!

~Jen at Hilo Ben Franklin

Friday, May 24, 2013

Crankin' Out Crafts Episode 252 - Perler Bangles


For our last perler bead projects, Puna is back to show you how to make fun bracelets with the perlers.

Create cute and colorful Perler bead bangles!


Supplies:
Perler beads in your color choice
Tweezers
Circular peg board
Ironing paper
Iron

Kids can make their own fun dress-up accessories using Perler beads, and if they break, Mom can always iron them back together again.


Wednesday, May 22, 2013

Crankin' Out Crafts Episode 251 - Perler Earrings


Perler beads are not just for making fun key chains. Today, Puna will show you how to use them to make earrings and embellishments.

Perler Beads can also be used to make jewelry

See how to make these cool earrings here: Crankin' Out Crafts: Episode 251 - Perler Earrings

Supplies:
Perler beads in in your color choice
Tweezers
Hexagon peg board
Ironing paper
Iron
Jump ring
Fishhook ear wires
*optional small buttons*

Don't forget to iron both sides of your earrings or embellishments to make sure that they stay together well.

Monday, May 20, 2013

Crankin' Out Crafts Episode 250 - Game Boy Keychain


Remember perler beads? This week's Crankin' Out Crafts is all about these trendy beads.

Create fun keychains with Perler Beads!

Watch our newest episode on our YouTube channel: Crankin' Out Crafts: Episode 250 - Game Boy Keychain

Supplies:
Perler beads in your color choice
Black Perler beads
White Perler beads
Tweezers
Square Perler peg board
Ironing paper
Iron
Two jump rings
Split-ring key chain
*optional pliers*

Perler beads are a fun kids craft, just make sure that you have parent supervision for ironing them in place.

Vintage Hair Comb

So, I've been slightly obsessed with hair accessories lately. I don't really know why except to say that it's getting hotter here, and having my hair up is sounding more and more appealing than letting it hang. If you want to put your hair up in style without spending some big bucks, some DIY hair accessories might be just the ticket. Plus, you can make them to match anything you own.


That being said, today's blog post is about - guess what? A DIY hair accessory! Yay! I whipped up this beautiful, vintage looking comb with rhinestones and copper wire in no time flat.


To make a comb like this of your own, all you need is a comb (yes, sorry, you need a comb to make a comb), some 26 gauge copper wire, and this beautiful 5mm rhinestone chain-like thing called a "cup-chain".


To create, simply hold the rhinestones against the comb and wrap in place, in between the comb teeth, with the copper wire. I finished my comb by weaving a small piece of my wire between all the other wires behind the comb.


The combs came in a 6 pack and I had enough wire and rhinestone cup-chain to finish 6 combs. Truthfully, I could've made more but since I only know about six people, I stopped.

If you like the combs you can come and visit them at our store and see them in beautiful reality. Or you can just make some of your own.

Puna @ Enchanted Lake

Sunday, May 19, 2013

Flower Filled Paper Mache Letters

Aloha Crafters ~

Today's Idea & Inspiration is our Paper Mache Letters filled with Silk Flowers. This is a really pretty party idea or can be used as home decor; just tailor the colors and types of flowers to fit your theme.

Supplies:
  • Paper Mache Letters
  • Silk Flower Heads
  • Glue Gun
  • Floral Foam
  • X-acto Knife
  • Styrofoam Cutter
Instructions:
  1. Using X-acto Knife cut top off of Paper Mache Letters
  2. Pull cardboard fillers out of Letters
  3. Cut Floral Foam to fit Letters half the height of the Letters
  4. Hot Glue Floral Foam into Letters
  5. Hot Glue Silk Flower Heads into Floral Foam
Happy Crafting!
Robin @ Kahului

Friday, May 17, 2013

Crankin' Out Crafts Episode 249 - Glitter Frame


Showcase your favorite photo in a sparkly frame. Transform a plain, inexpensive frame into a shining beacon. 

Glam-up a frame or canvas with glitter!

Watch our latest segment here: Crankin' Out Crafts: Episode 249 - Glitter Frame

Supplies:
craft tray
frame
glitter (we used Wow Ultrafine Glitter by American Crafts)
Mod Podge or glue
paintbrush
Master Shine Sealer (Triple Thick Gloss)

You can transform the look of almost any craft project with glitter! Thanks for joining us this week and stay tuned for more on Crankin' Out Crafts.

Wednesday, May 15, 2013

Crankin' Out Crafts Episode 248 - Glitter T-shirt


Brandon's back to show you a quick and easy way to add some shimmering color to your t-shirt.  Remember, glitter always sparkles best on black shirts!

Transform a plain t-shirt with glitter!

View how to make the project here: Crankin' Out Crafts: Episode 248 - Glitter T-shirt

Supplies:
Scribbles 3D glitter fabric paint (we used gold and blue)
cardboard
black t-shirt
painter's tape 
paintbrush
iron (to heat-set design)

Apply the tape in different patterns to make a variety of designs. Have fun creating your glitter t-shirts!

Monday, May 13, 2013

Crankin' Out Crafts Episode 247 - Glitter Keys


Brandon is spending this entire week glitterfying everything! It always adds a nice sparkle to many things, and can be used to color code things like keys! Watch as he uses simple products you probably have lying around, to create a brand new key.

Make your keys easily identifiable with colored glitter!

Catch our newest episode here: Crankin' Out Crafts: Episode 247 - Glitter Keys

Supplies:
craft tray
keys
glitter
Mod Podge
paintbrush
Master Shine Sealer (Triple Thick Gloss)

This is a great tip for color-coding items that look alike and avoiding a mix-up!


Sunday, May 12, 2013

Happy Mother's Day!


Happy Mother's Day to all of the mothers, grandmothers, mother-like-figures, and even fathers who get to be both parents! We appreciate all you do and hope that you get a day to do what you want! (May crafting be a little part of your day!)

And if there are any of you that still need to buy a Mother's Day gift, stop by Ben Franklin! We have lots of options and ideas for the perfect gift. (Plus, make sure to find the newspaper insert that came out a couple of weeks ago and bring in the 40% off coupon!)

Have a happy, wonderful day!

~Jen at Hilo Ben Franklin

It's a Super Mario Party

Aloha Crafters ~
Today's Idea & Inspiration is Treats & Decor for a Super Mario Bros party.
Mario Gift Bag
Supplies:
  • Natural Handled Gift Bag (77899393)
  • Red Cardstock (30116572)
  • Black Cardstock (30116568)
  • Blue Cardstock (30116575)
  • White Cardstock (30112153)
  • MS Lg Circle Cutter (30111123)
  • Olfa Cutting Mat (77531418)
  • Super (blue) 2" Oval Punch (30028743)
  • Extra Jumbo (yellow) 1 1/2" Circle Punch (30028731)
  • Mega (pink) 2 1/2" Oval Punch (30028753)
  • Giga (purple) 3" Circle Punch (30028761)
  • Giga (purple) 3" Oval Punch (30028763)
  • Xyron Machine (30004151)
  • Scissors
  • Red pen
Instructions (per bag):
Cut 1 ~ 8"x3" rectangle of Red Cardstock
Punch 1 ~ 3" Red Cardstock Oval using Giga (purple) Punch, cut Oval in half
Punch 3 ~ 3" White Cardstock Ovals using Giga (purple) Punch
Punch 2 ~ 2 1/2" Blue Cardstock Ovals using Mega (pink) Punch
Punch 2 ~ 2" Black Cardstock Ovals using Super (blue) Punch
Punch 1 ~ 1 1/2" White Cardstock Oval using Extra Jumbo (yellow) Punch
Using MS Lg Circle Cutter, Cut 1 ~ 5" Black Circle, cut Circle in half
Using Xyron Machine create stickers from paper pieces and adhere Cardstock pieces to Gift Bag
Print Red M in the 1 1/2" White Circle

Mario Ghost Balloon
Supplies:
  • White Balloon
  • Black Sharpie
  • White 8"x11" paper
  • Adhesive
Instructions:
Inflate balloon (if you want to do this in advance, the balloons can be secured with a rubber band than deflated)
Using Black Sharpie, draw Ghost face (refer to picture if needed)
Cut & adhere cones to sides of balloon (doublestick tape was used for the example)
  
Mushroom Head Candystick Bag
Supplies:
  • 12x12 Red Candy Dots Paper (30129698)
  • White Cardstock (30112153)
  • Candy Stick Bags (30118820)
  • Dark Green Candy Pearls (30132884)
  • Xyron Machine (30004151)
  • Scissors
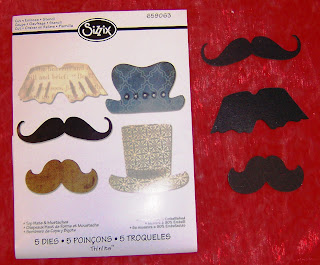
Mustache Straws
Supplies:
  • Big Shot Machine (30098709)
  • Sizzix Top Hats & Mustache Dies (30139806)
  • Black Cardstock (30116568)
  • Straws (plastic straws that bend work best)
  • Hole Punch that fits Straw Width
Instructions:
Using Big Shot, cut mustache of choice
Using Hole Punch, punch straw hole in middle of mustache
Insert straw through mustache

Happy Crafting!
Robin @ Kahului 


Thursday, May 9, 2013

Graduation Leis


Graduation ceremonies & celebration parties are right around the corner!  You still have time to make a special lei for your graduate!  We have workshops and demonstrations every day at Pearl City!  Join Kalo today and this week-end to create your own deluxe braided ribbon lei in your graduate's school colors!  I'll be demonstrating sewn ribbon leis as well as the straw leis from the easy one & two straws to the deluxe threee & four straw leis!
There's always something crafty going on at Pearl City!
gloria @ Pearl City

Tuesday, May 7, 2013

Pillow Box Talk

Pillow boxes make such great favors, and there are so many ways to dress them up.  We have a great selection of pillow boxes in our new Celebrations section.  Today, we took the glitter lace we have available in our stores, a little double stick tape and some pretty ribbon...and tadahhh...a really elegant favor!

Monday, May 6, 2013

Get Ready for Graduation at Ben Franklin Crafts / Crankin' Out Crafts Graduation Musical


Graduation season has officially arrived and we're gearing up to help you celebrate! Check out our special Crankin' Out Crafts Graduation Musical, made especially for the the season.

A special presentation by Crankin' Out Crafts!

Watch our Graduation Musical on our YouTube Channel, starring our Crankin' Out Crafts crew here!

We have lots of fun and creative ideas to prepare you for Graduation day and the party afterwards, from lei making, signs, favors, centerpieces and more. Don't forget, we also have graduation posters, banners, and fans available to order that can be customized with your graduate's name, photo, school, and school colors.

Visit any of our Hawaii store locations for more Ideas and Inspiration! Congratulations 2013 graduates!

Sunday, May 5, 2013

Quick & Easy Multi-Chain Bracelet

Aloha Crafters ~

Today's Idea & Inspiration is a Quick & Easy Multi-Chain Bracelet. With the variety of chains we have available in the store, the combinations are endless; and with our great Beader's Tool set, assembly was a breeze.

Supplies:
  • 60" Antique Gold sm link Metal Chain (30124373)
  • 48" Antique Gold lg link Metal Chain (30124358)
  • 8mm Antique Gold Jump Rings (30124331)
  • 15mm Antique Gold Lobster Clasp (30124289)
  • Beader's Tool Kit (30103700)

Instructions:
  1. Cut length desired of large link chain
  2. Thread small link chain through large link chain
  3. Attach jump rings to each end of large & small link chain
  4. Cut small link chain
  5. Attach lobster clasp & opposing end to each jump ring at bracelet ends
Happy Crafting!
Robin @ Kahului

Friday, May 3, 2013

Crankin' Out Crafts Episode 246 - Mom's Apron


This episode's Mother's Day gift is a great addition to the recipe book we made in our last episode. Puna is back to show you how to use Scribbles fabric stamp inks and stamps for Mom's Apron.

Decorate a plain apron with stamps!

View our segment on our YouTube Channel: Crankin' Out Crafts: Episode 246 - Mom's Apron

Supplies:
Scribbles stamp ink pad
Scribbles stamps (we used a butterfly and a rose)
Apron

These stamp inks are available in a few basic colors and are washable after heat setting.

Wednesday, May 1, 2013

Crankin' Out Crafts Episode 245 - Recipe Book


What's better than Mom's homemade cooking? Treat your Mom this Mother's Day by putting some of her best recipes together in this easy and durable recipe book.

Make Mom a recipe book for her collection of favorite dishes!

Catch our latest episode here: Crankin' Out Crafts: Episode 245 - Recipe Book

Supplies:
Letter stickers
Scrapbooking paper
2 Pieces of 8.5"x11" chipboard
Two 1.5" snap rings
Double-stick tape
Crop-a-dile
Washi tape for optional embellishing

When you're done making your recipe book cover, don't forget to add recipes. You can print them up on your computer and they'll fit perfectly in your book.