Thursday, December 29, 2016

New Year Countdown Board

I hope everyone had an awesome Christmas!
Can't believe how fast this year has flown by.  Now it's time to start getting ready for the New Year!  For those of you who love to have New Year's Eve parties, I have a great project that makes a great conversation starter for all your friends and family!
All you need are a few items...
 
1. Black, Gold, Grey and White Cardstock
2. Double-stick tape
3. Paper Cutter
4. We-R-Memory Envelope Punchboard
5. Metallic Gold, White and Black stamp pad
6. Black 0.5 Micron Pen
7. White Gelly Roll Pen
8. Gold Montana Acrylic Paint Pen
9. Washi Tape
10. Black or White Mounting or Illustration Board
 
  
It looks like a long list, but trust me!  There isn't much work involved!
Your punch board, which I highly recommend purchasing if you do not already own one, will be doing most of the hard work.  You will just be using your creativity!

First, cut a 6x6 inch square out of your cardstock and use the instructions on your punch board to cut out a template for a 3x5 inch envelope.  I chose cardstocks in different colors, textures and patterns for variety. 

 
 Keep that in mind when choosing the cards going into the
envelopes as well!  A conversation starter about the past year such as "Favorite Song?" and "Favorite Holiday Memory?" will be on each card.  This means that each envelope is going to be put on the board in a "portrait format".  Because they are going to be pockets, tape only the two longer sides and one short side down.  Cut off the other short flap.  This is where the card will slip in.  (After putting the envelopes together, you can distress the sides with a stamp pad to give it a vintage look.)
 
Each pocket is going to represent each hour leading down to midnight starting at 6:00 pm.  You can decorate the front of the pockets with washi tape and baker's twine, then write an hour on each envelope.  If you want, you can punch out shapes and write the times on these pieces before sticking them onto your pockets.   Go nuts and mix techniques!


 I punched out a 4 x 6 inch envelope out of some festive gold and white chevron paper to mark the New Year!  In here, I put a card that read "New Years Resolutions?"
That would probably be the best way to start the New Year, other than some champagne and maybe a kiss from that special someone.  (Or maybe your dog.  Puppy kisses work too.)
Whatever you choose to do with your loved ones, we at the Pearl City Ben Franklin would like to wish you a Safe, Prosperous and Happy New Year!

Cheers!
Erika @ PC

Monday, December 26, 2016

Bow-Making Made Easy!


Hi guys! I hope everyone had a great Christmas and that Santa brought you everything on your list! For those of us procrastinators who are doing our gift exchange a bit later, here's a great bow making solution that will save you so much time, while keeping your gift wrapping skills impressive. 

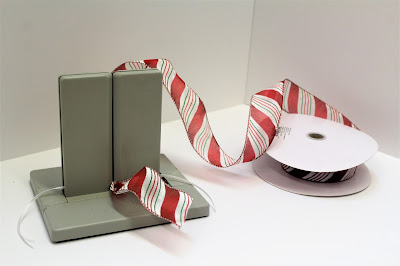
All I did was use the Bow-Dabara and some wired holiday ribbon about an inch wide!


First thing you'll want to do is cut a thin ribbon that will be what you use to tie your bow together. I used 8 inches of very thin white satin ribbon. Insert this piece in-between the two plastic panels that stand up from the Bow-Dabara board.


For this next part, I'll leave my decorative wired ribbon of choice still attached to the spool as I weave it back and forth. The length you weave on each side will determine how big your bow will be. The bigger the loop, the bigger the bow!


When you begin to weave your ribbon, make sure you twist it once before pushing it down to the board. So the motion will look like: out, in, twist, push down. Repeat this technique back and forth on each side of the Bow-Dabara as if you're making infinity symbols. When you have about four or five loops on each side, you're all done!


At this point pull up the skinny ribbon from the board and tie a knot tightly around the mid section of your bow.


So good! All you need to do is fluff the loops and cut the tail! The Bow-Dabara is great in a pinch. A perfect bow every time!

Bethany @Enchanted Lake

Have a Happy New Year everyone! 

Tuesday, December 20, 2016

Gifts in a Jar

Time is running out and it's time to start scrambling for last minute gifts!
Don't know what to get for a co-worker's child?  Maybe for your friend's little sister?
Can't think of little presents to give to all the guests at your Christmas celebration?
I have just the ideas you need for all of your last-minute gifts and favors!
 
 
The solution?  GIFTS IN A JAR!
These are simple to make and you can put anything in them!  Not to mention, the container is pretty cute and useful, so that won't go to waste like a flimsy gift box.
I have three examples of what you can do.  For the first jar, which was just a small 4 oz. jelly jar, I punched gift tags out of different colors of cardstock, pre-decorated a few of them and included doodle twine in a variety of colors as well.
 
 
I had younger children in mind for the next jar.  I chose a 16 oz. jar to old larger items because I wanted to include pipe cleaners of different colors and large, fluffy pom poms.  Add in some colorful yarn, feathers and googly eyes and you've got a kit to make your own little monsters!  You can even pre-make a critter for inspiration if you'd like.  All they need is adult supervision and a glue gun, or some really strong kid-safe glue like

 
The next one is for those fairy garden lovers out there!  I pretty much just included a bunch of random wooden pieces such as spools, tiny knobs and candlestick holders and a few natural textures like rocks, small pinecones and moss.  A small plant like this cute soft green succulent would also be a great accent and would add a lot of height to the fairy garden.  Also, some jute cord and a wooden or kraft paper tag would be a great touch for the outside of the jar.  Don't forget your little fairy!  Here, I included a small Christmas fairy.  How cute is she?


There you have it!  The possibilities are endless!  You could have a snowman kit with large white pom poms, clay carrot noses, black beads and brown pipe cleaners!  How about a New Year's celebration kit with supplies to make a paper hat that says 2017?  It could even include a small container of confetti and a noisemaker!  Whatever you make, don't forget to include holiday spirit!
 
Have fun!
Erika @ PC

Monday, December 19, 2016

Holiday Wood Designs

 
Happy Holidays! I hope everyone out there is having fun getting their Christmas craft on! I'm really enjoying painting fresh new home decor and digging into card making and cookie baking. So many favorite things. Here are a few samples of some pretty wood decor pieces I decorated. My favorite thing about these is that the shapes are cute, pre-cut, and that the wood surface allows you to do almost anything to it! So many possibilities!


Supplies:
wooden word or Santa or ornament shape
acrylic paint (dark green, green, dark burgundy, red, ivory, white, tan
bristle brush
1/2 inch wide nylon brush w/flat end
jute/twine
hot glue gun/glue sticks
buttons 


First, paint the front of every other letter with a very dark green. Use a brush that will give you even and smooth coverage. This will be your base coat for the distressed and rustic look. Let the letters dry for 20 minutes, and paint diagonal stripes on your remaining letters using your 1/2 flat tipped nylon brush and Ivory acrylic paint. I like to use this brush for stripes because if I hold it at an angle, it is exactly the direction and width of the stripes I want to make. Wait about 10 minutes for the stripes to dry before painting the red stripes. After this next layer is dry to the touch, take your bristle brush, light red and lighter green, and "feather" light strokes over the painted areas. The idea is to keep your back and forth strokes in a horizontal movement and to not coat too thickly so that you can see the layer underneath peeking through.


Hot glue jute and buttons on to your letters as textural elements! They just add to that rustic charm.
 
 
Ben Franklin is carrying a few other cute holiday sets as well, including the word "Home" and a Santa face and ornament shaped photo stand. 
 

 You can use Mod Podge and sheets of patterned card stock paper to  cover larger flat areas, and then cut out with an X-acto blade. Even layer some textured/gritty Snow Tex on there to create realistic looking snow. Dry time would be about an hour or so depending on how thickly the Snow Tex was applied. E6000 glue can be used to put all the Santa pieces together. Ta Da!


Cute home decor!
 
Bethany @Enchanted Lake
Happy Crafting!

Tuesday, December 13, 2016

Simple Nativity Scene

12 days 'till Christmas already?!   WHAAAAT?
Yup, that's right! I hope everyone's holiday season isn't too crazy!
How's that holiday shopping? It seems to get harder and harder every year.
For those of you looking for an easy-peasy piece of holiday décor that would also
be great as a gift for a church-goer or who likes the sacredness of the Christmas season,
I have a beautiful and elegant wooden nativity scene!
All you need are a few salvaged items from your basic crafts pantry.
 
 
Supplies Needed
Jumbo Popsicle Sticks
Wooden Figures
Raffia
Jute Cord
White Felt
Wooden Bead
Rolled Paper Floral Wire
Snowflake or Star
Shell (optional)
Brown Stamp Pad (optional)
 
First, distress your popsicle sticks with a brown stamp pad.  It's really up to your personal style.  I wanted to give this a primitive and antique feel, but you can leave it plain if you'd like.  Second, hot glue all your sticks into a triangle form.  I made sure to make one flat so that it could stand on its own when not on a Christmas tree.  Next, I cut out a semi-circle piece of white felt for Mary's veil, then hot-glued the curve to the crown of her head.  I then cut a piece of the rolled paper wire for Joseph's can and curved the top to create a small cane.   For Baby Jesus, I cut a small piece of felt and wrapped it around a small wooden bead.  I hot-glued the little bundle into a tiny shell.  
 
After the Mary and Joseph figures were hot-glued onto the floor of the stable, I hot-glued a couple pieces of raffia on either side of the couple and then placed Baby Jesus at the very center.  To finish it up, I glued a "North Star" (snowflake) at the apex of the stable roof and then glued a piece of jute rope onto the back for hanging on a tree.
 
There you have it!  A cute little nativity that although primitive,
makes a great and meaningful gift. 
 
See you next week!
Erika @ PC


Monday, December 12, 2016

Let It Snow Ornament


Happy Christmas season, everyone! 
Today's project is a DIY "unbreakable ornament" for your tree!


All you need are these few things:

Unbreakable plastic ornament
Tiny tree
E6000 Glue
Snow Tex
Powdered Snow
Decocolor medium size Oil based Pen 
brush or plastic butter-knife


First, take your E6000 glue and adhere the tree to the inside of the lid of your ornament. The total cure time is one day, but to the touch the glue will be secure in 30 mins to an hour.

Then with a brush/plastic butter-knife, scoop out some Snow Tex into the bristles of your tiny tree. It is like a thick gritty paste, so don't be afraid to pile it on and make it thick! Total dry time is close to an hour, depending on thickly it is applied.


As your snow is drying, write a message on the outside of your plastic ornament!
This oil based paint pen is great for writing on slick surfaces like glass and plastic, I highly recommend them! The medium sized one in black is what I used to write "LET IT SNOW" on the front of my ornament. Write in smooth and even stokes, as if using a regular marker. Dry time for the writing is roughly 10 minutes to the touch.

Once the glue under the tree is dry to the touch, add in the loose powdered snow around the tree and screw the lid back on the ornament. And ta da!!!

Super cute and super easy!

Bethany @Enchanted Lake