Showing posts with label fun. Show all posts

Tuesday, May 23, 2017

Address-a-Lopin' Around...

Are you someone who has trouble writing in a straight line when it comes to
addressing envelopes and packages?  Are you a perfectionist?  Well, guess what?
We now have that perfect tool that will help you write in evenly spaced and straight lines
on every parcel and letter you mail!
 
Meet the ADDRESS-A-LOPE!
 
 
Looking at something this simple makes you think of boring mail like bills and what not, but let me tell you, you don't have to give up your creativity when using this!  Here is an example of the different looks you can achieve when you mix your media up!  Pictured are kraft paper, black and cream colored envelopes livened up with some stickers and designer scrapbooking cardstock from collections we carry in our stores.
 
 
All you need to start off, is a nice, clean envelope in the paper of your choice, some pens, embellishments and, of course, your handy-dandy Address-a-Lope!
 
 
If you would like, decorate your envelope first!  I chose a simple but cute and colorful paper from Amy Tangerine's On A Whim collection and used that like a washi tape at the very bottom of the envelope.  I then used a brown stamp pad to lightly rub the edges of the envelope, giving it an aged and distressed look.  Then, I chose a pretty floral sticker from, you guessed it, the Amy Tangerine On A Whim clear sticker sheet! I am in love with the collection's bright, summery and colorful look!


Third, line up the address-a-lope on the left side of your envelope.  There are two window sizes to choose from.  Focus on the smaller size, because this is the one for return addresses.  Here, you are going to left-face your name and address.   This is how I started off using a snazzy imaginary name.
 
 
After your return information has been filled, move the address-a-lope down and to the right of the envelope, and focus now on the larger windows.  Here is where you will write the name and address of the person you are sending your letter to!
 
 
Now, you're special SNAIL MAIL is FINITO!
Don't forget to put a stamp on that!
Have fun!
 
Erika @ PC

Saturday, May 20, 2017

We-R-Memory Keepers Tab Punch Board

Hey there, planner folks and scrapbooking lovers!
We just got in an awesome new punch board from the famous We-r-Memory line. 
They just keep on coming up with all these new boards, it's insane!
This new board is nice and compact, and is light blue and white just like their
popular Alpha punch boards.


Meet the new Tab Punch board!  This little guy's purpose is a simple one, and it is also
fairly simple to use, but there is so much you can do with it.  The tabs can be used to make dividers for planners, mini file folders, and even recipe cards!  Today, I will be showing you how to make mini folders with one of the papers from the incredibly adorable Simple Stories Emoji Love Scrapbook paper collection!  I cut out a 8x5 piece and then folded it, making one side of the fold about a 1/2 inch longer than the other.  This is so that there is room for the tab to pop out.

 
First, this little transparent blue bit, that you see right here can actually be moved around. Right now, it is lined up with the CORNER ROUNDER, which basically helps line the paper up to the puncher right above it so that, when punched, it creates a cute rounder edge on your page!


Next, the TAB!  Take the blue bit and move it over to the SIDE TAB notch.  This is what will make the puncher create the wavy sides of the tab.

 
Ta-DAAA!
 

To make the other side of the tab, flip the paper over.  There are Small, Medium and Large sizes that you can choose from.  All you have to do is line up the side that you already punched out to the indentation of whatever size you want on the board.  Here, I have it lined up to Medium.  Then, press that punch and you have your full tab! 


Lastly, time to get rid of that extra piece of paper that's just hanging out next to that tab!
Lift up the blue magnetic arm, take that iconic We-r-Memory cutting blade out of its little home and slide that sucker right over the piece of paper to cut!


Here is the finished little folder!  These would be so cute as inserts for planners as well as just little organizers for school, work or at home!  Here are examples of how you an decorate your little folders using the scrapbook papers that we carry at our stores.  Pictured are the Kaisercraft Island Escape collection and Amy Tangerine's On A Whim collection.  (I LOOOVE the gold letter "thickers" and tropical/summery clear stickers in Amy's collection!)


Have fun, and stay connected for more We-R-Memory Keepers news
and updates!

Erika @ PC 


Thursday, May 4, 2017

Pineapple Quote!

Pineapples!
Just can't get enough of this fun tropical fruit!
We've been getting in TONS of pineapple-themed goods at our stores including bags, ceramics and wooden serving platters.  This is the perfect time to stock up for summer entertaining, so it's time to come on down and get crafty!
Today, I have a great painting project that would be great for kids as well as adults for those artsy get-togethers.  It's time to bring the fun of the boozy painting classes home!  All you need are basic pineapple colors like yellows, oranges, greens, oranges and some tans, as well as a cool tropical blue and white for the contrasting background.  You will also need a tan Stabilo marker, a black fine tip acrylic Montana or DecoColor marker, as well as a White Gelly Roll. 
Here, I painted on a natural slice of wood for a rustic feel, but feel free to paint on a canvas or wooden pallet.  Whatever floats your boat!
 
 
I first laid down a coat of white and then, while it was still wet, blended in some Delta Americana AcrylicTropical Blue for a lighter toned turquoise blue.  Once that background layer was dry, I used Ceramcoat Acrylic in Butter Yellow to paint the top three quarters of an oblong shape for the pineapple.  This took two coats for good coverage. 

 
After this was dry, I went ahead and painted the leaves.  Using upstrokes, I started at the top of the pineapple and tapered the tops of the leaves by slowly turning my brush sideways. (As a note, I used a 1 inch synthetic flat brush.)  I mixed a different shades of green such as Ceramcoat Spring Green and Delta Americana Chartreuse just to add more depth and dimension.  Just don't add too much!  You will be writing over the pineapple afterwards, so don't put too much effort into making it too detailed! 

 
I then used the Stabilo pen to lightly sketch the "eyes" of the pineapple.  This is where I brought a bit more detail into the painting, but feel free to use a paint marker or regular acrylic paint.  You can add a little more detail in this area, depending on how long of a quote you use.  After this was dry, I wrote the quote "You are the pineapple of my eye." in black Montana marker straight over the pineapple.
 
 
Afterwards, I used the white Gelly Roll gel pen to add some 3D effects to the letters!  I love the sketchy look, so I went over my lines multiple times.
 
 
Once everything was dry, I sprayed the painting with a light and even coat of Acrylic Sealer.  This is to prevent the water-based pens like the Stabilo and the Gelly Roll from smudging in the future.
 
 
And there you have it! 
Again, you can always experiment and make it your own.  The steps I used only took me about an hour.  Having a blow dryer or heat gun on hand would help in speeding up the process.  (Waiting for paint to dry can be a real drag.)  If you want to have a more detailed pineapple, go for it!  Want to use a different quote?  Fantastic!  If you're having a painting party, everyone can put their own spin on their painting.  Seeing everyone's unique style is always the best part!  Plus, what better party favor to go home with than a piece of summery décor and some renewed artistic confidence?
 
Cheers!
Erika


Thursday, April 20, 2017

Shaker Grad Pics!

Graduates!  It's time to send your grad photos to friends and family!
 Now, we are all familiar with the traditional black cal folder and the message 
written in white gold or silver pen.
IT'S TIME TO BREAK THE RULES.
Today, we have two awesome ways to deck out your senior portraits!
 

First way: Cardstock! There are so many colorful designs to choose from
in our stores!  All you have to do is choose a theme and pattern and, with just a few scrapbooking 
techniques, you can add some color to that plain black cal folder!  Add some ephemera embellishments and even some pop-up accents!
Here, I used a couple papers from Amy Tangerine's new On a Whim Collection.
Just as a heads up, Ben Franklin Crafts is selling Lauhala print Cal Folders!
This item is exclusively sold at our stores, so don't miss out!  They add a great "Island" touch,
which is great for sending photos out-of-state.  Paired with cute tropical-themed paper, it is ADORABLE.

Notice the glitter yet?  Yes, there are sequins and glitter on the photos!
I used the We-R-Memory Fuse Tool to make the graduates' photos into "shaker photos"!

                                                                                  
 It's a pretty simple process, really.  All you need is scrapbook sleeves, sequins, glitter and your graduate's photo!  Slip the photo into the sleeve and place it flush against the corner.  (That way, all you need to do is fuse two sides!)  Slide some sequins and glitter onto the photo and fuse the remaining two sides to seal them in.  Lastly, cut off the excess sleeve plastic! 

Back to the Lauhala print.  It can be a little tricky to work with for it can go in either the "tacky" direction or the "cute" direction depending on how you use it. 

                                                     
Just like working with textures in mixed media, mixing a fun and modern print consisting of simple shapes with the photo-realistic lauhala print can balance everything out.  And of course, Amy Tangerine will have that perfect, quirky and colorful, tropical paper!  Here, I used the other, more solid side of the tropical print paper to create a space for a short message.  The square could even be made into a pocket large enough for a graduation or grad party invitation!

 Here are the close-ups of the "shaker photos" .   I slid these photos into the decorated Cal-Folders and it really brought everything together.  It added that extra gold accent and "fun factor" to the portraits.   Wouldn't these be fun to get in the mail?  I was having a ball shaking them after they were fused! 😀

There are so many ways to customize your graduation photo to make it really represent who you are and what you're all about!  Have fun with it because this is your celebration, Graduate!

Congrats!
Erika @ PC

Thursday, April 6, 2017

Spring Keiki Crafts Camp 2017

Hey Crafters!
I hope everyone had an awesome Spring Break!
At our stores, we had a very successful Keiki Craft Camp making
fun and adorable crafts with the kids.  Let me just say, there were A LOT of kids this Spring, which was AMAZING.  No surprise, because the projects included classics like Perler Beads and Shrink Art!
Sara at Market City with a full class!  We're ready for today's craft, Teach!

What was especially impressive was the number of kids who showed up during the second day of camp.  Why you ask?  SLIME, of course!  Yes, that craze that's been sweeping the nation and causing Elmer's Glue to just fly off the shelf!  In fact, slime even caused a nationwide shortage of Elmer's Glue.  Crazy, right?  We loved how all of the kids' slime turned out different, representing each child's preferences and color choices.  "More glitter,  More Borax"!  "Not too much foam beads!" The measurements had to be just right!  We had so many fun and interesting ways to customize the slime.  Not just by look, but by texture as well!   This glob had some colored foam beads that seriously made it look like ice cream.  I mean, come on!  Look at it!
One of the most rewarding things was watching them play with the slime and to see them have fun with it. 


Just the right amount of lotion produces a satisfyingly stretchy slime.


Much stretch.  So wow!

So goopy and messy, but that's half the fun!
Just in case anyone is interested in the slime recipes that we used, each store did have their own special concoction. So, feel free to check out each one for different recipes and have fun experimenting at home!  Also, don't forget that our stores have started expanding on the Slime supplies, so specialty items like Borax, foam beads and clear glue are starting to hit our shelves.
Stay tuned to see what else we have in store!

Look at the mixed media scrapbooking going on here!  These kids even include photos in their wood craft project.  What a great way to record and make memories over the break.  The keiki got to create their very own piece of mixed media art!  We gave them everything they could ever ask for; from glitter to cardstock.  And they went nuts.  Like, glitter on the floor and their faces nuts! 
SO MUCH FUN!

You will not believe how much glitter was left on the table. 
Although making a big mess is all part of the CREATIVE PROCESS!

Bright colors and Glitter are all the rage right now. 
  
A stinkin' adorable project that we had on the last day was a Pet Rock and Sanctuary.  Basically, our kids decorated a pet rock, painting it whatever animal they wanted, and they then created a little habitat/home for it using a clear pail, odds and ends, and a whole lot of imagination!  From shark tanks to butterfly homes, the crafts these kids made were so  creative.   There were many who liked to jazz up their homes with lots of bright colored doodles all over their pails and flower cut outs strewn all over the inside.  We also noticed there were some who liked to keep things simple, with a bit of Spanish moss here and a bit of green fluffy moss there.  Maybe a little washi tape around the rim of the can along with a couple cute bows tied onto the handle.


This craft camp is a lot of fun for kids, and it's a great way to make new friends and to learn how to make a bunch of different crafts!  This program is available at all stores during Spring, Summer and Fall.  Stay connected with us on our company website (benfranklinhawaii.com), Facebook (@BenFranklinCrafts) and Instagram (@bfcrafts)!

Saturday, March 4, 2017

Starfish Wishes!

Hey Crafters!
If you guys haven't been down to any of our stores recently,
you seriously need to make the trip.  ESPECIALLY if you are a wood crafter!
We have so many unfinished wood pieces for everyone to paint and decorate
that it's insane!  Never had we had this big of a variety in our stores.
And for you ocean-themed décor lovers out there, you will love all of the nautical
items we have been getting in as well!
Coral sprays, seaglass pieces, laser-cut mermaids and scientific octopus illustrations; 
If you can name it, we've got it.  Today, you can mark this post as "Starfish Spam" because it is just starfish-themed wood crafts galore!
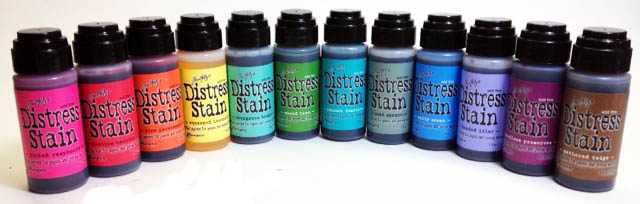
Another magical technique that I learned from our amazing Visual Merchandiser, JFlo, is the use of Tim Holtz' Distress Stains to give an interesting and colorful look to the wood pieces.  Because many of the woods are lighter in color, the stains will appear as a vibrant watercolor effect on the surface!
You can even stain the wood with multiple colors and distress it even more with acrylic paints for a vintage "shabby chic" look.
Below I have a small box distressed with light pink and cream-colored stains which was then distressed with a few streaks of Delta Americana acrylic paint in the color Chocolate. This particular paint color gives more of a gel stain feel with some fine golden glitter mixed in.  It looks SO GREAT with it and definitely adds that extra special something!

I then hot-glued a small white wooden starfish cutout, which were sold in a pack with a variety of sizes.  This one seemed perfect.  Don't think you can't distress this little starfish too, because it will look awesome with some stain and paint as well!  And the little white speckles around the starfish?
White Sakura Gelly Roll.  YEP!


This strand of beaded cord was too cute to pass up!  I needed to put it on something as a decorative and beach-y, ocean-y accent.  So, I took a small wooden easel sign, colored it with a few stains in cream and a few shades of green and blues and then distressed the edges with Ceramcoat paint in the color Wedgewood Blue.  I then hot-glued a small piece of the cord to the side!
This can make a cute table-number sign, menu board, a desk memo board or even just a cute frame for your precious memories.
Finally, just to appreciate the pure essence of a starfish, here we have... a starfish!
This is a pallet that I painted with Delta Americana's Waterfront, which is a bright and fun shade of turquoise!  I then distressed the edges with a brown stamp pad.  Yes, you read right!  Stamp pads are great for distressing because you've already got your ink on a felt pad and all you need to do is rub the edges of a project with it.  Perfect every time! 
I still felt like the blue needed to be toned down a bit more to achieve that vintage ocean-themed look I was going for, so I went with Tim Holtz' Distress stains in Burlap and Walnut.  These are both brown tones, with burlap being the lighter cream, yellow tone and walnut being a deep and rich brown.  I had to be careful with Walnut, so I just took a synthetic flat brush, tapped it onto the stain bottle's felt top and streaked the color onto the wood. Using a little water, I was able to spread the dark color on and make it look more like aged wood without it appearing too streaky.  To add a little extra something, I streaked a little Ceramcoat Metallic 14K Gold over the surface.  It also gave the surface more dimension.  Then, I hot-glued a pretty white starfish onto it!  Simple yet elegant. 
Not just aged, but Vintage and Chic!

Stop by to check out our selection of wood pieces today and I am guaranteed that you will find that perfect piece for your desk, coffee table, bedroom, anything!  You will be amazed.
Also, don't forget to stop by our scrapbooking and hard crafts departments for some Distress Stains and Acrylic Paints!
Have fun and see you next week!
Erika @ PC


Monday, February 6, 2017

I Heart Floral Wreaths

Hey Everyone! 

I wanted to do something cute for Valentine's Day that was a bit different from the pink, red, and white vibe this year and was inspired by more purples, berry colors, and champagne shimmers in making this fun heart wreath!


Supplies  
Heart shaped straw wreath
2 bunches of artificial flowers
hot glue gun / glue sticks
wire cutters
2-3 inch wide wire ribbon


First, wrap ribbon all the way around your wreath, with slight overlapping. Hot glue first piece, and last piece. Wrap very tightly.


Once ribbon is secured, using wire cutters, cut flowers off leaving some stem length. Remove all greenery from bouquet and set aside for later.

Curl bottom of wire stem to desired flower height and hot glue flat curled wire to the wreath. Continue per flower until desired. To maintain heart shape, angle flower head downwards at the inner and outer points of the heart, to dramatically enhance its shape. 

Use leftover leaves and greenery to fill around the inner and outer heart shape, to hide all that wire, and fill all those holes!


So lovely!! I am really digging these pinks and berry purples!
Have a great week!

Bethany @Enchanted Lake

Thursday, December 29, 2016

New Year Countdown Board

I hope everyone had an awesome Christmas!
Can't believe how fast this year has flown by.  Now it's time to start getting ready for the New Year!  For those of you who love to have New Year's Eve parties, I have a great project that makes a great conversation starter for all your friends and family!
All you need are a few items...
 
1. Black, Gold, Grey and White Cardstock
2. Double-stick tape
3. Paper Cutter
4. We-R-Memory Envelope Punchboard
5. Metallic Gold, White and Black stamp pad
6. Black 0.5 Micron Pen
7. White Gelly Roll Pen
8. Gold Montana Acrylic Paint Pen
9. Washi Tape
10. Black or White Mounting or Illustration Board
 
  
It looks like a long list, but trust me!  There isn't much work involved!
Your punch board, which I highly recommend purchasing if you do not already own one, will be doing most of the hard work.  You will just be using your creativity!

First, cut a 6x6 inch square out of your cardstock and use the instructions on your punch board to cut out a template for a 3x5 inch envelope.  I chose cardstocks in different colors, textures and patterns for variety. 

 
 Keep that in mind when choosing the cards going into the
envelopes as well!  A conversation starter about the past year such as "Favorite Song?" and "Favorite Holiday Memory?" will be on each card.  This means that each envelope is going to be put on the board in a "portrait format".  Because they are going to be pockets, tape only the two longer sides and one short side down.  Cut off the other short flap.  This is where the card will slip in.  (After putting the envelopes together, you can distress the sides with a stamp pad to give it a vintage look.)
 
Each pocket is going to represent each hour leading down to midnight starting at 6:00 pm.  You can decorate the front of the pockets with washi tape and baker's twine, then write an hour on each envelope.  If you want, you can punch out shapes and write the times on these pieces before sticking them onto your pockets.   Go nuts and mix techniques!


 I punched out a 4 x 6 inch envelope out of some festive gold and white chevron paper to mark the New Year!  In here, I put a card that read "New Years Resolutions?"
That would probably be the best way to start the New Year, other than some champagne and maybe a kiss from that special someone.  (Or maybe your dog.  Puppy kisses work too.)
Whatever you choose to do with your loved ones, we at the Pearl City Ben Franklin would like to wish you a Safe, Prosperous and Happy New Year!

Cheers!
Erika @ PC