Showing posts with label tropical. Show all posts

Monday, February 19, 2018

Mermaid Jar


Happy Monday, art movers, shakers and makers!

I am so excited for beach weather! Here is a mermaid mason jar project that will light up any beach themed home or party!


Supplies : 
mason jar
pink tissue paper
gloss mod podge
light blue acrylic craft paint
paintbrush
jute
blue ribbon
starfish
black paper
double sided tape
twinkle lights 
cup of water for 


First, glue tissue to mason jar and let dry. Cut out a mermaid silhouette with HouseMart Ben Franklin's complementary Accucut machine that is free to use!  Use double sided tape to secure to the inside of the jar.

Thin out some of the light blue acrylic paint with water and "watercolor" some of it over the top and bottom of the tissue covered mason jar.

Allow to dry and then tie jute, ribbon, and starfish to the outside!

Throw some tinkle lights in there behind your mermaid silhouette and you have yourself a fancy magic nightlight!


 Have fun crafting!

Bethany @Enchanted Lake


Monday, January 1, 2018

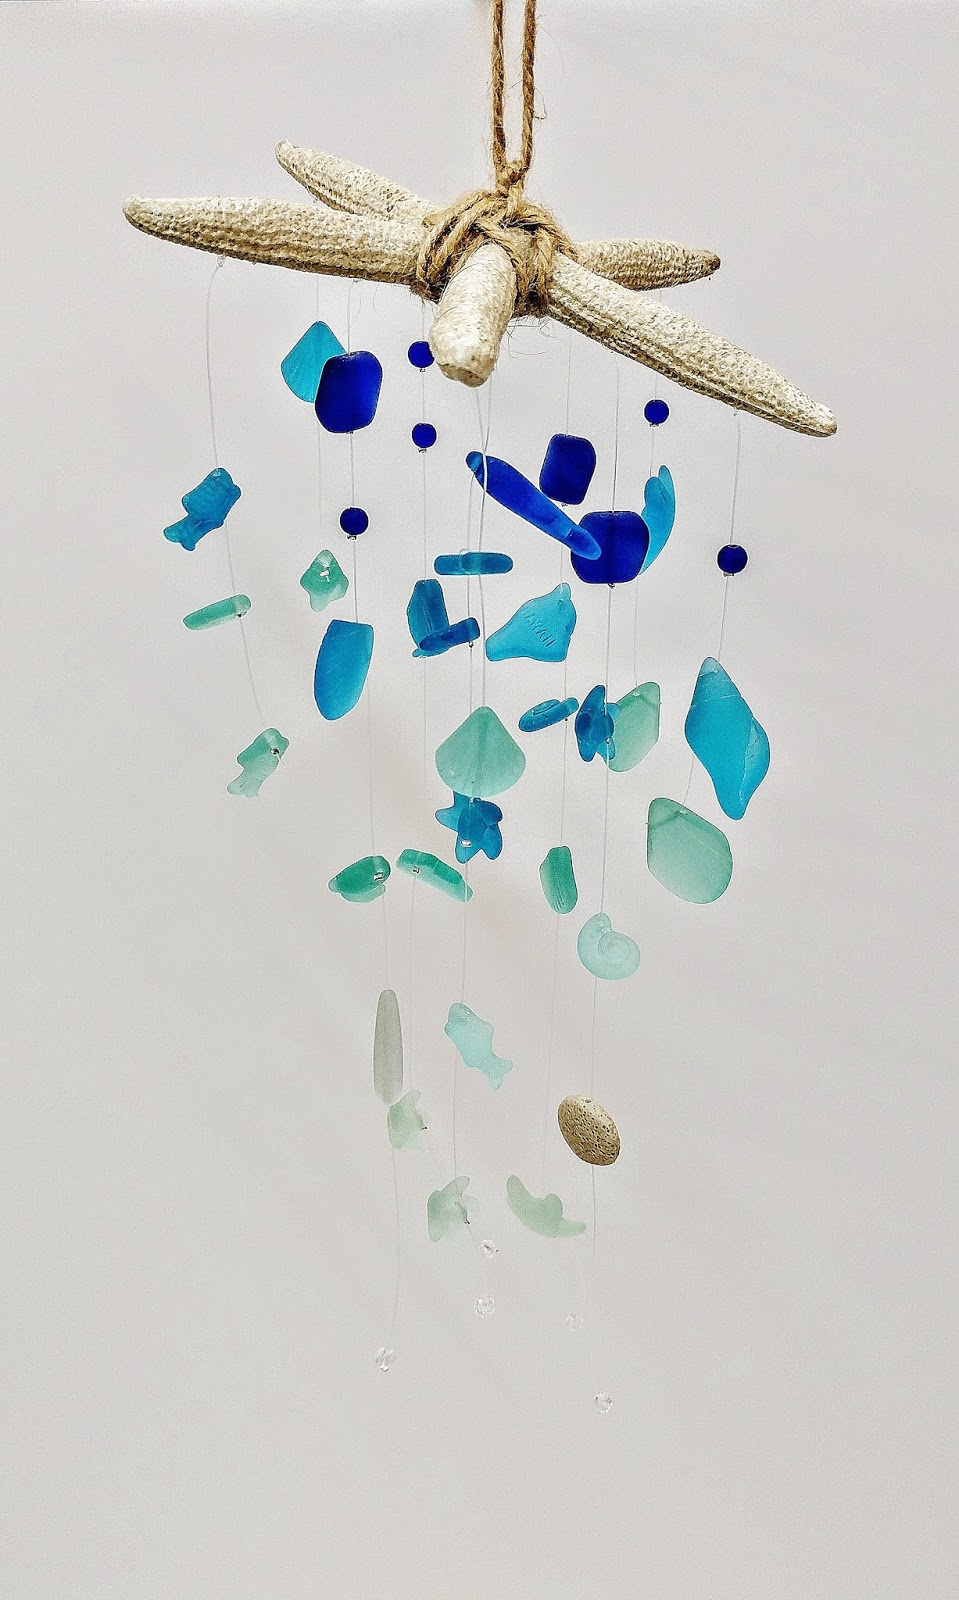
Sea Glass & Starfish Light Catcher

Happy Monday!
Let's have fun this week with some tropical sea glass mobiles! After all, Kailua is a beach town! I was inspired by the ombre sea glass colors available at HouseMart Ben Franklin and thought this mobile would be great for a baby's room or even outside the front door to greet guests as they enter the house!


Supplies:
Resin starfish (a real one would break)
clear beading plastic string or fishing line
scissors
small silver crimp beads
hand held crimper
assorted bags of sea glass
jute

First I tied 2 strings to each starfish leg that were 2 feet long. Then I started with the darkest blue of sea glass and put the bead through on to the string, and finished each bead off by placing a crimp bead, and using my hand held crimping pliers, flattened out said crimp bead so that the sea glass couldn't slide down the string! I kept stringing and crimping, going from dark to light. I put more beads on the center strings, and as I went down, I spaced out the beads further and further from each other. 

One of the sea glass strands came with a sand textured bead as well as small clear sparkling faceted beads, which I incorporated into the ends of the mobile so that they looked like water crystals. This was really fun to make, and using those crimp beads made a world of difference!

When I finished, I trimmed all the excess strings off the ends, and secured the center of the starfish with jute so that it could hang from the middle.

Have fun making your mobiles! Feel free to make different kinds using different beads, or even get crazy with it and use felt flowers! Have a great week!

Bethany @ Enchanted Lake


Monday, July 24, 2017

Ceramic Pineapples!

Happy Maker's Monday!
Today is a great day to decorate pineapples!
House Mart Ben Franklin stores just got in these really cute white ceramic home decor pineapples, and I was really itching to decorate them and add some color. There are so many ways you can add color to ceramic, I wanted to show you using some simple techniques and tools. 


This first pineapple is my FAVORITE!
All you need is alcohol ink in 2 greens and 2 oranges. 
I used a cotton swab, or a small square of felt, and squeezed a few drops on to the piece, and then promptly rubbed it on the surface of the pineapple. Because I only wanted the color to stick to the outer bumpies, I made sure to not press too hard and let the ink touch only the parts that stick out. Alcohol ink is SO easy to use! You can add splatters and drips, and because it acts like watercolor, you can get some really beautiful color blends by swirling multiple colors together. A little bit goes a LONG way. I must have only used 8 drops for this entire pineapple. The more drops you add, the more intense the color gets! Have fun using this technique on ceramic, or glass!
I finished this off by tying some jute around the leaves to give it a 'diy'-textured feel.


This next pineapple is very classy and is super easy to replicate! (I also love that this entertaining decor can be used as a candle stick, or single cupcake server, or votive holder!) I used 'Testor's' gold enamel and simply applied it with a brush! Easy as that! It's very thick, but also very drippy so be sure to spread out the gold or else it will pool up and drip off into places you might not want to be glossy golden! This gold enamel is so much better than gold paint. It has a very strong bond, and maintains that golden glossy metallic surface! So gorgeous!


This next pineapple is probably the most quirky! Ben Franklin sells brush tip glass markers, and I wanted to test it on a white ceramic piece. They are really fun to play with and the felt tip is flexible. If you are familiar with calligraphy markers, or TomBow markers, the felt tip is just like those! These markers will look translucent on clear glass, very opaque on white ceramic. I definitely liked the bold fluid strokes on this white pineapple. The colors will also mix with each other if you overlap the strokes while each color is still wet. I also love modern calligraphy and typography so I threw a little 'aloha' at the top. It's also recommended to bake the color on, so that it becomes super permanent. It's not meant to be food safe, so only apply to areas that your mouth or food will not be!

Have fun playing!

Bethany @Enchanted Lake

Monday, February 27, 2017

Mermaid in a Jar


Happy Monday! Hope you've had a great week and that you're ready for some mermaid crafting! I can't get enough of the mermaid theme!


Supplies: 
smooth mason jar
warm white twinkle firefly lights
matte Mod Podge
nylon brush
1 sheet light blue wrapping tissue
X-acto blade
pencil
black thick card stock paper
E6000 clear glue
chunky white/clear glitter
jute/twine
scissors
shells
starfish
net


First, cut the approximate length of tissue (in one long rectangle) that will cover the entire jar with an extra inch of overlap. Slowly and bit by bit, paint Mod Podge on to the glass, laying the tissue over it. Since tissue is thin and tears very easily, don't touch or move it once it's touched the glue. To make sure everything lines up at the end, make sure you're checking to make sure the tissue is lined up with the jar throughout the process.

After the jar has been covered, let it sit to dry for 30+ minutes.
As it's drying, cut out a mermaid shape from the black card stock paper. it could even just be the shape of a mermaid tail.


After the jar is dry, add more glossy Mod Podge on the outside around the top and the bottom. Sprinkle the chunky white/clear glitter over it being careful to leave a big clear space for the mermaid to be seen clearly.

Glue part of the mermaid to the inside of the jar. To make her look more realistic in there, only glue one part of the silhouette so that it's not completely smooth to the side. The E6000 will need to cure for 30+ minutes before the jar can be handled.

Throw some pretty lights in there behind her to make it look like she's floating in a sea cave!

And there it is! Super cute mermaid in a jar!

Happy Crafting! 

Bethany @Enchanted Lake


Monday, February 20, 2017

Nautical Sea Door Hanger


Hello everyone! Are you ready for more beachy home decor? I'm ready for the sunshine and the waves. Check out this cute Sea door hanger you can make using paper mache letters! I love them! They're such a great size and can be used in so many different ways.


Supplies:

paper mache letters S E A
acrylic paint in dark brown, mint green, ivory, and dark blue
one nylon brush
one thick haired bristle brush
matte mod podge
assorted ocean themed card stock sheets
E6000 clear glue

Optional:
net
starfish
Glossy Accents dimensional clear glaze


++++++++++++++++++++++++++++++++++++++++++++++++++++++++++++++++++++++++++


Luckily the wood panel already comes stained and with a rope attached, so all we have to do is decorate the letters! 

First I picked out a few ocean themed sheets of card stock paper I liked, and used my brush and Mod Podge to apply an even layer to the front surface of the letters S and A. Then, I let the paper dry on the letters. 

Using an X-acto blade to cut out around your letter will be a much easier method, rather than trying to trace the image and try to align the paper beforehand.


With your nylon brush, paint the sides of your letter with acrylic paint. Paint the last letter with acrylic paint, and let sit to dry for 10-20 minutes. When all of the paint is completely dry to the touch, you can glue on the accents like starfish or netting. Glue your letters with E6000 down to the wooden board. This glue will need one whole day to completely cure but to the touch will be solid within a few hours.


 Dimensional glaze on specific areas will give a really nice glossy appearance. This gel will squeeze out like a tube of puffy paint but will need to dry over several hours.


For the beach-worn look on the E I painted the letter mint green, allowed the paint to dry, and then lightly brushed on ivory paint.


For the A I used patterned card stock paper and Mod Podge to adhere it to the front.

So cute right? So charming. I can't wait to make more tropical and nautical crafts! Check out next Monday's blog for "Mermaid in a Jar"!

Bethany @Enchanted Lake 


Monday, January 30, 2017

Wedding Mermaid Crown

Hello fellow artists and crafters!
This week I've been thinking a lot about this new year and all the magical DIY projects there are to make for a wedding. I am really loving all the inspiration from nature and incorporating organic elements into the ceremony and reception in an elegant way.

I thought I'd experiment with mermaid crowns!


Supplies
16 or 20 guage florist wire
paper wrapped florist wire
stem of small white flowers
white starfish
strand of pearl beads on a wire
hot glue gun / glue sticks
white shells
white primer spray paint
jute / twine 
wire cutters
   **optional** Silver glitter Spray

 First, using the paper wrapped wire, twist two pieces together in an oval measured to the circumference of your head. Bend the 16-20 gauge wire into an arch, then twist a few times around the base, and then continue with arches until you've gone the whole way around. You will end up using about 3-4 lengths of 12in wire.

Spray paint the entire crown white, and let sit to dry for about 1 hour.

Next, take the strand of your wire with pearl beads on it and weave it through the open arches you made, wrapping twice to anchor it to the crown.

Hot glue the white shells around the base. I placed my shells over the rough wire ends to hide them.

Glue your starfish on, being sure to only apply glue to the areas that touch the wires, as opposed to coating the entire back with glue.

Next glue in your white flowers!

I then wrapped jute / twine around the rough intersections of wire on the crown to 
1) soften the sharp edges
2) add a bit of earthy rope texture in to contrast with the white

I secured the jute / twine with hot glue.

Using the silver flash glitter spray, I misted the entire crown to give it some shimmer!


Have a great week!

Bethany @Enchanted Lake

Monday, January 23, 2017

Resin Ocean Shore

Hey all!

I am really excited to show you this project! This was my first time experimenting with pour-able resin, and it was easier than I anticipated, yet also was an interesting experience to learn and create at the same time! Goes to show, you never know until you try it! Don't be afraid of experimenting with new mediums!


Supplies
pre-varnished and stained wooden tray with an edge
alcohol inks in greens, blues, and turquoise 
assorted shells and a starfish
white sand with white glitter mixed in
raw small glass chunks (sold in store)


First, to dye your glass, pour amount desired into zip-lock bag and squeeze a few drops of alcohol ink inside. A little ink goes a long way. When exposed to air, alcohol ink will dry very quickly, so utilizing the bag will help you get more even coverage. Add more glass, or color for intensity, as desired. Allow pieces to fully dry on some disposable flat surface.

I used a variety of blues and greens, and encouraged less consistent coverage so that some glass pieces would be darker than others. You can even leave a few pieces clear for contrast against the colorful ones.

After the glass had dried (10 minutes tops) I placed them in my tray to get a sense as to how they would look, and where I should place them in the sand.


 The box of resin comes with two bottles, that should be mixed with a 1:1 ratio, and a little goes a long way. Once 2 parts have been thoroughly mixed, separate a portion and mix that with sand. Spread gooey sand mixture to cover entire bottom of tray. Sprinkle dry sand onto parts you wants to be taller. All sand and shells will sink to the bottom through this resin, so keep that in mind. I placed individually each piece of glass and shell into the resin and sand mixture. As it cures, about 30-40 minutes after initial resin mixing, you can sprinkle more sand on top in certain areas to make some parts look like "dry sand". As it will be starting to harden, anything added on will be more likely to flat on top rather than sink to the bottom. Anything that gets covered by this glossy resin will look "wet" and I wanted the tops of the shells, glass, and sprinkles of sand to look "dry". 


Allow your gorgeous slice of the ocean to sit in a flat protected area away from dust or disturbances for 24 hours. It is SO amazing to touch it when it's dry and see how "wet" it looks when it is completely dry!! This would make a great tray for candles, or as a centerpiece on a coffee table, or even and interesting piece of wall art that seems to defy gravity! 

This was so much fun to make, and now I want to cover everything in this magical gloss!!! 
Have fun and happy art-ing!

Bethany @Enchanted Lake