This week I wanted to show you "mini painting" ideas!
This project will also be taught as a class on April 14th from 5-7p at our HouseMart Ben Franklin Enchanted Lake location! The fee is $35 with all supplies included!
Supplies:
at least 20 popsicle sticks
2 longer sticks
acrylic paint in white, black, assorted blues, purples, teals and pinks
1" wide rectangle nylon paintbrush
cup of water
hot glue / hot glue gun
black ribbon
silver Minc foil
Zig 2 way glue pen
First, hot glue your popsicle sticks to two longer sticks. I used 16, but feel free to experiment with different lengths and sizes!
Next, paint your mini pallet with your assorted colors, starting from black and working down to purple, blue, and teal and pink.
Next, after your background is completely dry, sprinkle some watered down white paint using your paintbrush over the surface to create stars!
Then once your stars are dry, you can use your Zig glue pen, and Minc foil to make a few of the stars extra shiny!
Then all you need to do is paint a silhouette of palm trees using black paint!
Hot glue a bow and a ribbon to the top, and ta da!
A super cute night scene!
Have fun!
Bethany @Enchanted Lake
Showing posts with label gift. Show all posts
Monday, February 26, 2018
Mini Pallet Night Sky Painting
Labels:
beach,
craft,
galaxy,
gift,
gift ideas,
hawaii,
ideas,
mini,
mini paintings,
paint,
pallet,
plam trees,
popsicle sticks,
project,
silhouette,
sky,
Stars,
trees
Monday, September 5, 2016
Gold Rimmed Plaster Flowers
Hello all!
A while back I saw a photo of something like these flowers and couldn't find any tutorials, so I've done the leg work and recreated this elegant look using just a few basic supplies!
Supplies:
liquid gold enamel (found in the model paint section)
round nylon fine tip brush
mineral spirits (cleaner)
large flat disposable dish or pan (for plaster)
Design Master spray paint in mint
Plaster of Paris (small tub) but in usage, maybe 5 cups
several cups of water
stirring stick
plastic clothes hanger
newspaper
your choice of silk/faux flowers. The ones I used looked like a type of Magnolia.
(the more fabric in the flower, the better. Plaster won't bond to plastics.)
The first step is to pour out your plaster into the dish you've selected. Make sure that this dish can be either thrown away for used for other crafts, as the plaster may harden to the surface if not cleaned promptly. Normally in plaster projects, one would have a container of water, and simply pour the plaster in to it until the top of the pile is sticking out from the surface, but I did it the other way around. I added plaster and water until it was the consistency of pancake batter. You want it to be thick enough to coat the flower, not runny and watery. Also time will thicken your mixture because it will be starting to set even as you're working with it, so you'll need to work fairly quickly.
I just put the whole thing in there, stem and all. I made sure to squish the flower in the plaster in my hands as to get it soaked into all the tiny areas, and so it can soak through the fabric to become stiffer and stronger once dried. Your flower will be somewhat heavy after being coated with the plaster, don't worry it will be lighter once it dries. I bent the stems and hung it on a clothes hanger over some newspaper. Let your flowers dry over night to completely harden.
The flowers looks really beautiful even just like this! Again, keep in mind any plastic in the flower will repel the plaster and even if the plaster covers the plastic parts (leaves, stamens) it will break off like a chocolate shell on ice cream.
I then took my mint spray paint and just lightly coated them, putting more color in the center of the flower, and barely any on the petals. I wanted white to show through, so by just adding a touch of color, it gave the flowers a soft porcelain effect.
After about an hour you can begin the enamel. Using a thin round brush, paint the enamel along all the edges of the flower, and the very center.
Clean your brush with your mineral spirits. You'll need a more aggressive chemical to to the job as the enamel will not want to come off the brush hairs!
After all is dry and complete, feel free to arrange your flowers in vase, trim off the stems to glue them onto the lid of a box, or the side of a frame! This can be a really great way to give a really classy gift for a wedding, or for a golden anniversary!
Bethany @ Enchanted Lake
A while back I saw a photo of something like these flowers and couldn't find any tutorials, so I've done the leg work and recreated this elegant look using just a few basic supplies!
Supplies:
liquid gold enamel (found in the model paint section)
round nylon fine tip brush
mineral spirits (cleaner)
large flat disposable dish or pan (for plaster)
Design Master spray paint in mint
Plaster of Paris (small tub) but in usage, maybe 5 cups
several cups of water
stirring stick
plastic clothes hanger
newspaper
your choice of silk/faux flowers. The ones I used looked like a type of Magnolia.
(the more fabric in the flower, the better. Plaster won't bond to plastics.)
The first step is to pour out your plaster into the dish you've selected. Make sure that this dish can be either thrown away for used for other crafts, as the plaster may harden to the surface if not cleaned promptly. Normally in plaster projects, one would have a container of water, and simply pour the plaster in to it until the top of the pile is sticking out from the surface, but I did it the other way around. I added plaster and water until it was the consistency of pancake batter. You want it to be thick enough to coat the flower, not runny and watery. Also time will thicken your mixture because it will be starting to set even as you're working with it, so you'll need to work fairly quickly.
I just put the whole thing in there, stem and all. I made sure to squish the flower in the plaster in my hands as to get it soaked into all the tiny areas, and so it can soak through the fabric to become stiffer and stronger once dried. Your flower will be somewhat heavy after being coated with the plaster, don't worry it will be lighter once it dries. I bent the stems and hung it on a clothes hanger over some newspaper. Let your flowers dry over night to completely harden.
The flowers looks really beautiful even just like this! Again, keep in mind any plastic in the flower will repel the plaster and even if the plaster covers the plastic parts (leaves, stamens) it will break off like a chocolate shell on ice cream.
I then took my mint spray paint and just lightly coated them, putting more color in the center of the flower, and barely any on the petals. I wanted white to show through, so by just adding a touch of color, it gave the flowers a soft porcelain effect.
After about an hour you can begin the enamel. Using a thin round brush, paint the enamel along all the edges of the flower, and the very center.
Clean your brush with your mineral spirits. You'll need a more aggressive chemical to to the job as the enamel will not want to come off the brush hairs!
After all is dry and complete, feel free to arrange your flowers in vase, trim off the stems to glue them onto the lid of a box, or the side of a frame! This can be a really great way to give a really classy gift for a wedding, or for a golden anniversary!
Bethany @ Enchanted Lake
Labels:
#benfranklincrafts,
#centerpiece,
#EnchantedLake,
anniversary,
bridesmaid,
classy,
diy,
elegant,
enamel,
Flower,
gift,
golden,
ideas,
magnolia,
maidofhonor,
rose
Tuesday, June 7, 2016
Mermaid Scale Frame
Get ready for a whole lot of purple!
Instead of the usual teal and pink combination that we usually associate with
the mermaid, I'm putting another enchanting hue in the spotlight.
Over the past few months, mermaids have been EVERYWHERE.
(We even have a mermaid birthday party as this month's Pinspiration Station theme
at our Pearl City Store!) So, what I've decided to make this week was a
mermaid-themed gift that was simple to make,
and REALLY affordable. It's also a great summer project to do with your kids.
This project, my fellow crafters, is a Mermaid Scale Frame!
~~~~~~~~~~~~~~~~~~~~~~~~~~~~~~~~~~~~~~~~~~~~
Let's get started!
*** Supplies Needed ***
SPC Wooden Frame
4 inch Wooden Letter
Ceramcoat Acrylic Paint*
1 inch Flat Acrylic Paintbrush
Hot Glue Gun or Wood Glue
Paint Pen*
*use color(s) desired
The colors I used for my frame were multiple shades of purple, teal and white.
The exact names are Passion Purple, Lavender, GP Purple, White and Coastal Waters.
(The last color mentioned was actually a Delta Americana acrylic paint, which basically just dries to
a Satin finish instead of matte like Ceramcoat.)
I made a scalloped, "scale" pattern starting from the bottom of my frame.
Every time I painted the next layer of scales up, I made sure to overlap the previous one.
This is where you can have fun with the colors. Even if you have only four or five colors,
you can mix them up to make new shades or even add depth to your scales. For example,
I blended a little of the dark GP Purple into the lighter Passion purple shade to get a nice shadow effect. After letting your scales dry, you can even add some detail by dotting on dark paint over the light-colored scales and vice versa.
I then painted the wooden letter and added pearl detailing using a BoBunny Pearl Pen.
This is basically a puffy paint for hard crafts and scrapbooking. It works on wood, paper and clay
and dries to a pearlized finish. After this, I glued the 'M' to the top right corner of my frame!
To personalize it even more, you can even write the name of your friend, mom, sister or whoever the
receiver of this amazing gift is on your frame with a paint pen. I used a black fine tip Montana marker. That wraps up this project! As always, don't hesitate to change it up and make it your own.
Have fun with it and enjoy!
See you all next week!
Erika @ PC
Tuesday, April 12, 2016
Anchor Wood Panel Art
Afternoon, Crafters!
Today I have a "Pin-spired" nautical-themed piece of art that can be re-created with just three items! Seriously! It's an easy and fast gift for that ocean-loving friend or for yourself to use as some
really cool beach décor.
The only things you will need to make this is paint, a 9x12 inch wood panel and some jute rope.
You're going to need two or three colors of paint to create that ombre effect on your wood panel. Darkest blue will go at the bottom, then you keep mixing in more and more white to tint that color as you move toward the top of the panel.
Next, paint on an anchor in pure white, being sure to leave a little space at the top and bottom of it. Hot glue a few strips of our new Studio G jute rope on to the top and bottom for some accenting texture and there you have it!
This is, again, a very fast and minimalistic piece of nautical art that can be "spruced up" and personalized quite easily. Write a friend's or loved one's name on it. Mod Podge some sequins onto the anchor. Glue some shells or starfish on it.
Create your own masterpiece!
Have fun!
Erika @ PC
Labels:
anchor,
beach,
benfranklincrafts,
bfcrafts,
cute,
decor,
diy,
easy,
fun,
gift,
Housemart,
jute,
nautical,
paint,
pcbfcrafts,
Pearl City,
simple,
summer,
wood
Thursday, March 24, 2016
Mother's Day Coloring Book
Hey Crafters!
With Mother’s day just around the corner, I found myself thinking about all those childhood handmade gifts that I gave to my Mom, and my son is now giving to me. That colorful card is a time-honored tradition, when it comes down to it! As I was preparing a few sketches for our next coloring workshop, it occurred to me that maybe it was time to go back to the roots…and turn the tables!
We all know Moms deserve to take some time to relax and de-stress. With that in mind, I decided to create the coloring book card.
This project is super easy to put together, and can be customized in countless ways. For the cover, I used card stock and vellum.
I decided to keep the title simple. Once I had printed it on my vellum and cut it down to size, I ran it through the mink to add a touch of elegant sparkle to it.
I used a total of 8 images; 6 hand-drawn, 2 free use printables. As you can see, my original drawings are much larger than the final versions, which made it easier for me when it came to drawing them up.
The most challenging part of the project was determining how the pages needed to be laid out, based on how I’d be folding them. I re-sized my images in a word document, then printed them double sided on smooth white card stock and cut them down to size.
Using a bone folder, (don’t worry, it’s not real bone,) I folded them in half and layered them together. Coordinating ribbon and a needle — a hole punch might be handy if you have trouble passing the needle through the papers — were all I needed to bind my mini-coloring book together.
Just like that, you have a handmade, customizable gift for Mom that’s very grown-up. Want to make sure she takes the time to de-stress? Include a Ben Franklin gift card for some new drawing utensils and a sign-up for our coloring techniques workshop!
-Chelsea @Mapunapuna
Thursday, May 7, 2015
Monogram Tote
Hi There! Still need a last minute gift for Mother's Day? I have another great idea for you! Today I'll be showing you how to make a monogram tote.
You will need the following supplies:
- Canvas tote bag
- 1 qty. 12" Doily
- Craft Decor "Doilies" stencil
- Acrylic paint and textile medium OR fabric paint
- paint brush
-12"x12" piece of cardboard or chipboard
First, place the cardboard or chipboard inside the bag. This will prevent paint from seeping through onto the other side of the bag. Next, (if using acrylic paint) mix your paint with textile medium according to the directions on the bottle. Center your 12" doily on the bag. Carefully apply paint to just the outer design of the doily. Don't load your brush with too much paint because it will bleed under the doily.
Slowly remove the doily and let the paint dry. It's ok if the paint bled in a few spots. Once the paint is dry, take the Craft Decor "Doilies" stencil and place the bottom right stencil in the center of your painted design.

Apply paint the same way you did the first time. Remove stencil and let paint dry. For the monogram, you can either use a stencil or hand paint it. We have a variety of alphabet stencils in different fonts.

There you have it! Now your mom will have a personalized reusable tote she can take with her wherever she goes.
Hope you all have a great Mother's Day! Until next time, happy crafting!
Rachel @ Mapunapuna
You will need the following supplies:
- 1 qty. 12" Doily
- Craft Decor "Doilies" stencil
- Acrylic paint and textile medium OR fabric paint
- paint brush
-12"x12" piece of cardboard or chipboard
First, place the cardboard or chipboard inside the bag. This will prevent paint from seeping through onto the other side of the bag. Next, (if using acrylic paint) mix your paint with textile medium according to the directions on the bottle. Center your 12" doily on the bag. Carefully apply paint to just the outer design of the doily. Don't load your brush with too much paint because it will bleed under the doily.
Slowly remove the doily and let the paint dry. It's ok if the paint bled in a few spots. Once the paint is dry, take the Craft Decor "Doilies" stencil and place the bottom right stencil in the center of your painted design.

Apply paint the same way you did the first time. Remove stencil and let paint dry. For the monogram, you can either use a stencil or hand paint it. We have a variety of alphabet stencils in different fonts.

There you have it! Now your mom will have a personalized reusable tote she can take with her wherever she goes.
Hope you all have a great Mother's Day! Until next time, happy crafting!
Rachel @ Mapunapuna
Friday, May 1, 2015
Crankin' Out Crafts Episode 416 - Balloon Boutique
In our newest episode, JFlo creates a unique balloon great for graduations, recitals, centerpieces or any party.
Watch our segment here on our YouTube channel: Crankin' Out Crafts Episode 416 - Balloon Boutique
Supplies:
mylar balloon
10-qty. cello sheets
balloon cup
balloon stick
low temp glue gun & glue sticks
curling ribbon
Balloon Boutique creations are so easy to make! All supplies available at our HouseMart Ben Franklin Crafts stores.
![]() |
| Balloon Boutique |
Watch our segment here on our YouTube channel: Crankin' Out Crafts Episode 416 - Balloon Boutique
Supplies:
mylar balloon
10-qty. cello sheets
balloon cup
balloon stick
low temp glue gun & glue sticks
curling ribbon
Balloon Boutique creations are so easy to make! All supplies available at our HouseMart Ben Franklin Crafts stores.
Wednesday, November 20, 2013
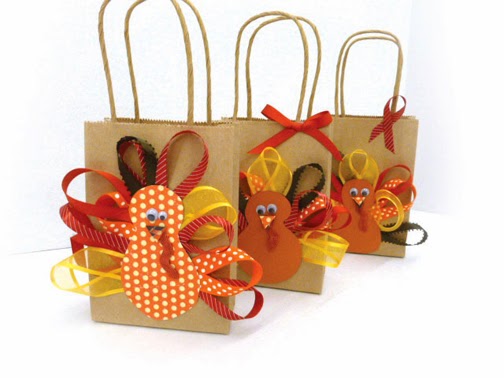
Crankin' Out Crafts Episode 317 - Turkey Favor Bag
Want to give a special treat to your guests on Thanksgiving? JFlo shows you how to make up these cute bags.
![]() |
| Dress-up a gift bag for Thanksgiving! |
Catch our segment here: Crankin' Out Crafts Episode 317 - Turkey Favor Bag
Supplies:
Cardstock
Ribbons
Googly eyes
Small handle bag
Scissors
Pencil
Hot-glue gun and glue sticks
Use felt instead of paper to turn this embellishment into a decoration to put on a t-shirt or cloth bag.
Labels:
bfcrafts,
crafts,
Crankin' Out Crafts,
decorating,
diy,
Favors,
gift,
gift bag,
Holidays,
HouseMart Ben Franklin Crafts,
kids crafts,
ribbon,
Thanksgiving,
turkey
Monday, November 18, 2013
I Twine All the Time
Yep, we just started carrying this 100 yard spool of twine at our stores. That's a lot of twine! We used it to wrap around these bottles and jars, AND a large ornament, AND had some left over. Do this with twine, it's so easy, and you'll have some lovely decor pieces when you're done.
Puna @ Enchanted Lake
Friday, November 15, 2013
Crankin' Out Crafts Episode 315 - Christmas Yarn Wreath
This last decor piece is a sure to please both your aesthetics and your budget. Bora walks us through making a radiant wreath.
![]() |
| Christmas Yarn Wreath |
Watch our episode here: Crankin' Out Crafts Episode 315 - Christmas Yarn Wreath
Supplies:
Styrofoam wreath
Yarn
Scrap paper
Rhinestones or buttons
Circle punch
Hot-glue gun and glue sticks
This wreath makes such a classy statement hung on the front door or railing.
Wednesday, November 13, 2013
Crankin' Out Crafts Episode 314 - Ombre Frame
JFlo is here today to show us how to jump on the trendy ombre train by making this darling frame.
![]() |
| Create an Ombre Frame for your favorite photo! Makes a great gift! |
Watch our episode here: Crankin' Out Crafts Episode 314 - Ombre Frame
Supplies:
Balsa wood plank
Acrylic paint
Frame
Paint brush
Hot-glue gun and glue sticks
An ombre frame would make a super special, handmade Christmas gift for those trendsetters on your list.
Labels:
balsa wood,
ben franklin crafts hawaii,
bfcrafts,
Christmas,
crafts,
Crankin' Out Crafts,
diy,
frame,
gift,
Holidays,
housemartbfc,
ombre,
ombre frame,
painting
Monday, November 11, 2013
Crankin' Out Crafts Episode 313 - Iced Peppermint Frame
Lisa is back just in time to help us kick off our "Even More Christmas Decor" week. Join her today to make a super sweet frame.
| Iced Peppermint Frame |
Watch our festive episode here: Crankin' Out Crafts Episode 313 - Iced Peppermint Frame
Supplies:
Bare wood frame
Acrylic paint in white and red
Mod podge
Diamond dust
Paint brush
Frame that sweet picture with this sweet frame and everyone is sure to be envious.
*Don't forget to check out our earlier post from today - Awesome ornaments from HouseMart BFC Enchanted Lake!
Monday, October 14, 2013
Fill Up a Frame
Are you looking for great gift and decorating ideas for the soon to be upon us holiday season? What about a new, stylish frame?
These extremely affordable shadowbox frames are perfect for gift giving and decorating. Fill the shadowbox section with almost anything, then insert a picture and you're done.
For fall, here is a colorful leaf filled frame. You could also fill with raffia, small pumpkins, or even candy corn for a festive fall feeling.
These extremely affordable shadowbox frames are perfect for gift giving and decorating. Fill the shadowbox section with almost anything, then insert a picture and you're done.
For fall, here is a colorful leaf filled frame. You could also fill with raffia, small pumpkins, or even candy corn for a festive fall feeling.
If it's Christmas you're decorating for, fill the shadowbox with jingle bells, snow, pinecones, or peppermints. It's a fun, playful way of framing that special photo.
Thanks for the read!
Puna @ Enchanted Lake
Labels:
affordable,
autumn,
Christmas,
christmas gift,
craft,
decoration,
diy,
easy,
fall,
fast,
frame,
fun,
gift,
Jingle Bells,
leaf,
quick,
shadowbox,
simple
Monday, September 23, 2013
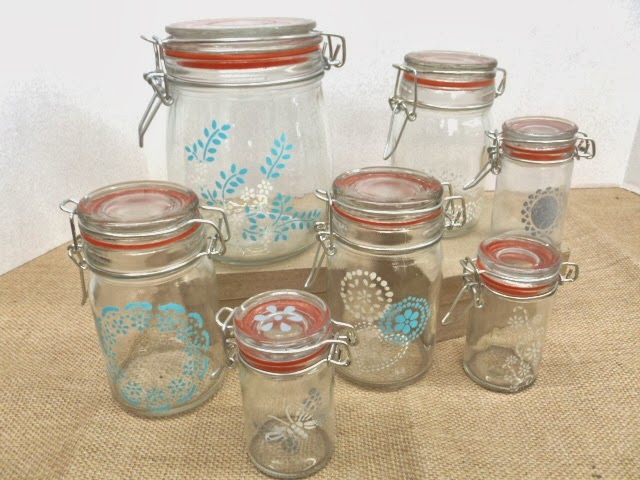
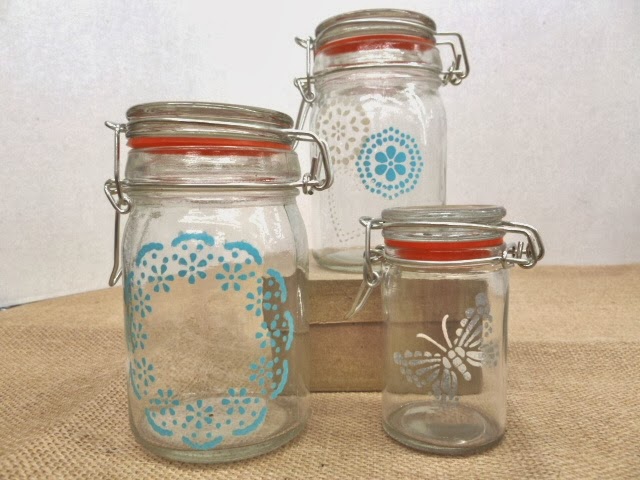
Simply Pretty Gift Jars
So, I know that I've featured these food-safe jars on our blog previously, but they're so cute that I keep wanting to make more and more things with them. Since they're food-safe, they would make great containers for all those Christmas cookies and party mix that you're planning on making for gifts, with, of course, some added decoration.
Enter the Martha Stewart Crafts adhesive stencils in the "Fair Isle Dots" design. The stencils are perfect for use on things like these jars because they are slightly sticky on one side, helping the stencil to stick to curved surfaces and making it even easier for you get a mess-free image. When you're done stenciling, simply wash with warm, soapy water; the stencil will remain sticky even after washing.
Because I was stenciling on glass, I used the Americana Multi-Surface paints for this project. They can be air-dried or oven-baked for permanence.
Some of you may think that it's a little early to be focusing on Christmas, but guess what, as of today there are only 92 days left til our favorite holiday. It's definitely time to be starting on all those gift giving crafts.
See you next week!
Puna @ Enchanted Lake
Monday, September 16, 2013
Faux Stained Glass Votive Holder
Here's
a great gift idea for a birthday or for those pesky holidays that are approaching so very quickly. You can even get your kids to help you with making them
because they are so, so easy. You need Scribbles puffy paint in black,
alcohol inks in various colors, a brush, and a votive.
First, use your puffy paint to draw your design on the glass votive. For my sample, I stuck to easy, geometric shapes. The paint can take up to a day to dry, depending on how thick it's applied; make sure your lines are completely dry before moving to the next step. Next, take your brush and alcohol inks and color in the spaces between your puffy paint lines. You can use rubbing alcohol to clean your brush between colors. You could also use the rubbing alcohol to clean up any over-spill or mistakes. Then...well actually, then your done. Wrap them up and give them away as presents! Yay!
Puna @ Enchanted Lake
First, use your puffy paint to draw your design on the glass votive. For my sample, I stuck to easy, geometric shapes. The paint can take up to a day to dry, depending on how thick it's applied; make sure your lines are completely dry before moving to the next step. Next, take your brush and alcohol inks and color in the spaces between your puffy paint lines. You can use rubbing alcohol to clean your brush between colors. You could also use the rubbing alcohol to clean up any over-spill or mistakes. Then...well actually, then your done. Wrap them up and give them away as presents! Yay!
Puna @ Enchanted Lake
Labels:
alcohol ink,
brush,
candle holder,
craft,
diy,
easy,
faux stained glass,
gift,
kid's craft,
scribbles,
votive
Monday, September 9, 2013
Easy-Peasy Wall Art
Isn't it so cool? Also, you're going to be so surprised at how easy it is. It literally took me half-an-hour to complete this project. How, you ask? First, gather up your supplies. It's only three things so it should take you about a minute. You'll need 2" vinyl letters, a 12"x12" canvas, and some black spray paint.
Next step, use the vinyl letters to spell out your quote or saying. The letters are great because they stick enough to not let the spray paint seep through, but not enough to hamper your attempts to rearrange them into a more pleasing layout if needed. I actually had to rearrange my letters a couple of times, so believe me, this does come in handy. When you're happy with the way your quote looks, simply spray paint over the letters. Once the paint has dried, you can peel off the vinyl. That's it!
I hope you like it!
Puna @ Enchanted Lake
Labels:
canvas,
craft,
decor,
diy,
easy,
gift,
handmade,
how-to,
love,
quote,
saying,
simple,
spray paint,
vinyl letters,
wall art,
wine,
wine wall art
Friday, July 26, 2013
Crankin' Out Crafts: Episode 275: Clothespin Shadowbox
Puna explains how to decorate this incredibly cute shadow box in just a few steps.
![]() |
| Use scrapbooking elements to decorate! |
Watch our episode here: Crankin' Out Crafts: Episode 275 - Clothespin Shadowbox
Supplies:
Shadow box
Scrapbooking paper
Tim Holtz's Distress Stains
Sticker embellishments
Double-stick tape
This shadowbox is great to memorialize a special occasion by using the included clothespins to hold ticket stubs or other memorabilia.
Tuesday, June 11, 2013
4th of July Glass Tea Light Holder
What is one of the HOTTEST things at Ben Franklin Craft
Stores right now? BURLAP! It is so easy to use and adds character to just about
any craft! This week we made a tea light candle holder for 4th of
July out of ribbon and burlap. Perfect for any 4th of July party,
gift or just decorating around the house.
You will
need:
1 glass jar
Wired burlap
ribbon
Red, White
and Blue ribbon
Jewel ribbon
1 button
Hot glue and
glue gun
Scissors
Scissors
All you need to do is wrap the burlap and ribbons around the jar and hot glue in place. Tie the red, white and blue ribbons together in a double knot at the front of the jar. Create a circle medallion by trimming one wired side of the burlap ribbon and gathering it by pulling the other wire, hot glue to keep its shape. Pull the red, white and blue ribbons through the middle and hot glue in place, add a cute button and hot glue the jewel ribbon. TADAH!
Deborah @ Market City
Labels:
4th of July,
burlap,
burlap ribbon,
candle,
decoration,
gift,
Glass jar,
Mason jar,
patriotic,
tealight
Thursday, June 6, 2013
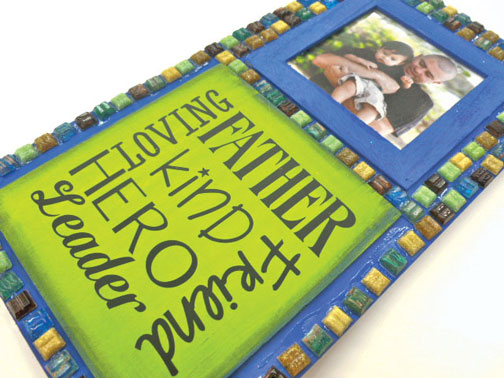
Crankin' Out Crafts Episode 257 - Mosaic Picture Frame
Create a unique design with Mosaic tile and give a gift that will last for a lifetime. Mosaics can make your project dimensional and add a splash of color and texture.
![]() |
See how JFlo creates a one of a kind Frame.
|
Here's another easy project to make with our new mosaic tiles: Crankin' Out Crafts: Episode 257 - Mosaic Picture Frame
Supplies:
Ready-to-Decorate Wood Frame with plaque
Ceramcoat acrylic paint (we used blue bayou & gecko)
paintbrush
e6000 glue or craft glue
mosaic tiles
vinyl word stickers
This project is great to make for Father's Day on Sunday, June 16th! Come and check out the different color packs of mosaic tiles and ready-to-decorate wood surfaces at our stores.
Tuesday, June 4, 2013
Crankin' Out Crafts -ep256 Mosaic Tile Flower Dish
Watch how JFlo changes clear Glass tiles to colorful mosaic pieces. These unique tiles can be added to a project of your choice!
![]() |
| Glass tiles are great for embellishing! |
Watch our newest episode here: Crankin' Out Crafts: Episode 256 - Mosaic Tile Flower Dish
Supplies:
Glass tiles (pointed teardrop shape)
Alcohol Ink (we used watermelon & silver)
Blending solution
Blending tool
Clear Petri Dish (plastic)
e6000 glue
glitter
Glitter-It Glue
Funnel
paintbrush
glitter tray
Decorate your next craft project with glass tiles today! They come in a variety of shapes and sizes.
Subscribe to:
Posts (Atom)