Showing posts with label blue. Show all posts

Tuesday, July 19, 2016

Beach-themed Centerpiece

"Life's a beach and I'm just playing in the sand!"
 
For those of you ocean-lovers who live by this saying, this project is
a great piece of décor or centerpiece for your upcoming special event!  Whether it's a birthday party, grad party, anniversary or wedding, this idea
will be a "shore" pleaser for all those beach-bums at heart.
(And yes, I did just type that.)
 
++++++++++++++++++++++++++++++++++++++++++++
 
 
~ Here's what you'll need! ~
 
1. Glass Vase
2. 4 inch Wooden Letter
3. Sand
4. Rope or Twine
5. Paint
6. Glitter Paste
7.  Floral Wire
8. Painter's Tape
9. Shells & Starfish (optional)
 
+++++++++++++++++++++++++++++++++++++++++
 
Let's get started!
 
Step 1.  Paint your wooden letter in your desired paint color.  I chose
Delta Americana's Coastal Waters, which is a nice mix between teal and turquoise. Paint a layer of glitter paste onto your wooden letter.  I chose a light blue paste by BoBunny.


Step 2.  Wrap a piece of rope around my vase and fill it with some sand.  I think black sand would be and interesting contrast as well.  Feel free to add some shells, rocks or starfish to "embellish".


Step 3. Twist your floral wire into a coral shape, then
Wrap the shape in some blue painter's tape to give your "coral skeleton" some body.  I then brushed on a thick layer of the same BoBunny glitter paste to add more depth and dimension to the blue of the tape.


Step 6. Lastly, place your "coral" piece into your vase and the wooden letter right in front.
Now you're done!


I hope everyone has fun recreating and personalizing this idea.  Add some firefly or tea lights, change up the colors or embellish your letter with jewels!
The possibilities are endless.
As always, have fun and see you next week!
 
Erika @ PC


Tuesday, March 8, 2016

Because Mermaid Reasons...

Hey, Everyone!
Today I have another project using one of our unfinished wood products.  Wait!  Don't skip my post just yet!  *lol*  I promise this one is an awesome one.  This DIY is super easy and adorable.  Trust me.  Mermaids are involved.  Well, reasons to be a mermaid to be more accurate.


I painted this sign using DecoArt's Chalky finish in Serene and Treasure as well as Ceramcoat acrylic paint in Pthalo Blue. 
I painted a base coat in the minty blue Serene color, layered on some deep Pthalo blue and teal-colord Treasure chalky finish, then distressed the wood as a finishing touch with more Serene. I then used a Montana acrylic marker in Gleaming Pink and a white Deco pen for the wording, which I was inspired to write based on a hilarious Twitter post. 
 To embellish I tied a few bows on the wire in complimenting colors, but you could also use rhinestones, shells and even twine to create designs onto the wood itself.


Instead, I doodled a few clam shells around the wording.  It turned out so cute and cheeky.  If you ever get the chance to read the actual post, do it.  It is amazingly funny and... you will also see why I couldn't put the entire quote word for word on this sign. *Haha*  
But Hey!  It still turned out awesome, right?

This is a simple and fun sign to make as a gift for that mermaid-lover in your life.  
Or that one who wants to be a mermaid.  Because... Mermaids!
 Or sirens... There's two kinds of people in this world. :)

Have fun!
Erika@PC

Monday, November 25, 2013

Get on the Shabby Chic Grapevine

I've seen a lot of fall decorations made with grapevine wreaths lately; especially, I think, because the woodsiness of grapevine can really enhance the feeling of autumn in your home. However, once we move past fall, you shouldn't put those decorations away; you can easily update your grapevines for Christmas. Here are a few Christmas grapevine decorations for you to peruse:


First, a simple and wondrous, wintry wreath. The shades of blue and gray and the glittery, icy, frosted accents make your "winter wonderland" easy to achieve. If I could, I would do up my whole house in these vintage hues, they give me such a feeling of calmness and serenity, like a quiet, winter morning.


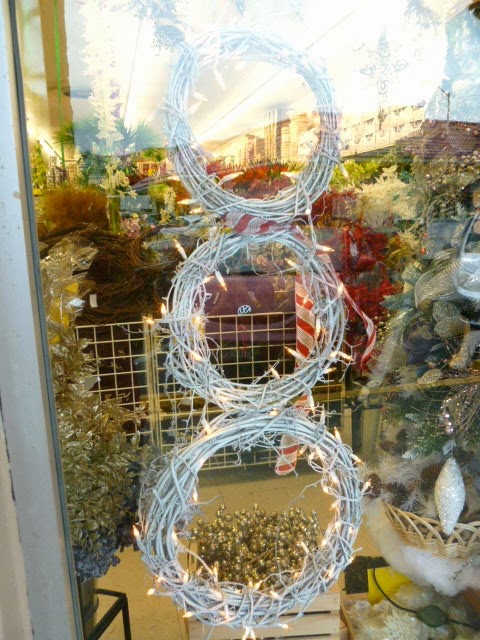
Next up, here's a fun idea for a tall window or door; how about making a grapevine snowman? The homely and rustic grapevines are spray painted white and then wrapped in lights for extra appeal. A pretty piece of ribbon then becomes our snowman's scarf. Our "Frosty" catches everyone's gaze without going overboard.


And last, here's a beautiful grapevine chandelier to hang in your home. Again with this piece we've taken the rustic grapevine and added some glitz in the form of glittery ornaments and a deep, teal color. The end result is a chic and playful hanging that has hints of a primitive, unsophisticated style.

I hope you enjoyed our grapevine, shabby-chic Christmas ideas. Only 29 more days to go til everyone's favorite time of year!

Puna @ Enchanted Lake