Showing posts with label seashells. Show all posts

Tuesday, March 8, 2016

Because Mermaid Reasons...

Hey, Everyone!
Today I have another project using one of our unfinished wood products.  Wait!  Don't skip my post just yet!  *lol*  I promise this one is an awesome one.  This DIY is super easy and adorable.  Trust me.  Mermaids are involved.  Well, reasons to be a mermaid to be more accurate.


I painted this sign using DecoArt's Chalky finish in Serene and Treasure as well as Ceramcoat acrylic paint in Pthalo Blue. 
I painted a base coat in the minty blue Serene color, layered on some deep Pthalo blue and teal-colord Treasure chalky finish, then distressed the wood as a finishing touch with more Serene. I then used a Montana acrylic marker in Gleaming Pink and a white Deco pen for the wording, which I was inspired to write based on a hilarious Twitter post. 
 To embellish I tied a few bows on the wire in complimenting colors, but you could also use rhinestones, shells and even twine to create designs onto the wood itself.


Instead, I doodled a few clam shells around the wording.  It turned out so cute and cheeky.  If you ever get the chance to read the actual post, do it.  It is amazingly funny and... you will also see why I couldn't put the entire quote word for word on this sign. *Haha*  
But Hey!  It still turned out awesome, right?

This is a simple and fun sign to make as a gift for that mermaid-lover in your life.  
Or that one who wants to be a mermaid.  Because... Mermaids!
 Or sirens... There's two kinds of people in this world. :)

Have fun!
Erika@PC

Wednesday, March 25, 2015

Crankin' Out Crafts Episode 412 - Decorating Driftwood & More Samples

New driftwood pieces came in to our stores this spring. Check out how to embellish them with moss, seashells, and succulents.  

Decorating Driftwood

See the different ways you can decorate driftwood here: Crankin' Out Crafts Episode 412 - Decorating Driftwood

Supplies:
driftwood
hot glue gun & gluesticks
Super Moss
succulents
seashells 
starfish 

Keep watching the video for more unique driftwood samples!

Thursday, February 19, 2015

Mason Jars Part 2 - Beachy Table Decor

Hello again! This is Part 2 of my 3 part blog on how to decorate our new PURPLE mason jars.  Last week I showed you how to turn your jar into a beautiful candle holder.  Today I will show you how to dress up your jar to use as table decor for a wedding or any other type of party.


You will need the following supplies:
- Pint size mason jar
- 1 2.5" burlap roll
- 1 spool 7/8" satin ribbon in your color of choice
- 1 bag seashells
- 1 roll 1/4" double sided tape
- E6000 glue or a hot glue gun


First take your burlap roll and wrap around your jar to measure how much you need.  It should overlap about 1/4".

Apply double sided tape to your strip of burlap.  I put one strip on the top and one on the bottom.  Remove the tape backing and place burlap on jar.  Try to line it up so the ends meet in the middle of one side of the jar.


Next, do the same to your satin ribbon.  It should only need one strip of double sided tape. Place the satin ribbon over the burlap. Make sure the ends meet at the same place as the burlap.


Finally, turn your jar so that the side where the ribbon ends overlap is in the back.  Pick out your favorite shell and use either E6000 or a hot glue gun to adhere the shell in the center of your ribbons.


Voila, you're done! This project is great because you can customize it to your own color scheme and it is very fast and easy to make.  You can place it on your table as is or use it for flowers, utensils, or anything else you can think of! Enjoy and come back next Thursday to see Mason Jars Part 3 - Doily Vase.

Friday, September 19, 2014

Crankin' Out Crafts On The Road -ep386 Beach-Inspired Art with Local Artist Glo (Birdhouse)

We are at Duke's in Waikiki Crafting with Local Artist Glo!  She shows us some creative ways to embellish birdhouses using her beach treasures. 

Decorated a wooden birdhouse with beach-found objects!


Supplies:
E6000
Popsicle stick
foam brush 
mod podge
birdhouse
drift wood
seashells

Mahalo to Glo and Duke's Waikiki for being a part of our videos this week. Glo's artwork can be purchased her My Locker at HouseMart BFC Pearl City.

Wednesday, September 17, 2014

Crankin' Out Crafts On The Road -ep385 Beach-Inspired Art with Local Artist Glo (Letter)

Local Artist Glo is at Duke's in Waikiki sharing with us some tips and techniques for crafting with beach found objects. Check out her beautiful Beach inspired art! Her art pieces can be purchased at the Pearl City Location in the "My Lockers" section.

Beach-Inspired Art - Letter decorated with sand, shells, beach glass and more


Supplies:
E6000
Popsicle stick 
wood
mod podge
foam brush
sand, beach glass, drift wood

Tuesday, October 15, 2013

Resin Working with Shells

Check out these AWESOME Shells created using UV Resin, Photos and some embellishments!!


Supplies:
Photos (Printed on Computer Paper)
Sea Shells
UV Resin
UV Lamp
Mod Podge
Small Brush
Embellishments (Rhinestones, Glitter, Small metal embellishments and tiny pearls)
Sand (Tan Color)


How To:

Use Mod Podge to adhere the photo to the inside of the shell by brushing a coat onto the shell itself and also brushing a coat onto the back of the photo. Carefully rub out any air bubbles with your fingers. Once the Mod Podge dries, Pour some UV Resin onto the edges of the shells and dip them into Sand, place under the UV Light for a few minutes and take out. Coat the photo and the inside of the shell with Resin and place back under the UV light for a few minutes to harden. Use Rhinestones and small embellishments by coating the embellishments with Resin on the shells and placing under the UV Light to harden.

Use these shells as a way to display your trips and memorabilia. They would look great scattered in a bowl or even on a magnet! Glue a ribbon on them as a Christmas Ornament!

Thanks For Looking and CRAFT ON!!!!!! ~ Deborah @ Market City


Wednesday, November 21, 2012

Mason Jar Gift Ideas

Mason Jar Gift Ideas!

It is time to get to crafting on those presents ya'll! The great things about Mason Jars is they can hold all and display all kinds of wonderful things..with some love, a mason jar, a decorated lid a gift tag....you can't go wrong in my book.
In the past I have filled mason jars with dry ingredients for hot cocoa, cookies, s'mores, brownies, trail mix and such, which is always fun and a cool look with all the layers.  Bath salts and infused sugars are also very nice.

Here's what I'm trying this year:

A little colored sand, sea shells, and votive on the inside, and some jute and shells glued at the open top lid..it's not a brand new idea obviously and very easy, but I just love how it turned out!  You can even through a flameless candle in there to make it more versatile.  A great gift, favor, centerpiece or accent to your home.

This Jar is filled with all your sewing goodies.  The lid is stuffed with a little bit of polyfil and covered in felt for the perfect pin cushion. You could add a monogram or other personalized touch...a great gift idea for any crafter!


Tuesday, August 14, 2012

Seashells by the Seashore Picture Stand and Jewelry Hanger


I am so excited about all the beautiful seashells we have in-store...so many seashells, so many possibilities.  This seashell picture hanger is a decorative way to display pictures, postcards, jewelry and more.  Take a 12x12 picture frame, replace glass with decorative card stock.  Glue jute, twine or ribbon to the sides of your frame carefully with a hot glue gun.  Decorate mini-clothes pins with shells (using hot glue or E600 glue) and clip onto the jute.  Now you have a beautiful display for your home or office, and you can change out the pictures and the background paper whenever you like!


Great idea for wedding memories.  Why chose one picture to put in a frame to remember your special day when you can pin up multiple photos, your invitation, vows and other memories!  You could even use wrapping paper from one of your favorite gifts, or your wedding program/invitation for the background paper.


Use a black Deco pen to personalize seashells.  Glue a shell directly on the frame, or onto a magnet (for a metal frame/surface or refrigerator) with E600 glue.  I can't wait to share these magnetic shell greetings with my friends and guests from the mainland!


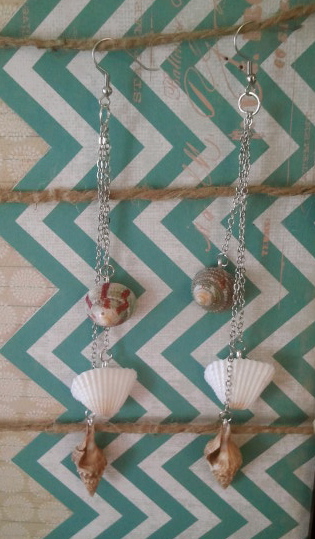
I am so excited about these bohemian-beach-chic shell earrings.  No drilling required!  The shell picture hanger design makes an awesome display for your earring collection too!