Showing posts with label shells. Show all posts

Monday, January 30, 2017

Wedding Mermaid Crown

Hello fellow artists and crafters!
This week I've been thinking a lot about this new year and all the magical DIY projects there are to make for a wedding. I am really loving all the inspiration from nature and incorporating organic elements into the ceremony and reception in an elegant way.

I thought I'd experiment with mermaid crowns!


Supplies
16 or 20 guage florist wire
paper wrapped florist wire
stem of small white flowers
white starfish
strand of pearl beads on a wire
hot glue gun / glue sticks
white shells
white primer spray paint
jute / twine 
wire cutters
   **optional** Silver glitter Spray

 First, using the paper wrapped wire, twist two pieces together in an oval measured to the circumference of your head. Bend the 16-20 gauge wire into an arch, then twist a few times around the base, and then continue with arches until you've gone the whole way around. You will end up using about 3-4 lengths of 12in wire.

Spray paint the entire crown white, and let sit to dry for about 1 hour.

Next, take the strand of your wire with pearl beads on it and weave it through the open arches you made, wrapping twice to anchor it to the crown.

Hot glue the white shells around the base. I placed my shells over the rough wire ends to hide them.

Glue your starfish on, being sure to only apply glue to the areas that touch the wires, as opposed to coating the entire back with glue.

Next glue in your white flowers!

I then wrapped jute / twine around the rough intersections of wire on the crown to 
1) soften the sharp edges
2) add a bit of earthy rope texture in to contrast with the white

I secured the jute / twine with hot glue.

Using the silver flash glitter spray, I misted the entire crown to give it some shimmer!


Have a great week!

Bethany @Enchanted Lake

Tuesday, July 19, 2016

Beach-themed Centerpiece

"Life's a beach and I'm just playing in the sand!"
 
For those of you ocean-lovers who live by this saying, this project is
a great piece of décor or centerpiece for your upcoming special event!  Whether it's a birthday party, grad party, anniversary or wedding, this idea
will be a "shore" pleaser for all those beach-bums at heart.
(And yes, I did just type that.)
 
++++++++++++++++++++++++++++++++++++++++++++
 
 
~ Here's what you'll need! ~
 
1. Glass Vase
2. 4 inch Wooden Letter
3. Sand
4. Rope or Twine
5. Paint
6. Glitter Paste
7.  Floral Wire
8. Painter's Tape
9. Shells & Starfish (optional)
 
+++++++++++++++++++++++++++++++++++++++++
 
Let's get started!
 
Step 1.  Paint your wooden letter in your desired paint color.  I chose
Delta Americana's Coastal Waters, which is a nice mix between teal and turquoise. Paint a layer of glitter paste onto your wooden letter.  I chose a light blue paste by BoBunny.


Step 2.  Wrap a piece of rope around my vase and fill it with some sand.  I think black sand would be and interesting contrast as well.  Feel free to add some shells, rocks or starfish to "embellish".


Step 3. Twist your floral wire into a coral shape, then
Wrap the shape in some blue painter's tape to give your "coral skeleton" some body.  I then brushed on a thick layer of the same BoBunny glitter paste to add more depth and dimension to the blue of the tape.


Step 6. Lastly, place your "coral" piece into your vase and the wooden letter right in front.
Now you're done!


I hope everyone has fun recreating and personalizing this idea.  Add some firefly or tea lights, change up the colors or embellish your letter with jewels!
The possibilities are endless.
As always, have fun and see you next week!
 
Erika @ PC


Wednesday, March 30, 2016

Mermaid Shell Top

Hi, Everyone!
This week we are going to be doing a really fun mermaid-themed project!
A Mermaid Shell Top!
How cool is this?  It's a really easy and cheap idea for fast mermaid costume or just for a quirky beach shirt for this summer.  Who doesn't want to feel like a mermaid once in a while?


What I used to make this mermaid top was a regular white t-shirt, GP Purple Ceramcoat Acrylic paint, Iridescent Purple Scribbles, and Textile Medium.  I also had some parchment paper to help stop the paint from bleeding onto the back of the shirt as well as an iron to cure the paint.


First, try on your shirt to see where you will want your shells to be.  Make marks with a washable fabric marker.  (I chose to just wing it.)
Next, you're going to mix the paint and the textile medium with a ratio of 2:1.  Two parts acrylic paint to one part textile medium.  What this medium does is it makes any craft grade acrylic paint permanent and flexible on fabric.  This means that it won't wash or flake off even if the fabric wrinkles.  


Make sure you put a piece of parchment paper underneath the front layer of your shirt so that the paint doesn't get onto the back.  The textile medium will make the two side stick together if you don't!   Then, start painting your shells!  I chose the basic clam shell shape like a certain red-haired mermaid.  

After letting that dry, heat set it with either an iron or a heat tool.  You're going to want to heat each area for at least thirty seconds to cure the medium.  


Lastly, draw the outlines of the shells with the puffy scribbles paint for some dimension!


As always, feel free to mix it up!  Add some embellishments like rhinestones or even use glitter paint for more texture and sparkle.  How about writing a mermaid-themed quote underneath in a funky script?  You could even paint some iridescent scales for that real siren look.

Have fun!
Erika @ PC

Thursday, February 18, 2016

How Wood You Decorate These?

Crankin’ Out Crafts, Episode 463 - Beach Signs


Watch as JFlo transforms unfinished wood into beautiful home decor using various paints and markers. 


Supplies Used:
Satin Paint by Americana
Ceram Coat Paints
Paintbrush
Montana Acrylic Marker
Starfish
E6000
Ribbon

Crankin’ Out Crafts, Episode 464 - Photo Holders

JFlo explains how to transform raw unfinished wood into cute photo holders and displays.


Project 1: Wooden Base Photo Holder
Chalky Paint
Paintbrush
Wire spray with seashells
Photograph

Project 2: Pallet
Ceram Coat Paints
Tim Holtz® Distress Ink Pads
E6000
Wooden clothespins
Starfish
Optional: Wire spray with seashells

Crankin’Out Crafts, Episode 465 - Pallets

JFlo shares creative pallet decor ideas.


Unfinished wooden pallet
Acrylic Paint
Paintbrush

Pallet 2:
Ubermatte Spray Paint
Ribbon
Montana Acrylic Paint Marker

Thursday, February 5, 2015

Crankin' Out Crafts - Episode 405 Two-part Resin

JFLo will show you how beautiful two-part resin can be and give your next craft project a high gloss glass-like finish.

Add embellishments and a glossy finish with resin

View our newest episode here: Crankin' Out Crafts - Episode 405 Two-part Resin

Supplies:
two part resin (EnviroTex Pour-On Resin)
Popsicle stick
paper cup

Tuesday, October 15, 2013

Resin Working with Shells

Check out these AWESOME Shells created using UV Resin, Photos and some embellishments!!


Supplies:
Photos (Printed on Computer Paper)
Sea Shells
UV Resin
UV Lamp
Mod Podge
Small Brush
Embellishments (Rhinestones, Glitter, Small metal embellishments and tiny pearls)
Sand (Tan Color)


How To:

Use Mod Podge to adhere the photo to the inside of the shell by brushing a coat onto the shell itself and also brushing a coat onto the back of the photo. Carefully rub out any air bubbles with your fingers. Once the Mod Podge dries, Pour some UV Resin onto the edges of the shells and dip them into Sand, place under the UV Light for a few minutes and take out. Coat the photo and the inside of the shell with Resin and place back under the UV light for a few minutes to harden. Use Rhinestones and small embellishments by coating the embellishments with Resin on the shells and placing under the UV Light to harden.

Use these shells as a way to display your trips and memorabilia. They would look great scattered in a bowl or even on a magnet! Glue a ribbon on them as a Christmas Ornament!

Thanks For Looking and CRAFT ON!!!!!! ~ Deborah @ Market City


Monday, July 30, 2012

Crankin' Out Crafts Episode 132 - Beach Wreath (Summer Wreath)


Welcome back to another craft-filled week on Crankin’ Out Crafts. For this week, we’re going to focus on summery wreaths. In today’s episode, JFlo is back to show us a nautically inspired Beach Wreath.

Learn how to make a beach/ocean-inspired wreath!


Supplies:
Straw wreath
10” Deco mesh
White tulle
Printed tulle
Shells
Scissors
Hot glue gun
Glue sticks
Greening pins

The light and airy tulle and Deco mesh used on our wreath really recalls the seaside and ocean waves. We think it makes a perfect accent for Summer or for a vacation house on the beach.

Monday, January 16, 2012

Wonderful Wood


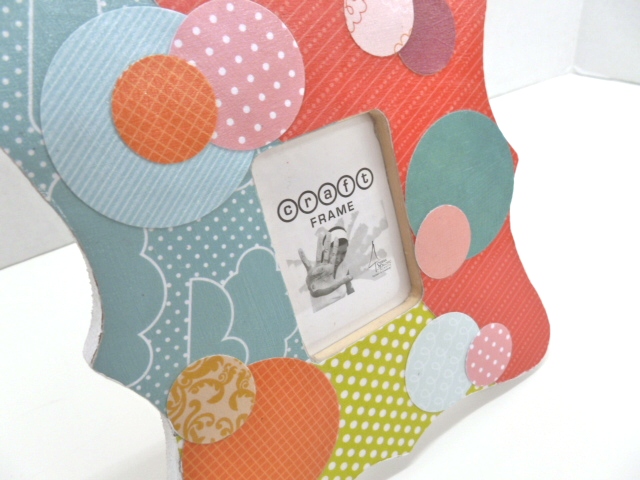
Hello everyone! For today's blog, I wanted to share with you our great selection of ready to decorate wood which is on sale right now! Theses wood pieces are so easy to decorate that you won't want to stop.


You can decoupage scrapbooking paper on them to make interesting designs. For this frame I just used a circle punch and scissors to cut shapes out of pretty paper.


Look around your home for more inspo. Do you have a lot of buttons? Try hot-gluing them to a wood piece to make a colorful and cheery frame.


You could also use some acrylic paint and shells to make a seashore themed piece.

I hope you got some good ideas from these wonderful wood pieces. Drop in to Enchanted Lake Ben Franklin to get a closer look at these and other fun pieces.

Thanks for reading!
Puna @ Enchanted Lake