Showing posts with label ocean. Show all posts

Monday, January 1, 2018

Sea Glass & Starfish Light Catcher

Happy Monday!
Let's have fun this week with some tropical sea glass mobiles! After all, Kailua is a beach town! I was inspired by the ombre sea glass colors available at HouseMart Ben Franklin and thought this mobile would be great for a baby's room or even outside the front door to greet guests as they enter the house!
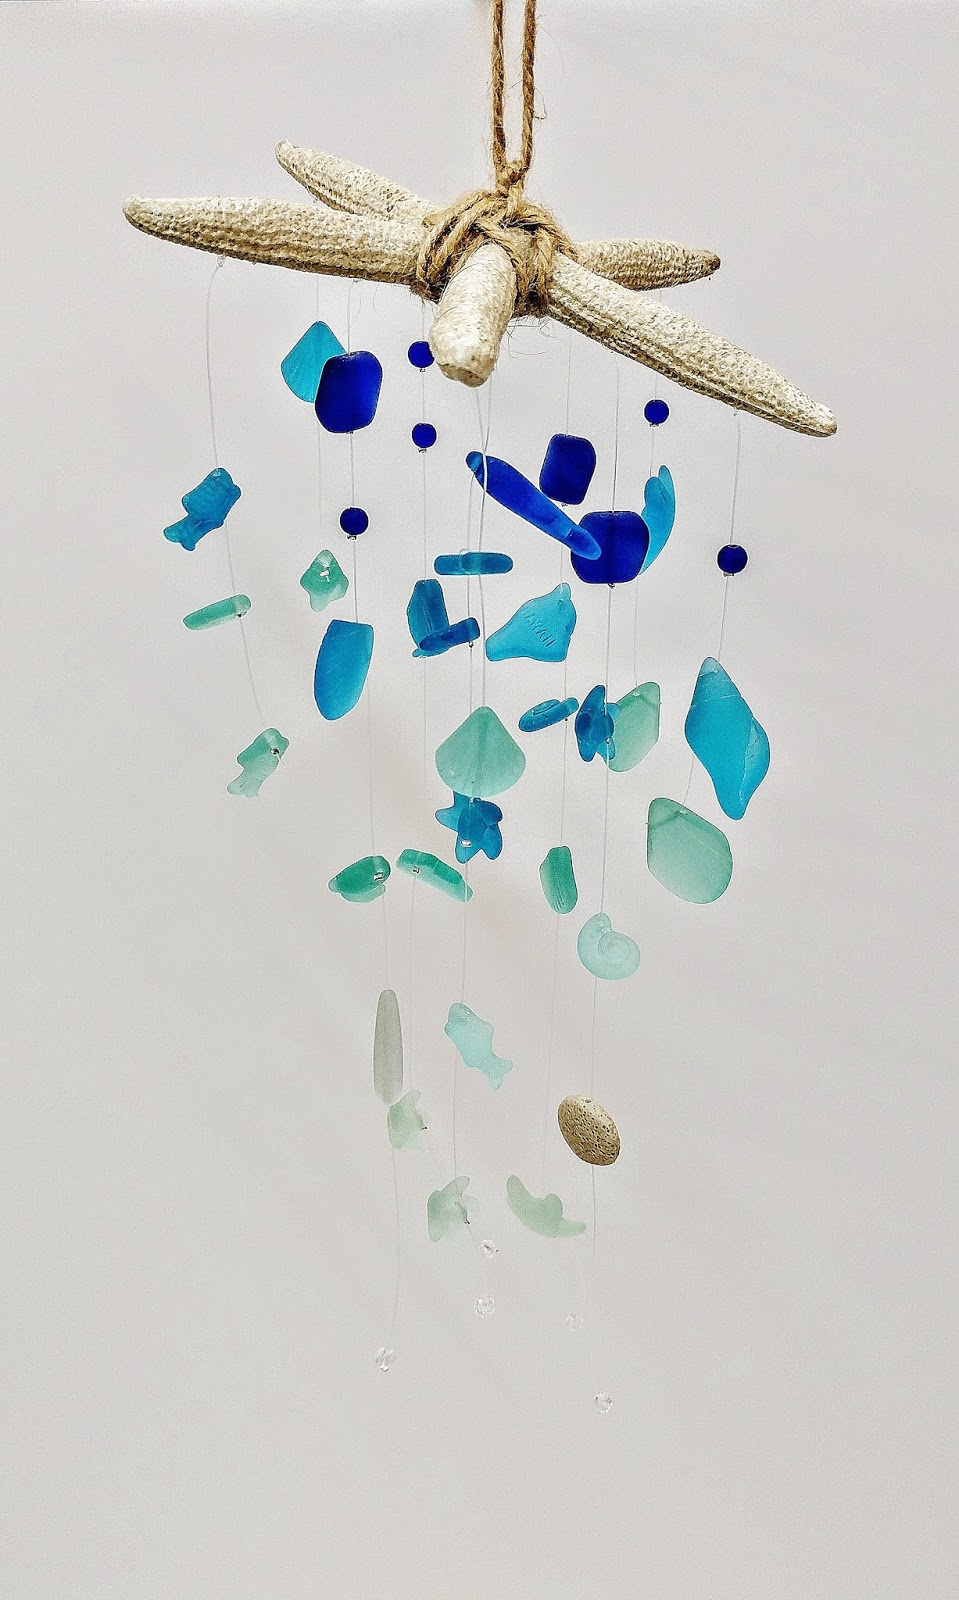


Supplies:
Resin starfish (a real one would break)
clear beading plastic string or fishing line
scissors
small silver crimp beads
hand held crimper
assorted bags of sea glass
jute

First I tied 2 strings to each starfish leg that were 2 feet long. Then I started with the darkest blue of sea glass and put the bead through on to the string, and finished each bead off by placing a crimp bead, and using my hand held crimping pliers, flattened out said crimp bead so that the sea glass couldn't slide down the string! I kept stringing and crimping, going from dark to light. I put more beads on the center strings, and as I went down, I spaced out the beads further and further from each other. 

One of the sea glass strands came with a sand textured bead as well as small clear sparkling faceted beads, which I incorporated into the ends of the mobile so that they looked like water crystals. This was really fun to make, and using those crimp beads made a world of difference!

When I finished, I trimmed all the excess strings off the ends, and secured the center of the starfish with jute so that it could hang from the middle.

Have fun making your mobiles! Feel free to make different kinds using different beads, or even get crazy with it and use felt flowers! Have a great week!

Bethany @ Enchanted Lake


Monday, February 27, 2017

Mermaid in a Jar


Happy Monday! Hope you've had a great week and that you're ready for some mermaid crafting! I can't get enough of the mermaid theme!


Supplies: 
smooth mason jar
warm white twinkle firefly lights
matte Mod Podge
nylon brush
1 sheet light blue wrapping tissue
X-acto blade
pencil
black thick card stock paper
E6000 clear glue
chunky white/clear glitter
jute/twine
scissors
shells
starfish
net


First, cut the approximate length of tissue (in one long rectangle) that will cover the entire jar with an extra inch of overlap. Slowly and bit by bit, paint Mod Podge on to the glass, laying the tissue over it. Since tissue is thin and tears very easily, don't touch or move it once it's touched the glue. To make sure everything lines up at the end, make sure you're checking to make sure the tissue is lined up with the jar throughout the process.

After the jar has been covered, let it sit to dry for 30+ minutes.
As it's drying, cut out a mermaid shape from the black card stock paper. it could even just be the shape of a mermaid tail.


After the jar is dry, add more glossy Mod Podge on the outside around the top and the bottom. Sprinkle the chunky white/clear glitter over it being careful to leave a big clear space for the mermaid to be seen clearly.

Glue part of the mermaid to the inside of the jar. To make her look more realistic in there, only glue one part of the silhouette so that it's not completely smooth to the side. The E6000 will need to cure for 30+ minutes before the jar can be handled.

Throw some pretty lights in there behind her to make it look like she's floating in a sea cave!

And there it is! Super cute mermaid in a jar!

Happy Crafting! 

Bethany @Enchanted Lake


Thursday, February 23, 2017

Sea Glass Windchime

So what if the groundhog saw his shadow again!
Six more weeks of Winter is not going to stop us from starting our
Spring crafting!  We have so much fun craft supplies coming in for the Spring and Summer seasons.  Nautical, Fairy Garden and Natural Woodland-themed items are making their way to our stores and filling our shelves this very moment.
There's also a very special product that we got in that has been requested MANY times by both our guests and employees. Haha!  That item is...Branch pieces!  We have both light-colored and dark colored branches in bundles available for you, so don't miss out.  Grab a bundle for all your Wooden frames, fairy garden, Bohemian and Nautical crafts!  Today, I have an easy and beautifully Boho craft for you.
 
 
This Seaglass windchime will be a great craft to display on your lanai or favorite tree in the backyard!  All you need are a few items.
 
 
Supplies
+ Two branches
+ Jute Cord
+ Hot Glue Gun or E6000
+ Sea glass pieces
+Scissors
 
First, cut about five to six pieces of jute in lengths ranging from 15 to 20 inches.  You want to have at least two inches to tie one end to the branch.
 
 
Second. knot one end of the jute to a branch.  Make sure there are no loose ends sticking up for a clean look.  You can secure them with a little hot glue.


 Next, glue your pieces of sea glass to the jute cords!  You can glue them on using any pattern you want.  And there you have it!  This is a great craft to display on your front porch over the summer and it could also make a great nautical wall hanging.
 
Have fun and see you next week!
 
Erika @ PC

Monday, February 20, 2017

Nautical Sea Door Hanger


Hello everyone! Are you ready for more beachy home decor? I'm ready for the sunshine and the waves. Check out this cute Sea door hanger you can make using paper mache letters! I love them! They're such a great size and can be used in so many different ways.


Supplies:

paper mache letters S E A
acrylic paint in dark brown, mint green, ivory, and dark blue
one nylon brush
one thick haired bristle brush
matte mod podge
assorted ocean themed card stock sheets
E6000 clear glue

Optional:
net
starfish
Glossy Accents dimensional clear glaze


++++++++++++++++++++++++++++++++++++++++++++++++++++++++++++++++++++++++++


Luckily the wood panel already comes stained and with a rope attached, so all we have to do is decorate the letters! 

First I picked out a few ocean themed sheets of card stock paper I liked, and used my brush and Mod Podge to apply an even layer to the front surface of the letters S and A. Then, I let the paper dry on the letters. 

Using an X-acto blade to cut out around your letter will be a much easier method, rather than trying to trace the image and try to align the paper beforehand.


With your nylon brush, paint the sides of your letter with acrylic paint. Paint the last letter with acrylic paint, and let sit to dry for 10-20 minutes. When all of the paint is completely dry to the touch, you can glue on the accents like starfish or netting. Glue your letters with E6000 down to the wooden board. This glue will need one whole day to completely cure but to the touch will be solid within a few hours.


 Dimensional glaze on specific areas will give a really nice glossy appearance. This gel will squeeze out like a tube of puffy paint but will need to dry over several hours.


For the beach-worn look on the E I painted the letter mint green, allowed the paint to dry, and then lightly brushed on ivory paint.


For the A I used patterned card stock paper and Mod Podge to adhere it to the front.

So cute right? So charming. I can't wait to make more tropical and nautical crafts! Check out next Monday's blog for "Mermaid in a Jar"!

Bethany @Enchanted Lake 


Monday, January 30, 2017

Wedding Mermaid Crown

Hello fellow artists and crafters!
This week I've been thinking a lot about this new year and all the magical DIY projects there are to make for a wedding. I am really loving all the inspiration from nature and incorporating organic elements into the ceremony and reception in an elegant way.

I thought I'd experiment with mermaid crowns!


Supplies
16 or 20 guage florist wire
paper wrapped florist wire
stem of small white flowers
white starfish
strand of pearl beads on a wire
hot glue gun / glue sticks
white shells
white primer spray paint
jute / twine 
wire cutters
   **optional** Silver glitter Spray

 First, using the paper wrapped wire, twist two pieces together in an oval measured to the circumference of your head. Bend the 16-20 gauge wire into an arch, then twist a few times around the base, and then continue with arches until you've gone the whole way around. You will end up using about 3-4 lengths of 12in wire.

Spray paint the entire crown white, and let sit to dry for about 1 hour.

Next, take the strand of your wire with pearl beads on it and weave it through the open arches you made, wrapping twice to anchor it to the crown.

Hot glue the white shells around the base. I placed my shells over the rough wire ends to hide them.

Glue your starfish on, being sure to only apply glue to the areas that touch the wires, as opposed to coating the entire back with glue.

Next glue in your white flowers!

I then wrapped jute / twine around the rough intersections of wire on the crown to 
1) soften the sharp edges
2) add a bit of earthy rope texture in to contrast with the white

I secured the jute / twine with hot glue.

Using the silver flash glitter spray, I misted the entire crown to give it some shimmer!


Have a great week!

Bethany @Enchanted Lake

Monday, January 23, 2017

Resin Ocean Shore

Hey all!

I am really excited to show you this project! This was my first time experimenting with pour-able resin, and it was easier than I anticipated, yet also was an interesting experience to learn and create at the same time! Goes to show, you never know until you try it! Don't be afraid of experimenting with new mediums!


Supplies
pre-varnished and stained wooden tray with an edge
alcohol inks in greens, blues, and turquoise 
assorted shells and a starfish
white sand with white glitter mixed in
raw small glass chunks (sold in store)


First, to dye your glass, pour amount desired into zip-lock bag and squeeze a few drops of alcohol ink inside. A little ink goes a long way. When exposed to air, alcohol ink will dry very quickly, so utilizing the bag will help you get more even coverage. Add more glass, or color for intensity, as desired. Allow pieces to fully dry on some disposable flat surface.

I used a variety of blues and greens, and encouraged less consistent coverage so that some glass pieces would be darker than others. You can even leave a few pieces clear for contrast against the colorful ones.

After the glass had dried (10 minutes tops) I placed them in my tray to get a sense as to how they would look, and where I should place them in the sand.


 The box of resin comes with two bottles, that should be mixed with a 1:1 ratio, and a little goes a long way. Once 2 parts have been thoroughly mixed, separate a portion and mix that with sand. Spread gooey sand mixture to cover entire bottom of tray. Sprinkle dry sand onto parts you wants to be taller. All sand and shells will sink to the bottom through this resin, so keep that in mind. I placed individually each piece of glass and shell into the resin and sand mixture. As it cures, about 30-40 minutes after initial resin mixing, you can sprinkle more sand on top in certain areas to make some parts look like "dry sand". As it will be starting to harden, anything added on will be more likely to flat on top rather than sink to the bottom. Anything that gets covered by this glossy resin will look "wet" and I wanted the tops of the shells, glass, and sprinkles of sand to look "dry". 


Allow your gorgeous slice of the ocean to sit in a flat protected area away from dust or disturbances for 24 hours. It is SO amazing to touch it when it's dry and see how "wet" it looks when it is completely dry!! This would make a great tray for candles, or as a centerpiece on a coffee table, or even and interesting piece of wall art that seems to defy gravity! 

This was so much fun to make, and now I want to cover everything in this magical gloss!!! 
Have fun and happy art-ing!

Bethany @Enchanted Lake


Tuesday, July 19, 2016

Beach-themed Centerpiece

"Life's a beach and I'm just playing in the sand!"
 
For those of you ocean-lovers who live by this saying, this project is
a great piece of décor or centerpiece for your upcoming special event!  Whether it's a birthday party, grad party, anniversary or wedding, this idea
will be a "shore" pleaser for all those beach-bums at heart.
(And yes, I did just type that.)
 
++++++++++++++++++++++++++++++++++++++++++++
 
 
~ Here's what you'll need! ~
 
1. Glass Vase
2. 4 inch Wooden Letter
3. Sand
4. Rope or Twine
5. Paint
6. Glitter Paste
7.  Floral Wire
8. Painter's Tape
9. Shells & Starfish (optional)
 
+++++++++++++++++++++++++++++++++++++++++
 
Let's get started!
 
Step 1.  Paint your wooden letter in your desired paint color.  I chose
Delta Americana's Coastal Waters, which is a nice mix between teal and turquoise. Paint a layer of glitter paste onto your wooden letter.  I chose a light blue paste by BoBunny.


Step 2.  Wrap a piece of rope around my vase and fill it with some sand.  I think black sand would be and interesting contrast as well.  Feel free to add some shells, rocks or starfish to "embellish".


Step 3. Twist your floral wire into a coral shape, then
Wrap the shape in some blue painter's tape to give your "coral skeleton" some body.  I then brushed on a thick layer of the same BoBunny glitter paste to add more depth and dimension to the blue of the tape.


Step 6. Lastly, place your "coral" piece into your vase and the wooden letter right in front.
Now you're done!


I hope everyone has fun recreating and personalizing this idea.  Add some firefly or tea lights, change up the colors or embellish your letter with jewels!
The possibilities are endless.
As always, have fun and see you next week!
 
Erika @ PC


Tuesday, June 7, 2016

Mermaid Scale Frame

Get ready for a whole lot of purple!
Instead of the usual teal and pink combination that we usually associate with 
the mermaid, I'm putting another enchanting hue in the spotlight.
Over the past few months, mermaids have been EVERYWHERE.
(We even have a mermaid birthday party as this month's Pinspiration Station theme
at our Pearl City Store!)  So, what I've decided to make this week was a
 mermaid-themed gift that was simple to make, 
and REALLY affordable.  It's also a great summer project to do with your kids.
This project, my fellow crafters, is a Mermaid Scale Frame!


 ~~~~~~~~~~~~~~~~~~~~~~~~~~~~~~~~~~~~~~~~~~~~
 Let's get started!

***  Supplies Needed  ***
SPC Wooden Frame
4 inch Wooden Letter
Ceramcoat Acrylic Paint*
1 inch Flat Acrylic Paintbrush
Hot Glue Gun or Wood Glue
Paint Pen*

*use color(s) desired


 The colors I used for my frame were multiple shades of purple, teal and white.
The exact names are Passion Purple, Lavender, GP Purple, White and Coastal Waters.
(The last color mentioned was actually a Delta Americana acrylic paint, which basically just dries to
a Satin finish instead of matte like Ceramcoat.)
I made a scalloped, "scale" pattern starting from the bottom of my frame.  
Every time I painted the next layer of scales up, I made sure to overlap the previous one. 
This is where you can have fun with the colors.  Even if you have only four or five colors,
you can mix them up to make new shades or even add depth to your scales.  For example,
I blended a little of the dark GP Purple into the lighter Passion purple shade to get a nice shadow effect.  After letting your scales dry, you can even add some detail by dotting on dark paint over the light-colored scales and vice versa.  


I then painted the wooden letter and added pearl detailing using a BoBunny Pearl Pen.
This is basically a puffy paint for hard crafts and scrapbooking.  It works on wood, paper and clay
and dries to a pearlized finish.  After this, I glued the 'M' to the top right corner of my frame!
To personalize it even more, you can even write the name of your friend, mom, sister or whoever the 
receiver of this amazing gift is on your frame with a paint pen.  I used a black fine tip Montana marker.  That wraps up this project!  As always, don't hesitate to change it up and make it your own.
Have fun with it and enjoy!

See you all next week!
Erika @ PC

Tuesday, May 3, 2016

"Oh Whale..." Glass Box

"Whale" have I got an adorable project for everyone this week...
(*crickets chirping*)
Doodlebug has a great ocean-themed collection for us that is perfect for summer scrapbooking pages.  Bright colors, sea life, beach balls, palm trees and of course, mermaids!  But is all honesty, I do prefer the whales.  One, they are amazing creatures, and two, who could resist that vibrant color palette?  It went really well with the Ceramcoat Watermelon and Butter Yellow paints.
 
 
This is one of the glass top wooden boxes that all stores got in for Spring.  Because this particular design was a little more shallow than the others, I decided to use it as a shadow box instead of a storage container.  I Mod-Podged a piece of the whale paper onto the bottom of the box and then gave the inside of the box two coats of Butter Yellow Ceramcoat.  I then painted the outside with Watermelon.  After that dried, I used a dry bristle brush to distress the sides with a bit of Metallic 14K Gold Ceramcoat. 
I then wrote a cute pun right onto the whale paper as a finishing touch.
That's pretty much it for this project, but like always, experiment, make it your own and have fun!
 
Erika @ PC


Wednesday, March 30, 2016

Mermaid Shell Top

Hi, Everyone!
This week we are going to be doing a really fun mermaid-themed project!
A Mermaid Shell Top!
How cool is this?  It's a really easy and cheap idea for fast mermaid costume or just for a quirky beach shirt for this summer.  Who doesn't want to feel like a mermaid once in a while?


What I used to make this mermaid top was a regular white t-shirt, GP Purple Ceramcoat Acrylic paint, Iridescent Purple Scribbles, and Textile Medium.  I also had some parchment paper to help stop the paint from bleeding onto the back of the shirt as well as an iron to cure the paint.


First, try on your shirt to see where you will want your shells to be.  Make marks with a washable fabric marker.  (I chose to just wing it.)
Next, you're going to mix the paint and the textile medium with a ratio of 2:1.  Two parts acrylic paint to one part textile medium.  What this medium does is it makes any craft grade acrylic paint permanent and flexible on fabric.  This means that it won't wash or flake off even if the fabric wrinkles.  


Make sure you put a piece of parchment paper underneath the front layer of your shirt so that the paint doesn't get onto the back.  The textile medium will make the two side stick together if you don't!   Then, start painting your shells!  I chose the basic clam shell shape like a certain red-haired mermaid.  

After letting that dry, heat set it with either an iron or a heat tool.  You're going to want to heat each area for at least thirty seconds to cure the medium.  


Lastly, draw the outlines of the shells with the puffy scribbles paint for some dimension!


As always, feel free to mix it up!  Add some embellishments like rhinestones or even use glitter paint for more texture and sparkle.  How about writing a mermaid-themed quote underneath in a funky script?  You could even paint some iridescent scales for that real siren look.

Have fun!
Erika @ PC

Thursday, August 28, 2014

Crankin' Out Crafts On The Road Episode 378 - Paper Plate Seahorse

JFlo & Special Guest Keiki Crafter Dreden create an Seahorse from a paper plate. You can make your own too!

Seahorse Paper Plate projects


Supplies:
pattern
paper plate (makes two seahorses)
google eyes
double stick tape or glue 

markers or crayons

*Seahorse Pattern is available for download on the Projects tab on our website here

This is a fun and easy project to do at a ocean-themed kids event or party!

*The Waikiki Aquarium is located in Waikiki at 2777 Kalakaua Avenue on the island of Oahu. It is a great place to visit with the entire family and to learn more about Pacific Marine Life through their ongoing educational exhibits. For more info see their website: http://www.waikikiaquarium.org.

Tuesday, August 26, 2014

Crankin' Out Crafts On The Road Episode 377 - Fingerprint Fish Postcard

JFlo is at the Waikiki Aquarium this week creating some easy kids crafts! Check out today's project a fingerprint fish postcard.  

Fingerprint Fish Postcard


Supplies:
orange acrylic paint
yellow acrylic paint
micron pen
watercolor pencils
paint brush 
water

*The Waikiki Aquarium is located in Waikiki at 2777 Kalakaua Avenue on the island of Oahu. It is a great place to visit with the entire family and to learn more about Pacific Marine Life through their ongoing educational exhibits. For more info see their website: http://www.waikikiaquarium.org.

Monday, August 12, 2013

A Sand Keeper

Don't you love it when inspiration strikes you at the most unforeseen moment? My inspiration for today's blog came to me when a friend of mine was shopping for a tray to place some small flowers in. After searching through the store, he settled on this wooden piece that has small partitions and a sliding glass door. When he added the small, corked bottles to it I knew that we had a great idea in the making.


Here is my take on what he and I put together that day. I'm going to call it a sand keeper  but really it could hold any small mementos from trips for a beautiful display. I painted the box with our Americana Multi-surface paints in a few beachy colors and later added some shells to the outside.


Craft bottles are in each compartment to hold sand or small shells. Mementos could also be simply placed inside the keeper. To distinguish one section from the other, I just wrote out small tags with place names on them and attached them to the bottles with bakers twine.

I hope you like the idea, you could stop by our Enchanted Lake store to see it, if you wanted to.

Puna @ Enchanted Lake

Friday, August 3, 2012

Crankin' Out Crafts Episode 134 - Nautical Tulle Wreath


For our last wreath of the week, we’re back with another nautical themed beauty. Puna will show you how to make this fun “lifesaver”.
  
It's "knot" hard to make this tulle wreath! Create for your home or event.

Watch the episode on our YouTube channel: Crankin' Out Crafts: Episode 134 - Nautical Tulle Wreath

Supplies:
Styrofoam wreath
Tulle, 2-4 rolls in your choice of colors
Scissors
*optional – Glue gun and glue sticks
     Embellishments

This wreath may be nautically inspired but is not usable as a floatation device. All seafaring jokes aside, this wreath makes a cute addition to any house for a summer decoration.

Monday, July 30, 2012

Crankin' Out Crafts Episode 132 - Beach Wreath (Summer Wreath)


Welcome back to another craft-filled week on Crankin’ Out Crafts. For this week, we’re going to focus on summery wreaths. In today’s episode, JFlo is back to show us a nautically inspired Beach Wreath.

Learn how to make a beach/ocean-inspired wreath!


Supplies:
Straw wreath
10” Deco mesh
White tulle
Printed tulle
Shells
Scissors
Hot glue gun
Glue sticks
Greening pins

The light and airy tulle and Deco mesh used on our wreath really recalls the seaside and ocean waves. We think it makes a perfect accent for Summer or for a vacation house on the beach.