Showing posts with label graduation centerpiece. Show all posts

Thursday, June 4, 2015

Grad Party Centerpiece

Hi there! Today I'll be showing you an awesome centerpiece idea.  It's perfect for your upcoming grad parties but it's so universal you can make it for any celebration.

You will need the following supplies:

- Styrofoam ball, you can choose what size ( I used the 4" one)
- Tissue paper in at least 2 different colors ( I used 3)
- Glitter paper or metallic paper for cut outs
- white floral wire
- 1 BBQ skewer
- Hot glue gun
- serrated knife or Styrofoam cutter 


First, use the serrated knife or Styrofoam cutter to cut your ball in half.


 Next, cut your tissue papers into approximately 8" squares.  I cut each sheet in half and then cut those halves into thirds.  You can make them smaller if you want a little smaller centerpiece.  I used about 9 sheets per color. 


Take one sheet of tissue paper and pick it up from the center.  Pull the outside edges down and gather them.


Put hot glue on the center of the tissue paper and place on the Styrofoam.  You'll need to hold it there for about a minute so it doesn't fall. Alternate between the different color tissue papers.  The metallic I used is blue on one side and silver on the other so I used both sides instead of purchasing 2 different colors. That way, I had white, silver and blue. 


Continue, alternating colors until you cover the whole Styrofoam.


Now you can add your embellishments! I used the store die cut machine to cut out "2015," 2 large stars, and 2 small grad caps out of glitter paper.  I used a Marvy Uchida star punch to punch out smaller stars as well.  I used double sided tape to join the 2015 together and hot glued it to a BBQ skewer.  Then I glued each of the other cut outs to a piece of white floral wire that I cut at different lengths.  Poke them into the Styrofoam to arrange.  You can also add a photo of the graduate or school logo.  You can really add anything you want.


It makes such a great centerpiece and works for any occasion!

I hope you enjoyed this project and until next time, happy crafting!
Rachel @ Mapunapuna

Monday, June 1, 2015

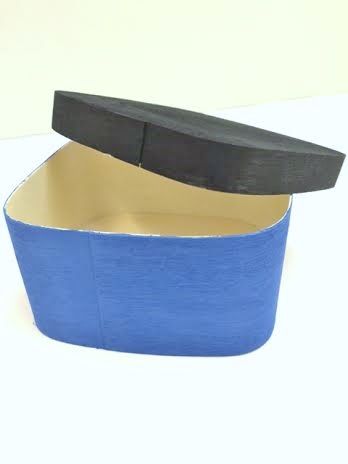
Graduation Gift Box (unfinished wood box)

Today you'll learn how to create a cute graduation gift box using an unfinished wood.  It's great to give as a gift or you can use it as a center piece.  Let's get started.


Supplies:
Unfinished wood with a removable cover
Acrylic paint - black
Acrylic paint - color of your choice
Paint brush
Hot Glue Gun
12mm Rhinestone (clear/crystal)
DecoColor - Gold (fine tip)

Optional Supplies:
Buttons
DMC Floss


First gather your paint and unfinished wood box.  Paint the bottom of the box with the school color or any color you choose and paint the top (cover) black.


Take your top cover (black) and get your rhinestones.  With a hot glue gun add a dot of hot glue onto the lower part of the cover and add your rhinestone.  Continue this step until you cover the bottom rim of the cover.


Once that is complete, with your gold paint pen draw/write Class of 2015 on the top of the cover.


At this point you can hot glue on a button with a tassel in the middle of the box cover (optional).

And your done!
Hope you enjoyed this quick graduation gift box!


Have a Craftastic Day!
Julie @ Enchanted Lake

Thursday, April 23, 2015

Beautiful Flower Centerpieces

Hi there! Today I will be showing you how to make these beautiful flower pomanders.  They make excellent centerpieces for your upcoming grad or birthday parties, weddings, or just for your home!

You will need the following supplies:

- 1 qty. 5" Styrofoam ball
- 2 or 3 sheets of scrapbook paper, any color (I like the look of the ones with pearl finish)
- Victoria Lynn White Pearl Corsage Pins
- a flower punch, any brand or style
- 1 qty. glass candlestick
- E6000 glue


First, use E6000 to glue the Styrofoam ball to the glass candlestick.

Next, punch out your flowers.  You will use 2-3 sheets depending on how big the flower is and how close together you place them.  Use your finger nails to gently curl up the petals.

Use the corsage pins to attach the flowers to the Styrofoam ball.  I layered 2 flowers together in order to better cover the Styrofoam.


Continue until you cover all the Styrofoam.


These also look great hung.  Use a needle and suji to string through the Styrofoam and make a loop or use E6000 to glue the suji down.  They look nice hung in a cluster at different lengths.

Until next time, happy crafting!
Rachel @ Mapunapuna  

Sunday, March 31, 2013

Graduation Favor or Centerpiece ~ Personalized Fan

Aloha Crafters ~

Today's Idea & Inspiration is a Personalized Fan that can be used as a Graduation Favor or Centerpiece.

Our local Baldwin High School Yearbook Teacher Taryn Apo, was kind enough to email me some candid shots from their 2013 yearbook.


Supplies:
Paper Fan (30139465)
Mini Bowdabra (30075357)
Eclips Machine (30120535)
Eclips Baby Shower Cartridge (30120558)
3/8" Organza Ribbon with Satin Edge (school colors of choice)
Black Cardstock
Adhesive of choice
Scissors

Instructions:
Chose desired photos
Die-cut Paper Fan from Black Cardstock (We have a free use fan die-cut in the store that can be used when you purchase your paper here.)
Die-cut High School initials & Graduation Year (I used the Eclips Machine for the numbers)
Build & adhere Collage on paper die-cut fan using chosen photos
Adhere Collage to Fan
Adhere High School Initials to Collage
Make Bow from Ribbon using Mini Bowdabra
Adhere Bow to Fan
Adhere Graduation Year Numbers to Ribbon

Happy Crafting!
Robin @ Kahului