Showing posts with label acrylic paint. Show all posts

Thursday, February 18, 2016

How Wood You Decorate These?

Crankin’ Out Crafts, Episode 463 - Beach Signs


Watch as JFlo transforms unfinished wood into beautiful home decor using various paints and markers. 


Supplies Used:
Satin Paint by Americana
Ceram Coat Paints
Paintbrush
Montana Acrylic Marker
Starfish
E6000
Ribbon

Crankin’ Out Crafts, Episode 464 - Photo Holders

JFlo explains how to transform raw unfinished wood into cute photo holders and displays.


Project 1: Wooden Base Photo Holder
Chalky Paint
Paintbrush
Wire spray with seashells
Photograph

Project 2: Pallet
Ceram Coat Paints
Tim Holtz® Distress Ink Pads
E6000
Wooden clothespins
Starfish
Optional: Wire spray with seashells

Crankin’Out Crafts, Episode 465 - Pallets

JFlo shares creative pallet decor ideas.


Unfinished wooden pallet
Acrylic Paint
Paintbrush

Pallet 2:
Ubermatte Spray Paint
Ribbon
Montana Acrylic Paint Marker

Monday, June 1, 2015

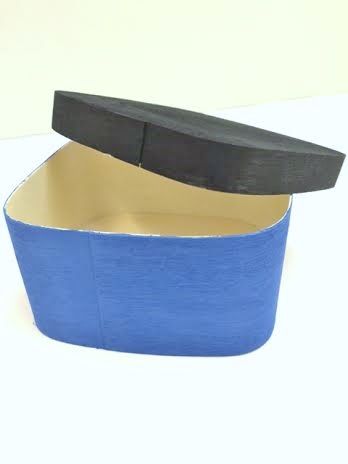
Graduation Gift Box (unfinished wood box)

Today you'll learn how to create a cute graduation gift box using an unfinished wood.  It's great to give as a gift or you can use it as a center piece.  Let's get started.


Supplies:
Unfinished wood with a removable cover
Acrylic paint - black
Acrylic paint - color of your choice
Paint brush
Hot Glue Gun
12mm Rhinestone (clear/crystal)
DecoColor - Gold (fine tip)

Optional Supplies:
Buttons
DMC Floss


First gather your paint and unfinished wood box.  Paint the bottom of the box with the school color or any color you choose and paint the top (cover) black.


Take your top cover (black) and get your rhinestones.  With a hot glue gun add a dot of hot glue onto the lower part of the cover and add your rhinestone.  Continue this step until you cover the bottom rim of the cover.


Once that is complete, with your gold paint pen draw/write Class of 2015 on the top of the cover.


At this point you can hot glue on a button with a tassel in the middle of the box cover (optional).

And your done!
Hope you enjoyed this quick graduation gift box!


Have a Craftastic Day!
Julie @ Enchanted Lake

Monday, May 18, 2015

Simple Clothespin Card/Picture Holder

Supplies:
Craft pick
Wooden Dowel (1/16" or 1/8" in diameter)
Mini clothespin
Glue gun


Lets Get Started:

Gather your craft pick or dowel and a mini clothespin. 


Add a dot of hot glue onto your craft pick or dowel and connect it to the back of the clothespin.


This is how it should look like:


At this point you can embellish your clothespin.  You can paint it with acrylic paint, mod podge with glitter, add washi tape and much more.


This card/picture holder is great for any occasion.
Here's an example of a centerpiece:


Have fun crafting this project!

Have a Craftastic Day!
Julie @ Enchanted Lake

Thursday, March 26, 2015

Liquitex Photo Transfer

Hi there! Photo transfer projects are very popular right now, so today I will show you how it's done so you can jump on this trend!

You will need the following supplies:
-Any size canvas, depending on the size of photo to be transferred
-Liquitex Gloss Medium and Varnish (can also use Liquitex Gloss Gel, Heavy Gloss Gel or Super Heavy Gloss Gel)
-Acrylic Paint
-Paint brushes
-A photo or magazine cut out (it will be destroyed so I don't recommend using originals unless you have duplicates)

First, place your photo on a nonstick surface.  I used a spare piece of glass. Brush the Liquitex gloss medium over your photo to adhere it. Apply several coats so you have a thick layer of medium.  Set it aside to dry.


While your gloss medium is drying, paint your canvas with a background that will match your photo. Keep in mind the photo transfer will be transparent so your background will show through.  For my project, I painted the canvas a solid color then painted a large peony on one side, leaving space for my photo transfer.


Set your canvas aside and go back to your photo.  When it is dry it will be completely transparent, not cloudy.  Carefully peel off your photo from the nonstick surface and place it in a bowl of water.  Let it soak for at least 10 minutes.


After it is completely saturated, take it out of the water.  Flip it over and gently rub off the paper.  You can use your fingers or a wet sponge.  Be careful so you don't rip the layer of gloss medium as it is very fragile.  Once all the paper is removed you will be left with your transfer.


Let the water dry or gently wipe dry with a paper towel.  Flip it back over so the side you just rubbed off the paper from is underneath.  Adhere your transfer to your canvas by placing it down where you want it then brushing over with more Liquitex Gloss Medium and Varnish.  I recommend using your fingers to smooth down the edges and any bubbles that might form.  Continue to brush the gloss medium over the entire surface.  Let it dry then enjoy your new masterpiece!


This project is perfect for a personalized gift or your own unique decoration.  The transfer can also be applied to wood for a more rustic, shabby chic look.


As a side note, our stores are hiring so if you're interested in working with crafts all day long then apply today!  See our website, http://hmstores.com/careers/ for more information.

Until next time, happy crafting!

Rachel @ Mapunapuna


Monday, February 9, 2015

How to Distress Unfinished Wood with Acrylic Paint

Supplies: 
SPC Unfinished wood (your choice)
Paint Brush
Acrylic Paint (2 colors)
Cup of Water
Paper Towel
Scratch Paper

Step One:
You can clean your SPC unifinished wood with a damp paper towel (optional). 


Choose your base paint and paint your wood.


Step Two:
Let your base coat dry. Squeeze your distress color (second acrylic paint) onto scratch paper. Dip your paint brush and brush your paint onto your scratch paper until paint looks a bit dry.

 
Step Three:
Brush along the edges of your wood until you are satisfied.


Once you are done let your paint dry.


And you're done!

Have a Craftastic Day!
-Julie @ Enchanted Lakes

Friday, May 16, 2014

Crankin' Out Crafts On the Road in Texas with JFlo - Episode 362 Fingerprint Flower Card


JFlo is On the Road and shows how to craft memories and capture a moment in time with fingerprints and friends. She recently visited friends in Georgia to create this unforgettable craft.

JFlo and friends make lovely Fingerprint Cards together

Catch our latest episode here: 

Supplies:
5x7 piece of card stock
pink acrylic paint 
purple acrylic paint 
green paper for leaves
micro pen
brown paper 
scissors 

We hope you enjoyed our Crankin' Out Crafts On The Road episodes this week! Stay tuned for more quick 'n easy crafts that you can do, too. Have a great weekend!

Tuesday, May 13, 2014

Crankin' Out Crafts On the Road in Texas with Mattie - Episode 361 Clay Pea Pods


This week, Crankin' Out Crafts goes on the road! Meet our new friends that will show us some great craft projects that you can make, too. Today, watch as our friend Mattie demonstrates how to use Sculpey clay and create peas in a pod.  

Our new friend Mattie from Texas and JFlo

Watch Mattie show us how to make these cute Pea Pods out of clay here on our YouTube Channel! Crankin' Out Crafts On the Road in Texas with Mattie - Episode 361 Clay Pea Pods

Supplies:
green Sculpey clay
Xacto Knife or Cutting Tool
Clay Mat
stylus (ball tool)
black acrylic paint or fingernail polish 
white acrylic paint or fingernail polish
scrap paper for paint or nail polish
aluminum foil
cookie sheet

*Don't forget to line your cookie sheet with aluminum foil before baking in the oven
*Bake clay at 275 degrees F, 15 minutes for every 1/4-inch thickness

Mahalo Mattie for sharing such an adorable and fun project! After Mattie's demonstration, she shows you some of her favorite clay charms. Follow her on Instagram @mattiemayfield28 to see more of her clay creations! 


Tuesday, February 11, 2014

RTD Wood Jewelry Holder

Create this cute RTD Wood Jewelry Holder by using any acrylic paint. 


Supplies:
RTD Wood Jewelry Holder
Acrylic paint brush set
Foam brush


Paint the inside of the cabinet a solid color (I used a turquoise blue). You can unscrew the hooks if you would like to get a nice even paint job. Once the inside is dry, screw them back in. You are going to want to give it two coats of paint. Paint the outside with black acrylic paint, make sure to give it two coats. use the same color as you used for the inside to paint designs on the sides. I did simple paisleys and swirls! Customize it with stickers, glitter and even Deco pens!


 Thanks for looking and CRAFT ON!!!!!!
~Deborah @ Market City

Monday, December 2, 2013

For those on your Naughty-cal List

We're going to take some time off from talking about Christmas decor today to talk about Christmas gifts. I know, it's not really a big leap, but gift giving IS an important part of the holidays, right? And on that note:

Check out these hand-made, cute, sea-loving totes! These chevron patterned, canvas totes are sold in gray and red, and all I had to do to make them gift-worthy is decorate them with some nautical flair.


One the first bag I painted a sand dollar using turquoise Ceramcoat acrylic paint. You can free hand your design like I did or use a stencil.


On the second bag I simply hot-glued some rope in an anchor shape. I would suggest using Fabri-tac to attach the rope if you're planning on washing the bag.

One little word of warning about these bags: they have a plastic lined interior which makes them great for taking to the beach, but unfortunately also makes them unable to stand up to heat. So that means no iron-on patches or transfer paper for these guys. Just stick to your normal paints and fabric glues to keep them, and your recipients, happy.

Now, who's ready for some nautical gift giving?

Puna @ Enchanted Lake

Monday, October 7, 2013

Clever Christmas Countdown


Yes, I know that many of you think it's too soon to be thinking about Christmas. I mean, we haven't even gotten to Halloween yet, right? But, if you want to be on top of your homemade Christmas, now is the time to start.


On that note, today's blog topic is this fast and easy "Days Til Christmas" counter. For the project you need either a plastic plate or a ready-to-decorate wood frame, chalkboard paint, multi-surface paint or acrylic paint, ribbon, scrap paper, Bistro chalk markers, chalk, double-stick tape, and a hot-glue gun.


This version has a spot for your favorite picture at the top. I painted the edges of the frame with Americana multi-surface paints, and the part with the counter, with the chalkboard paint. Around the picture is a frame of printed scrap paper and under it a quick bow. Use Bistro markers to write a more permanent "Days til Christmas" at the bottom of your chalk board, and the chalk to write in your daily count down. As of today, we have 80 days til Christmas.


Our second counter is on a plastic charger plate that we have in specifically for Christmas this year. Paint the chalkboard paint on the flat, center part of the plate. The cute bow at the top is simply hot-glued on. A note on the chalkboard paint: follow the directions closely. The paint will take 24 hours to cure before you can write on it with the chalk. The "Days til Christmas" saying is again written with the more permanent Bistro marker, and the countdown is in chalk.

80 days left til Christmas. Are you ready?

Puna @ Enchanted Lake

Thursday, October 3, 2013

BFC Fall Keiki Craft Class

Our Fall Keiki Craft Class starts October 7-11 from 10-12pm. This is a great opportunity for the keiki's to create awesome crafts and make great friendships.

Ben Franklin Mapunapuna Store will be having 2 Make n Take's on Saturday, October 5, 2013 from 11am-1pm.

Celebrate World Card Making Day with us! Make a card at the store for any occasion.

Candy Crush Craft: Are you a Candy Crush Addcit or know someone who is? Come in for a great Make n Take that will showcase your passion for Candy Crush! You can choose between a Smart Phone Plug Charm or a Candy, may you want to do both!


Fall Keiki Craft Classes at ALL STORES October 7-11, 2013 (10am-12noon)


This week-long program was specifically designed for kids 8 years and older to expand their imagination by utilizing tools and techniques in a fun & creative environment. By the end of the week, your child will go home with 10 unique projects for you to share with the rest of the family and treasure for a lifetime! Project Info: Mon, Oct.7 - Class Shirt / Fall Fan; Tues, Oct.8 - Monster Ball / RTD Pail; Wed, Oct.9 - Canvas Painting / TicTacToe Magnet Set; Thurs, Oct.10 - Halloween Mask / Wind Chimes; Fri, Oct.11 - Halloween Ornament / Halloween Lei. Sign-up today at any Hawaii BFC store. Fee $60 includes all supplies for 10 crafts. Space is limited! Click on image to download Registration Form. See stores for more details.

Thursday, September 12, 2013

Distressed Countdown Advent Cabinet


I had so much fun making this project. This Advent Calendar Cabinet is the perfect holiday decoration. Drawers are just big enough to hold little treasures so excited keiki's can count down the days until Christmas arrives.


Distressed Countdown Advent Cabinet by Beth
Tim Holtz Distress Stain
30143784 - UNF Cabinet 24 Drawers w/ Shutter
77501692 - Mod Podge
30141040 - Americana Multi-Surface Paint (Vanilla Shake)
30145457 - Joyous Tradition Paper scrapbook paper
30136620 – ½” EK Tools mini punch
James Button
Paint the cabinet with the color of your choice. Measure each drawer and cut 24 pieces of patterned paper to fit, mixing patterns and colors as desired. Punch a half-hole in the top edge of each piece to match the notches on the drawers. Use the stain to ink the edges around the cabinet. Mod Podge the cut paper to the drawers. Cut paper to fit the sides and back of the Advent calendar box; ink and adhere with Mod Podge.

Happy Crafting! Beth @ Mapunapuna BFC

Thursday, August 29, 2013

Haunted House Decoration

Here’s a great way to turn a wood birdhouse into a great haunted house centerpiece. These can hangers-on to great table decorations. 


Supplies:

Acrylic paint

Decoart Decoupage Gloss

Wood Birdhouse

Scrap paper – The Authentique Thriller paper is great to use

Double-sided tape

Pop Dots

Halloween ornaments/accessories

Shape punches

Tim Holtz's Distress Stain


Paint the birdhouse black. Let it dry. While it is drying, I looked through the Authentique Thriller paper to decoupage the house or using the scrap paper picked out to decorated the birdhouse. To give the paper a distressed appearance I ripped the paper and used the Tim Holtz’s stain. To finish it off I added a spider web and used grey acrylic paint on the roof. 

Happy Crafting! Beth @ Mapunapuna BFC


Tuesday, August 13, 2013

Evil Despicable Me Minion


Evil Despicable Me Minion Jar!


A few weeks ago we showed you how to make a Minion from the movie Despicable Me, now take a look at this purely evil Minion... He has crazy hair and everything!

You will need:
A mason jar
Purple acrylic paint
Bottle cap (I used a Snapple bottle cap)
Purple yarn
Black and white felt
One large googly eye
Fabri-tac

First, paint the inside of the jar purple. After the inside is dry, cut out his black overalls from felt and glue on with fabri-tac. Also cut a strip for the strap of his glasses and glue on. Paint the inside of the bottle cap with white acrylic paint and glue the googly eye into the center. Attach his bottle cap eye to the jar. To make the hair, use pieces of yarn tied at the base and brush it out with a hair brush to give it a troll look, glue it to the top of the jar. Last, cut out his evil spiked teeth from white felt and glue onto the jar. ISN'T HE JUST SO EVILY CUTE!

Thanks for looking and CRAFT ON! ~Deborah @ Market City

Tuesday, July 30, 2013

Sparkly Butterfly Mobile


Beautiful Sparkly Butterfly Mobile

I am thinking this would be GREAT for a baby's room, garden party decor, baby shower, weddings, graduations, adult rooms.... ( I would use it in my room!

Supplies needed:
2 Embroidery hoops. I used 9" and 5"
Acrylic paint
clear thread
Glitter
Cardstock
Hot Glue or Fabri-tac
Butterfly paper punch. I used a Martha Stewart punch


First paint the embroidery hoops (only use the solid ring from the inside of the hoop) and add glitter on the edges. Punch out a LOT of butterflies. I used 4 sheets of light yellow cardstock Begin gluing the butterflies onto the thread back to back, kind of making a sandwich with the thread in the middle. Only glue in the center of the butterfly because you will separate the wings once you are done. Tie the strings of butterflies to the hoops and assemble so it will hang even. Separate the wings and hang anywhere in your house!! You can add beads, pearls, glitter, fancy cardstock and even gems to give it an extra special touch!

Use rainbow colors of cardstock to give it a different look or even HOT pink and black for a sassy feel! Be creative and let your imagination play! 

Thanks for looking and CRAFT ON! ~Deborah @ Market City