Showing posts with label tissue paper. Show all posts

Thursday, June 4, 2015

Grad Party Centerpiece

Hi there! Today I'll be showing you an awesome centerpiece idea.  It's perfect for your upcoming grad parties but it's so universal you can make it for any celebration.

You will need the following supplies:

- Styrofoam ball, you can choose what size ( I used the 4" one)
- Tissue paper in at least 2 different colors ( I used 3)
- Glitter paper or metallic paper for cut outs
- white floral wire
- 1 BBQ skewer
- Hot glue gun
- serrated knife or Styrofoam cutter 


First, use the serrated knife or Styrofoam cutter to cut your ball in half.


 Next, cut your tissue papers into approximately 8" squares.  I cut each sheet in half and then cut those halves into thirds.  You can make them smaller if you want a little smaller centerpiece.  I used about 9 sheets per color. 


Take one sheet of tissue paper and pick it up from the center.  Pull the outside edges down and gather them.


Put hot glue on the center of the tissue paper and place on the Styrofoam.  You'll need to hold it there for about a minute so it doesn't fall. Alternate between the different color tissue papers.  The metallic I used is blue on one side and silver on the other so I used both sides instead of purchasing 2 different colors. That way, I had white, silver and blue. 


Continue, alternating colors until you cover the whole Styrofoam.


Now you can add your embellishments! I used the store die cut machine to cut out "2015," 2 large stars, and 2 small grad caps out of glitter paper.  I used a Marvy Uchida star punch to punch out smaller stars as well.  I used double sided tape to join the 2015 together and hot glued it to a BBQ skewer.  Then I glued each of the other cut outs to a piece of white floral wire that I cut at different lengths.  Poke them into the Styrofoam to arrange.  You can also add a photo of the graduate or school logo.  You can really add anything you want.


It makes such a great centerpiece and works for any occasion!

I hope you enjoyed this project and until next time, happy crafting!
Rachel @ Mapunapuna

Thursday, April 17, 2014

Balloon Boutique


We now have a new Balloon Boutique. Let us help create a fun balloon creation or you can make them yourself.


Come in to check out the many different ways to decorate for a graduation or your next special event. 

Beth @ Mapunapuna BFC

Friday, July 5, 2013

Crankin' Out Crafts Episode 266 - Tissue Paper Lantern


Turn those fun summer days into beautiful summer nights with today's crafty project.

Create a fun & colorful summer party lantern!


Supplies:
Paper lantern
Tissue paper in a lot of colors
Glossy Mod Podge
Paint brush
Scissors

When you're finished decorating your lantern, take some time to go over the empty spots with Mod Podge to give the whole piece a more even looking finish.

Tuesday, June 25, 2013

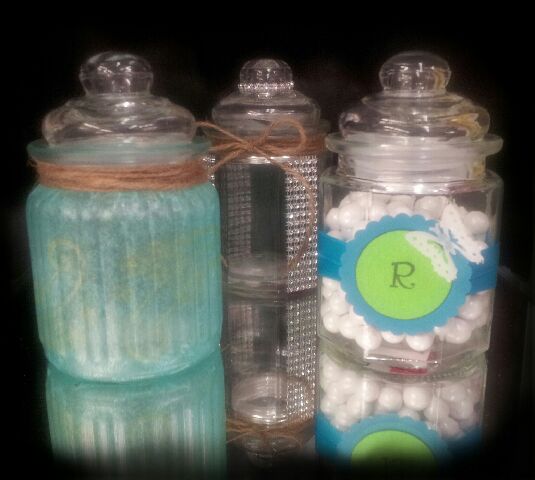
Small Glass Jar Decor and Party Favor Ideas!


These glass jars are perfect for any occasion! Fill them with candy for a party favor or drop a tea light in them with the lid off for a decoration. These are just a few simple and quick ideas on how to use these small Glass Canisters!


Translucent Blue Tissue Paper Glass Jar


You will need:
Tissue Paper 
Stamp 
Gold Stamp Pad
Mod Podge- Glossy 
Foam Brush
Hemp Cord 
Hot Glue
Glass Canister with Lid 

1.       Cut the tissue paper to fit the glass jar and stamp image on the tissue paper.
2.      Brush one coat of Mod Podge on the glass jar and smooth the stamped tissue paper on while it is still wet. Smoothing the bottom underneath the jar and the top of the tissue to the jar.
3.      Let dry for a few minutes and then give it one more coat of Mod Podge to seal it.
4.      Wrap the hemp around top of the jar and secure with glue


Monogram Glass Jar

You will need:
Satin Ribbon 
Two coordinating sheets of Cardstock 
Nesting circle punches about 1 ½” and 2” 
Butterfly Punch
Vellum
Double sided tape 
Glass Canister with Lid 

1.       Wrap the satin ribbon around the jar twice and secure in the front with double sided tape.
2.      Punch one 1 ½” circle and one 2” circle of coordinating paper.
3.      Write, print or stamp desired design or monogram on the smaller circle. And adhere the two circles together.
4.      Adhere the circles to the front of the jar where the ribbon is adhered. 
5.      Punch a butterfly out of vellum and use a small amount of double sided tape to stick it to the front.


Bling Glass Jar

You will need:
Hemp Cord
Gem Ribbon 
Glass Canister with Lid 
Hot Glue 

1.       Trim the Gem ribbon to the desired width and height of the jar. Adhere with Hot Glue on every other side.
2.      Trim one strand of the Gem Ribbon and adhere around the lid.
3.      Wrap Hemp cord around the top of the jar and tie in a pretty bow!


Thanks for looking and HAPPY CRAFTING! ~ Deborah @ Market City

Wednesday, April 11, 2012

Crankin' Out Crafts Episode 86 - Tissue Flowers

Today, we're continuing on with graduation decorations week. Create gorgeous billows of color at your next grad party with Tissue Flowers.

JFlo helps you create colorful party decorations with just a few supplies.


Supplies:
Tissue Paper
Scissors
Wire or Chenille Stems

These tissue flowers are sure to brighten up any room or event!