Showing posts with label mixed media. Show all posts

Wednesday, June 22, 2016

Summer Keiki Craft Camp 2016 - Mixed Media Projects

Summer Sun and Crafty Fun all rolled into one;
THAT is what Keiki Crafts is all about during this sunshine season!
We spent the second day doing Mixed Media art and making them into greeting cards
and envelopes.  It was a BIG HIT with the kids!  Colorful bubbles were everywhere!
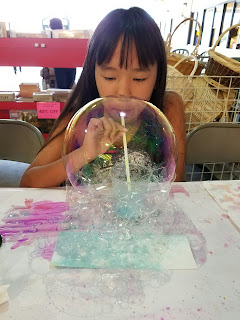
We mixed watercolors and alcohol inks into Miracle Bubble Soap to blow colorful bubbles onto our papers.   The bubbles fizzed, popped, foamed and overflowed onto the papers to create beautiful and whimsical shapes and designs in pretty pastel colors!  Remember when you used to mix that chocolate syrup into a cool glass of milk and then blew into your straw to make it bubble up to the rim of your glass?  We used this technique with the alcohol ink colored soap and let the bubbles overflow into our papers!

Mix alcohol ink and soap, then blow some fizzy bubbles!

Blowing rainbow bubbles creates a splash of pastel color!

Such a gigantic mountain of pink bubbles!
Big bubbles are a surprise!
Let the bubbles fall onto the paper!
 We also used crayons to draw and sketch on our watercolor and brushed on some watercolors to create a resist effect.  Wax and Water don't get along, so the result is a cool resist design!
Check out everyone's awesome watercolor art!

Here's everyone's masterpieces!
 If you're interested in learning about this amazing Keiki Crafts Camp, come into any of our stores
and we'll be happy to give you more info about it!  Sign up your keiki today!

Erika @ PC        

Wednesday, March 16, 2016

Distress Stain Postcard

Hi, Everyone!
 
Today, I'm going to show you how to do a really simple technique that involves the elusive Distress Stain inks that we have in our scrapbooking sections.  They're a product that something that kind gets looked over often and I wanted to start bringing them back into the "Crafter's Spotlight". 
I'll start off small.  5 x 7 inch to be exact.
 
I chose stains in Frayed Burlap, Stormy Sky and Weathered Wool.  I also have a .08 tip Micron pen for some hand-lettering. 
 
 
 I taped down a 5 x 7" watercolor postcard to my table with masking tape to keep the paper from bowing too much.  I put a wash down just to get the paper wet.  This is just so that the distress stains, which are water-based and can therefore be handled like watercolors, will flow freely without forming a harsh edge when dry.  Just make sure that your brush is sopping wet before doing so.  I then brushed on a little bit of Frayed Burlap. 
 
 
What I wanted to achieve was a somewhat tie-died look.  Soft edges and colorful patches that sort of "bloom" on your paper.  So, use a lot, but not too much water.  You'll see amazing colors flow out of each ink and they will just get more amazing as they dry like this little patch of Stormy Sky. So cool!


After the paper was completely dry, I added a little saying in Micron pen at the bottom right hand corner.  And that's all she wrote!  This is a very versatile technique that's great mixed media scrapbookers and watercolor artists.  It's a beginner technique that is great for making quick postcards to send to family overseas.  And as always, a quirky saying will make it 100 times more personal and cute.

 
Have fun!
Erika @ PC

Tuesday, July 29, 2014

NEW Paper Quilling Techniques!!

Try out the NEW line of Paper Quilling at Ben Franklin Stores! See how easy it is to create these cute cupcakes and other designs using Quilling Papers and a Quilling Tool


Supplies:
Quilling Tool
Quilling Papers
Quick Dry Tacky Glue


Step one:
Choose the design you want to create. Begin rolling the strip of paper around the quilling tool, holding the paper snug as you go.

Step Two:

Let the paper spiral un-ravel to the width you want. Glue the end of the strip to help keep its form. If you would like to make a tear drop shape, pinch one side of the circle. Make different shapes by pinching in different areas.


Step Three:

Glue shapes together to make your design! Use on Cards, Scrapbooks, Mixed Media and so much more!!!


 Thanks for looking and CRAFT ON!!!!!!

~Deb@ Market City


Friday, August 9, 2013

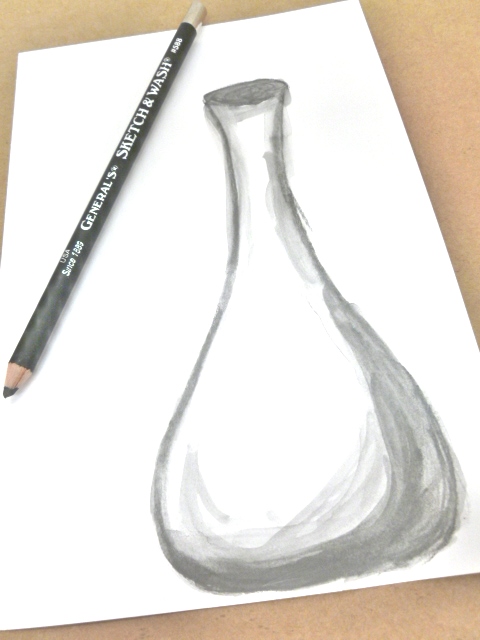
Crankin' Out Crafts Episode 280 - Water-Soluble Graphite Pencils


For our last "artsy" episode, Puna returns with a product that really washes away the competition.

Water-Soluable Graphite Pencils


Supplies:
Water-soluble graphite pencils or
Sketch and Wash pencils
Brush
Water
Mixed Media or Watercolor paper

These graphite pencils are great for taking with you outdoors to do quick sketches.

Wednesday, August 7, 2013

Crankin' Out Crafts Episode 279 - Elegant Writers vs. Micron Pigment Pens


JFlo joins us today to talk about a special washing technique using the Elegant Writer calligraphy pens and the difference between dye based ink and pigmented ink.

Elegant Writer vs. Micron Pigment Pens


Supplies:
Elegant Writer
Micron Pen
Brush
Water
Mixed Media or Watercolor paper

Use the Micron pen for the lines that you would like to be permanent, hard lines and the Elegant Writer for shading and washing.

Thursday, September 20, 2012

Crankin’ Out Crafts: Episode 155 – Tin-Embellished Frame


JFlo takes a frame to the next level by embellishing it with NEW Tin Strips and distress it with alcohol inks.  Watch how quick and easy it is to accessorize with this new product.

Add a decorative tin strip to a frame or vase for an elegant look!

 
Supplies:
Tin strips
Tin Snips
Citrus alcohol ink
Besides frames, the tin strips can be used also to embellish a glass block, vase, can and more. The alcohol inks in various colors really bring out the textures and patterns of the tin strips. Try out different color combos to create unique and distressed looks!
*Don't forget to take a look at today's previous post from Lynn at the Mapunapuna Bead Shoppe! She shows you the newest project that will be demonstrated - the beaded pomander keyring!

Wednesday, September 19, 2012

Crankin’ Out Crafts: Episode 154 – Tin-Embellished Home Décor


Make your own home décor for any season. JFlo demonstrates how to use Tin Strips with Black Canvas to create a trendy accessory for your home or office.

Embellish your home décor projects with our new tin strips!


Supplies:
4x4 Black Canvas
tin strip
tin snips
Bistro chalk marker – White
With these mini canvases, you can spell out a name, word, or favorite phrase!

Friday, July 20, 2012

Black Canvas


Aloha Crafters ~

Today's Idea & Inspiration is Black Canvas - what fun! Black Canvas allows light colors to pop and dark colors to go deep.
  • Use with paint, spray paint, paint markers, oil pastels & mixed media.
  • Great for stencil techniques.
  • Allow the canvas to show through to create edges and contrast.


Happy Crafting!

- Kahului BFC