Tuesday, December 26, 2017

New Year's Crowns!

Happy Tuesday, people! Christmas has passed us- and now we are headed straight to the New Year! New Year's Eve parties are a'coming, and I love to see all the cool decor and accessories that come. So, I have created simple crowns that you can wear to get that festive feel at home or at any New Year's party! All you need are a few different materials- chenille stems, glue, and rhinestones!


Materials

  • Chenille Stems (color of your choice, metallic colors preferred!)
  • Rhinestones, beads, pearls.. any embellishment of your choice!
  • Hot glue gun + glue sticks
Instructions
  • Take your chenille stems and create your base- 2 stems for a whole-head crown, and just 1 for a mini! You can either hot glue the ends together, or twist them together.

  • Next take a loose chenille stem, and fold it over to create a loop and 2 "tails"- make sure your 2 tails are fairly even in length.

  • Glue on your tails to your base, and glue the next loop on next to the first, overlapping the bottoms as desired.


  • Continue until your whole crown is complete, then glue on rhinestones and embellishments as desired!

  • Feel free to tweak lengths and sizes to create different style and effects! Happy crafting, and Happy New Year!


Tuesday, December 19, 2017

Nylon Flowers

Hello, and happy Tuesday once again! Christmas is already on Monday, can you believe that? It's insanity. Complete insanity. As per usual, I am now struggling to catch up on last-minute gifts, and this is a favorite craft of mine I always fall back on- nylon flower making! You can make simple to elaborate flowers, and turn them into hairpieces, floral arrangements- just about anything you can do with flowers, you can do with these!


Materials
  • Wire Cutters
  • Londy Wire
  • Nylon Thread (Nylon Sewing Thread)
  • Needle-Nosed Pliers
  • Low-temp Glue Gun + Sticks
  • Nylon Material/Tubing
  • Flower pistils/stamens (optional)
  • Solid, round cylindrical objects. (I used 2 sizes of stick glues here)
  • Floral Tape


Instructions
  • Starting with your wire and flower center beads, fold a small bunch of your beads in half, and wrap with wire.


  • Next, take your two cylinders, and these will be what we are using to create the petals. For this flower, you will need 3 small petals and 6 large petals. To create them, simply wrap the londy wire around the cylinder, and twist the ends together, trimming the excess, and leaving a wire tail about 1-2in long.


  • Then, after shaping all the petals, we'll need to wrap them in nylon. Take one of your nylon tubes, and stretch it over the wire frame, gathering all loose ends at the base of the petal, and bind with the nylon thread. Wrap the loose ends tightly, and firmly tug the string to snap it. Seal with a small amount of hot glue.


  • Take your 3 small petals and wrap the wire tails around the base of the flower center we made earlier in this pattern. Afterwards, wrap the remaining 6 large petals around the 3 small petals.


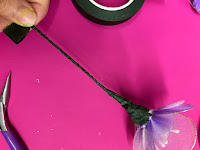
  • Finally, seal the wire with some hot glue- after it cools for a few moments, you can squish it down and compact it with your fingers. Use caution here! After this, wrap the stem with floral tape to hide the glue and wire, pulling tightly and covering the entire stem.


  • You are done! You can experiment with different petal shapes and layouts to create an endless variety of flowers- go crazy with your colors and shapes, experimenting will get you some very nice results. Enjoy! 


Saturday, December 16, 2017

PomPom Snowman

            Pompom Snowman


Material List:
White yarn
2 Sizes of pompom Maker (the biggest one)
Sharp Scissors
6” of turquoise satin Ribbon
Adhesive Rhinestone Colors: Black-Red-and Turquoise 6 mm
Pipe Cleaners Turquoise or a matching Blue
Fabric Tec


.


1- The pompom maker opens from both sides, open one side. Start to wrap the yarn around it. Make it as full as possible; just make sure you can close it.
2- Open the other side and do the same. Cut the yarn when done


3- You will need a 12” piece of the yarn
4- When both sides are fully covered with the yarn & closed. Take your scissors to cut down the middle of each side.
5- Take the yarn, put in the middle and tie real tight.
6- Then pull out the sides.


7- It will have some pieces that will be longer than the others. Cut and shape with your scissors
8- Make another one smaller or bigger
9- Tie the 2 ends together to form your snowman, may need to reshape again
10- Tie the ribbon around the middle between the 2 pompoms.to makes the scarf
11- Put a small amount of the fabric Tec on the back of the rhinestones (just to make sure they stay on)


Black Rhinestones are for the eyes
Red Rhinestones- for the nose
Turquoise Rhinestones -is for the buttons on his belly
12- With the pipe cleaner, roll the ends into a circle on both sides of the pipe cleaner. Make the ends come out just little to form an ear muff. Put on the end. If you want to put some Fabric Tec on the ends.

     I really enjoyed making the snowman, Hope you do too.


                Joy @ Hilo Ben Franklin

Tuesday, December 12, 2017

Little Lump 'o Coal

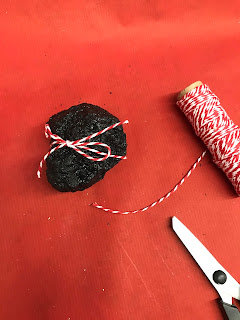
Happy Holiday! Christmas is fast approaching... like, light-speed. So, I thought of a fun stocking-stuffer! We sell geodes up at our registers for just $5, and kids (and adults!) just love smashing them open to reveal the lovely sparkles inside, so why not put a fun holiday twist on it? Turn it into.. a lump of coal! And don't forget- video their reactions for some great memories!


Materials

  • Black Paint
  • 2 Paintbrushes
  • Geodes
  • OPTIONAL Baker's Twine (or any ribbon of choice)


Instructions
  • First, take your first paintbrush and brush off all the excess powder and rock dust off your geode- if you don't, the paint may just fall off with the dust later! (You can also rinse your geode, but I was too excited to wait for mine to dry)

  • Next, simply paint the entire outer surface black. I did mine half at a time, and I painted two coats just in case!
  • Optional- wrap/tie the coal with a piece of baker's twine or ribbon- I prefer the baker's twine because it adds a simple touch, and gives it a bit of a comical air.


Monday, December 11, 2017

Cube Tree Ornament

Merry Christmas!
All of us at Ben Franklin are having so much fun decorating everything Christmas themed, from home decor, to ornaments, and from trees to centerpieces! Here is a quick tutorial on how to make a cube shaped "snow globe"!


Supplies: 
cube glass ornaments
powdered snow
E6000 glue
long pointed tweezers
festive red ribbon
oil based white paint marker
1 inch tall trees

optional: sea glass spray in 'ice' color


Spray very top of ornament with very light coating of 'ice' Sea Glass spray. This will make it look more frosted!
Use white oil based paint marker to make small dots over the top and the sides, to make it look like snow is falling!


Coat bottom of tiny tree with E6000 glue. Using tweezers, place tiny tree through the top of the ornament. 


 Add powdered snow!


Write 'Let it Snow' on the outside of your ornament with the oil based marker and adorn the top with your cute ribbon!
Ta Da!

Bethany @Enchanted Lake 

Saturday, December 9, 2017

Felt Piontsettia

                
 Felt Poinsettia


.


Material List:
Needle with a big eye
Green felt square
Red felt square
6 Pearls
Twine
Hot Glue

1-Trace and cut the Flower pattern out of the red felt


2- Trace and cut the 5 Leaf’s with the green felt


3- Take one petal; fold in 4 at the base. Sew in the back and make it tight. Do the same to all 5 petals.


4- Face the flower down with the back facing up.


5- Place one leaf in between the 2 of the petals. And so on. Do the same for all 5 leaves.


6-turn over so the front is face up. Glue one pearl in the middle of the flower, the other 5 around it.


7- Take the twine, fold in half and tie a knot at the end. Then glue the end to the back of your flower.


                      JOy @ Hilo Ben Franklin