Showing posts with label jute. Show all posts

Tuesday, April 25, 2017

Distressed Mason Jars

Mason jars!
The number of uses of this beloved jar has grown so much since its uni-tasking canning days.
(Bringing a little bit of Good Eats reference into this..😄)
Now it can be used as storage for small craft items or random doodads, soap dispensers for those
Urban or Industrial Chic bathrooms, and even plant pots!  We all need that simple and fresh look for the kitchen table, right?  What's better than a clear mason jar and some lovely flowers from the garden? (Or the neighbor's garden?)
Here, I have a way that you can add a little bit of Shabby Chic to your Mason Jar centerpiece.
Behold the basic technique of sand-paper distressing!


Here is a close up of a jar that was spray-painted with Chalky Finish spray paint in Morning Sky.
Gorgeous, isn't it?  It' s the perfect and elegant French blue tone for Spring!  Notice anything different about thatlittle distressed bit?  Right!  It has a tinge of penny-copper so that it looks like a distressed copper pot.  (Actually, it was Design Master spray paint in Rose Gold!)
Rose Gold and Copper just add that right amount of "antique" (antiquity?) to a craft piece.  It's both classic and modern with its pinkish metallic hue.   Here's a shot of the inside.

 
 All you need is a few spritzes!  It's best not to overdo it so that the paint doesn't all pool to the bottom.  The same goes for the outside of the mason jar.  After spraying the inside, turn the jar upside down and spray in light even coats.


Here are the two Spring-time Mason jars that I created using beautiful cool-toned pastel colors.
The one on the right is that perfect minty hue (Ubermatte's Mist), with its cover painted in rose gold once again.  As always, experiment, experiment.  Creativity stems from both inspiration and experimentation, so don't be afraid of those lovely mistakes.  It's trial and error!
Also, don't forget to have fun!

Erika @ PC

Tuesday, December 13, 2016

Simple Nativity Scene

12 days 'till Christmas already?!   WHAAAAT?
Yup, that's right! I hope everyone's holiday season isn't too crazy!
How's that holiday shopping? It seems to get harder and harder every year.
For those of you looking for an easy-peasy piece of holiday décor that would also
be great as a gift for a church-goer or who likes the sacredness of the Christmas season,
I have a beautiful and elegant wooden nativity scene!
All you need are a few salvaged items from your basic crafts pantry.
 
 
Supplies Needed
Jumbo Popsicle Sticks
Wooden Figures
Raffia
Jute Cord
White Felt
Wooden Bead
Rolled Paper Floral Wire
Snowflake or Star
Shell (optional)
Brown Stamp Pad (optional)
 
First, distress your popsicle sticks with a brown stamp pad.  It's really up to your personal style.  I wanted to give this a primitive and antique feel, but you can leave it plain if you'd like.  Second, hot glue all your sticks into a triangle form.  I made sure to make one flat so that it could stand on its own when not on a Christmas tree.  Next, I cut out a semi-circle piece of white felt for Mary's veil, then hot-glued the curve to the crown of her head.  I then cut a piece of the rolled paper wire for Joseph's can and curved the top to create a small cane.   For Baby Jesus, I cut a small piece of felt and wrapped it around a small wooden bead.  I hot-glued the little bundle into a tiny shell.  
 
After the Mary and Joseph figures were hot-glued onto the floor of the stable, I hot-glued a couple pieces of raffia on either side of the couple and then placed Baby Jesus at the very center.  To finish it up, I glued a "North Star" (snowflake) at the apex of the stable roof and then glued a piece of jute rope onto the back for hanging on a tree.
 
There you have it!  A cute little nativity that although primitive,
makes a great and meaningful gift. 
 
See you next week!
Erika @ PC


Tuesday, April 12, 2016

Anchor Wood Panel Art

Afternoon, Crafters!
Today I have a "Pin-spired" nautical-themed piece of art that can be re-created with just three items! Seriously!  It's an easy and fast gift for that ocean-loving friend or for yourself to use as some
really cool beach décor.
 
 
The only things you will need to make this is paint, a 9x12 inch wood panel and some jute rope.
You're going to need two or three colors of paint to create that ombre effect on your wood panel.  Darkest blue will go at the bottom, then you keep mixing in more and more white to tint that color as you move toward the top of the panel. 
Next, paint on an anchor in pure white, being sure to leave a little space at the top and bottom of it.  Hot glue a few strips of our new Studio G jute rope on to the top and bottom for some accenting texture and there you have it!
 
This is, again, a very fast and minimalistic piece of nautical art that can be "spruced up" and personalized quite easily.  Write a friend's or loved one's name on it.  Mod Podge some sequins onto the anchor.  Glue some shells or starfish on it. 
Create your own masterpiece!
 
 
Have fun!
Erika @ PC

Monday, November 18, 2013

I Twine All the Time

You know what I love? TWINE! Yes, twine, because twine is so versatile. You can use it to hang things or string things, or even to cover things. That's what we did today, see?


Yep, we just started carrying this 100 yard spool of twine at our stores. That's a lot of twine! We used it to wrap around these bottles and jars, AND a large ornament, AND had some left over. Do this with twine, it's so easy, and you'll have some lovely decor pieces when you're done.

Puna @ Enchanted Lake

Monday, October 14, 2013

Crankin' Out Crafts Episode 300 - Pumpkin Flowers


B-Dizzle drops in this week to show us a simple and beautiful craft to decorate your home or door with!  

Fun Halloween Flowers made with kraft bags


Supplies:
Kraft colored paper sacks
double stick tape
1/8" hole punch
twine or jute
decorative scrapbook paper
black paper
scissors
hot glue gun
glue sticks

Watch as she turns ordinary paper sacks into a cute Halloween decoration.

Monday, July 1, 2013

Gilded Wind Chime


Here's another smart summer craft for you to try out. It's called the gilded wind chime and it's easier to make than you think. You need 4 clay pots about 1.5"small, Americana multi-surface paints in your favorite colors, painter's tape, Martha Stewart liquid gilding (I used the brass color), 20mm wooden beads, a good length of jute, and scissors.


The first fun step is to paint and gild your pots. I ended up putting about 4 coats of paints on my pots (not nearly as bad as it sounds since they're so tiny), let them dry for 20 minutes, then taped off an angled portion at the top of the pot. Using a small paint brush, I brushed on the liquid gilding. I really liked the way the brush strokes of gilding looked over the color, so I left them a little rough, but it's pretty hard to see them in these pictures.


Next, grab your length of jute, I measured about 2 yards and folded it in half, but that was WAY more than I needed. Anyway, take your jute and tie a knot in it about 6 inches from the top of the loop. It kind of looks like this. Next, your going thread your jute through the hole in the pot, and make another knot right above the pot to keep it all in place.


Now, start adding your beads. You really need to make sure that your wooden bead will sit inside your pot so that when the wind blows the bead will make your pot ring. When you have the bead situated, just make another knot under it to keep it in place.


To add the next pot, simply thread it onto the jute and tie a knot where you want the pot to sit. Add the second bead exactly the way you added the first one. If you want to, you can put a little bit of glue (I used Fabri-tac) to hold the beads onto the knots to keep them from slipping. I like to be extra careful with stuff like this.


My finished wind chime had a total of 4 pots, but I didn't put a bead in the last one because it acts as a weight to keep the jute taut and the beads swinging. These little terracotta bells actually have a very nice sound.

I hope you liked the post. If you want to come and listen to my wind chime, you should visit me here at the Enchanted Lake store.


Puna

Tuesday, June 25, 2013

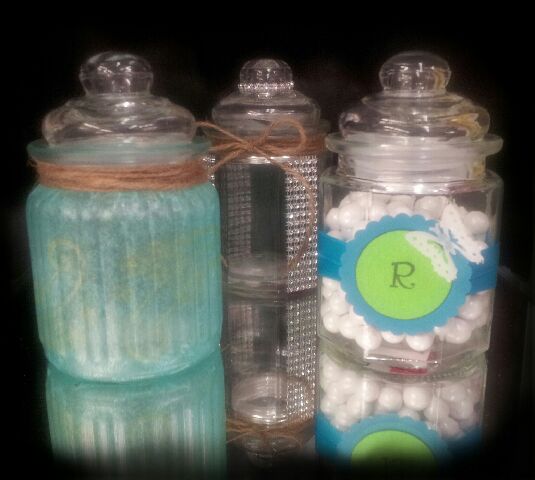
Small Glass Jar Decor and Party Favor Ideas!


These glass jars are perfect for any occasion! Fill them with candy for a party favor or drop a tea light in them with the lid off for a decoration. These are just a few simple and quick ideas on how to use these small Glass Canisters!


Translucent Blue Tissue Paper Glass Jar


You will need:
Tissue Paper 
Stamp 
Gold Stamp Pad
Mod Podge- Glossy 
Foam Brush
Hemp Cord 
Hot Glue
Glass Canister with Lid 

1.       Cut the tissue paper to fit the glass jar and stamp image on the tissue paper.
2.      Brush one coat of Mod Podge on the glass jar and smooth the stamped tissue paper on while it is still wet. Smoothing the bottom underneath the jar and the top of the tissue to the jar.
3.      Let dry for a few minutes and then give it one more coat of Mod Podge to seal it.
4.      Wrap the hemp around top of the jar and secure with glue


Monogram Glass Jar

You will need:
Satin Ribbon 
Two coordinating sheets of Cardstock 
Nesting circle punches about 1 ½” and 2” 
Butterfly Punch
Vellum
Double sided tape 
Glass Canister with Lid 

1.       Wrap the satin ribbon around the jar twice and secure in the front with double sided tape.
2.      Punch one 1 ½” circle and one 2” circle of coordinating paper.
3.      Write, print or stamp desired design or monogram on the smaller circle. And adhere the two circles together.
4.      Adhere the circles to the front of the jar where the ribbon is adhered. 
5.      Punch a butterfly out of vellum and use a small amount of double sided tape to stick it to the front.


Bling Glass Jar

You will need:
Hemp Cord
Gem Ribbon 
Glass Canister with Lid 
Hot Glue 

1.       Trim the Gem ribbon to the desired width and height of the jar. Adhere with Hot Glue on every other side.
2.      Trim one strand of the Gem Ribbon and adhere around the lid.
3.      Wrap Hemp cord around the top of the jar and tie in a pretty bow!


Thanks for looking and HAPPY CRAFTING! ~ Deborah @ Market City

Monday, April 8, 2013

Pinspiration Pinterest Party


Our portion of the blog for the next few weeks is going to be focusing on projects we're featuring in our Pinspiration Pinterest Party. The party is taking place on April 27th, right here at our Enchanted Lake Ben Franklin from 10:00am - 2:00pm. Join us that Saturday for the following make 'n takes plus some great demonstrations, awesome prizes, and a lot of fun.


These wrap bracelets are everywhere on Pinterest now, but it can be difficult sometimes to find a good tutorial. Instead, you could come to our store on April 27th and make your own under the watchful eyes of one of our crafters for just $8.00. That's way better than buying one for $20+.


How about a memo center that adds to the decor in your home instead of clashing with it? Make one of these to match your scheme for only $8.00. The project only takes about 20-30 minutes as long as you're a quick color picker.


Last but not least, what about something to perk up your party? How about a colorized centerpiece made to look like sea glass? You can join us on April 27th and create your own Faux Sea Glass centerpiece for just $3.00. Believe it or not these are made with food coloring and Elmer's Glue, and look great out in the sun.

We certainly hope that you can make it to our fun event. If you need more information or you have any questions please ask us at the Enchanted Lake store. We'll give you the latest news, fees, and project times.

Puna @ Enchanted Lake

Wednesday, November 21, 2012

Mason Jar Gift Ideas

Mason Jar Gift Ideas!

It is time to get to crafting on those presents ya'll! The great things about Mason Jars is they can hold all and display all kinds of wonderful things..with some love, a mason jar, a decorated lid a gift tag....you can't go wrong in my book.
In the past I have filled mason jars with dry ingredients for hot cocoa, cookies, s'mores, brownies, trail mix and such, which is always fun and a cool look with all the layers.  Bath salts and infused sugars are also very nice.

Here's what I'm trying this year:

A little colored sand, sea shells, and votive on the inside, and some jute and shells glued at the open top lid..it's not a brand new idea obviously and very easy, but I just love how it turned out!  You can even through a flameless candle in there to make it more versatile.  A great gift, favor, centerpiece or accent to your home.

This Jar is filled with all your sewing goodies.  The lid is stuffed with a little bit of polyfil and covered in felt for the perfect pin cushion. You could add a monogram or other personalized touch...a great gift idea for any crafter!


Tuesday, August 14, 2012

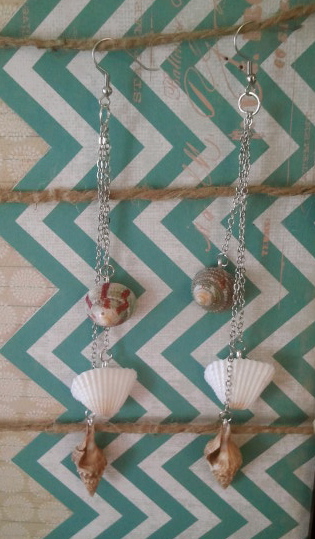
Seashells by the Seashore Picture Stand and Jewelry Hanger


I am so excited about all the beautiful seashells we have in-store...so many seashells, so many possibilities.  This seashell picture hanger is a decorative way to display pictures, postcards, jewelry and more.  Take a 12x12 picture frame, replace glass with decorative card stock.  Glue jute, twine or ribbon to the sides of your frame carefully with a hot glue gun.  Decorate mini-clothes pins with shells (using hot glue or E600 glue) and clip onto the jute.  Now you have a beautiful display for your home or office, and you can change out the pictures and the background paper whenever you like!


Great idea for wedding memories.  Why chose one picture to put in a frame to remember your special day when you can pin up multiple photos, your invitation, vows and other memories!  You could even use wrapping paper from one of your favorite gifts, or your wedding program/invitation for the background paper.


Use a black Deco pen to personalize seashells.  Glue a shell directly on the frame, or onto a magnet (for a metal frame/surface or refrigerator) with E600 glue.  I can't wait to share these magnetic shell greetings with my friends and guests from the mainland!


I am so excited about these bohemian-beach-chic shell earrings.  No drilling required!  The shell picture hanger design makes an awesome display for your earring collection too!