Showing posts with label beads. Show all posts

Monday, January 1, 2018

Sea Glass & Starfish Light Catcher

Happy Monday!
Let's have fun this week with some tropical sea glass mobiles! After all, Kailua is a beach town! I was inspired by the ombre sea glass colors available at HouseMart Ben Franklin and thought this mobile would be great for a baby's room or even outside the front door to greet guests as they enter the house!
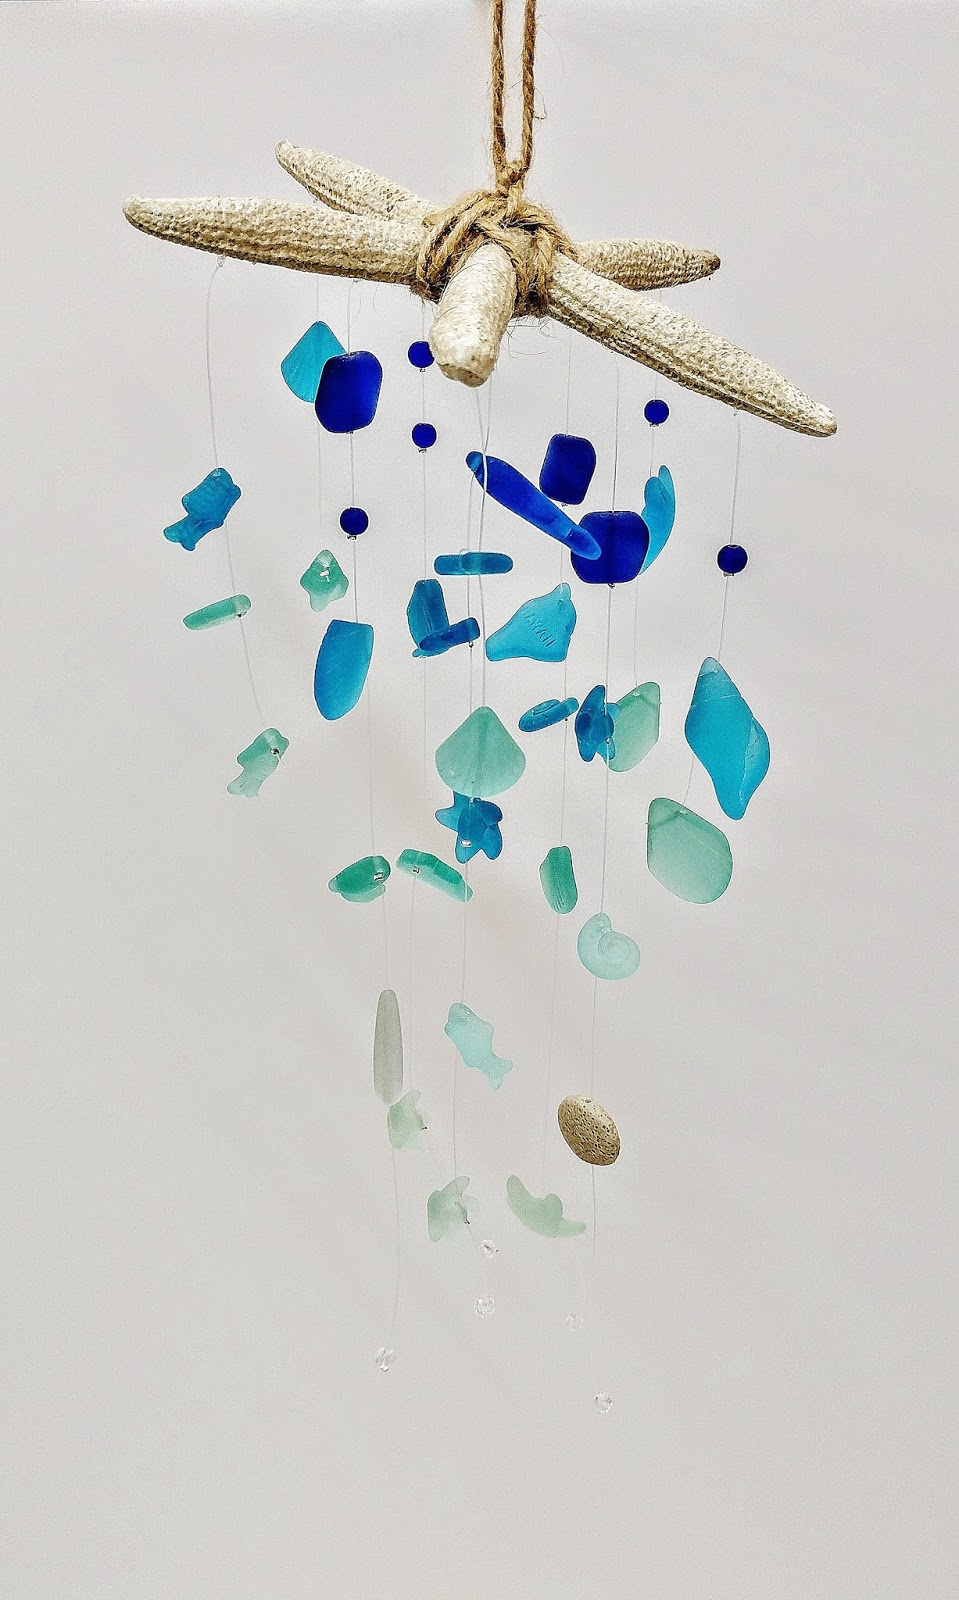


Supplies:
Resin starfish (a real one would break)
clear beading plastic string or fishing line
scissors
small silver crimp beads
hand held crimper
assorted bags of sea glass
jute

First I tied 2 strings to each starfish leg that were 2 feet long. Then I started with the darkest blue of sea glass and put the bead through on to the string, and finished each bead off by placing a crimp bead, and using my hand held crimping pliers, flattened out said crimp bead so that the sea glass couldn't slide down the string! I kept stringing and crimping, going from dark to light. I put more beads on the center strings, and as I went down, I spaced out the beads further and further from each other. 

One of the sea glass strands came with a sand textured bead as well as small clear sparkling faceted beads, which I incorporated into the ends of the mobile so that they looked like water crystals. This was really fun to make, and using those crimp beads made a world of difference!

When I finished, I trimmed all the excess strings off the ends, and secured the center of the starfish with jute so that it could hang from the middle.

Have fun making your mobiles! Feel free to make different kinds using different beads, or even get crazy with it and use felt flowers! Have a great week!

Bethany @ Enchanted Lake


Tuesday, February 16, 2016

Crankin' Out Crafts - We Sell Seashells At The Craft Store


Crankin' Out Crafts - Episode 461
Floating Sunrise Shell Pendant

Lynn makes a floating pendant by adhering an L Bell component onto the back of a sunrise shell. So easy to do for yourself!


Click here to watch this Crankin' Out Crafts episode

Supplies Used:
Sunrise shell
UV Resin
UV Resin Lamp
Chain
Hair gomu part (half tube)Optional: Rubbing alcohol


How to Wire Wrap a Shell
In this episode Lynn shows you a basic technique of wire wrapping a scallop shell.


Supplies Used:
Scallop shell
14” thick wire
Ruler
Round nose plier
6-Step bail making plier


Wednesday, February 10, 2016

Beaded Heart Charm

Hey, crafters!   Valentine's Day is right around the corner and we're all
 looking for small gifts to make for our friends and families.  If you're looking for something 
to make that is unique and straight from the heart, how about a cute handmade keychain?  
We will be having a special demo tomorrow for a Beaded Heart Charm!  It's going to be from 12:30 to 1 pm at the Pearl City location. 

This demo is completely free and our beading instructor, Gayle, will be happy to answer any questions you may have, so come check us out!
Don't forget you can also cruise around the store for some ideas on last-minute Valentine's cards, scrapbook pages and various other crafts.

See you tomorrow!
Erika @ PC

Tuesday, January 5, 2016

Crankin' Out Crafts - Bead Shoppe Fun With Lynn

Let’s learn from Lynn, straight from the Bead Shoppe inside of HouseMart Ben Franklin Crafts Māpunapuna.  She explains how to make a Button Wire Ring, No Hassle Tassel and Boho Style Stretchy Bracelet in these three Crankin' Out Crafts episodes.


Crankin’ Out Crafts - Episode 449 
Get your zen on with an easy wire ring project! Lynn is back to show you how to use a ring mandrel to make simple but stylish ring! 


Crankin' Out Crafts - 
Episode 550
Tassels are all the rage and Lynn goes step by step with the Beadalon Tassle Maker! 


Crankin' Out Crafts - Episode 551 
An easy beading project, Lynn shares some tips on how to make a classic design that has been updated with trendy components!


Monday, October 28, 2013

Resin-ating Everything

You may have seen a lot of posts lately about our new UV Crystal Resin that we are now carrying in our stores. That's probably because this product is so super cool that all of us are excited about using it. I personally like this resin because it makes making classy jewelry amazingly easy and, well, classy looking. Also, as you will soon find out, it is gloriously versatile in the things that can be done with it.


This lovely Parisian looking piece is a cell phone charm straight out of a kit. The kit includes everything that you see (plus more) and everything you need to make this chic charm.


This pendant borrows an idea from the lovely Beth at our Mapunapuna store. I was so in love with her sprinkle pendant that I just had to make one for myself. I mean, who doesn't love candy?


This nautical stunner was made by our very own Toni and is a purse hook. I'm thinking handmade Christmas gifts for all those large handbags that my friends frequently tote around. 


And this piece, believe it or not, is a jelly jar lid. This is another great gift idea for Christmas. Give to your friends who need a small jewelry holder that is just as elegant as their jewelry.


What did I say? Totally versatile, right? I'll expect to see you all in our stores soon to get your hands on some awesome resin-ating fun.

Puna @ Enchanted Lake

Scroll down for fun with Popsicle sticks for the holidays on Crankin' Out Crafts!

Sunday, August 25, 2013

Bezel Resin Pendants

Aloha Crafters ~
Today's Idea & Inspiration is a trio of Bezel Resin Pendants. These pendants were made using our new Bezel Pendants and Jewelry Resin. Lani, our talented associate filled two with glitter and the third with beads. There are any number of objects that can be added to jewelry bezels to create an endless array of patterns and textures. Paper and photos can be inserted, and pigments, dyes, metallic powders, oil & acrylic paints can also be added.
Supplies:
  • Jewelry Resin (30139371)
  • Beveled Pendants (sq = 30142770) (oval = 30142774)
  • Beads of choice
  • Glitter of choice
Instructions:
  1. Measure & Mix resin accurately according to Jewelry Resin packaging.
  2. Pour a small amount of mixed resin into bezel.
  3. Place objects where desired.
  4. If bubbles appear, pop with toothpick.
  5. Fill bezel with resin slightly higher than the rim.
  6. After curing, trim and sand edges.
Happy Crafting!
Robin @ Kahului

Thursday, April 25, 2013

Crankin' Out Crafts Episode 243 - Beaded Bookmark


Know a Mom who loves to get immersed in a good book? Puna will show you a super fast gift perfect for an avid reader.

Does your mom love to read? Make an elegant bookmark for Mother's Day!


Supplies:
Organza ribbon
Beads
Scissors
Darning needle

This simple craft is something that even young children can help to make and Mom is sure to love.

Monday, April 8, 2013

Pinspiration Pinterest Party


Our portion of the blog for the next few weeks is going to be focusing on projects we're featuring in our Pinspiration Pinterest Party. The party is taking place on April 27th, right here at our Enchanted Lake Ben Franklin from 10:00am - 2:00pm. Join us that Saturday for the following make 'n takes plus some great demonstrations, awesome prizes, and a lot of fun.


These wrap bracelets are everywhere on Pinterest now, but it can be difficult sometimes to find a good tutorial. Instead, you could come to our store on April 27th and make your own under the watchful eyes of one of our crafters for just $8.00. That's way better than buying one for $20+.


How about a memo center that adds to the decor in your home instead of clashing with it? Make one of these to match your scheme for only $8.00. The project only takes about 20-30 minutes as long as you're a quick color picker.


Last but not least, what about something to perk up your party? How about a colorized centerpiece made to look like sea glass? You can join us on April 27th and create your own Faux Sea Glass centerpiece for just $3.00. Believe it or not these are made with food coloring and Elmer's Glue, and look great out in the sun.

We certainly hope that you can make it to our fun event. If you need more information or you have any questions please ask us at the Enchanted Lake store. We'll give you the latest news, fees, and project times.

Puna @ Enchanted Lake

Sunday, January 6, 2013

Beaded Bow Necklace


Aloha Crafters ~

Today's Idea & Inspiration is a Beaded Bow Necklace.

Supplies:
  • Beads
  • Wire - 24 gauge
  • Chain
  • Clasp
  • Jump Rings
  • Thread – similar to bead color
  • Jewelry pliers
  • Scissors
  • Sewing Needle
Instructions:
  1. Cut 9” wire, make tiny loop at end with pliers
  2. String 3” of wire with beads
  3. String end of wire through tiny loop at other end of wire
  4. String another 3” of beads
  5. String end of wire through tiny loop again
  6. Wrap wire around center 2-3 times then trim
  7. Cut thread about 12”, tie knot at end that will not slip through beads
  8. String 1 bead, go back through the same way (making it a stop bead)
  9. String 4” of beads onto thread, tie off
  10. Thread excess thread back up through beads
  11. Tie strand of beads around center of wire bow (you may wish to glue or sew in place)
  12. Attach jump rings to bow than chain
  13. Attach jump rings to other end of chain, attach clasp
Happy Crafting!

Saturday, November 3, 2012

Beaded Christmas Ornament Cover

Aloha Crafters ~

Today's Idea & Inspiration is a Beaded Cover for a Christmas Ornament.

SUPPLIES:
  • Hard Beading Needle ~ 30061220
  • Beadalon Wildfire ~ 30131631
  • Miyuki 11/0 crystal AB ~ 30130302
  • 3mm Bi-Cone Crystal AB ~ 30037017
  • 4mm Bi-Cone Crystal AB ~ 30037077
  • 5mm Bi-Cone Crystal AB ~ 30051077
  • Crystazzi 8mm Crystal AB Drop ~ 30095075
  • Crystazzi 6mm Crystal AB Oval ~ 30095036

Instructions:
Cut 1 yd Wildfire
String 1 Seed Bead.  Sew through bead again (this creates a stopper bead). Leave 3-4” tail.
ROUND 1 ~ String 34 more Seed Beads (for a total of 35), form circle by sewing the same direction through the 1st strung bead.


ROUND 2 ~String 7 Seed Beads, 1 – 3mm Bi-Cone, 7 Seed Beads. Sew through 7th Seed Bead in Round 1. Repeat stringing pattern and sew through 14th, 21st,  28th  & 1st Seed Beads in Round 1.

ROUND 3 ~ Sew down through 1st 7 Seed Beads & 3mm Bi-Cone. String 9 Seed Beads, 1 – 3mm Bi-Cone, 9 Seed Beads. Sew through 2nd Bi-Cone. Repeat stringing pattern and sew through 3rd, 4th, 5th & 1st 3mm Bi-Cones.

ROUND 4 ~ Sew down through 1st 9 Seed Beads & 3mm Bi-Cone. String 11 Seed Beads, 1 – 4mm Bi-cone, 11 Seed Beads. Sew through 2nd Bi-Cone. Repeat stringing pattern and sew through 3rd, 4th, 5th & 1st 3mm Bi-Cones


ROUND 5 ~ Sew down through 1st 11 Seed Beads & 4mm Bi-Cone. String 15 Seed Beads, 1 – 4mm Bi-cone, 15 Seed Beads. Sew through 2nd Bi-Cone. Repeat stringing pattern and sew through 3rd, 4th, 5th & 1st 4mm Bi-Cones

ROUND 6 ~ Sew down through 1st 15 Seed Beads & 4mm Bi-Cone. String 19 Seed Beads, 1 – 4mm Bi-cone, 19 Seed Beads. Sew through 2nd Bi-Cone. Repeat stringing pattern and sew through 3rd, 4th, 5th & 1st 4mm Bi-Cones

ROUND 7 ~ Sew down through 1st 19 Seed Beads & 4mm Bi-Cone. String 19 Seed Beads, 1 – 5mm Bi-cone, 19 Seed Beads. Sew through 2nd Bi-Cone. Repeat stringing pattern and sew through 3rd, 4th, 5th & 1st 4mm Bi-Cones

ROUND 8 ~ Sew down through 1st 19 Seed Beads & 5mm Bi-Cone.
*1st Dangle ~ String 4 Seed Beads, 1 4mm Bi-Cone, 1 Seed Bead, 1 5mm Bi-Cone, 1 Seed Bead, 1 4mm Bi-Cone, 2 Seed Beads, 1 8mm Drop, 1 Seed Bead. Sew back through 8mm Drop, 2 Seed Beads, Bi-Cones & 2 Seed Beads. String 2 Seed Beads. Sew through 4mm Bi-Cone that initiated this Dangle.

String 19 Seed Beads, 1 – 5mm Bi-cone
2nd Dangle ~ String 4 Seed Beads, 1 6mm Oval, 2 Seed Beads, 1 4mm Bi-Cone, 1 Seed Bead. Sew back through 4mm Bi-Cone, Seed Beads, Oval & 2 Seed Beads. String 2 Seed Beads. Sew through 5mm Bi-Cone that initiated this Dangle.
String 19 Seed Beads, sew through next 4mm Bi-Cone.

Repeat from * until all the way around. Tie off and sew tails through beads.

Note: Add more thread as needed. Knot together and thread through beads.

 Happy Crafting!

Friday, June 1, 2012

Designer White & Black Bracelet

Aloha Crafters ~

Today's Idea & Inspiration is a White Bead & Black Ribbon Bracelet. One of the fun things about crafting, is being able to interpret a designer piece for a fraction of the cost of the original.

I used white beads and black picot ribbon, but the color and shape possibilities for this style are endless.

Supplies:
  • 10-15 Beads depending on size
  • Ribbon the same width of the beads
  • Thread to match ribbon
  • Needle that will fit through bead hole

Instructions:
  1. Cut 36" of thread, thread needle, knot ends together.
  2. With ribbon on spool, leave a 12" tail of ribbon, thread your needle through ribbon.
  3. Make a loop the width of your bead, sew through.
  4. String bead on thread.
  5. Make another ribbon loop, sew through.
  6. Continue stringing beads and looping ribbon until you have your desired length.
  7. Tie knot and then bow. Cut ribbon.

Happy Crafting!

-Kahului BFC


Friday, May 4, 2012

Give MOM the Royal Treatment ~ Window Display


Aloha Crafters ~

Mother's Day is Sunday, May 13th. Ben Franklin Crafts offers some GREAT GIFT IDEAS. What mom wouldn't love a chocolate fondue pot or a bouquet of flowers? Or you could make her a quick bracelet from the matching bead sets we offer in our bead shop. Unique and fun gifts are available all over our stores, just let your imagination run wild.

Pictured:
Wilton Chocolate Pro (30089044)
Solid Oak Deluxe Bead Loom (30110510)
Vintaj Big Kick (30123340)

Happy Crafting!

-Kahului BFC

Thursday, March 8, 2012

Mapunapuna Bead Shoppe Blast

Join us for the Bead Shoppe Blast at Mapunapuna BFC on Saturday, March 17th from 10am to 2pm. We'll have beading demos, Make 'n Takes, and specials during the event.


Visit the Bead Shoppe for more details and to see project samples. Hope to see you there!

*Don't forget to read today's earlier post from Lynn on the Serpentine Bracelet.

Friday, January 13, 2012

Crankin' Out Crafts Episode 51 - Beaded Earrings

We're finishing up our Jewelry Week episodes today. In this episode, Brandon teaches you how to make easy Beaded Earrings. Make a pair to match your favorite outfit or to give as cute favors/gifts to family and friends!

Watch as Brandon creates easy earrings with just a few supplies!


Supplies:
Headpins
Jesse James Beads (make sure the hole in at least 2 beads are small enough for the bead to sit on the head of the headpin)
Needle-Nose Pliers
Round Nose Pliers
Cutting Pliers
Fish hook earrings
 
Thank you so much for watching our Crankin' Out Crafts Episodes and we appreciate your continued support! We enjoy thinking of new craft products and love sharing them with all of you. Have a great weekend and have fun crafting! See you again next week for our next set of episodes.

Wednesday, January 11, 2012

Crankin' Out Crafts Episode 50 - Quick Link Linking

Ever wonder how those Quick Link bracelets are made? There are no splits or openings in the links! Puna shows an easy way to connect all these quick link shapes to create a bracelet.

See how easy it is to create your own Quick Links Bracelet!

Here's the link to the Episode: Crankin' Out Crafts: Episode 50 - Quick Link Linking

Supplies:
Quick Links (whatever shapes/sizes you want)
Connector Clamps
Flat Pliers
Beads
Magnetic Clasps

We'll be back Friday for our last Crankin' Out Crafts Jewelry creation!

Monday, January 9, 2012

Crankin' Out Crafts Episode 49 - Easy Quick Link Earrings

Our theme this week is all about Jewelry! You can make your own jewelry to wear yourself or to give as gifts. Today, Brandon demonstrates how to make Easy Quick Link Earrings.

Brandon shows you how to create the quickest set of earrings with Quick Links!

View the video on our youtube channel: Crankin' Out Crafts: Episode 49 - Easy Quick Link Earrings

Supplies for this project:
Quick Links (2 circle & 2 smaller oval links to hang in each circle)
Fish Hook Earrings
Nose Pliers

All supplies available at our BFC stores. Check back Wednesday, for another jewelry project!

Friday, August 5, 2011

Whatcha doing this weekend?

Looking for something fun to do or just want to learn something new? Spend your weekend with us at BFC! Here's a list of events going on at our stores:

Join us at ALL HAWAII BFC LOCATIONS for the following:
Saturday, August 6
10:30am-11am - Free demo on how to use the Cinch Bindery Tool
11am-12noon - Make 'n Take creating the Candy Stick Bag Favor (Fee 50¢)
Samples pictured below:


12-12:30pm - Free demo on how to create your own Menu Board

Sunday, August 7
11-11:30am: Free demo on Soy Paint
12-12:30pm: Free demo on new items by Wilton - Shape Punches!

at PEARL CITY BFC: Feather Hair Extensions
Saturday, August 6 from 1:30-3:30pm
 

It's the latest fashion trend - Express your own style and learn how to add colored feather hair extensions to your hair! (Fee: $4 + supplies)

at MAPUNAPUNA BFC Bead Shoppe:
Saturday, August 6 from 2-3pm: Cupcake Charm with Packaging Demo


Sunday, August 7 from 2-2:30pm: Beading Box Demo


And don't forget to watch a new episode of Joy of Crafting on Sunday, 6:30pm on OC16. Visit our website www.benfranklinhawaii.com for a listing of more events or to download our store calendars. Have a good weekend everyone and hope to see you at BFC!

Tuesday, July 19, 2011

Crafty Summer Night at Market City

Aloha!


Market City invites you to join us on Saturday July 23rd for our "Crafty Summer Night" event. From 4pm to 7pm our talented staff will demonstrate and teach you many crafty tips for your upcoming events!


Come learn how to make to Kokeshi doll treat box!


Join Nicole for tips on how to decorate fabric! Learn helpful hints on how to decorate a canvas bag with "Hello Kitty" style! Add flowers and rhinestones perhaps even some ribbon bows for accents.
Interested in the Feather hair extentions? So are we! Join Chris as she demonstrates how to put these lovely feathers in your hair to add color and flavor to your style! One great way to express yourself with hints of zebra stripes, hot pink, or subtle peacock aqua colors!


So mark your calanders for Saturday September 23rd starting at 4pm and come prepared to learn and be inspired to craft! With these helpful tips and many more your event will never be the same!


Aloha! Can't wait to meet you,


Tanya