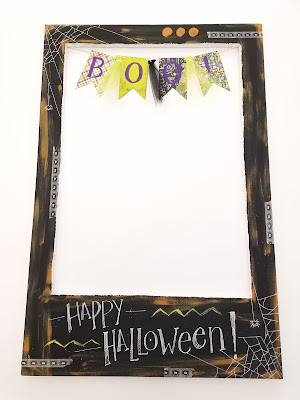
If you haven't started planning your Halloween party yet, it's time to get started!
Today, I have a fun and easy project that's sure to please friends and family of all ages.
This generation seems to be all about instant photos again. Polaroids have made a comeback in
a BIG way, the technology being even more popularized by Fujifilm's Instax camera series.
Photo booths are also a big thing! I've seen them at many holiday parties, complete with props.
What better souvenir to take home from a party than a photo? Frozen memories, right?
Here, I have a fun prop that can be made using very basic techniques and
only a few supplies.
+ + + + + + + + + + + + + + + + + + + + + + + + + +
This takes the humble foam board and makes it into something special and memorable!
The only supplies I used to color it was acrylic paint in Halloween colors, a white acrylic paint marker and some washi tape. The banner within the frame is made out of cardstock and tulle and hung on a piece of baker's twine.
I first cut out the inside of the board using an X-acto knife. The opening is about 16x22" and there is a two-inch margin on the top, left and right side of the opening as well as a 6 inch border on the bottom. I used the iconic look of the Instax photos because the dimensions of the foam board was perfect for it. Plus, the extra space at the bottom left room for more decoration and messages!

I chose a basic black as the base color of the frame and then distressed it with some Bittersweet orange Ceramcoat acrylic paint using a dry bristle brush. After that was dry, I stuck a few pieces of cute spider washi tape in a few areas and then doodled and wrote my message on it using a Deco-color acrylic paint marker.
I cut a basic pennant shape out of some Halloween cardstock and used Ceramcoat's Passion purple to paint on the letters. Some black and apple green glitter tulle was used to add a little more texture to the banner. After stringing everything onto some baker's twine, I hot-glued the ends to the back of the frame and let it bow into the opening a little.
And now it's done!
This is such an awesome activity to have at and holiday party and I highly
recommend it. Have fun and see you all next week!
Erika @ PC


Wow! I love this idea. You are so clever! This came out graphically perfect! Thanks for sharing. Love you on the Joy of Crafting too.
ReplyDelete