Showing posts with label jewelry. Show all posts

Tuesday, April 19, 2016

Steampunk Mermaid Jewelry Box

Mermaids?  Lovely!  Steampunk Mermaids?  Ah-maaa-ziiiing!
This week's project uses the new Graphic 45 - Under the Sea scrapbook paper that our stores got in
a couple weeks ago.  The name is somewhat misleading because when they were put out, we found out that they were not like any other ocean-themed paper we've seen before.
In fact, there was a very quirky Victorian Steampunk twist to it.  Which was AWESOME.
Seriously, why did we have to wait so long for this paper??


Alright!  I took one of our really cool unfinished jewelry boxes to decorate using this scrapbook paper. To get started, I painted the outside with Chalky Finish in the color Treasure to give it a cool ocean feel.  I then Mod Podged scraps and cutouts of the paper onto the top and sides of the box.  I also Mod-Podged scraps of the Seashell print onto the interior bottom of the jewelry box.  
 Inside, there were little compartments that I painted using the brighter colors that were present in the paper to compliment the teal blue of the chalky finish.  After Mod-Podging more cutouts on the bottoms of the compartments and one onto the mirror that was underneath the box's cover, I painted the inside of the box with a bright Satin Americana paint in the color Leprechaun.  
After that, I distressed the sides of the box with Delta Ceramcoat in Metallic Gold 14K.

As a finishing touch I embellished the box with some of Tim Holtz' small metal gears and small beads using UV resin... Juuuuust to add a little extra Steampunk feel.  And there we have it!
Always remember:  Make it your own and have fun.  We have a TON of scrapbook
designs available for you to customize your very own jewelry box and a plethora of unfinished wood boxes for you to choose from.  There are seriously so many choices, so don't hesitate to ask for some ideas and inspiration.  
That's what we're here for!

Erika @ PC


Tuesday, February 16, 2016

Crankin' Out Crafts - We Sell Seashells At The Craft Store


Crankin' Out Crafts - Episode 461
Floating Sunrise Shell Pendant

Lynn makes a floating pendant by adhering an L Bell component onto the back of a sunrise shell. So easy to do for yourself!


Click here to watch this Crankin' Out Crafts episode

Supplies Used:
Sunrise shell
UV Resin
UV Resin Lamp
Chain
Hair gomu part (half tube)Optional: Rubbing alcohol


How to Wire Wrap a Shell
In this episode Lynn shows you a basic technique of wire wrapping a scallop shell.


Supplies Used:
Scallop shell
14” thick wire
Ruler
Round nose plier
6-Step bail making plier


Thursday, July 17, 2014

Bead Party this Saturday!

Join us for beading Make 'n Takes this Saturday, July 19th from 10am to 2pm at our Hilo, Kahului and Mapunapuna Bead Shoppes! 

Bead Party on Saturday, July 19th from 10am to 2pm at Hilo, Kahului and Mapunapuna

Whether you are a beginner or have been beading for years, we have projects just for you! See our bead shoppes for more details. Flyer can also be viewed and downloaded on our website here. See you there!

Monday, January 13, 2014

Garnet Glitz

I've decided to try my hand at making more jewelry this year. You could say it's a kind of New Year's resolution to practice some jewelry making techniques. So to start, I'm making a garnet bracelet and earring set for January. I got the idea for this bracelet and earring set from a craft magazine and decided to make a few changes to it to use findings and materials I had on hand. If you didn't know, garnet is January's gemstone.


Here's a picture of the finished bracelet all shiny and pretty. To complete this project, you'll need some silver chain, 4mm and 6mm jump rings, garnet colored glass beads, a toggle clasp, jewelry wire, crimp tubes, and some pewter findings.


First things first, cut your chain into 10 lengths of 2 and 1/8 inches. 5 pieces of chain get slipped onto a 4mm jump ring, and then another jump ring is added to the opposite side of the chains. You do this twice to make two sets of dangly chain pieces.


Next, add the toggle clasps, one to each chain set with a 6mm jump ring. On the opposite side of one of those sets, loop jewelry wire onto the 4mm jump ring and set with a crimp tube. Then you'll thread a bicone, a pewter finding, a bicone, a pewter finding, and finally another bicone, onto the wire. Finish the bracelet off by making another loop around the unused chain set and secure with another crimp tube to the unused chain set.


Done! This was a great way for me to start my beading practice because there was just enough technique involved to make it interesting but no crazy wire wrapping to make me frustrated. Check out our blog next week for the next installment; we're finishing up this set with a pair of matching garnet glitz earrings.

Thanks for reading!
Puna @ Enchanted Lake

P.S. If you're thinking that this would make a great Valentine's Day gift, you're really on top of things. Scroll down to see today's episode of Crankin' Out Crafts featuring a fun Valentine's idea.

Tuesday, October 29, 2013

Resin Paper Punch Pendant

Making your own pendants out of paper has never been easier! Using UV Resin to seal, harden and protect the paper you can turn just about any paper punch into jewelry!!


Supplies:
Martha Stewart Butterfly Paper Punch
UV Resin
UV Lamp
Jump Ring
Necklace chain


Punch the butterfly out of any paper you want, I used a cream colored cardstock. Using the silicone pad, cover one side of the paper punch out with UV Resin, place under the UV Light for a few minutes and then flip it over and repeat on the other side. This will coat the paper punch out with hard clear Resin. Add the Jump ring and put onto the necklace chain! You now have a cute necklace that you did ALL YOURSELF!

Monday, October 28, 2013

Resin-ating Everything

You may have seen a lot of posts lately about our new UV Crystal Resin that we are now carrying in our stores. That's probably because this product is so super cool that all of us are excited about using it. I personally like this resin because it makes making classy jewelry amazingly easy and, well, classy looking. Also, as you will soon find out, it is gloriously versatile in the things that can be done with it.


This lovely Parisian looking piece is a cell phone charm straight out of a kit. The kit includes everything that you see (plus more) and everything you need to make this chic charm.


This pendant borrows an idea from the lovely Beth at our Mapunapuna store. I was so in love with her sprinkle pendant that I just had to make one for myself. I mean, who doesn't love candy?


This nautical stunner was made by our very own Toni and is a purse hook. I'm thinking handmade Christmas gifts for all those large handbags that my friends frequently tote around. 


And this piece, believe it or not, is a jelly jar lid. This is another great gift idea for Christmas. Give to your friends who need a small jewelry holder that is just as elegant as their jewelry.


What did I say? Totally versatile, right? I'll expect to see you all in our stores soon to get your hands on some awesome resin-ating fun.

Puna @ Enchanted Lake

Scroll down for fun with Popsicle sticks for the holidays on Crankin' Out Crafts!

Monday, August 19, 2013

For the record...

Today's blog topic focuses on something that a lot of younger people may not get the chance to see very often. If you don't know what these earrings are supposed to be then you're missing out on a piece of musical history! I made these vinyl record earrings because last week Monday was Vinyl Record day.


They were pretty easy to make too. All I did was take a couple of big black buttons and add small pieces of red paper to them to cover up the button holes and to be the record label. Then, with a white ultra-fine Deco Color pen, I made the highlights on the sides of the record. To add the ear hooks, all I did was punch a hole at the top of the button with the Crop-a-dile and add a jump ring.


Here's a picture of my coworker, Asia, modeling the earrings for me. I tried to use the biggest buttons I could find. If you don't have the buttons, you could also easily make the records out of clay.

Let's bring vinyl back in style! Well, for your ears anyway.

Puna @ Enchanted Lake

Wednesday, July 10, 2013

Crankin' Out Crafts Episode 268 - Clear-backed Resin Pendant


The glass-like clarity of our Super Resin UV Crystal makes it a clear winner. Today Puna shows you a technique to make see-through pendants.

Check out our selection of Resin Jewelry Making Kits!


Supplies:
Super Resin UV Crystal
Transparent image
Quick links solid metal ring
Crimp bead
Toothpick
Scotch tape or packing tape
Small piece of cardstock
UV oven
Board to cover oven
Watch or timer

Don't forget to pop all the bubbles in the resin before baking your layer. You cannot take bubbles out once the resin has hardened.

*Resin supplies and kits available exclusively at our Hawaii Ben Franklin Crafts Stores

Monday, July 8, 2013

Crankin' Out Crafts Episode 267 - Resin Pendant


We are introducing our new Super Resin UV Crystal this week with lots of new products exclusive at HouseMart Ben Franklin Crafts. This new product will enhance your craft projects in just minutes. Watch how JFlo creates this beautiful pendant using a photo and the Super Resin UV Crystal.

Introducing new resin products available exclusively at Hawaii BFC stores!


Supplies: 
Super Resin UV Crystal 
UV Light oven
Toothpick
Photo
Pendant Base
Scrap Cardstock
Board to cover UV Light
Watch/Timer
Embellishments
Optional: glitter, sticky tool

*Don't forget to scroll down and read today's earlier post - a very fun necklace idea from Enchanted Lake BFC!

Spectacle Necklace


Did you know that we have a national holiday for geeks? It's called "Embrace Your Geekness Day" and it's coming up soon! In fact, it's this Saturday, July 13th. But in honor of my personal geekness, I decided to celebrate for the whole month starting with this quirky spectacle necklace.


Here's a bunch of pendants I made in a few different colors. All I did was print up a picture of eyeglasses and then trace the picture onto clear shrink film using Sharpie markers. Then I cut out my designs, punched the holes in either end, and put them in a 300 degree oven for about 3 minutes until they shrunk down to about half their size and were laying flat on the cookie sheet.


This is what the finished necklace looks like. It's 18" long including the pendant. I think the shrink film is the best media for this off-the-wall kind of jewelry, don't you?

Puna @ Enchanted Lake

Friday, May 24, 2013

Crankin' Out Crafts Episode 252 - Perler Bangles


For our last perler bead projects, Puna is back to show you how to make fun bracelets with the perlers.

Create cute and colorful Perler bead bangles!


Supplies:
Perler beads in your color choice
Tweezers
Circular peg board
Ironing paper
Iron

Kids can make their own fun dress-up accessories using Perler beads, and if they break, Mom can always iron them back together again.


Wednesday, May 22, 2013

Crankin' Out Crafts Episode 251 - Perler Earrings


Perler beads are not just for making fun key chains. Today, Puna will show you how to use them to make earrings and embellishments.

Perler Beads can also be used to make jewelry

See how to make these cool earrings here: Crankin' Out Crafts: Episode 251 - Perler Earrings

Supplies:
Perler beads in in your color choice
Tweezers
Hexagon peg board
Ironing paper
Iron
Jump ring
Fishhook ear wires
*optional small buttons*

Don't forget to iron both sides of your earrings or embellishments to make sure that they stay together well.

Tuesday, April 23, 2013

Crankin' Out Crafts Episode 242 - Mom Charm


Moms have a soft spot for handmade items. Show your love by making a cute clay charm.

Make a personalized pendant for Mom!


Supplies:
Sculpey clay
Clay roller
Clay stylus or knife
Oven
Hemp cord

This charm can be made into a pendant, bracelet, or even a pretty purse charm.

Monday, February 25, 2013

Typography Necklace

Do you swoon over a new font you found on the Internet? Do you stop and stare at a well printed sign? Do you love typography and all things wordy? Do you love type so much that you never, ever want to be parted from it? So much so that you want to wear wonderfully font-tastic jewelry every where you go?

If you answered yes to any of these questions, I made this necklace just for you! It's the perfect accompaniment to any word nerd's attire, and as you can see, it's a testament to your gumption, courage, and general moxie-tude.


If you want to create your own typographic statement jewelry, all you need is some shrink plastic (yes, I am talking about those good old shrinky-dinks that you used to play with when you were seven and had to bug your parents to stick in the oven for you), a 1/4" hole punch, some chain, jump rings, a clasp, and a sparkly crystal on a head pin for the extra accent.

Then, you can download your new favorite font, print up a wonderful word (like moxie) and simply trace your word onto your piece of shrink plastic. The necklace above is made with matte shrink plastic and a slick writer pen from American Crafts. Don't forget to cut out your word and punch your holes before you start to shrink. String everything up on a chain and show off your new word nerd style. Oh the moxie-ness of it all!

Puna @ Enchanted Lake

Whoops! Almost forgot to let you know that there's a post before this one. Please scroll down and check it out.

Sunday, January 6, 2013

Beaded Bow Necklace


Aloha Crafters ~

Today's Idea & Inspiration is a Beaded Bow Necklace.

Supplies:
  • Beads
  • Wire - 24 gauge
  • Chain
  • Clasp
  • Jump Rings
  • Thread – similar to bead color
  • Jewelry pliers
  • Scissors
  • Sewing Needle
Instructions:
  1. Cut 9” wire, make tiny loop at end with pliers
  2. String 3” of wire with beads
  3. String end of wire through tiny loop at other end of wire
  4. String another 3” of beads
  5. String end of wire through tiny loop again
  6. Wrap wire around center 2-3 times then trim
  7. Cut thread about 12”, tie knot at end that will not slip through beads
  8. String 1 bead, go back through the same way (making it a stop bead)
  9. String 4” of beads onto thread, tie off
  10. Thread excess thread back up through beads
  11. Tie strand of beads around center of wire bow (you may wish to glue or sew in place)
  12. Attach jump rings to bow than chain
  13. Attach jump rings to other end of chain, attach clasp
Happy Crafting!

Monday, September 17, 2012

Crankin’ Out Crafts: Episode 153 – Jewelry Holder (Tin Embellishments)


Welcome to another week of fun-filled crafting on Crankin’ Out Crafts! This week we will be featuring a new item available now in our stores – decorative tin metal embellishments. JFlo adds color with alcohol inks to a tin strip then uses it as a unique decorative element to a jewelry holder.

Organize earrings with a jewelry holder made by you!

Supplies:
Tin/Metal Strip
Black Canvas
Furniture nails
Alochol Inks
Felt Applicator
Silver Floral Wire

These tin strips add an elegant touch to any project! Stay tuned for more this week on CoC.

Friday, August 17, 2012

Martha Stewart Crafts for the Home


Aloha Crafters ~

Today's Idea & Inspiration comes from Martha Stewart's new stencils for the home. Here they were used on make-up and jewelry organizers:
Following they were used to upcycle items for the kitchen:
Happy Crafting!

Tuesday, August 14, 2012

Seashells by the Seashore Picture Stand and Jewelry Hanger


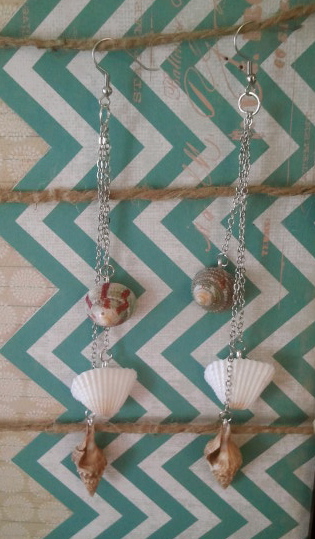
I am so excited about all the beautiful seashells we have in-store...so many seashells, so many possibilities.  This seashell picture hanger is a decorative way to display pictures, postcards, jewelry and more.  Take a 12x12 picture frame, replace glass with decorative card stock.  Glue jute, twine or ribbon to the sides of your frame carefully with a hot glue gun.  Decorate mini-clothes pins with shells (using hot glue or E600 glue) and clip onto the jute.  Now you have a beautiful display for your home or office, and you can change out the pictures and the background paper whenever you like!


Great idea for wedding memories.  Why chose one picture to put in a frame to remember your special day when you can pin up multiple photos, your invitation, vows and other memories!  You could even use wrapping paper from one of your favorite gifts, or your wedding program/invitation for the background paper.


Use a black Deco pen to personalize seashells.  Glue a shell directly on the frame, or onto a magnet (for a metal frame/surface or refrigerator) with E600 glue.  I can't wait to share these magnetic shell greetings with my friends and guests from the mainland!


I am so excited about these bohemian-beach-chic shell earrings.  No drilling required!  The shell picture hanger design makes an awesome display for your earring collection too!


Friday, August 10, 2012

The CINCH Jewelry Holder

Aloha Crafters ~

Today's Idea & Inspiration is a Jewelry Holder made with The CINCH Bindery Tool.

Supplies:
  • THE CINCH BINDERY TOOL (30105279)
  • THE CINCH Black 12X12 Chipboard (30105294)
  • THE CINCH 1" Wire (30105282)
  • 8" Round Beveled Mirror (30086573)
  • Dritz Awl (30081891)
  • Glue Gun (77548404)
  • Glue Sticks (30078029)
  • 6' Rose Rope (30122396)
  • Pink Hydrangea (30128534)
  • White Hydrangea (30082834)
  • Pink Ranunculus (30063332)
Instructions:
  1. Using The Cinch Bindery Tool pierce a row of holes on 1 side of the black chipboard
  2. Place 1" wire through holes, tighten using The Cinch Bindery Tool
  3. Using awl, pierce holes in top corners for rose rope
  4. Using glue gun, adhere mirror to chipboard,
  5. Adhere rose rope around mirror, cut left over rope
  6. Pull flowers off stems, adhere to chipboard as desired
  7. Using leftover rose rope, thread through top corners to use as a hanger, twist wire on rope to secure
  8. Hang flowered mirror jewelry holder on wall
  9. Hang jewelry from wire
Happy Crafting!

-Kahului BFC

Friday, June 8, 2012

Leather Bow Cuff

Aloha Crafters ~

Today's Idea & Inspiration is a Leather Bow cuff.

Supplies:
  • Piece of Leather - (77678342)
  • E6000 Glue - (1368505)
  • Snap Button - (77650788)
  • Thread to match leather
  • Sewing needle
Instructions:
  1. Cut an oval piece of leather - approx. 8.75" X 4". Make it longer or smaller, depending on the size of your wrist.
  2. Form a bow.
  3. Secure bow by wrapping thread around the middle of the formed bow.
  4. Cut a small rectangle of leather - approx. 1.5" X 0.4".
  5. Glue the small rectangle of leather over the thread.
  6. Sew the snap button, one part at each end of the leather, so when they snap together they form the cuff around your wrist.
Happy Crafting!