Hi there! Today I will be showing you how to make an autumn rice mosaic.
You will need the following supplies:
- Raw rice
- Alcohol Ink, your choice of colors
- 4"x4" Art Alternatives Wood Panel
- Tacky Glue
- Mod Podge
- BBQ Skewer
- Small bowls or an old muffin tin
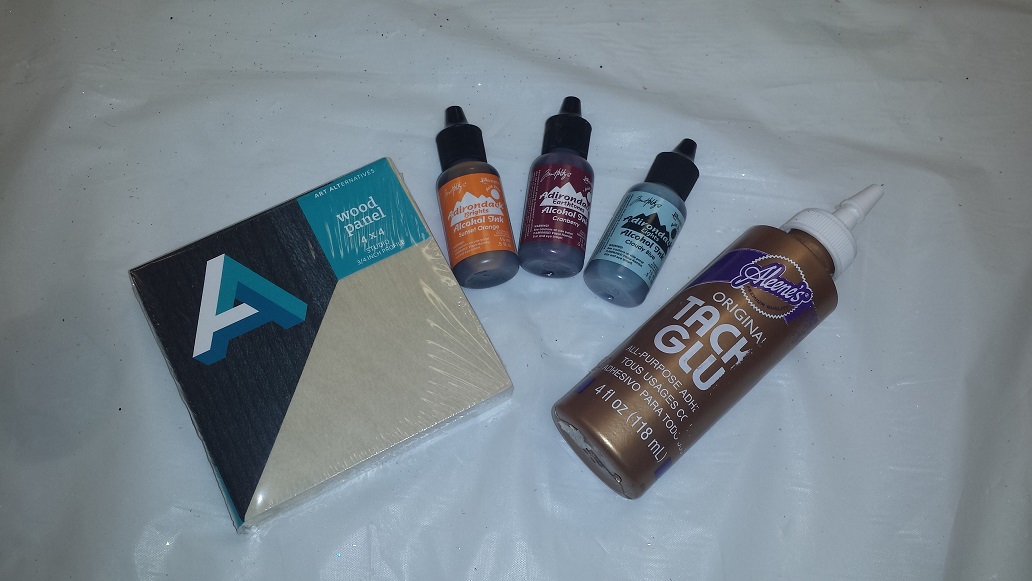
First, pour a handful of rice into a small bowl or container. Put about five drops of alcohol ink into the bowl. Mix until all the rice is colored. Add more drops if you desire more color. Use a separate bowl for each color you're going to mix.
Next, use a pencil to draw your image on the wood panel. If you are copying a printed image, you can use graphite paper to transfer it to the panel.
Spread tacky glue over a small section of your image. Dip the pointed end of your skewer in the tacky glue to make the tip a little tacky. Use it to pick up and place the rice down one by one. Work in sections so the tacky glue doesn't dry out.
Once your entire panel is covered with rice, apply a coat of Mod Podge, either matte or glossy depending on your preference.
There you have it! These look great if you have several that you display together. They could also be used as coasters! There are lots of different things you can do with this.
Until next time, happy crafting!
Rachel @ Mapunapuna
Showing posts with label alcohol ink. Show all posts
Thursday, August 20, 2015
Monday, January 26, 2015
How To Color Your Glitter With Alcohol Ink
Alcohol Ink (color of your choice)
Extra fine glitter - white
Stampendous! Shaved Ice glitter (what I used)
Plastic cup
Popsicle stick
Step One:
Prepare your glitter in a plastic cup.
Step Two:
Choose your alcohol ink color.
Add 2-3 drops of alcohol ink into your glitter and mix with your popsicle stick.
Step Three:
Let your glitter mix dry before adding your glitter into any project.
And your done!
Have a Craftastic Day!
-Julie @ Enchanted Lakes
Labels:
alcohol ink,
arts,
cellophane,
craft,
extra fine glitter,
glitter mix,
iridescent,
paper craft,
popsicle sticks,
Resin
Tuesday, February 25, 2014
Resin Marble Magnet
Create these magnets using marbles, embellishments, resin and magnets!
.jpg)
Supplies:
Resin
UV Lamp
Flat Marbles
Magnets
E-6000
Glitter
Alcohol Inks
Papers, printed acetate sheets etc...
When using Resin, you always want to work in layers, curing each layer as you go.
Place a drop of resin onto the back of the marble and then cut out an image from the acetate (we used a rose image). Cure the resin under the UV Lamp to seal it in place. You can cut out more images and layer them at this time if you wish. You can even use glitter by just sprinkling a tiny bit onto the resin while it is still wet, and cure it under the UV Lamp. Once you have the look you want, put a few drops of resin onto the marble and use a toothpick to mix in some alcohol ink (Only about half a drop though!) You can use any color and even mix colors to get exactly what you want! Once you are happy with the look, cure it under the UV Lamp for about 2-3 Minutes. Once it is done, use E-6000 to glue the magnet onto the back! We also used a cut out from paper and cured it with resin onto the back of the other marble before using the acetate images and alcohol inks.
Check out next week's blog to see how to make this magnetic frame!
Thanks for looking and CRAFT ON!!!
~Deb @ Market City
Labels:
alcohol ink,
marble magnets,
marbles,
Resin,
Super Resin UV Crystal,
washi paper
Monday, September 16, 2013
Faux Stained Glass Votive Holder
Here's
a great gift idea for a birthday or for those pesky holidays that are approaching so very quickly. You can even get your kids to help you with making them
because they are so, so easy. You need Scribbles puffy paint in black,
alcohol inks in various colors, a brush, and a votive.
First, use your puffy paint to draw your design on the glass votive. For my sample, I stuck to easy, geometric shapes. The paint can take up to a day to dry, depending on how thick it's applied; make sure your lines are completely dry before moving to the next step. Next, take your brush and alcohol inks and color in the spaces between your puffy paint lines. You can use rubbing alcohol to clean your brush between colors. You could also use the rubbing alcohol to clean up any over-spill or mistakes. Then...well actually, then your done. Wrap them up and give them away as presents! Yay!
Puna @ Enchanted Lake
First, use your puffy paint to draw your design on the glass votive. For my sample, I stuck to easy, geometric shapes. The paint can take up to a day to dry, depending on how thick it's applied; make sure your lines are completely dry before moving to the next step. Next, take your brush and alcohol inks and color in the spaces between your puffy paint lines. You can use rubbing alcohol to clean your brush between colors. You could also use the rubbing alcohol to clean up any over-spill or mistakes. Then...well actually, then your done. Wrap them up and give them away as presents! Yay!
Puna @ Enchanted Lake
Labels:
alcohol ink,
brush,
candle holder,
craft,
diy,
easy,
faux stained glass,
gift,
kid's craft,
scribbles,
votive
Tuesday, August 6, 2013
Alcohol Inks and Bells!!
Colorize your Jingle Bells to ANY color you want using Alcohol Inks from Tim Holtz!
Alcohol Ink “Stains” the metal with bright or subtle colors depending on the one you choose. It’s a great way to customize your decorations.
These bells are great for the upcoming fall, put them in a bowl for a modern yet classic look, or tie some in a wreath. These Alcohol inks give a great Antique / rustic look
Supplies: Alcohol Inks (Copper, gold, reds, blues, purples)
Felt pads and tool
Jingle bells (silver or gold)
Step 1: Use the Alcohol Ink Tool and Felt pads. Squirt a few drops of the ink onto the felt pad.
Step 2: Blot the felt pad on the metal bells to transfer the ink, set aside to dry for a few minutes and you now have custom Jingle Bells!
Thanks for looking and CRAFT ON!!! ~Deborah @ Market City
Labels:
alcohol ink,
alcohol ink effects,
antique,
Jingle Bells,
rustic,
Tim Holtz
Tuesday, June 4, 2013
Crankin' Out Crafts -ep256 Mosaic Tile Flower Dish
Watch how JFlo changes clear Glass tiles to colorful mosaic pieces. These unique tiles can be added to a project of your choice!
![]() |
| Glass tiles are great for embellishing! |
Watch our newest episode here: Crankin' Out Crafts: Episode 256 - Mosaic Tile Flower Dish
Supplies:
Glass tiles (pointed teardrop shape)
Alcohol Ink (we used watermelon & silver)
Blending solution
Blending tool
Clear Petri Dish (plastic)
e6000 glue
glitter
Glitter-It Glue
Funnel
paintbrush
glitter tray
Decorate your next craft project with glass tiles today! They come in a variety of shapes and sizes.
Saturday, March 16, 2013
Designer Fans
Bud & June Nakama
Joelle & Kiana Kawahara
June had to convince Bud to make one; Bud resisted & said he wasn't an artist but, once he started, his creative side came out! Joelle & Kiana didn't go for the pink colors & used their favorite colors instead! If you want to make one of your own, join us this Saturday from 11am-2pm to create your own fan! Alcohol inks & a stamping technique makes it easy to create this floral design. I've added butterflies along with the flowers for you to try this week! And, we just received die which you can use on our Accucut machine with pictures, designer papers,etc. for your special ocassion (just ask one of associates for help & information)!
There's always something crafty going on at Pearl City!
gloria @ Pearl City
Wednesday, September 12, 2012
Crankin’ Out Crafts: Episode 151 Inked Tin (Alcohol Inks)
For today’s episode, JFlo
shows you how to make elegant gift tins using alcohol inks.
![]() |
| Decorate tins with alcohol inks to create unique designs! |
Learn how to do today's project here: Crankin' Out Crafts: Episode 151 - Inked Tin
Supplies:
Tin container
Alcohol inks
Alcohol ink applicator
& Felt
Ribbon or buttons for
further embellishment
These tins are great to
hold gift cards or magnets and can be decorated to match any occasion.
Monday, September 10, 2012
Crankin’ Out Crafts: Episode 150 - Inked Heart Ornament (Alcohol Inks)
Welcome to the Alcohol Ink
themed week of Crankin’ Out Crafts. For the first episode, Puna is here to show
you how to use these versatile inks on a glass ornament for a beautiful look.
![]() |
| Decorate ornaments with alcohol inks! |
Watch our newest episode here: Crankin' Out Crafts: Episode 150 - Inked Heart Ornament
Supplies:
Clear glass ornament
Alcohol inks
Alcohol ink applicator
& Felt
Paint
Ribbon and paint pens for
further embellishment
Use the alcohol inks to
make ornaments to fit in with any theme for Christmas décor that is absolutely
your own.
*Also, don't forget to read today's earlier post by Puna from Enchanted Lake. She'll introduce you to the new embossed tin strips that you can use to embellish your craft projects with.
Sunday, March 11, 2012
SPRING BREAK CRAFTING
We had fun yesterday morning as the Keikis created thier Marshmallow Bunnies! Hearty Clay is so easy to work with and doesn't require baking since it air dries!
More crafting coming up today, Tuesday, March 13th! Beading will be the featured craft for the Keiki as they create a beautiful Memory Wire bracelet (10:30am-12noon). A touch of art for Teens as they use Alcohol Inks to create colorful ceramic tiles (2:30-4pm).
Register early..seating is limited. Fees vary.
Keiki (ages 5-11 must be accompanied by an adult) Teens (ages 12-18)
See you there!
gloria from Pearl City
Wednesday, February 29, 2012
Crankin' Out Crafts Episode 68 - Cherry Blossom Lantern
Ready for another illuminating craft? JFlo is here today to show you how to make beautiful cherry blossom inspired lanterns.
View the episode here: Crankin' Out Crafts: Episode 68 - Cherry Blossom Lantern
You can cut different shapes out of the applicator felt and stamp anything onto your lantern, or follow our design and make a lantern for Girl's Day or a special girl's birthday party. They're even elegant enough to use for weddings!
| Create an elegant design using the Alcohol Ink applicator & inks! |
View the episode here: Crankin' Out Crafts: Episode 68 - Cherry Blossom Lantern
You can cut different shapes out of the applicator felt and stamp anything onto your lantern, or follow our design and make a lantern for Girl's Day or a special girl's birthday party. They're even elegant enough to use for weddings!
Subscribe to:
Posts (Atom)


.jpg)
.jpg)
.jpg)
.jpg)


