Showing posts with label spring. Show all posts

Monday, January 29, 2018

Upcycled Party Decor

Hi and happy Monday! To beat those Monday blues, I thought we could talk a bit about parties! I've been loving all the cute fun bright spring decor I've been seeing around and wanted to show you a cute way to turn paper bags into hanging poofs! They would be great around the main buffet table, or around a photo booth!

Supplies:
craft paper bags
scissors
hole punch
string
double sided tape


First cut all the tops of the bags. I used 10 bags per hanging flower fan.


I hole punched my bags on both sides of the bottom flap (4 holes per bag) 


String together all 10 bags!


Use your double sided tape (one piece in the middle, and one on the top) to attach all the bags together! This will also cause the tops to open more!


Ta Da! Tie off your string and trim the excess!
Have fun throwing spring parties!!

Bethany @Enchanted Lake


Monday, January 15, 2018

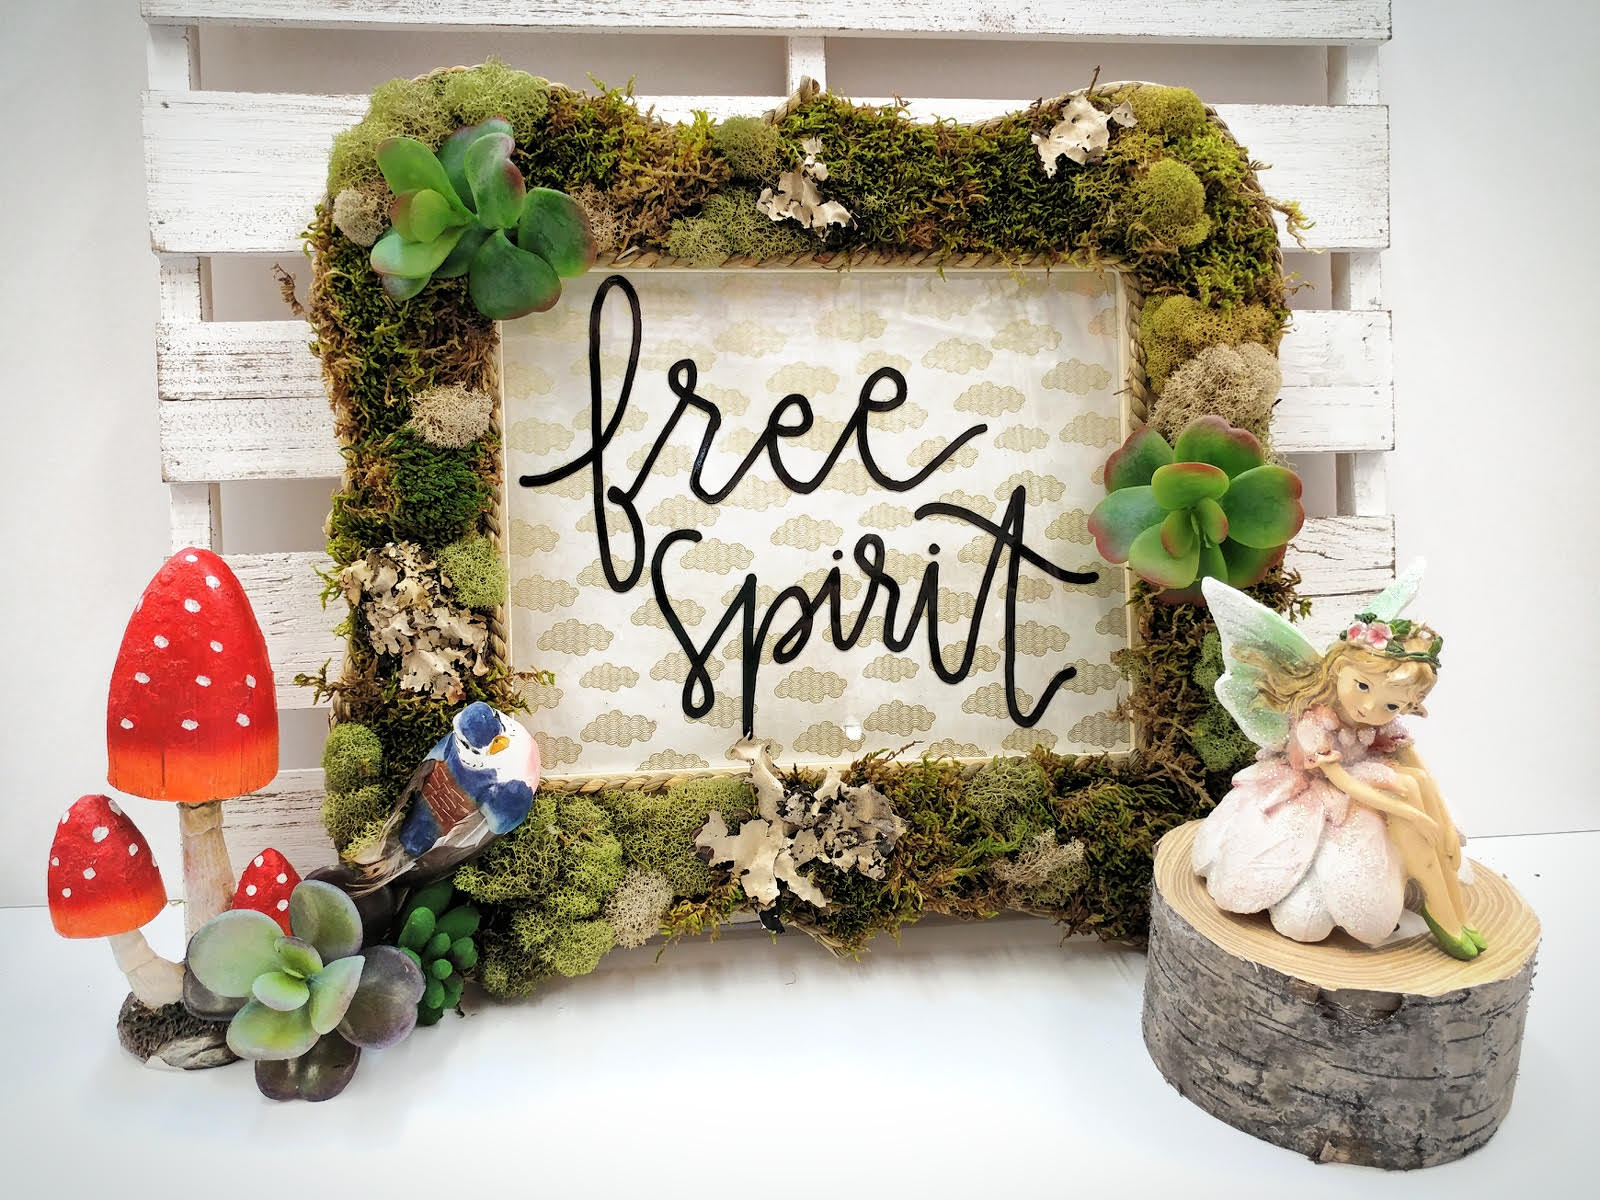
Moss Fairy Garden Frame

Happy New Year crafters!
I'm excited for spring and everything garden party! I was inspired by our collection of fairy garden decor trickling in and thought a frame would make the perfect addition!


Supplies:
wood frame
hot glue / hot glue gun
assorted moss
rope
oil based black paint pen
natural cardstock patterned paper
optional : mushrooms, succulents, fairies, butterflies, birds, sticks

First, cut your cardstock paper sheet to size, and place inside frame.

Trace your favorite quote or calligraphy phrase through the glass panel with the oil based marker. 
Allow to dry and then place in frame.

Then glue rope all around inside and outside edges, adding extra glue to the inner sides so that it is more secure.

Then glue in mosses and fun earthy natural accents! 


Ta Da!
All you would need is a cute little fountain and fairy scene to go with this cute frame!

Happy Spring!

Bethany @Enchanted Lake


Tuesday, April 25, 2017

Distressed Mason Jars

Mason jars!
The number of uses of this beloved jar has grown so much since its uni-tasking canning days.
(Bringing a little bit of Good Eats reference into this..😄)
Now it can be used as storage for small craft items or random doodads, soap dispensers for those
Urban or Industrial Chic bathrooms, and even plant pots!  We all need that simple and fresh look for the kitchen table, right?  What's better than a clear mason jar and some lovely flowers from the garden? (Or the neighbor's garden?)
Here, I have a way that you can add a little bit of Shabby Chic to your Mason Jar centerpiece.
Behold the basic technique of sand-paper distressing!


Here is a close up of a jar that was spray-painted with Chalky Finish spray paint in Morning Sky.
Gorgeous, isn't it?  It' s the perfect and elegant French blue tone for Spring!  Notice anything different about thatlittle distressed bit?  Right!  It has a tinge of penny-copper so that it looks like a distressed copper pot.  (Actually, it was Design Master spray paint in Rose Gold!)
Rose Gold and Copper just add that right amount of "antique" (antiquity?) to a craft piece.  It's both classic and modern with its pinkish metallic hue.   Here's a shot of the inside.

 
 All you need is a few spritzes!  It's best not to overdo it so that the paint doesn't all pool to the bottom.  The same goes for the outside of the mason jar.  After spraying the inside, turn the jar upside down and spray in light even coats.


Here are the two Spring-time Mason jars that I created using beautiful cool-toned pastel colors.
The one on the right is that perfect minty hue (Ubermatte's Mist), with its cover painted in rose gold once again.  As always, experiment, experiment.  Creativity stems from both inspiration and experimentation, so don't be afraid of those lovely mistakes.  It's trial and error!
Also, don't forget to have fun!

Erika @ PC

Thursday, April 6, 2017

Spring Keiki Crafts Camp 2017

Hey Crafters!
I hope everyone had an awesome Spring Break!
At our stores, we had a very successful Keiki Craft Camp making
fun and adorable crafts with the kids.  Let me just say, there were A LOT of kids this Spring, which was AMAZING.  No surprise, because the projects included classics like Perler Beads and Shrink Art!
Sara at Market City with a full class!  We're ready for today's craft, Teach!

What was especially impressive was the number of kids who showed up during the second day of camp.  Why you ask?  SLIME, of course!  Yes, that craze that's been sweeping the nation and causing Elmer's Glue to just fly off the shelf!  In fact, slime even caused a nationwide shortage of Elmer's Glue.  Crazy, right?  We loved how all of the kids' slime turned out different, representing each child's preferences and color choices.  "More glitter,  More Borax"!  "Not too much foam beads!" The measurements had to be just right!  We had so many fun and interesting ways to customize the slime.  Not just by look, but by texture as well!   This glob had some colored foam beads that seriously made it look like ice cream.  I mean, come on!  Look at it!
One of the most rewarding things was watching them play with the slime and to see them have fun with it. 


Just the right amount of lotion produces a satisfyingly stretchy slime.


Much stretch.  So wow!

So goopy and messy, but that's half the fun!
Just in case anyone is interested in the slime recipes that we used, each store did have their own special concoction. So, feel free to check out each one for different recipes and have fun experimenting at home!  Also, don't forget that our stores have started expanding on the Slime supplies, so specialty items like Borax, foam beads and clear glue are starting to hit our shelves.
Stay tuned to see what else we have in store!

Look at the mixed media scrapbooking going on here!  These kids even include photos in their wood craft project.  What a great way to record and make memories over the break.  The keiki got to create their very own piece of mixed media art!  We gave them everything they could ever ask for; from glitter to cardstock.  And they went nuts.  Like, glitter on the floor and their faces nuts! 
SO MUCH FUN!

You will not believe how much glitter was left on the table. 
Although making a big mess is all part of the CREATIVE PROCESS!

Bright colors and Glitter are all the rage right now. 
  
A stinkin' adorable project that we had on the last day was a Pet Rock and Sanctuary.  Basically, our kids decorated a pet rock, painting it whatever animal they wanted, and they then created a little habitat/home for it using a clear pail, odds and ends, and a whole lot of imagination!  From shark tanks to butterfly homes, the crafts these kids made were so  creative.   There were many who liked to jazz up their homes with lots of bright colored doodles all over their pails and flower cut outs strewn all over the inside.  We also noticed there were some who liked to keep things simple, with a bit of Spanish moss here and a bit of green fluffy moss there.  Maybe a little washi tape around the rim of the can along with a couple cute bows tied onto the handle.


This craft camp is a lot of fun for kids, and it's a great way to make new friends and to learn how to make a bunch of different crafts!  This program is available at all stores during Spring, Summer and Fall.  Stay connected with us on our company website (benfranklinhawaii.com), Facebook (@BenFranklinCrafts) and Instagram (@bfcrafts)!

Saturday, March 4, 2017

Starfish Wishes!

Hey Crafters!
If you guys haven't been down to any of our stores recently,
you seriously need to make the trip.  ESPECIALLY if you are a wood crafter!
We have so many unfinished wood pieces for everyone to paint and decorate
that it's insane!  Never had we had this big of a variety in our stores.
And for you ocean-themed décor lovers out there, you will love all of the nautical
items we have been getting in as well!
Coral sprays, seaglass pieces, laser-cut mermaids and scientific octopus illustrations; 
If you can name it, we've got it.  Today, you can mark this post as "Starfish Spam" because it is just starfish-themed wood crafts galore!
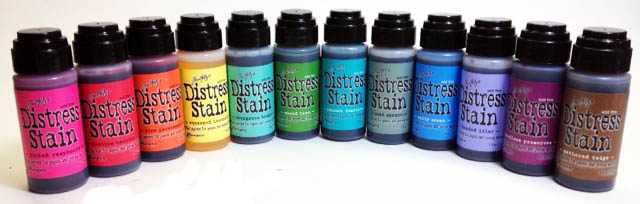
Another magical technique that I learned from our amazing Visual Merchandiser, JFlo, is the use of Tim Holtz' Distress Stains to give an interesting and colorful look to the wood pieces.  Because many of the woods are lighter in color, the stains will appear as a vibrant watercolor effect on the surface!
You can even stain the wood with multiple colors and distress it even more with acrylic paints for a vintage "shabby chic" look.
Below I have a small box distressed with light pink and cream-colored stains which was then distressed with a few streaks of Delta Americana acrylic paint in the color Chocolate. This particular paint color gives more of a gel stain feel with some fine golden glitter mixed in.  It looks SO GREAT with it and definitely adds that extra special something!

I then hot-glued a small white wooden starfish cutout, which were sold in a pack with a variety of sizes.  This one seemed perfect.  Don't think you can't distress this little starfish too, because it will look awesome with some stain and paint as well!  And the little white speckles around the starfish?
White Sakura Gelly Roll.  YEP!


This strand of beaded cord was too cute to pass up!  I needed to put it on something as a decorative and beach-y, ocean-y accent.  So, I took a small wooden easel sign, colored it with a few stains in cream and a few shades of green and blues and then distressed the edges with Ceramcoat paint in the color Wedgewood Blue.  I then hot-glued a small piece of the cord to the side!
This can make a cute table-number sign, menu board, a desk memo board or even just a cute frame for your precious memories.
Finally, just to appreciate the pure essence of a starfish, here we have... a starfish!
This is a pallet that I painted with Delta Americana's Waterfront, which is a bright and fun shade of turquoise!  I then distressed the edges with a brown stamp pad.  Yes, you read right!  Stamp pads are great for distressing because you've already got your ink on a felt pad and all you need to do is rub the edges of a project with it.  Perfect every time! 
I still felt like the blue needed to be toned down a bit more to achieve that vintage ocean-themed look I was going for, so I went with Tim Holtz' Distress stains in Burlap and Walnut.  These are both brown tones, with burlap being the lighter cream, yellow tone and walnut being a deep and rich brown.  I had to be careful with Walnut, so I just took a synthetic flat brush, tapped it onto the stain bottle's felt top and streaked the color onto the wood. Using a little water, I was able to spread the dark color on and make it look more like aged wood without it appearing too streaky.  To add a little extra something, I streaked a little Ceramcoat Metallic 14K Gold over the surface.  It also gave the surface more dimension.  Then, I hot-glued a pretty white starfish onto it!  Simple yet elegant. 
Not just aged, but Vintage and Chic!

Stop by to check out our selection of wood pieces today and I am guaranteed that you will find that perfect piece for your desk, coffee table, bedroom, anything!  You will be amazed.
Also, don't forget to stop by our scrapbooking and hard crafts departments for some Distress Stains and Acrylic Paints!
Have fun and see you next week!
Erika @ PC


Monday, February 6, 2017

I Heart Floral Wreaths

Hey Everyone! 

I wanted to do something cute for Valentine's Day that was a bit different from the pink, red, and white vibe this year and was inspired by more purples, berry colors, and champagne shimmers in making this fun heart wreath!


Supplies  
Heart shaped straw wreath
2 bunches of artificial flowers
hot glue gun / glue sticks
wire cutters
2-3 inch wide wire ribbon


First, wrap ribbon all the way around your wreath, with slight overlapping. Hot glue first piece, and last piece. Wrap very tightly.


Once ribbon is secured, using wire cutters, cut flowers off leaving some stem length. Remove all greenery from bouquet and set aside for later.

Curl bottom of wire stem to desired flower height and hot glue flat curled wire to the wreath. Continue per flower until desired. To maintain heart shape, angle flower head downwards at the inner and outer points of the heart, to dramatically enhance its shape. 

Use leftover leaves and greenery to fill around the inner and outer heart shape, to hide all that wire, and fill all those holes!


So lovely!! I am really digging these pinks and berry purples!
Have a great week!

Bethany @Enchanted Lake

Tuesday, January 24, 2017

Spring Gardening Fun!

If you are an avid gardener or someone who loves to collect cute succulents, then
Ben Franklin is definitely THE place to be right now!
We just got in a bunch of cute little plants and succulents that are great for
 Spring décor and require no watering at all. (Haha!)  They are so fun to look at, that
with all the different varieties we have, the selection isn't always the easiest. 
At the Pearl City store, we've dedicated a small area to our
Spring Gardening collection!
 
  
The area gives a real Gardener's Shed and home with stacks of terracotta pots
and hanging macramé planters.  It really feels like there are live plants growing everywhere; out of drawers, pots and even on the doors (We tied some air plants onto them!).
All these little details adds to the magic of the space!
You will find crates and pots overflowing with colorful succulents
along with a few chic pieces of vintage décor like distressed wooden doors
and glass floaters.  Natural textures like wood, stone, terracotta and rope all
make a great backdrop for the plants, which are the real stars here. 
 
 
These little beauties can be put together to make a beautiful bouquet,
flower arrangement or an eye-catching wreath perfect for Spring and Summer.
Here, we matched succulents in soft green and blue hues to create a refreshing
focal point on a natural grapevine wreath.  For a little extra something,
a copper strand of twinkling firefly lights were wound around it.  
 
The copper wire gives it that "industrial chic" look.
 
Another special feature that was added was
the Faux Brick Wall.  The warm colored brick texture is what created a more rustic atmosphere. It was also very simple to create!  All you needed to do was blend the right colors and
use a brick sponge that you can find at any convenience store to stamp the pattern. 
First, we used painter's tape to create a clean border.  Then, we painted the
pillar black to act as a dark grout against the arm-colored bricks.


We mixed rich terracotta reds and deep browns with an antique off-white and mossy green.
On a piece of palette paper, which is a convenient disposable palette, we blended all the colors.
No measurements or ratios! Just mix up the colors, press your damp sponge into the paint and then stamp it onto the wall. It's always best start a row with the brick "breaking the margin" so to say.
 
 
If you look at the finished pillar, what makes it look realistic is that the bricks don't follow a perfect grid pattern.  Each row starts and ends with maybe half a brick or so.  It's like laying down real bricks!  After the bricks are dry, we rounded off the corners of the bricks using some black mixed with antique white. This helped add more depth and dimension to the bricks so that they actually looked like they were sort of jutting out of the wall!


 If you are ever able to stop by our stores, peruse the Spring section!
We hope that you will find inspiration and think of some great ideas
for decorating your home this season!
 
Erika @ PC


Wednesday, March 23, 2016

Golden Easter Egg Hunt!

Hello, Crafters!

   Join us at the Pearl City Ben Franklin for our 
annual Golden Easter Egg Hunt on Easter Sunday!  
From 10 to 4  pm, children between the ages of 5 and 12 
can come in and search for the special egg.  
If they do, they win a treat!  


  Watch out!  This little critter is fast and will move
 around the store to find new hiding spots. Be quick and have fun!
                                                                     
  Happy Easter!
Erika @ PC

Friday, February 26, 2016

Hand-Painted Signs

Hey, everyone!  
.So, the weekend is here and if you're still trying to satisfy that craft craving you've been having there is still an awesome selection of wooden signs in all shapes and sizes waiting for you at all of our Ben Franklin Crafts locations!  This past week, we've been cranking out some samples for you guys to check out.  I chose a few wooden signs because I've just had a hankering for painting this past week.  Being surrounded by all these unfinished wood products just does this to you I guess.lol  


All I had to do was let the creative juices flow.  These palettes were only $3.99!  I couldn't pass up the opportunity because there's just so many ways to go with these.  Landscapes, Quirky signs, Sassy Alpaca in sunglasses, pineapples...  The possibilities are endless.
All you needed was a variety of brushes, a few Delta Ceramcoat and Satin Americana acrylic paint colors and some decorative ribbon!  Below, I even made a Spring/Easter-themed piece using one of the mini signs.  These are $1.99 each, and they already come with the hooks attached so that you could hang them up.  Not to mention there is a variety of shapes to choose from: scalloped rectangles, arrows and ovals like this little guy here.

 This small sign can be adorable as a little Easter gift or just as seasonal decor for your home. 
 This is also a great activity to do with kids.   
Three colors, and a pom pom.  How simple is that?

As always, have fun!
Erika @PC

Wednesday, February 17, 2016

Freshly-Squeezed Caddy

Good Day, Crafters!
This past week, we've had a huge load of unfinished wooden products come into our stores.  Seriously, I can't stop looking at them because there are so many ideas that just pop into my head!  So many different shapes and containers to choose from. 


Today, I chose a small pen holder for one of my first projects.  As you can see, this has three slots where you can store your pens, pencils and other tools.  Something small just to clear up the desk area.  I also chose an adorable lemon-printed paper by Dear Izzy to Mod Podge onto the sides. A bright and fun fuchsia color to make it pop. I created different shades by mixing in some white acrylic and created a distressed effect, keeping the base the darkest fuchsia. 
I also wrote a quote on the front panel with an acrylic paint pen.

So, if you guys get the chance, stop by at one of our stores to check out our awesome selection of unfinished wood products and decorate your very own caddy, treasure chest, serving tray, wish box, frame or sign today!

Erika @ PC

Thursday, March 19, 2015

Swing Into Spring with this Fun Wreath

Spring is in the air with this cute wreath! It's fun to make and will really get you into the season.


You will need the following supplies:
- 12" Styrofoam wreath
- 1 skein Nohea eyelash yarn in Lime Green
- a bush of spring flowers
- small chalkboard
- hot glue gun


First wrap the Styrofoam wreath with the Nohea yarn.  Glue down the start of the yarn and apply strips of glue while you go.


Once the entire wreath is wrapped glue the end of the yarn down.  Pick off the flowers from your bunch and glue on one side of the wreath.


Using a piece of chalk or  chalk pen, write a cute spring saying on the chalkboard.  Glue the chalkboard on the side diagonal from your flowers.  Glue a few small flowers to the chalkboard frame.


There you have it! Now your wreath is ready to be hung.  If you want an Easter wreath, instead of flowers you can glue on mini Easter eggs! Have fun making this wreath your own.

Until next time, happy crafting!
Rachel @ Mapunapuna