Hey fellow crafters!
Check out this crazy amazing cauldron!
And it's SO easy to make!
Supplies:
Krylon charcoal stone spray
glass bowl with curly feet
plastic or vinyl stickers (stars) but you can also use alphabet letters
rubbing alcohol/cloth or paper towel
newspapers to protect surface
firefly lights
First wipe down your glass vase with rubbing alcohol and a cloth. This will remove any smudges or fingerprints so the spray can coat the glass evenly.
Then apply your stickers all over the face, ensuring that the edge is smooth and flat with the glass. You don't want the spray to drip behind the sticker!
Then lay the vase upside down on your newspaper, blocking the inside from any of the mist and spray away! Keep in mind the texture will occur quickly. Though it comes out at high pressure you'll want to do more coats vs. coating it all at once in order to avoid pesky drips.
This stone spray needs to dry completely before removing the stickers. No sneak peeks! Let sit for 1 hour, then carefully peel off your stars.
Throw in some warm white firefly lights in there to really make your stars shine!
Or red and purple lights would be fun!
Happy Autumn!
Bethany @ Enchanted Lake
Showing posts with label pumpkin. Show all posts
Monday, October 3, 2016
Starry Stone Cauldron
Labels:
#benfranklincrafts,
#bfcrafts,
#centerpiece,
#EnchantedLake,
#fireflylights,
autumn,
brew,
cauldron,
diy,
fall,
halloween,
harvest,
magic,
pumpkin,
spells,
spray,
Stars,
stone,
witch
Wednesday, September 21, 2016
Cute Pumpkin Vase
Pumpkin Spice, Pumpkin Pie, Pumpkin Soup... Everyone loves pumpkins! They are a symbol of Fall and are there for simple and organic decor pieces that are perfect for said season. Want to step up your pumpkin game further? The perfect time would be for Halloween, the time for that age-old tradition: CARVING JACK-O-LANTERNS! A little bit of history on these spooky lanterns: They were first used during the late 1600's to represent the Will 'o the Wisps that were seen floating around peat bogs at night. Cool, huh? Today, I'll show you how to make your very own Jack-o-Lantern! But, this one's going to be one that won't spoil and attract gnats and flies after two week...
+ + + + + + + + + + + + + + + + + + + + + + + + + + + + +
Supplies Needed
- Bubble Vase
-Tint spray paint in Mango
- Burlap sheet
- Fine Tip Montana Marker in Black
- Moss & Leaf pieces from a Fall Floral Spray
-Green Raffia
- Hot glue
-Scissors
-Firefly Lights
-Scrap piece of Cardboard
+ + + + + + + + + + + + + + + + + + + + + + + + + + + + + +
Let's get started!
Step 1: First thing's first: Spray a few coats of the Mango tint onto your bubble vase. I had already done that before I took the picture above. This took about 3 to 4 coats. Be sure to let each layer dry for a minute or two before spraying on the next one.
Step 2: Use the Montana marker to draw a cute (or scary) Jack-o-Lantern face onto your vase.
Tip: When coloring in a large area, use short strokes and be sure to lift your pen up between each stroke. No back & forth strokes! This is because the tint spray paint creates really thin layers that tend to peel off or scratch off. You don't want a lumpy face!
Step 3: Measure the top of your vase and cut a circle just a little bigger out of your scrap of cardboard. I cut out a piece of burlap about an inch or so bigger than the cardboard piece.
Step 4: Hot glue the ends of your burlap onto the cardboard. It doesn't have to be perfect!
Just make sure that there are no stray pieces sticking up. If it's wrinkled and bumpy, it's totally fine. It will actually help to add more texture and make it look more natural!
Step 5: Next, roll up a piece of burlap and hot glue. This will be the stem of your pumpkin. You can cut the top to make it more even, or leave it as. For my stem, it was a little too long, so I cut about an inch. Hot glue your stem onto your burlap disc.
Step 6: Start gluing some moss onto your pumpkin top. this is where the uneven surface helps you out. It will start looking amazing once you start doing this. The moss is KEY to this project, because it adds the organic element.
Step 7: roll three pieces of raffia together until it starts to curl naturally. Hot glue both ends to the base of of your burlap stem. This will be the wilted vine. After this, you can glue a leaf or two onto it.
Add your firefly lights inside, top it off with it's cute little stem top and your new Halloween Jack-o-Lantern is done! What's great about this Jack-o-Lantern is that it lasts for years! All you have to do is replace the lights' batteries every once in a while. It can also be a cute centerpiece for a Halloween party or even a great piece of decor for your mantel or coffee table.
Have fun and see you next week!
Erika @ PC
Labels:
autumn,
bfcraftspc,
centerpiece,
crafting,
crafts,
cute,
diy,
fall,
fun,
halloween,
jack-o-lantern,
party,
pearlcitybenfranklin,
pumpkin,
simple
Monday, September 19, 2016
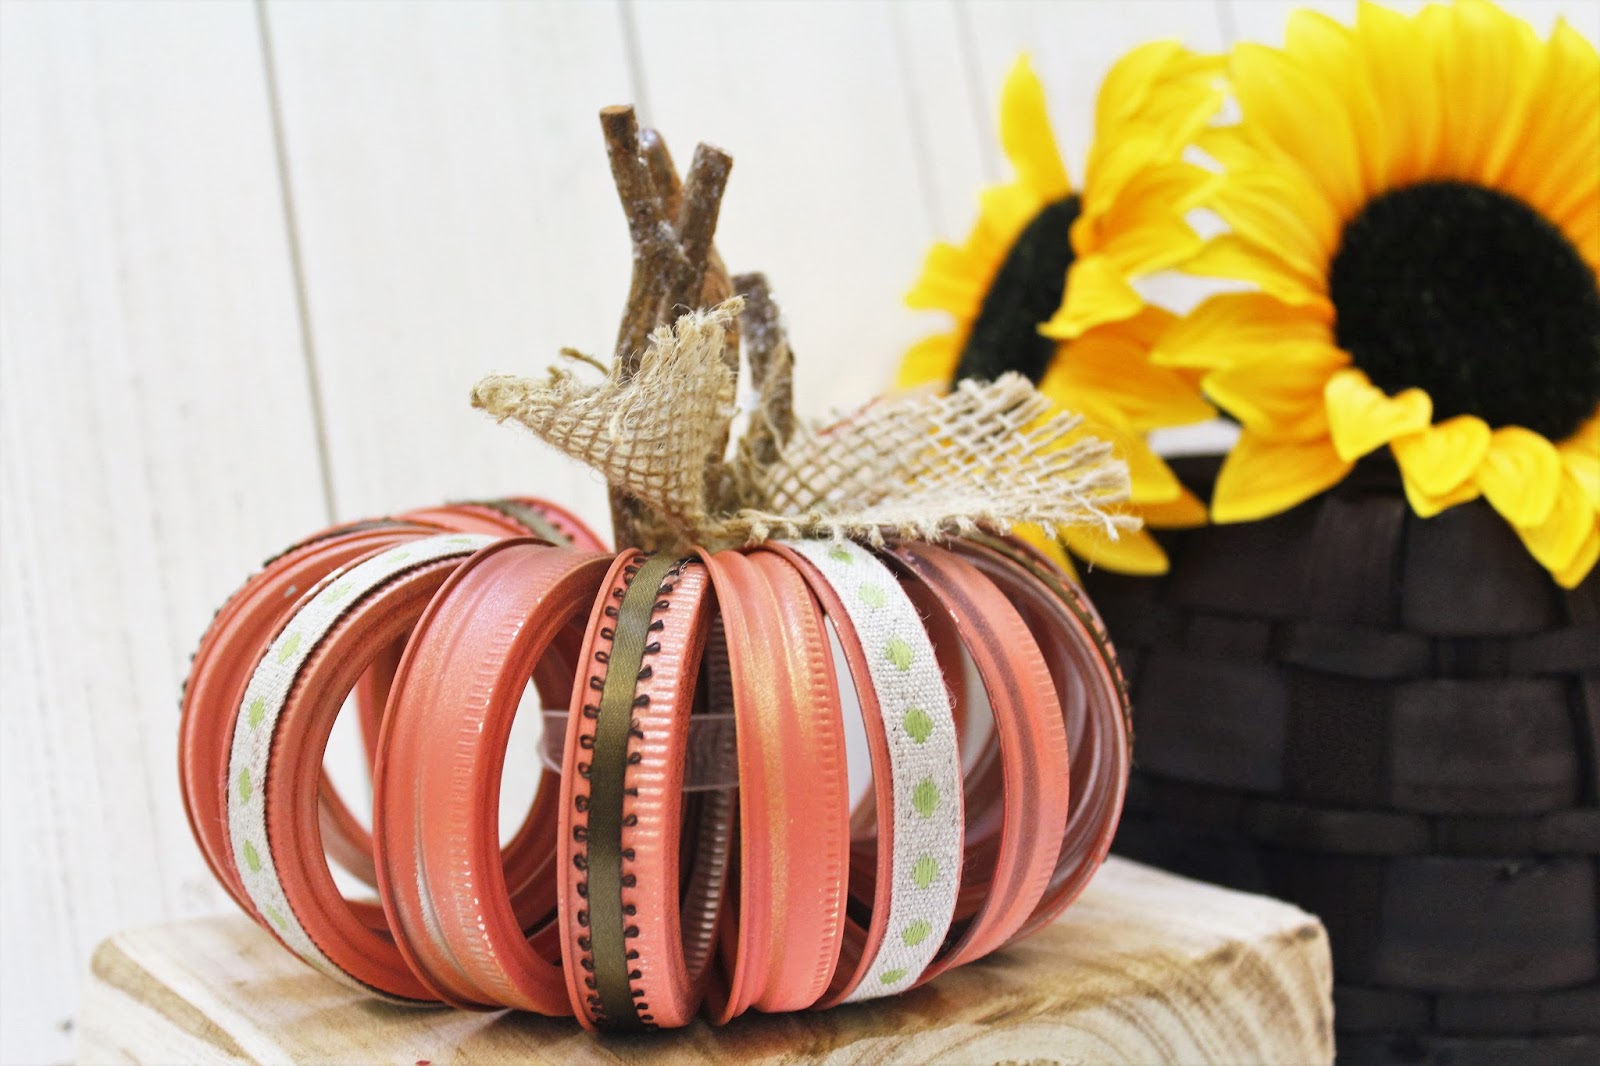
Pumpkin Made From Mason Jar Lids!
Happy Harvest to all of you dedicated followers!
And if this is your first time checking out a HouseMart Ben Franklin blog, welcome!!!
Supplies:
20 mason jar lids- any size
(you can find them in packs of 6 or 7) at any HouseMart Ben Franklin in Hawai'i
Salmon Uber matte spray paint
burlap
scissors
assorted ribbons (satin brown picot ribbon and tan burlap w/ green dots)
hot glue gun/ glue sticks
actual sticks from outside
First spray paint those lids! All you need is the rims, and not the flat discs. I used the salmon color, and it worked pretty well. It made my pumpkin take on a more subtle rustic color. You can also use copper spray to add shimmer accents here and there, to look like rust if you want your pumpkin to look more aged. Let your lids dry for 30 mins, and then hot glue ribbon on every other one! I alternated between two types of ribbon.
Then simply tie your lids together in the middle! it helps to make sure all the lids are facing the same way.
Secure those sticks in there with a bit of hot glue.
Cut a few leaf shapes from your burlap and glue those in there as well!
And there you have it! Simple and so cute.
Bethany @ Enchanted Lake
And if this is your first time checking out a HouseMart Ben Franklin blog, welcome!!!
Supplies:
20 mason jar lids- any size
(you can find them in packs of 6 or 7) at any HouseMart Ben Franklin in Hawai'i
Salmon Uber matte spray paint
burlap
scissors
assorted ribbons (satin brown picot ribbon and tan burlap w/ green dots)
hot glue gun/ glue sticks
actual sticks from outside
First spray paint those lids! All you need is the rims, and not the flat discs. I used the salmon color, and it worked pretty well. It made my pumpkin take on a more subtle rustic color. You can also use copper spray to add shimmer accents here and there, to look like rust if you want your pumpkin to look more aged. Let your lids dry for 30 mins, and then hot glue ribbon on every other one! I alternated between two types of ribbon.
Then simply tie your lids together in the middle! it helps to make sure all the lids are facing the same way.
Secure those sticks in there with a bit of hot glue.
Cut a few leaf shapes from your burlap and glue those in there as well!
And there you have it! Simple and so cute.
Bethany @ Enchanted Lake
Labels:
#benfranklincrafts,
#bfcrafts,
#EnchantedLake,
autumn,
decor,
fall,
harvest,
jar,
lid,
mason,
orange,
pumpkin,
ribbon,
rustic,
Thanksgiving,
upcycle
Monday, September 21, 2015
Pumpkin Bunting
Hey, everyone! Today, I'm going to be showing you how to make some cute pumpkin bunting. This is a really easy project that's fun to do with your kids.
Supplies Needed
Orange Cardstock
Green Cardstock
Brown Cardstock (optional)
Scissors
Double-Stick Tape
Oval Punch (any size you want)
1/8th inch Hole Punch
Twine, Cord or Ribbon
Pencil
Orange Crayon
Paper Scraps are perfect for this!
~~~~~~~~~~~~~~~~~~~~~~~~~~~~~~~~~~~~~~~~~~~~~~~~~~~~~~~~
Let's Get Started!
For one pumpkin, you're going to need to punch out three ovals out of the orange cardstock.
Second, place two ovals next to each other and put double-stick tape on the inner sides of both ovals like so.
Then, stick the third oval right at the center over the tape.
Next, with the crayon, add some shading to your pumpkin to give it some dimension. I used the Crayola crayon in the shade Burnt Orange.
After that, cut a stem and a thin strip of paper no longer than three inches out of the green cardstock. You could use the brown paper for the stem as well if you prefer a different color.
Attach the stem and strip of paper to the top of the pumpkin with double-stick tape.
Next, curl the strip of paper around a pencil. You could also used the crayon, but I like how the pencil added some texture.
Lastly, you're going to punch two holes at the top of the pumpkin on either side. That's pretty much it for your pumpkins. Now, all you have to do is make as many as you want to string onto your stringing of choice.
After making all your pumpkins, you're going to string them, making sure you pull the twine to the back on one side and then pull it back out on the other.
There you go! Aren't they adorable?
These are perfect for decorating scrapbook pages, greeting cards, table settings and even just for window or mantle decor. You could even draw Jack-o-Lantern faces on them, use different colored paper, add some letters onto each one to spell out a special message!
As always: Have fun!
Erika @ PC
Thursday, August 13, 2015
Falloween Jars
Hi there! Today I'll be showing you how to make two types of distressed mason jars, perfect for Fall/Halloween. The first is a candy corn pint size Mason Jar that's perfect as a centerpiece with some fall colored flowers. The second is a pumpkin jelly jar that would be a great favor for your Falloween parties.
You will need the following supplies:
- One pint size mason jar and one 4oz jelly jar
- One 3/4"x1" cork
- Ceramcoat paint in Pumpkin, Hello Yellow, White, and Green
- Jute/twine
- E6000
- Sandpaper, preferably 150 or 180 grit
- Paint brush
We'll start with the candy corn jar. First, paint the bottom third of the jar yellow. Apply a thick coat of paint. If you try to paint a second coat the first coat starts to peel off so try to just do one thick layer of paint.
Paint the next third of the jar orange and the last third white.
Let the paint dry completely. You can use a heat tool or blow dryer to speed up the process. Once the paint is dry, distress your jar by lightly sanding off some of the paint.
That's it! Now for the second jar, start by painting the whole jar orange. Again, make sure you apply a thick coat of paint. While that's drying, paint the lids green.
Let everything dry before distressing. The paint on the lids comes off really easily so make sure you sand very lightly. Put the lid back on the jar after you're done distressing. Place a drop of E6000 on the center of the lid and on the narrow end of the cork. Wait about a minute for the glue to get tacky before putting the cork on the lid. Let that dry for a few minutes until the cork is firmly in place. Cut about 10 inches of twine. Wrap it around the base of the cork a few times then tie it in a bow.
There you have it! Like I said these make great rustic looking decorations for your Fall/Halloween parties.
Until next time, happy crafting!
Rachel @ Mapunapuna
You will need the following supplies:
- One pint size mason jar and one 4oz jelly jar
- One 3/4"x1" cork
- Ceramcoat paint in Pumpkin, Hello Yellow, White, and Green
- Jute/twine
- E6000
- Sandpaper, preferably 150 or 180 grit
- Paint brush
We'll start with the candy corn jar. First, paint the bottom third of the jar yellow. Apply a thick coat of paint. If you try to paint a second coat the first coat starts to peel off so try to just do one thick layer of paint.
Paint the next third of the jar orange and the last third white.
Let the paint dry completely. You can use a heat tool or blow dryer to speed up the process. Once the paint is dry, distress your jar by lightly sanding off some of the paint.
That's it! Now for the second jar, start by painting the whole jar orange. Again, make sure you apply a thick coat of paint. While that's drying, paint the lids green.
Let everything dry before distressing. The paint on the lids comes off really easily so make sure you sand very lightly. Put the lid back on the jar after you're done distressing. Place a drop of E6000 on the center of the lid and on the narrow end of the cork. Wait about a minute for the glue to get tacky before putting the cork on the lid. Let that dry for a few minutes until the cork is firmly in place. Cut about 10 inches of twine. Wrap it around the base of the cork a few times then tie it in a bow.
There you have it! Like I said these make great rustic looking decorations for your Fall/Halloween parties.
Until next time, happy crafting!
Rachel @ Mapunapuna
Thursday, October 9, 2014
Crankin' Out Crafts -ep388 Light-up Pumpkin (Tulle)
Learn to make this adorable light up pumpkin. Great for Halloween home decor!
![]() |
| Use firefly lights to brighten up your Halloween décor! |
Watch our how-to video here: Crankin' Out Crafts -ep388 Light-up Pumpkin (Tulle)
Supplies:
bubble ball
firefly lights
Orange tulle
black paper
Sunflower to embellish
glue dots
Hot glue gun
Wednesday, October 16, 2013
Crankin' Out Crafts Episode 301 - Paper Strip Pumpkin
Use up your scrap paper to create a fun, festive, fall-filled finding.
| Cute paper pumpkins made from leftover scrap paper! |
Watch how easy it is to make this craft! Crankin' Out Crafts Episode 301 - Paper Strip Pumpkin
Supplies:
brads
scrapbook paper
paper trimmer
Crop-A-Dile
J-Flo turns decorative strips of paper into a fabulous pumpkin for your autumn table. Great for Thanksgiving, too!
Monday, October 14, 2013
Crankin' Out Crafts Episode 300 - Pumpkin Flowers
B-Dizzle drops in this week to show us a simple and beautiful craft to decorate your home or door with!
| Fun Halloween Flowers made with kraft bags |
Watch our episode here: Crankin' Out Crafts Episode 300- Pumpkin Flowers
Supplies:
Kraft colored paper sacks
double stick tape
1/8" hole punch
twine or jute
decorative scrapbook paper
black paper
scissors
hot glue gun
glue sticks
Watch as she turns ordinary paper sacks into a cute Halloween decoration.
Monday, November 12, 2012
Squaring Up to Fall
It's hip to be square this fall. Well actually, it's hip to be cubed. If you're looking for an easy fall table decoration, our stock of wood works up quick to make a slightly squared pumpkin. A four inch cube forms the pumpkin base with a little orange and yellow paint. I actually used a paint brush for my yellow lines, but a yellow Deco Color pen would be just as effective and possibly a little easier to use. A wooden star piece painted green and a one inch cube painted brown form the stem of our gourd. Finally, I've accented the piece with a small fall leaf garland. It just goes to show, some times it's better not to think outside the box.
Labels:
accent piece,
acrylic paint,
diy,
fall,
fall garland,
pumpkin,
table decoration,
Thanksgiving,
wooden block,
wooden cube
Tuesday, October 23, 2012
Hello Kitty Witch Pumpkin
Happy Halloween Hello Kitty!!
Painting pumpkins is a huge trend this Halloween. I saw this Hello Kitty Witch painted pumpkin, and had to make one as soon as possible!!!!
1) Using Crafter's Acrylic white paint and a poly-foam sponge, I painted my pumpkin white with two coats. *Tip- it helps to clean off your pumpkin and make sure it has dried thoughrally before painting.
2)While the paint was drying, i grabbed a black foamies sheet (to cut whiskers and small ovals for eyes), a yellow Felties sheet (cut small oval for the nose) and a thick white foamies sheet (for the ear or ears). I used a small pumpkin, but any size will do, as long as it's shape is wide and round. The size of your eyes, nose, whiskers and ears will depend on the size of pumpkin you chose. I didn't use a template, I just winged it..
3) I used E600 Glue to attach the pieces and I think it turned out just fine!
4) We have these fancy witch hats in all different sizes and ready for Kitty to wear! I just placed it over the pumpkin stem and tadaaah!
Labels:
crafter's acrylic white,
felties,
foamies,
halloween,
Hello Kitty,
Holiday decor,
kids craft project,
pumpkin,
witch,
witch hat
Wednesday, October 10, 2012
Crankin' Out Crafts Episode 162 - Pumpkin Wreath
Need more fall decoration ideas? JFlo
is back again today to show you how to
make something to spruce up your
pumpkin patch.
![]() |
| Create this very festive wreath for the fall season! |
View our segment here: Crankin' Out Crafts: Episode 162 - Pumpkin Wreath
Supplies:
Wire wreath form in your choice of
size
Pumpkin colored deco mesh
Scissors
Chenille stem to match your deco mesh
color
*optional: green deco flex tubing and
fall leaves
This pumpkin "wreath" is
great to hang on your front door or on your porch
because all the materials are made to
withstand weather and rain.
Friday, October 5, 2012
Gourd Glamour
Aloha Crafters ~
Today's Idea & Inspiration is a Crystal Embellished Pumpkin.
Supplies:
- 6" Styrofoam Ball (30017679)
- 3 Pkg White Hearty Clay 5.25oz (77856070)
- Copper Spray Paint (77643122)
- Black Flower Diamond Crystals (30119953)
- 2 Pkg Colorful Lines Crystals (30119949)
Instructions:
Using Hearty Clay form pumpkin around 6" Styrofoam Ball
After clay dries, spray with copper paint
After paint dries, embellish with crystals
Happy Crafting!
Friday, September 21, 2012
Deco Mesh Pumpkin Wall Hanging
Aloha Crafters ~
Today's Idea & Inspiration is a Deco Mesh Pumpkin. An interesting alternative for a Halloween Door Wreath.
Supplies:
- Wire Form Metal Mesh: 77570457
- Embroidery Hoop (size is your preference): 77614164
- Orange Chenille: 77674432
- Orange Deco Mesh: 30121903
- Gold Deco Mesh: 30135365
- Green Deco Mesh: 30115873
- Light Green Deco Mesh: 30115876
- Adhesive of choice
- Marker
- Scissors
Instructions:
For Pumpkin Body:
- Trace around Embroidery Hoop on to Wire Form Metal Mesh using marker
- Cut out Wire Form Metal Mesh circle
- Adhere Wire Form Metal Mesh to Embroidery Hoop (I used a glue gun)
- Cut Orange Chenille into 3" lengths
- Cut Orange Deco Mesh into 10" strips
- Cut Orange Deco Mesh 10" strips into 4 (four) - 5" strips
- Roll 5"x10" Orange Deco Mesh strips starting from one of the 5" sides
- Fold rolled Orange Deco Mesh roll in half, twist tie 1 of the Orange Chenille lengths around it once
- Thread Orange Chenille ends through Wire Form Metal Mesh twist tie & secure.
- Continue rolling, threading and securing Orange Deco Mesh rolls to Wire Form Metal Mesh until circle is full
For Stem & Leaves:
- Cut 10" of Gold Deco Mesh, roll, attach one end to top of pumpkin for (you can attach with a chenille length or glue)
- Depending on how thick you want your leaves, cut the Green Mesh between 5"-8", roll & adhere
Happy Crafting!
Subscribe to:
Posts (Atom)