Tuesday, July 26, 2016

Felt Fall Leaf Art

When you can cook eggs on the sidewalk, you know Summer is definitely here.
It can get miserable, especially during the early afternoon hours, so for those 
of you who like to beat the heat by crafting indoors in a nice and cool room, 
this is a great project!  Not only is it fun and easy, it's also a promise that 
nippy Autumn days are right around the corner... 

+ + + + + + + + + + + + + + + + + + + + + + + 

Supplies Needed
6 inch Embroidery Hoop
Leaf print out or stencil
Sharpie
*Felt
*Embroidery floss 
Needle
Fabric Scissors
Burlap 
*Buttons (optional) 

*Choose any color you want!

+ + + + + + + + + + + + + + + + + + + + + + + +

Let's get started!

Step 1. If you chose to print out a leaf shape like me, go ahead and cut out your leaf.  Trace the shape onto your felt and cut it out.


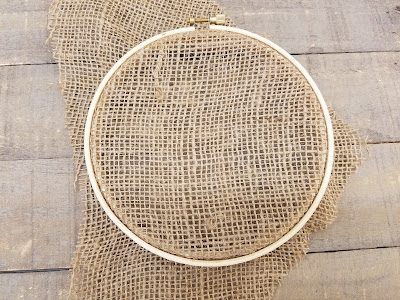
Step 2. Put your burlap into your embroidery hoop.  Make sure it's taut!


Step 3. Start stitching your leaf shape onto your burlap with the embroidery floss.  This is where you really get to see how your color choices work out!  As you can see, I used very bright and warm Fall colors.


Step 5.  This step is really optional, but I stitched on some colorful buttons in contrasting colors.  This is just to add a "cutesy" touch.


That's all she wrote!  
Again: EXPERIMENT.  
Try testing out different color combinations and embellishments.
Layer different colors of leaves on your burlap!  Stitch a border around your design or even add some wording!  
Have fun!

Erika @ PC

Monday, July 25, 2016

Nail & String Numbered Wall Clock

Happy Monday!

Today's project is a wall clock using nails and string to make the numbers!
So cool!


Supplies: 
square wooden pallet about 12in x 12in
pencil and eraser
galvanized flat head nails about 1 in tall
hammer
white crochet thread or hemp cord
scissors
drill
clock mechanism with 3/8 in. post 
1 AA battery


First, draw your numbers around your pallet with pencil! (the lines can be erased at the end)

Then hammer in your nails at any place where there is a beginning, end, or change in line direction. Your nails don't have to necessarily be evenly spaced. The curves are more tricky, and require more nails, but otherwise just pretend like you're making "connect the dots" numbers.


Once you have hammered in all your nails, use your crochet thread or hemp cord and tie a knot to one of your nails. The pattern I used was to make an "X" shape from one nail to the other, then go around the outsides. This will give you the thickest line. But really, there's no one way to do it. Just wrap your string around your numbers several times from one nail to the next and then tie it off at the end.


Next, take your drill and make a hole directly in the center. This is where the clock mechanism will go!
Drill from the front to the back so that the smooth side will be on the front.

Then, following the directions on the packaging for the 3/8 in. clock attachment, push the clock stem through the hole, securing with the nut provided. I colored the gold clock hands black with an oil based marker so that they would be more visible, but you can also just buy hands separately for $3 or so.


Then just plug in one AA battery in the back and ta da!! 


Bethany @ Enchanted Lake 

Wednesday, July 20, 2016

ALIEN FLYING SAUCER!

AND IT FLIES TOO!


Here's what we used...
  • Red Hart Yarn in Orange
  • Clover Pom Pom Maker
  • Googly Eyes - 20mm size
  • Paper Plates in White
  • Clear Plastic Single Cupcake Cups
  • Americana Acrylic Paint in Grey
  • Small Foam Brush
  • Montana Acrylic Paint Pens - Broad Point in Red, Blue and Green
  • Montana Acrylic Paint Pen - Extra Fine in Black
  • Hot Glue Gun - High Temp
  • Glue Sticks
Let's begin!

Start off with two white paper plates. Grab your Foam Brush and work on painting the bottom side of the paper plates with your Grey Acrylic Paint. Apply a second coat if necessary. Let that dry.

To make a pom pom, please visit our Pom Pom Garland Blog for steps.

With your pom pom, we're going to turn it into the alien head and use our hot glue gun and attach one 20mm googly eye. If the alien should have two eyes, I recommend grabbing smaller googly eyes, a 12mm should be good.

Your paper plates should be dry now. Take one side of the Cupcake Cups and stick your Alien Pom Pom inside. Now we're going to glue the cup upside down onto the middle of the plate with the Hot Glue Gun. Put glue around the rim of the cup. Take your plate, and stick it to the cup. That way the alien won't fall out of the cup as you try to attach the cup to the plate. After you've successfully attached the cup and plate together, add extra glue around the cup where it meets the plate for an extra hold. Give that a moment to dry.

Next, attach both plates together. Face the bottom (with out the alien) plate, white side up. Add glue to the outer rim. Line up both plates together and attach the top plate to the bottom plate.

Time to decorate your spaceship. On the top of your spaceship, add tiny circles around the edge to look like bolts holding your spaceship together. Make additional lines and bolts anywhere on the same plate to create more details. I added a vent on this spaceship. Don't forget some buttons. With the Montana Paint Pens (red, blue and green), getting it to look right was a snap. Much easier than painting with a brush or foam brush.

Now let your kids go have fun!

Thank you for Crafting with KrazyGoo!

Tuesday, July 19, 2016

Beach-themed Centerpiece

"Life's a beach and I'm just playing in the sand!"
 
For those of you ocean-lovers who live by this saying, this project is
a great piece of décor or centerpiece for your upcoming special event!  Whether it's a birthday party, grad party, anniversary or wedding, this idea
will be a "shore" pleaser for all those beach-bums at heart.
(And yes, I did just type that.)
 
++++++++++++++++++++++++++++++++++++++++++++
 
 
~ Here's what you'll need! ~
 
1. Glass Vase
2. 4 inch Wooden Letter
3. Sand
4. Rope or Twine
5. Paint
6. Glitter Paste
7.  Floral Wire
8. Painter's Tape
9. Shells & Starfish (optional)
 
+++++++++++++++++++++++++++++++++++++++++
 
Let's get started!
 
Step 1.  Paint your wooden letter in your desired paint color.  I chose
Delta Americana's Coastal Waters, which is a nice mix between teal and turquoise. Paint a layer of glitter paste onto your wooden letter.  I chose a light blue paste by BoBunny.


Step 2.  Wrap a piece of rope around my vase and fill it with some sand.  I think black sand would be and interesting contrast as well.  Feel free to add some shells, rocks or starfish to "embellish".


Step 3. Twist your floral wire into a coral shape, then
Wrap the shape in some blue painter's tape to give your "coral skeleton" some body.  I then brushed on a thick layer of the same BoBunny glitter paste to add more depth and dimension to the blue of the tape.


Step 6. Lastly, place your "coral" piece into your vase and the wooden letter right in front.
Now you're done!


I hope everyone has fun recreating and personalizing this idea.  Add some firefly or tea lights, change up the colors or embellish your letter with jewels!
The possibilities are endless.
As always, have fun and see you next week!
 
Erika @ PC


Monday, July 18, 2016

Fairy Flower Crown

Happy Monday!
What a beautiful day to make a gorgeous summer flower crown!


Supplies: 
Hot Glue Gun / glue sticks
green florist tape
flower stamens in any color
Floral wire in 20 gauge 
1-2 feet of raffia, or ribbon
assorted leaves, foliage, and faux flowers 
thick brown paper wrapped floral wire
wire cutters


First, twist two ends of your brown paper wrapped floral stems together. Then wrap the whole thing around your head to get the right size. Holding the size with your fingers, continue to wrap together the other end of the stem, creating a hoop shape.


 Then take 3-4 flower stamens, and fold them in half. Hold them against the brown stem and securely wrap with florist tape. The sticky-ness of the tape becomes activated when stretched! So pull your tape taught. If you rip it, hide the tear with a new piece.


Continue wrapping your florist tape around clusters of stamens folded in half as close together as you prefer. I wrapped them on about every 2 inches.


Then, taking your thinner gauged wire, hand wrap around your crown, making loops as you go. If you prefer to make loops on the top and bottom, and roughly 1 inch wide, you will use 3-4 sticks of wire. Trim excess wire with your wire cutters, making sure the sharp end won't poke you when you're wearing this magnificent head piece.


Then the only thing left to do is to hot glue your assorted flower heads to your crown! Make it as full or sparse as you want! The smaller the flower, the more feminine and fairy like. The larger the flower, the more bold and summery your crown will be! You can use similar colored flowers, or all completely random colors! That's what I love about flower crowns - there are so many different versions! And every one of them is unique and beautiful. 
Happy crafting!

Bethany @ Enchanted Lake  

Monday, July 11, 2016

Mermaids Only!

Be yourself.  Unless... you want to be a mermaid.  Then, be a mermaid.
So... TRUE! 

  Today, I will show you a cute and simple project that will make your
home, or bedroom, a special haven for all those mermaid lovers.


PWStraight Medium 
````````````````````
Wooden Sign 
Ceramcoat Acrylic Paint*
Glitter*
Montana Acrylic Marker (Fine Tip)*
Glitter*
Glue

*Choose any color you desire!


 PWjune16 Medium Paint a coat of acrylic paint in any color onto your wooden sign.  Let dry.  This might take a while depending on the thickness of your layer, so I recommend some deep breathing exercises.  Or maybe some Netflix.  That's always a good idea.


PWjune16 Medium  Second, write "Mermaids Only!" using your paint marker.  This fine tip marker is
FANTASTIC.  It's very opaque and smooth, and it also dries flat.


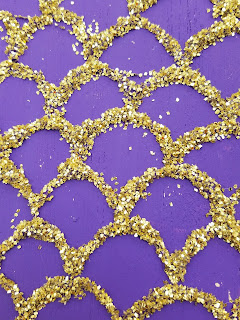
PWjune16 Medium   Next,  take some glue, either hot glue or a strong clear glue like Beacon 3in1, and
make a mermaid scale pattern starting from the base of the sign.  


PWjune16 Medium  Lastly, sprinkle your glitter onto the glue!  It's best to "pipe" and glitter each row
one at a time.  This is to prevent the first few rows from drying before you get to even put some glitter on there!

And you're done!
 Now your room can be an awesome "Mermaids Only" zone!


This is a great project that can be customized in many different ways.  Add
some embellishments or change up the colors!
This is that perfect gift for that nautical-obsessed person in your life.

See you next week!
Stylish Calligraphy

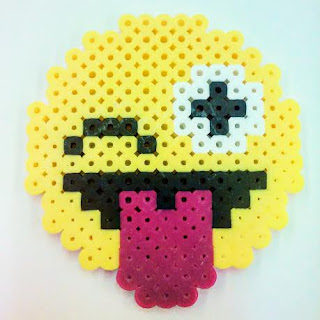
Perler Bead Emojis

Hey Everyone!
Today's craft is perfect for your keiki that are home for summer break!

In fact, our Keiki Craft Camp we are having this week from the 11th -  15th of July is doing this very same craft! The Craft Camp consists of two projects a day, and there are two different age groups. 

ages 8-10 from 10am-12pm & ages 10-up from 1pm-3pm

To check out what crafts your keiki will be making this week, visit any Hawai'i Ben Franklin store!
It's $60 for the whole week, or $20 per day.


Supplies:

perler beads in yellow, pink, black, and white
acrylic perler bead peg board
hot iron
perler ironing sheets 


To start with this emoji, I found this template online!
Or you can try to make your own and freestyle it, if you feel like improvising.
Ben Franklin even sells a book of ideas with animals, wearable sunglasses, and even a tree that you can make stand up!


 To start, you'll want to arrange your beads on your acrylic board going by row. I went from the top down. The reason behind this is just to make it easier to place beads next to each other without trying to fit them in a tiny space. 


Once you're all done making your shape, carefully cover it with the special ironing paper. 


Iron smoothly across the whole shape from side to side without lifting up as to not lift up the beads. Once you see that your beads have somewhat melted together, let the whole thing cool down with the paper still attached.


Once it has cooled, for a more sturdy bond you can flip the shape over and iron the other side with the ironing paper. This will keep your shape from easily bending or breaking. 
How cool is that?
It's like creating your own pixel art!
Have fun!


 Bethany @ Enchanted Lake
 

Wednesday, July 6, 2016

Gone Fishing Project! - Keiki Craft Camp Summer 2016

July 11-17, Monday through Friday


Here's what you're going to need...
  • Felt craft sheets, different colors
  • Arleen's Tacky Glue in Quick Dry\
  • Scissors
  • Magnetic Strip (1/2" x 30")
  • Super Magnet (Neodymium Ring Magnet)
  • Extra Small Popsicle sticks
  • String (We used crochet string for this project)
  • A small box, for storage
  • Paint Brushes (Synthetic or Bristle)
  • Ceramcoat, in colors of your choice
  • Deco Art Oil Paint Pens (optional, easy writing)
Prep your box by wiping down any dust off before painting. Decorate your box with a cute ocean theme! While that dries, get your felt sheets and cut out fish shapes approximately no smaller than 1.5", two for every color fish. Make 1/2" (or less) pieces of magnets from the magnetic strip, and glue them between your felt fishes with your Quick Dry Tacky Glue. Be sure to add glue to both sides of the magnet and the fish's edges on the inside

For your fishing rod, a small popsicle stick so that it will fit in your storage box. With a fisher's man knot, wrap your string around one end of the popsicle stick. Add some glue to prevent unraveling. Next tie your super magnet ring on the other end of your string.
What's great about this, is that you can take it a step further and create it on a larger scale. Using actual fabrics and some pillow stuffing, the kids can play this at their bed side. Just toss them out onto the floor and go fishing!

Thank you for Crafting with KrazyGoo!

Tuesday, July 5, 2016

Frosted Turquoise Hawaii Sign

You know those days where you are just itching to get out of the house to search for inspiration?
That's me every single time I have a day off!  Hop into the car and head out to the mall, the library,
the park...  Anywhere that will get your creative juices flowing!
I visited a little shop with some very beachy vibes last week and found a Hawaii sign that I loved the look of and tried to recreate it today.

~ Here's what you'll need! ~


 1. 8-inch wooden letters
2. Ceramcoat or Delta Americana Acrylic Paint
3. Gel Wood Stain
4. Mod Podge
5. Crystal Glitter

- - - - - - - - - - - - - - - - - - - - - - - - - - - - - - - - - - - - - - - - - - - - - - - - - - - - - - - -
 Let's get started!


The first thing to do is take your base color and brush it on! 
I mixed up a nice light turquoise color using Delta Americana's Coastal Waters and Ceramcoat's white.  Let this coat dry completely.


Next, I used the Delta Gel Wood Stain in the color Walnut.  It's a nice dark brown that will bring a nice contrast to the turquoise. 


 Then brush on a thin coat of Mod Podge and sprinkle on that magical crystal glitter!  


 After the Mod Podge is dry and you have that nice layer of shiny crystal dust on it, feel free to embellish it!  Want a beach theme?  Add some shells, starfish or a rope border!  Something a little more elegant?  Maybe a few rhinestones or flowers.  As for me, I took a few frosted rocks from a 
vase filler pack and hammered them to get smaller pieces.  I then hot glued them on for a "dew" look. 
That's all she wrote!  It's a really simple rainy-day project that's great for a cool
piece of home decor.  (Plus, the kids would LOVE painting their monograms...)
I hope everyone has an awesome week!

Erika @ PC