Showing posts with label buttons. Show all posts

Tuesday, July 26, 2016

Felt Fall Leaf Art

When you can cook eggs on the sidewalk, you know Summer is definitely here.
It can get miserable, especially during the early afternoon hours, so for those 
of you who like to beat the heat by crafting indoors in a nice and cool room, 
this is a great project!  Not only is it fun and easy, it's also a promise that 
nippy Autumn days are right around the corner... 

+ + + + + + + + + + + + + + + + + + + + + + + 

Supplies Needed
6 inch Embroidery Hoop
Leaf print out or stencil
Sharpie
*Felt
*Embroidery floss 
Needle
Fabric Scissors
Burlap 
*Buttons (optional) 

*Choose any color you want!

+ + + + + + + + + + + + + + + + + + + + + + + +

Let's get started!

Step 1. If you chose to print out a leaf shape like me, go ahead and cut out your leaf.  Trace the shape onto your felt and cut it out.


Step 2. Put your burlap into your embroidery hoop.  Make sure it's taut!


Step 3. Start stitching your leaf shape onto your burlap with the embroidery floss.  This is where you really get to see how your color choices work out!  As you can see, I used very bright and warm Fall colors.


Step 5.  This step is really optional, but I stitched on some colorful buttons in contrasting colors.  This is just to add a "cutesy" touch.


That's all she wrote!  
Again: EXPERIMENT.  
Try testing out different color combinations and embellishments.
Layer different colors of leaves on your burlap!  Stitch a border around your design or even add some wording!  
Have fun!

Erika @ PC

Thursday, April 3, 2014

Crochet Owl

It was so much fun to make these crochet owls. Quick and easy. I painted a canvas to put the owls on for a nice display.


Supplies:
  • Red Heart yarn or Sugar and Cream cotton yarn
  • Size H/8-5mm Crochet Hook
  • Yarn needle
  • Buttons
  • Moving eyes

Instructions:
First Round - start with a magic ring and hook 6 sc into the first sc to join.
Second Round – Chain one and then hook 2 sc in each stitch. Slip Stitch into the chain one and join.
Third Round – Change colors and then chain two. Hook a sc in the first stitch and then chain one. SC in the next stitch and then chain one. Repeat until you get to the end of the round and slip stitch into the second of the chain two.
Fourth Round – Change colors and chain one. DC in the chain one space and sc in the single crochet stitch, repeating this until you get to the end of the round and slip stitch into the chain one.
Fifth Round – Chain two and dc into the same space. Then hook 2 dc into the next stitch, one sc into the next three stitches and then 2 dc in the next two stitches.

Now, slip stitch in the next stitch, sc in the next three stitches and then hook 2 sc in the fourth, repeating around the rest of the body ending with a slip stitch into the last sc stitch, a slip stitch in the chain two space and a slip stitch in the first dc.

To Finish the top of the owl, you will hook a hdc in the next stitch in the next stitch, dc , chain one, dc in the next stitch, hdc in the next stitch, slip stitch in the next two stitches, hdc in the next stitch, dc, chain one, dc in the next stitch, hdc in the next stitch and finishing with a slip stitch in the next stitch.

Leave a long tail of yarn and cut to finish. Pull the yarn all the way through the loop on your hook and pull tight. Use the yarn needle to weave the tail up to an ear.

For the eyes, make a magic ring with 3 sc. Slip stitch in the first sc and join. Leave a long tail to stitch the eye in place. Choose a dark color, make a french knot for the eye. Instead of making french not you can use buttons or moving eyes. The beak is embroidered with yarn.

Beth @ Mapunapuna BFC

Tuesday, January 1, 2013

Wear Your Heart on Your Sleeve

Heart Felt Coffee Sleeve/Koozie


Wear Your Heart on Your Sleeve

Materials:
-Sleeve template (I used a cardboard sleeve from a local coffee house)
-Felt and/or Felties
-Sharp scissors
-Embroidery floss and large needle
-Hot glue or Fabri-Tac

How To:
-Using sharp scissors and your template cut felt (you can trace it with pencil)
-Thread floss onto needle (I doubled it, but you don’t need to).  Whip stitch around the edges of the felt.  Start and finish on the ends..glue the ends overlapped when you are finished stitching and add buttons or other embellishments.
-Cut out a square from brown felt and whip stitch the same way and glue to outside center of felt sleeve.
-Cut out a heart from the Felties, or use pre-cut ones.  Glue around the point and edges of the heart and stick onto the brown square.  This will leave the top of your heart open to put your little love note in!!
-Type or stamp words on paper, cut in a strip and stick it in your heart.
-Grab a latte and present to the one you love.

* OR…Make the square on the sleeve into a gift card pocket!!


Monday, September 10, 2012

Any-Tin Goes

Are you ready for the latest crafter's, anything-goes embellishment? Well, I've been having so much fun with it lately that I feel like I need some fanfare to introduce our newest fun product, (insert drumroll here) embossed tin strips!


I like to say they're an anything-goes embellishment because you can literally use them on anything and everything! Here they are wrapped around a distressed box for a beautiful accent. I glued the tin to the box using everyone's favorite glue, E6000.


We also wrapped them around some glass pieces like this bottle here. Believe it or not, this tin is held on by a pop-up glue dot. Those things are great!


And since the tin looked so good on burlap, I decided to wrap it around one of the burlap canvases which we just got in.


Here's a closer look at the tin strip itself. I spray painted the tin piece with "Bone" color spray paint from Montana Gold and then used silver alcohol inks to accent the raised areas.


I hope you'll have as much fun as I've been having with these strips. The next time you come in the store, they'll probably be on EVERYTHING.

Thanks for dropping by!
Puna @ Enchanted Lake

Wednesday, August 1, 2012

Party Favors

It's time to get this party started!  We've got your party favor supplies, and easy ideas that will dazzle your guests and keep your planning enjoyable and stress free!  


FLOWER FAVOR: EASY AS 1, 2, 3 !

We carry a wide variety of beautiful stickers and accessories that would be perfect for this favor!


This favor is SEW-FABULOUS and cute as a button!

We used E600 Glue to attach our buttons, and double sided tape to wrap a ribbon around the bottom half of the dish.  Take this idea and make favors for your party, gifts for your friends...and an emergency sewing kit for your household or glove compartment.  It's a cute way to store any little thing!


The SOCIAL BUTTERFLY Favor

1) Fill treat bags with colorful chocolate candies or jelly beans.

2) Fold a 12x12 sheet of colorful paper in half and cut a simple butterfly-ish shape.  

3)Decorate both halves of one side of the butterfly shape with bright colored paper shapes (using punches or scissors), gem stickers and any other decorate stickers, markers etc.  We decorated both the sides to mirror eachother, but feel free to get creative with your own design.

4) Fold the wings in half punching three spaced holes if you want to hang it.  Use double sided tape to attached the bag of treats to the wings.  Using ribbon, simply thread the holes, knotting the ribbon on the other side of the butterfly and hang.  If you don't wish to hang your butterfly simply use double sided tape to attach the bag of treats to the wings.  

5) Use pipe cleaners for antennas.

Great for a kid's party!


TU-TU CUTE favor

Share these favors at a Birthday party, baby shower, dance recital, etc.


Princess Star Wand Favor...*BLING*


This favor is fun, interactive and screams princess!

- 12" favor tube

- Glitter foam sheets

- Glitter ribbon

- Curling ribbon

- Star die cut from the Accu Cut machine located and available for use at all Ben Franklin locations.

-Assemble using double sided tape.  Place curling ribbon between the two star shapes using craft glue or double sided tape when assembling. 

- Decorate with sticker gems for some magical bling!


Favors should be fun and easy for you and your guests...so, do yourself a favor and come on in to Ben Franklin Market City and pick up your supplies and great ideas!


Wednesday, July 11, 2012

Crankin’ Out Crafts Episode 124 – Owl Embellishment


Can we get a "hoot hoot" for JFlo? She's here to make our next owl project,
a cute Owl Embellishment.

Add this owl embellishment to a page, card or frame!

Watch the episode on our YouTube Channel:  Crankin’ Out Crafts: Episode 124 – Owl Embellishment

Supplies:
Magazine
Ink pads
Scrapbooking paper
Double-stick tape
Twig or branch
Scissors
Buttons
Glue dots

Use this embellishment as a great handmade add on to scrapbooking pages,
cards, or even home décor.

Monday, May 28, 2012

Dad's Pennant


It's almost June, everyone, and you know what that means? That's right, Father's Day is right around the corner. (It falls on June 17th, to be exact.) So to help everyone prepare, I wanted to share an easy Father's day project with you.


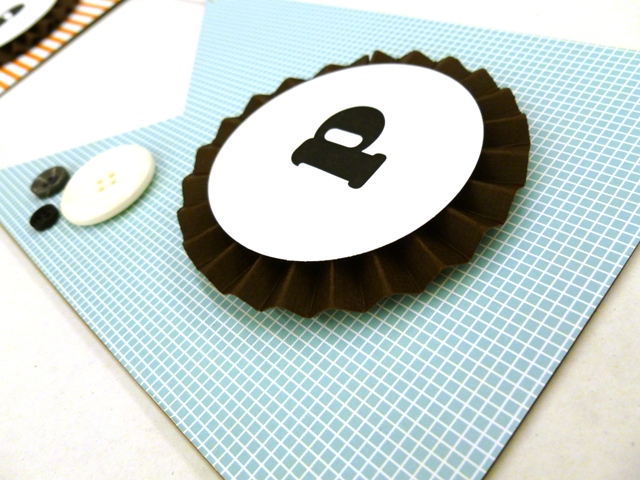
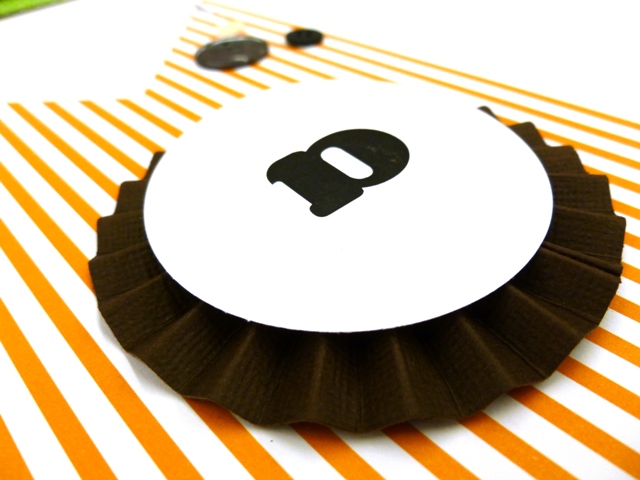
These Father's Day pennants are made using our pre-cut chipboard shapes and scrapbooking supplies like paper and embellishments. We simply taped our papers to the chipboard shapes and then used an Xacto knife to trim around the edges. We also added a few buttons toward the bottom of the pennant for an additional embellishment. A hot-glue gun and glue sticks make these pennants really quick to make.


The last bit of embellishment that we added was the word "Dad" placed on a dimensional, circular accent which we made out of paper. We simply took a 1.5" x 12" piece of paper and scored it every quarter inch and then accordion folded it. Tape this into a circle and hot glue to the pennant for a great dimensional touch. "Dad" was printed out on the computer using a word program and then punched out using a 2.5 inch circle punch.


These pennants are great for any occasion but we thought them especially good for a Dad who may have too many neckties. You can drop by our store to check out all of the great Father's Day ideas we're featuring.

Puna @ Enchanted Lake

Monday, January 16, 2012

Wonderful Wood


Hello everyone! For today's blog, I wanted to share with you our great selection of ready to decorate wood which is on sale right now! Theses wood pieces are so easy to decorate that you won't want to stop.


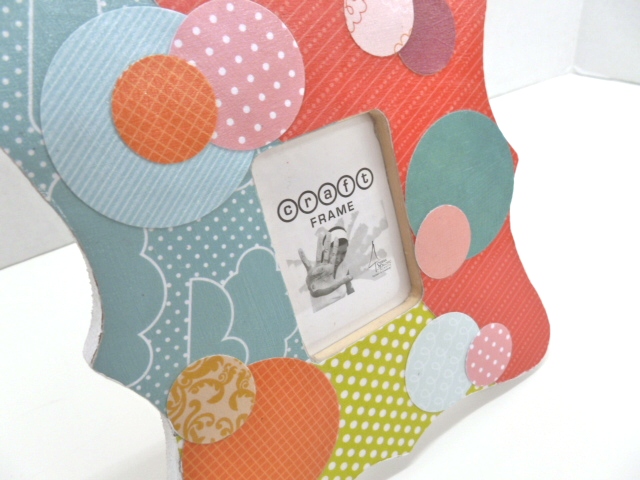
You can decoupage scrapbooking paper on them to make interesting designs. For this frame I just used a circle punch and scissors to cut shapes out of pretty paper.


Look around your home for more inspo. Do you have a lot of buttons? Try hot-gluing them to a wood piece to make a colorful and cheery frame.


You could also use some acrylic paint and shells to make a seashore themed piece.

I hope you got some good ideas from these wonderful wood pieces. Drop in to Enchanted Lake Ben Franklin to get a closer look at these and other fun pieces.

Thanks for reading!
Puna @ Enchanted Lake

Tuesday, January 3, 2012

Crankin' Out Crafts Episode 46 - Button Ring

We're ringing in the New Year with RINGS! This week we'll show you how to make simple, trendy rings. These can be used for favors, gifts, or as a fun accessory to your wardrobe. Today, Brandon creates a ring using colorful buttons.

Brandon shows you how to make a cool button ring.

You can watch the episode on our youtube channel here: Crankin' Out Crafts: Episode 46 - Button Ring

Supplies:
Ring Base
Buttons (assorted sizes)
E6000 or glue gun & glue sticks

Check back Wednesday for our next ring project!

Monday, December 26, 2011

Ready for a New Year?

Well, we all made it through Christmas. Pat yourself on the back, only one more holiday to go. Are you ready for the New Year? I thought that we might start the year off right by making a present for ourselves. Never mind all those other people! It's time to do something for you. So here's my project:


Yes, it's another calendar using those nifty SRM calendar stickers. I really wanted to make something decorative AND useful so I put together this wall-hanging calendar. 


Each month is made on a pre-cut chipboard pennant. You could use any shape that you want, but I thought that the pennants might be cute.


And just like the previous calendar posts, we're using up scrapbooking scraps, ribbons, buttons, and even making some of our own embellishments out of the stuff we already have.


I hope you like it. If you want a closer look at this calendar, you can always stop in at Enchanted Lake for a visit. I'll have it hanging up by our make your own calendars and SRM stickers.

Thanks for stopping by!
Puna @ Enchanted Lake

P.S. Don't forget to check out our previous post about the newest Crankin' Out Crafts episode.

Wednesday, December 21, 2011

Crankin' Out Crafts Episode 41 - Twine & Buttons / Ribbons & Picks

It's gift wrapping week and we're back again with two great ways for dressing up your boxes & bags. JFlo will be showing you how to decorate using Twine & Buttons, then Ribbons & Picks.

Throw away the old ribbons and stick-on bows, and use baker's twine & buttons, instead!

Supplies for wrapping using Twine & Ribbon:
Solid-colored wrapped gift
Baker's Twine (color of your choice)
Buttons (color of your choice)

Spruce up your gift wrapping with cool Christmas picks and two coordinating ribbons.

Supplies for wrapping using Ribbons & Picks:
Wide decorative ribbon
Thinner solid-colored ribbon with feathered/picot edge
Decorative Christmas pick


Don't be afraid to mix 'n match colors, ribbon, and different supplies to create unique looks. We hope you have as much fun wrapping this holiday season, as we do on Crankin' Out Crafts! Join us again Friday for one more gift wrapping technique. 

Tuesday, February 1, 2011

RTD Stationary


I'm really loving these new recycled stationary sets! Think of them as blank canvases ready to spark your creativity and get you crafting. The other cool thing is that when you're done you have a coordinating set for your office or some wonderful, handmade gifts and favors. They're really cheap too! Most items will only cost you a dollar and the most expensive is only three dollars.


This is what they look like with no decorations. I know they're pretty boring, but remember what I said about "blank canvases".


My first thought was how easy it would be to decorate a stationary set with my brand new Washi tape. The washi tape comes in a few different colors and a few different designs. For this one I only used one color and I decided on a simple stripe design. It only took fifteen minutes for me to make the complete set.


This set is a little more complicated but still pretty easy to put together. I started with the brand new Hero Arts three stamp set. It's called silhouettes, and it made me think about the old cameo jewelry that my great-grandmother used to have. I ended up making a cameo motif with two Marvy Uchida punches, the pink oval punch for the small cream oval and the purple scalloped oval punch for the outer, brown oval. I stamped the silhouettes onto the cream colored ovals with VersaMagic ink in "Jumbo Java." Then I finished off my vintage look by adding some cream colored buttons to the notebooks and pen with a glue gun.


So there it is, some super easy and cute stationary sets that you can put your own stamp on (pun intended, ha ha).

Hope you liked it!

Puna @ Enchanted Lake