Wednesday, March 30, 2016

Mermaid Shell Top

Hi, Everyone!
This week we are going to be doing a really fun mermaid-themed project!
A Mermaid Shell Top!
How cool is this?  It's a really easy and cheap idea for fast mermaid costume or just for a quirky beach shirt for this summer.  Who doesn't want to feel like a mermaid once in a while?


What I used to make this mermaid top was a regular white t-shirt, GP Purple Ceramcoat Acrylic paint, Iridescent Purple Scribbles, and Textile Medium.  I also had some parchment paper to help stop the paint from bleeding onto the back of the shirt as well as an iron to cure the paint.


First, try on your shirt to see where you will want your shells to be.  Make marks with a washable fabric marker.  (I chose to just wing it.)
Next, you're going to mix the paint and the textile medium with a ratio of 2:1.  Two parts acrylic paint to one part textile medium.  What this medium does is it makes any craft grade acrylic paint permanent and flexible on fabric.  This means that it won't wash or flake off even if the fabric wrinkles.  


Make sure you put a piece of parchment paper underneath the front layer of your shirt so that the paint doesn't get onto the back.  The textile medium will make the two side stick together if you don't!   Then, start painting your shells!  I chose the basic clam shell shape like a certain red-haired mermaid.  

After letting that dry, heat set it with either an iron or a heat tool.  You're going to want to heat each area for at least thirty seconds to cure the medium.  


Lastly, draw the outlines of the shells with the puffy scribbles paint for some dimension!


As always, feel free to mix it up!  Add some embellishments like rhinestones or even use glitter paint for more texture and sparkle.  How about writing a mermaid-themed quote underneath in a funky script?  You could even paint some iridescent scales for that real siren look.

Have fun!
Erika @ PC

Tuesday, March 29, 2016

Quilled Ball Bot

Hello Crafters!
 
Today we're going to be crafting a cute little paper quilled robot. I was inspired by this week's Keiki Craft Camp where one of the crafts was a paper quilled bird. I decided to take the technique and make a little ball robot instead!

 
For this particular bot, you will need the following strips of cardstock:

Body: 5, 1 inch wide strips. 3,4,5,6,7 inches long.
(White, Silver/grey, White, Orange, White)
Head: 2, 1 inch wide strips. 2 1/2 and 3 1/2 inches long.
(Orange, White)
Eye: 1, 1 x 1 1/2 inch black strip.
 
Double Stick Tape for assembly.
 
Optional (not pictured):
Base: 3 shades of tan/brown in 1 inch strips. 5,6,7 inches long.


The assembly process is pretty easy, and if you are familiar with this weeks curly bird, it's the same process.
We'll Start with the body strips. Staring with the smallest strip, our 3 inch white strip, curl the strip into a circle, and fasten with double stick tape.
From here, tape the end of the next size strip to the bottom of your circle, where the ends meet.
 
 
Wrap the opposite end of the next strip around and fasten it to the bottom of the circle. Your body will start to form. Continue these steps until you have used all 5 strips.
 
 
Now that the Body is complete, we can move on to his head! Starting with the orange strip, fold the ends at about 3/4 inches in. Now have the folded ends meet together, not overlap, and fasten with tape. You should have a half circle shape.
Next, do the same with the larger strip, but instead of folds 3/4 inch in, fold them about an inch inward. just like the body, tape one end of this new strip to the previous shape, wrap it around, and fasten.
Now, take the small black strip and roll it to about pencil width. Fasten with tape, and secure inside the orange strip of the head.

Tape the head to the body and tada! There you have your own little paper robot buddy!
 
To keep him balanced, it is optional to give him a base. I used three shades of brown/tan strips and fastened them together in the center. Then I simply taped the robot down onto the base.
 
I hope you've enjoyed this fun little paper quilling craft! Ideal for any sci-fi fan.
 
May the craft be with you!
 
James @ Market City


Saturday, March 26, 2016

                                               Aloha from our island of Hawaii
                                                                 Today we are making:

                                                                  Daisy Power pin holder


Materials needed:
3”inch Clay Pot
 3.5 Red Clay saucer
Ceramcoat White and Fuchsia Paint
One Gelly roll pen
2 ½” Styrofoam ball
Green Floral Tape
Greening Pins
Spanish moss
Crafter’s choice of brushes
1 1/4” Spouncer ( Stencil Décor)
9” large Girbera daisy Stem
Fun Craft Ribbon ¼” width color: pink and white
Tacky Glue
Glue Gun and Glue sticks
Ultra fine Glitter


   Paint Clay pot and saucer Fuchsia, let dry. When they are dry take the ¼” spouncer to make the white dots on the clay pot. Brush the tacky glue on the border of the clay pot, and then sprinkle the Ultra fine glitter on it. Set aside and let it dry.
Take the Gelly roll pen and cut of the clip from the cap. Take the pen and the daisy; wrap them with the floral tape. Do not cover the tip of the pen. You will be able to take it and actually use it.
Go back to the pot and glue the Styrofoam ball to the bottom of the pot with the Low temp glue gun.
Cover the top with the Spanish moss; use the greening pins to hold it down. When you have it all pinned down. Take the wrapped flower/gelly pin and stick it directly in the middle of the Styrofoam.
Take the White and Pink ribbon and make a bow around the flower.
You now have a Daisy power pen to write with and a much decorated pot to hold your pen in.
Enjoy and power on….

                                               JOYT@HILO BEN

Friday, March 25, 2016

Crankin' Out Crafts, Episodes 471-473: Just Bead Happy!

BFC Māpunapuna's Lynn explains step-by-step instructions on how to make ear wires, wire components and hooks to create your own gorgeous jewelry.

Crankin' Out Crafts, Episode 471: Make Your Own Ear Wires


In this episode Lynn shows you how to make your own ear wires using the 6 step bail making pliers. It's a great way to increase your wire working skills and personalize your earrings!

Watch the episode on YouTube here

Crankin' Out Crafts, Episode 472: Make Your Own Wire Components


Take your wire working skills to the next level by making your own earring or necklace components! We'll show you how to make a simple tear drop shape by shaping wire with the 6 step bail making pliers and the wrap and tap!

Watch the episode on YouTube here

Crankin' Out Crafts, Episode 473: Make Your Own Clasp


Here's another wire work episode, this time we show you how to make a simple S hook clasp by shaping wire with the 6 step pliers!

Watch the episode on YouTube here

Please visit our Bead Shoppes inside of HouseMart Ben Franklin Crafts Hilo, Kahului and Māpunapuna for your beading needs.

Thursday, March 24, 2016

Mother's Day Coloring Book

Hey Crafters!

With Mother’s day just around the corner, I found myself thinking about all those childhood handmade gifts that I gave to my Mom, and my son is now giving to me. That colorful card is a time-honored tradition, when it comes down to it! As I was preparing a few sketches for our next coloring workshop, it occurred to me that maybe it was time to go back to the roots…and turn the tables! 

We all know Moms deserve to take some time to relax and de-stress. With that in mind, I decided to create the coloring book card. 

This project is super easy to put together, and can be customized in countless ways. For the cover, I used card stock and vellum.

I decided to keep the title simple. Once I had printed it on my vellum and cut it down to size, I ran it through the mink to add a touch of elegant sparkle to it. 

I used a total of 8 images; 6 hand-drawn, 2 free use printables. As you can see, my original drawings are much larger than the final versions, which made it easier for me when it came to drawing them up.

The most challenging part of the project was determining how the pages needed to be laid out, based on how I’d be folding them. I re-sized my images in a word document, then printed them double sided on smooth white card stock and cut them down to size. 

Using a bone folder, (don’t worry, it’s not real bone,) I folded them in half and layered them together. Coordinating ribbon and a needle — a hole punch might be handy if you have trouble passing the needle through the papers — were all I needed to bind my mini-coloring book together. 

Just like that, you have a handmade, customizable gift for Mom that’s very grown-up. Want to make sure she takes the time to de-stress? Include a Ben Franklin gift card for some new drawing utensils and a sign-up for our coloring techniques workshop!  

-Chelsea @Mapunapuna

Wednesday, March 23, 2016

Golden Easter Egg Hunt!

Hello, Crafters!

   Join us at the Pearl City Ben Franklin for our 
annual Golden Easter Egg Hunt on Easter Sunday!  
From 10 to 4  pm, children between the ages of 5 and 12 
can come in and search for the special egg.  
If they do, they win a treat!  


  Watch out!  This little critter is fast and will move
 around the store to find new hiding spots. Be quick and have fun!
                                                                     
  Happy Easter!
Erika @ PC

Tuesday, March 22, 2016

Stencil and Paint Pen Art


Hey Guys!

Today I'll be talking about this spray painted stenciled piece. After Spray painting a bamboo stencil, I had some fun with a Montana Acrylic Marker and drew a mysterious samurai around the stenciled shapes.
 
 
For this project, I used a bamboo pattern stencil, masking tape, 8x8 canvas board, Orange and Green "Montana Gold" spray paints, and a Yellow "Montana Black" spray paint. Afterwards I went in with a Black Montana Acrylic Extra Fine tip Marker.
This piece was the result of a Montana Brand product testing session so are welcomed to use any other brands of spray paint and paint pens.
Your first step is taping down your stencil to your canvas board. position the stencil to your desired position, my stencil was placed centered on the board, and then use your masking tape to secure the stencil in position. you also want to cover the rest of the exposed canvas that you do not wish to be spray painted.
Take your masked off canvas board outside or in a well ventilated area to apply the spray paint. Carefully read and follow the instructions on the spray cans for the best result. I always suggest to spray about a foot away from the board, and only spray in short bursts. You don't want to be too close and you don't want to lay the paint on too much, especially when using a stencil. Too much paint applied can leak under the stencil and ruin the pattern.
After playing around with my three colors on the canvas, I let it dry for about 15 minutes. When your paint is completely dry, you can remove your masking tape and stencil. You'll have your patterned nicely painted onto your board!
Next I took my acrylic paint pen and just started to draw my character out. I made sure to not cross over any of the painted pattern, and only drew around it, to give it the appearance like the drawing was under the spray paint.
And that's it! Of course you are welcomed to draw any kind of pattern, characters, designs you desire, in any color you want! Get creative with it and make it your own.
Have fun!

-James
@Market City

Monday, March 21, 2016

Crankin' Out Crafts, Episodes 467-470: Lei Making

Beth and JFlo cover a variety of lei that can be found in our lei book. These lei are perfect for most occasions, like Mother's Day and Graduation!

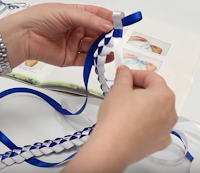
Crankin' Out Crafts, Episode 467: Braided Ribbon Lei
Project can be found on page 46 in Handcrafted Leis & Flowers, Volume V


Supplies needed:
10 yards of 1/4" satin ribbon (color of choice)
scissors
ribbon for a bow
Watch the episode on YouTube here 

Crankin' Out Crafts, Episode 468: Single & Double Pikake Lei
Project can be found in Handcrafted Leis & Flowers, Volume VII


Supplies needed:

25-26 yds of Rattail - (Pikake color)
1 skein of eyelash yarn (Nohea Fern)
size "H" Crochet Hook
Scissors

Double Pikake Lei
Supplies needed:
47 yds of Rattail (Pikake Color)
18 yds of eyelash yarn (Nohea Fern)
Size "H" Crochet Hook
Scissors

Watch the episode on YouTube here

Crankin' Out Crafts, Episode 469: Rosette Twist Lei
Project can be found on pages 18-19 in Handcrafted Leis & Flowers, Volume XII


Supplies needed:
(2) 10 yds of Elastic Cord (Gold)
10 yds Metallic Cord (White Pearl)
1 skein Nohea yarn (Curry)
10 yds 1/8" Satin Ribbon
1 skein Ali‘i yarn (Red)
Crochet Hook "G"

Watch the episode on YouTube here

Crankin' Out Crafts, Episode 470: Basic One Straw Lei


Supplies needed:
straw
one skein of Nani Yarn
2 yards of gross grain ribbon
2 kukui nuts
Easy Beader
Tape 
Scissors

Watch the episode on YouTube here

Please visit HouseMart Ben Franklin Crafts stores or Crafting Is Fun for your lei-making needs.

Henna on Purple Mason Jars!


Hey Everyone!
We are going to show you step by step how to do this henna design on a purple mason jar!

These are great for parties, weddings, gifts, DIY cake stand bases, or for housing succulents. 

The dark rich color of the jar adds a unique spin on the traditional rustic look.


Supplies Needed:

BoBunny Perler Pens (I used the colors Sugar and Tutu)
Mason Jars in any size (I used 1 pt)

***Optional Accents***
Candles or Firefly lights
Succulents
Chalkboard Sticker Labels
E6000 glue and a Cake Plate


BoBunny Perler pens come in many adorable Pearlized colors and can be found at any Ben Franklin store in Hawai'i.


First Step is to do a series of dots all around the top of the jar in the pink Tutu color. The Perler Pens respond like puffy paints, except they dry with a more rounded pearl-like look, which I like much better.


Next using the white Sugar color, go around your jar in a line. Then with pink Tutu, make arches going all around the jar. (At any time feel free to set aside to dry for a bit as to not smudge or smear the design accidentally. Just go at your own speed. It is also possible to do the whole thing without stopping to let it dry until the end.)


Then take white Sugar and make teardrop shapes in the empty corners of your arches.
First squeeze a dot then drag dot in a direction to make a shape that goes from wide to skinny. 


Do this same thing under the pink arches. Experiment with shapes! As long as each pattern looks roughly uniformed, try different kinds of shapes by changing the pressure and drag of your hand!


Add one large pink dot surrounded by 4 small white dots.

\


For this arrow shape, just make an extended teardrop shape, starting with the largest side first and then dragging the Perler pen. To make the arrows evenly spaced, I made one every 2 arches.


And that's how you make this design!! 
I went back later and made patterns on the bottom of the jar using the dot and line technique we used for the top.
You can also turn these upside down and adhere a plate to the top in order to make an ornate cake stand using E6000 glue.
Happy Decorating!

Bethany @Enchanted Lake


Saturday, March 19, 2016


                                    Aloha from our island of Hawaii

   Today I have a unique project to show for decorating for prom and graduation parties.

                                                             Frosted candle holders
 
 
Materials I used:
Glass tea light candle holder
Battery operated tea lights
Elmer’s school glue
Alcohol Ink colors: stream, and pitch black
Scribbles #d fabric Paint color: Confetti
1” Foam Brush


Take the Elmer’s glue, the alcohol Ink together and mix to the desired color you would like.
If you want it lighter only put a 4 drops, and if you want it dark put in about 10 to 12 drops.
Using the foam brush, take the mixture and brush it on the glass. Set on the side and let it dry.
Takes about 12 hours to dry. To write on the glass use the Scribbles. Put in the Battery operated
Tea light. 
A great way to add color to your glass candle holder with this technique.
 
                                                                    JOYT@HILOBEN

Thursday, March 17, 2016

St. Patrick's Coloring Book Box

Happy St. Patrick's day, Crafters!

In the spirit of the holiday, I have a very celtic-flavor project for you. With St. Patrick's day fast approaching and our first Adult Coloring Techniques class around the corner here at Mapunapuna, I was super excited to see these Celtic Spirit coloring books come in. I snapped one up as soon as they hit the shelf and thanked my lucky stars -- and the leprechauns -- for giving me the excuse to color my little heart out. I immediately fell in love with this Wind Rose image and decided to start there.

The best part about coloring something like this is that you can use just about any tool you like. In this case, I used Prismacolor colored pencils as my primary and accented it with everything from Zig brush-tip markers and Montana paint pens to sparkly Gelly Roll pens.
Once I had finished coloring, all I could think was how pretty it would be if I turned it in to a little treasure chest. I took up my trusty Exacto knife and cut all of the little bits of white out of the center of the image and around the edges.

It just so happens we carry a glass-topped box that is the perfect size to display this gorgeous knot. A bit of Uber Matte spray paint, some distressing with a stamp pad and I had a finished box! All that was left was to sandwich my picture between the glass that came with the box and a piece of acrylic and as easily as that I've created a custom piece of functional art from a coloring book page!

Interested in learning tips and tricks for creating your own beautiful pieces of art? Join us for our coloring technique workshops, held twice monthly. Just let your cashier know at the checkout that you'd like to sign up for the workshop the next time you pop in!


-Chelsea @Mapunapuna

Wednesday, March 16, 2016

Distress Stain Postcard

Hi, Everyone!
 
Today, I'm going to show you how to do a really simple technique that involves the elusive Distress Stain inks that we have in our scrapbooking sections.  They're a product that something that kind gets looked over often and I wanted to start bringing them back into the "Crafter's Spotlight". 
I'll start off small.  5 x 7 inch to be exact.
 
I chose stains in Frayed Burlap, Stormy Sky and Weathered Wool.  I also have a .08 tip Micron pen for some hand-lettering. 
 
 
 I taped down a 5 x 7" watercolor postcard to my table with masking tape to keep the paper from bowing too much.  I put a wash down just to get the paper wet.  This is just so that the distress stains, which are water-based and can therefore be handled like watercolors, will flow freely without forming a harsh edge when dry.  Just make sure that your brush is sopping wet before doing so.  I then brushed on a little bit of Frayed Burlap. 
 
 
What I wanted to achieve was a somewhat tie-died look.  Soft edges and colorful patches that sort of "bloom" on your paper.  So, use a lot, but not too much water.  You'll see amazing colors flow out of each ink and they will just get more amazing as they dry like this little patch of Stormy Sky. So cool!


After the paper was completely dry, I added a little saying in Micron pen at the bottom right hand corner.  And that's all she wrote!  This is a very versatile technique that's great mixed media scrapbookers and watercolor artists.  It's a beginner technique that is great for making quick postcards to send to family overseas.  And as always, a quirky saying will make it 100 times more personal and cute.

 
Have fun!
Erika @ PC

Textured Acrylic Painted Canvas

Hello Everyone!

My name is James and I am Ben Franklin's new Craft Coordinator at our Market City location and with that, makes me a new contributor to the Ideas and Inspirations Blog! I hope to provide you with fun and creative new... well, ideas and inspirations!


Today, we will be working on a textured acrylic painted canvas portrait. In my portrait, I did a sunset view of the island of Lana'i. Of course, you are welcomed to paint anything you want for yourself!
For this project, I just used red, yellow, blue, and white acrylic paints. Basic primary colors that can be used to make any color! Afterwards, I used the Liquitex Gloss Heavy Gel to give it that shine and layer of texture.
So here is the breakdown of steps and techniques that I used in this piece that can be applied to any painting:
 
-I like to start back to front, so I'll start with the background which is the sunset sky. I used a blend of Yellow and red to get a nice orange and painted the top half of the canvas with a nice gradient. Just play with the paints on your pallet until you get the blends and shades you want.
 
-The great thing about acrylic paints is that they dry very quick! so after about 5-10 mins, I'll start on the next layer, which would be the island and the clouds. the island is a blend of blue and red for a very dark shade of purple. Clouds are a blend of white, yellow, and red for some very light orange colors. Dab your brush against the canvas to give your clouds texture. Before those are dry, dab over your orange clouds with a light shade of purple/lavender color.
-When your island is dry, you can start with the foremost subject, the ocean. For this I painted the entire bottom half of the canvas with blue, partially blended with yellow for some shades of green.
 
-Before that completely dries, I'll take some yellow and greens and just brush some squiggles horizontally across the blue. The squiggles are larger and are more in quantity toward the bottom of the canvas, and they'll lessen and shrink as you work your way up toward the top of the canvas, just to the top of your blue horizon.
 
So that's a breakdown of my process for this piece! Now for that added texture.

When your canvas is completely dry, Take a scoop of your Gloss Heavy Gel and apply it to your canvas. It is very thick and white, but it will dry completely clear. Take a butter knife or just a scrap piece of cardstock and spread the gel evenly across the canvas, just like icing a cake. After it's even, you can use the tip of your brush handle and draw any design or pattern you would like into the gel. For this piece I drew grooves and stippled the tip of my brush all across the ocean to give it that water look. Afterwards you are going to let it dry for about 30 minutes to an hour, or until the gel is dry. Then your textured canvas piece is done!
 
Feel free to try your hand at this sunset portrait, or even just take some ideas from my process and apply it your own artwork!
 
-James
@Market City

Monday, March 14, 2016

Felt Clover Garland


Happy St. Patrick's Day!

Today I thought we could do a simple but adorable felt garland! 


Supplies Needed:

Green Felt (1-2 sheets)
Scissors
Embroidery thread (green)
Needle with eye large enough for Embroidery thread
Ball point pen

White ribbon or yarn (for pennant banner)
Black acrylic paint pen
Lime green card stock
Glue (I used low temp hot glue gun)


First thing we need to do is draw out our 4 clover leaf shapes with your pen.
Imagine you are drawing a heart shape, except instead of drawing the heart down to a point, you'll just draw straight down. You will want the width of the leaf to almost be as long as the same leaf. Be careful to not make your two bumps too oval like, they should be nice plump circle arches. (You can always trim the bumpies afterwards as well, just in case they are too long)


Then you will pull about 12 inches of embroidery thread through your needle and fold in half so the two ends touch. Knotting is not required. Push the needle through the leaf from the top. Make exactly as many stitches pictured above. This stitch will make your leaf fold into itself in a way that looks most natural.


When you've threaded all four leaves, pull both ends tight and knot together. Trim excess strings.


Ta Da!
Then if you want to make this garland, 
cut out five triangles from your lime green card stock, write "Lucky" with your black paint pen, and glue pennants to your white string/ribbon!

You can also glue these felt clovers to dowel rods and turn them into garden accents or cute decorations for a gift basket!

Enjoy and have a Happy St. Patrick's Day on the 17th!


Bethany @Enchanted Lake